2011 MERCEDES-BENZ G-CLASS fuel cap
[x] Cancel search: fuel capPage 10 of 288

Exterior viewOverview .......................................... 24
F
First-aid kit ......................................... 229
Flat tire Changing a wheel/mounting the
spare wheel ................................... 232
Preparing the vehicle .....................232
Raising the vehicle .........................233
Floormat ............................................. 211
Front fog lamp (display message) ... 173
Fuel Additives ........................................ 278
Notes ............................................. 277
Premium-grade unleaded gasoline . 278
Refueling ........................................ 131
Specifications ................................ 278
Troubleshooting ............................. 134
Fuel/water separator ....................... 220
Fuel consumption Notes ............................................. 136
Fuel filler cap (display message) ..... 178
Fuel filler flap Emergency release ........................133
Opening/closing ............................ 132
Fuel filter
Display message ............................ 178
Fuel level
Calling up the range (on-board
computer) ...................................... 167
Fuse allocation chart ........................ 243
Fuse box Battery case ................................... 244
Dashboard ..................................... 243
Front-passenger footwell ...............243
Transmission tunnel ....................... 244
Fuse extractor ................................... 243
Fuses Dashboard fuse box .......................243
Fuse allocation chart .....................243
Fuse box in the front-passenger
footwell .......................................... 243
Fuse box in the transmission
tunnel ............................................ 244
In the battery case .........................244
Notes ............................................. 242
G
Garage door opener Clearing the memory .....................211
Notes ............................................. 208
Opening/closing the garage door ..210
Programming the remote control ...209
Gear or selector lever (cleaning
guidelines) ......................................... 225
Genuine Mercedes-Benz parts ......... 274
Genuine wood trim and trim strips
(cleaning instructions) ...................... 225
Glove box ........................................... 193
Gradient-climbing capability
(maximum) ......................................... 146
GTW (Gross Trailer Weight)
(definition) ......................................... 267
H
Hazard warning lamps ........................ 93
Headlamp cleaning system ................ 93
Adding washer fluid .......................218
Notes ............................................. 281
Headlamp delayed switch-off
see Exterior lighting delayed switch-off
Headlamp protection grille .............. 100
Headlamps Cleaning ......................................... 224
Misting up ........................................ 94
Headlamps (automatic) ...................... 91
Head restraints Adjusting (angle) .............................. 79
Adjusting (rear) ................................ 80
Installing/removing (rear) ................80
Luxury .............................................. 80
Resetting (front) ............................... 80
see NECK-PRO head restraints
Heating
see Climate control ........................ 106
High beam flasher ............................... 93
high-mounted brake lamp Display message ............................ 173
Hill start assist .................................. 118
Hood Closing ........................................... 215
Display message ............................ 181
Opening ......................................... 214
8IndexProCarManuals.com
Page 14 of 288

Route guidance (on-board
computer) .......................................... 162
S
Safety Children in the vehicle .....................49
Child restraint systems ....................50
Overview of occupant safety
systems ........................................... 34
Safety systems
see Driving safety systems
Seat
Important safety notes ....................77
Seat backrest
Folding back .................................. 195
Folding forwards ............................ 195
Seat belt
Fastening, front ............................... 46
Fastening in the rear, center ............46
Seat belts
Adjusting the height ......................... 47
Belt force limiters ............................ 49
Cleaning ......................................... 226
Correct usage .................................. 44
Emergency Tensioning Devices ........ 49
Fastening ................................... 45, 46
Important safety guidelines .............43
Releasing ......................................... 48
Safety guidelines ............................. 35
Special seat belt retractor ...............51
Warning lamp ................................. 184
Warning lamp (function) ................... 48
Seat heating
Indicator lamp (Malfunction) ............82
Seats
Adjusting the 4-way lumbar
support ............................................ 81
Adjusting the head restraint ............79
Cleaning the cover .........................225
Correct driver's seat position ........... 76
Multicontour seat ............................ 81
Storing settings (memory
function) .......................................... 88
Switching seat heating on/off .........81
Switching the seat ventilation on/
off .................................................... 82
Seat ventilation
Indicator lamp (Malfunction) ............83
Sensors (cleaning instructions) ....... 224
Service indicator see Service interval display
Service interval display .................... 219
Displaying a service message (on-
board computer) ............................ 220
Service products
Brake fluid ..................................... 280
Capacities ...................................... 277
Coolant (engine) ............................ 280
Engine oil ....................................... 279
Fuel ................................................ 277
Important safety notes ..................276
Notes ............................................. 276
Refrigerant (air-conditioning
system) .......................................... 279
Washer fluid ................................... 281
Settings
Calling up a stored setting ...............88
Factory (on-board computer) .........162
On-board computer .......................162
Setting the unit (on-board
computer) Speedometer ................................. 163
Shift ranges ....................................... 123
Side marker lamp (display
message) ............................................ 173
Side window Important safety information ...........70
Side windows
Convenience closing feature ............71
Convenience opening feature ..........71
Opening and closing ........................71
Troubleshooting ............................... 72
Ski rack .............................................. 197
Sliding sunroof Important safety notes ....................72
Opening/closing .............................. 73
Operating manually ..........................73
SmartKey
Changing the battery .......................64
Changing the programming .............63
Checking the battery .......................64
Convenience closing feature ............71
Convenience opening feature ..........71
Important safety notes ....................6212IndexProCarManuals.com
Page 28 of 288
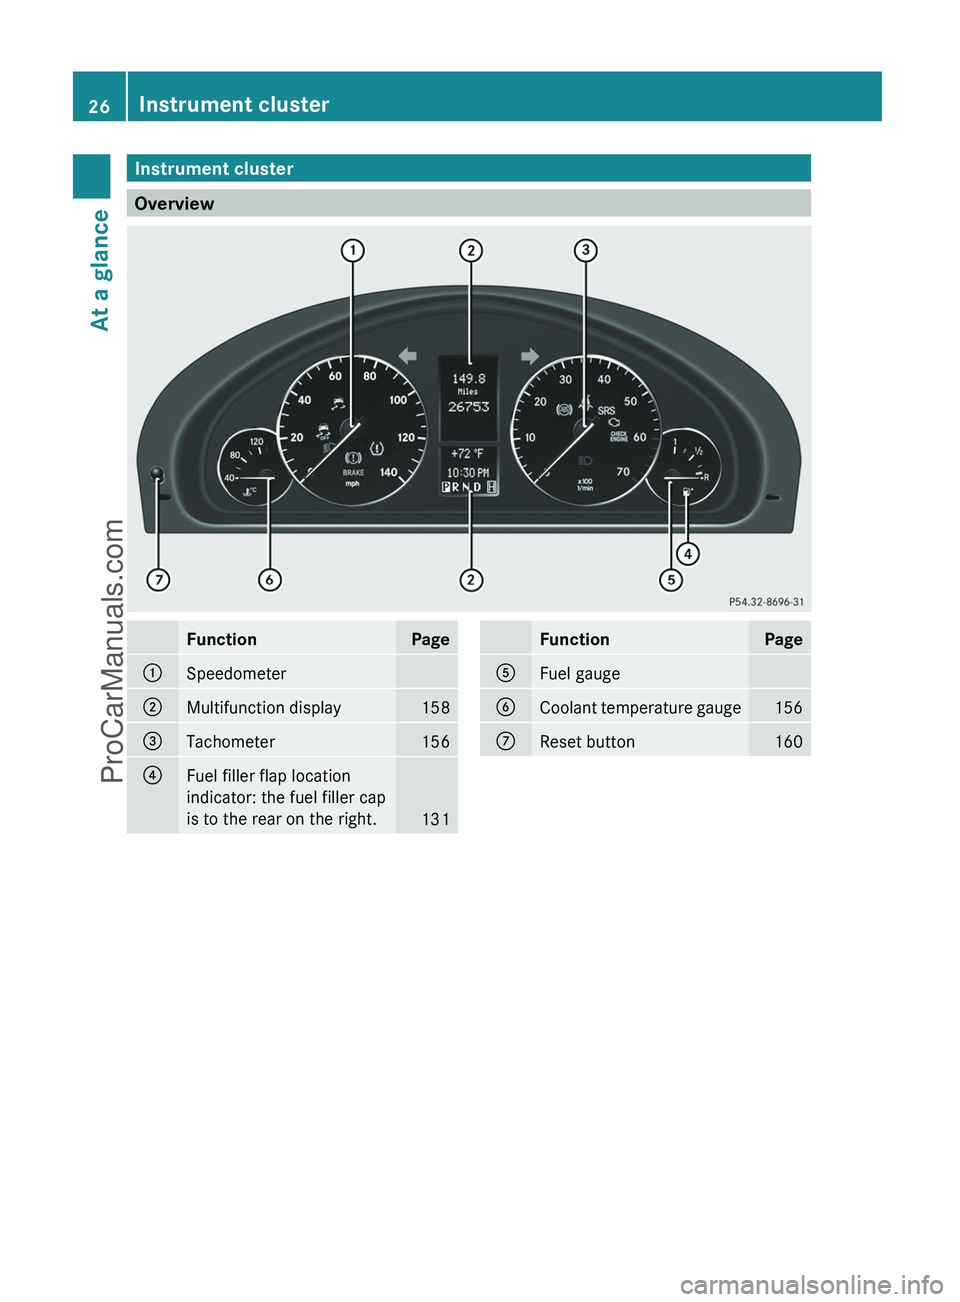
Instrument cluster
Overview
FunctionPage:Speedometer;Multifunction display158=Tachometer156?Fuel filler flap location
indicator: the fuel filler cap
is to the rear on the right.
131
FunctionPageAFuel gaugeBCoolant temperature gauge156CReset button16026Instrument clusterAt a glance
ProCarManuals.com
Page 134 of 288
! Do not use diesel to refuel vehicles with a
gasoline engine. Even small amounts of the
wrong fuel result in damage to the fuel
system and engine.
! Do not switch on the ignition if you
accidentally refuel with the wrong fuel.
Otherwise, the fuel will enter the fuel lines.
Notify a qualified specialist workshop and
have the fuel tank and fuel lines drained
completely.
Gasoline
Fuel grade
! You should only refuel with unleaded
premium-grade gasoline as this avoids
damaging the catalytic converter.
If engine running problems are apparent,
have the cause checked immediately and
repaired. Excess unburned fuel can
otherwise enter the catalytic converter,
leading to overheating and possibly
causing a fire.
i Only refuel with unleaded premium-grade
gasoline with a specified minimum octane
number of 91 (average value of 96 RON/
86 MON).
Usually, you will find information about the
fuel grade on the pump. If you cannot find
the label on the gasoline pump, ask the gas
station staff.
You can find further information under
"Fuel" ( Y page 277), by consulting an
authorized Mercedes-Benz Center or
visiting http://www.mbusa.com (USA
only).
! Use a filter when refueling from a fuel can.
Otherwise, the fuel lines and/or injection
system could be blocked by particles from
the fuel can.
Refueling
Fuel filler flap
When you open or close the vehicle with the
key, the fuel filler flap is automatically
unlocked or locked.
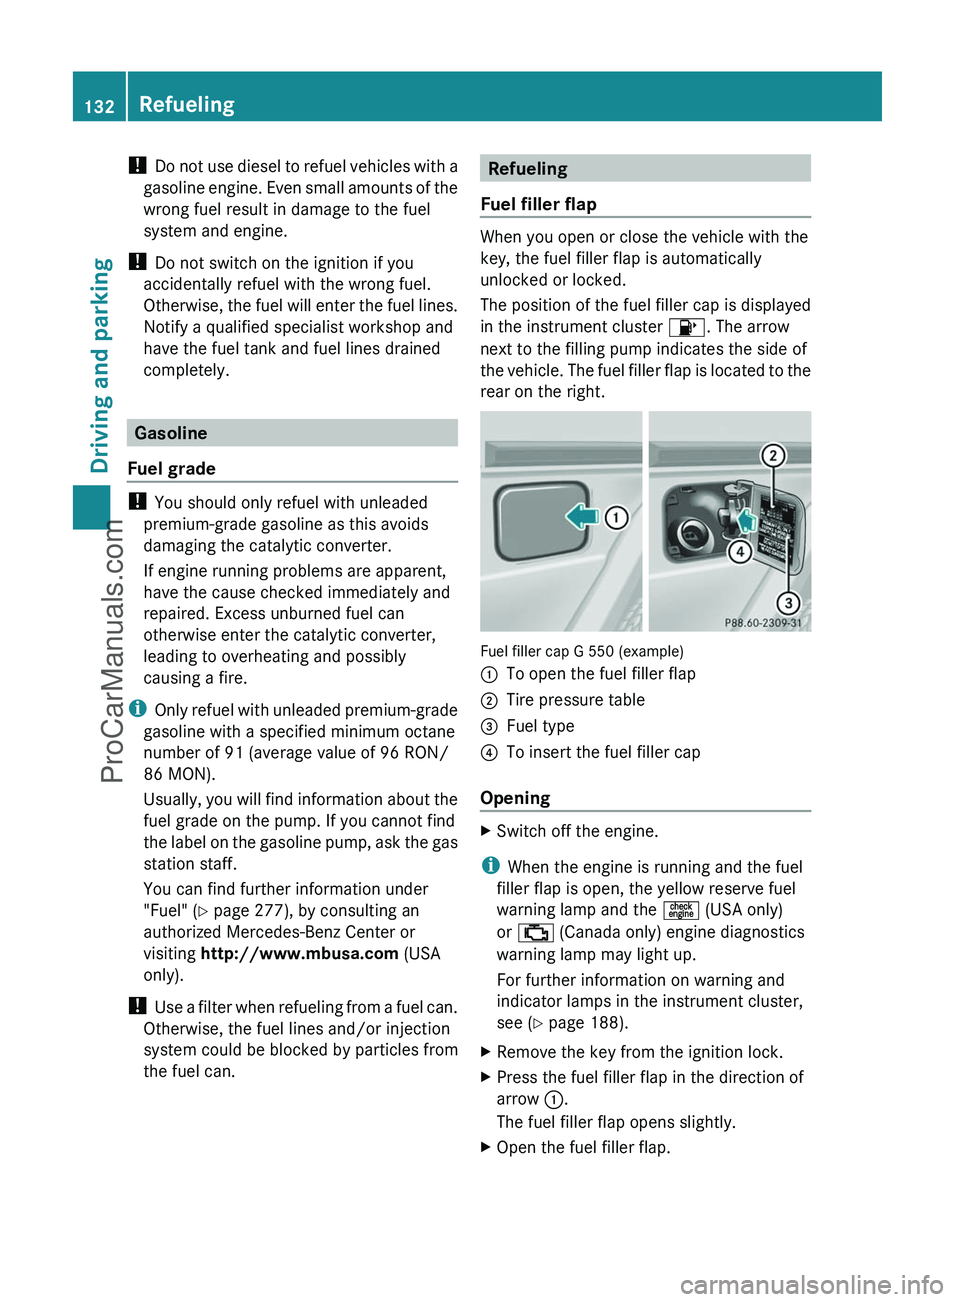
The position of the fuel filler cap is displayed
in the instrument cluster 8. The arrow
next to the filling pump indicates the side of
the vehicle. The fuel filler flap is located to the
rear on the right.
Fuel filler cap G 550 (example)
:To open the fuel filler flap;Tire pressure table=Fuel type?To insert the fuel filler cap
Opening
XSwitch off the engine.
i When the engine is running and the fuel
filler flap is open, the yellow reserve fuel
warning lamp and the = (USA only)
or ; (Canada only) engine diagnostics
warning lamp may light up.
For further information on warning and
indicator lamps in the instrument cluster,
see ( Y page 188).
XRemove the key from the ignition lock.XPress the fuel filler flap in the direction of
arrow :.
The fuel filler flap opens slightly.XOpen the fuel filler flap.132RefuelingDriving and parking
ProCarManuals.com
Page 135 of 288
XTurn the fuel filler cap counter-clockwise
and remove it.XInsert the fuel filler cap into the holder
bracket on the inside of filler flap ?.XCompletely insert the fuel pump nozzle into
the filler neck and refuel.XOnly fill the tank until the pump nozzle
switches off.
! Overfilling the fuel tank could damage the
fuel system.
Closing
XReplace the fuel filler cap and turn it
clockwise. The fuel filler cap audibly
engages.XClose the fuel filler flap.
i Close the fuel filler flap before locking the
vehicle. A locking pin otherwise prevents
the fuel filler flap from closing after the
vehicle has been locked.
Fuel filler flap emergency release
GWarning!
Avoid contact with the vehicle walls as they
may contain sharp edges. Otherwise, you
could injure yourself while releasing the fuel
filler flap.
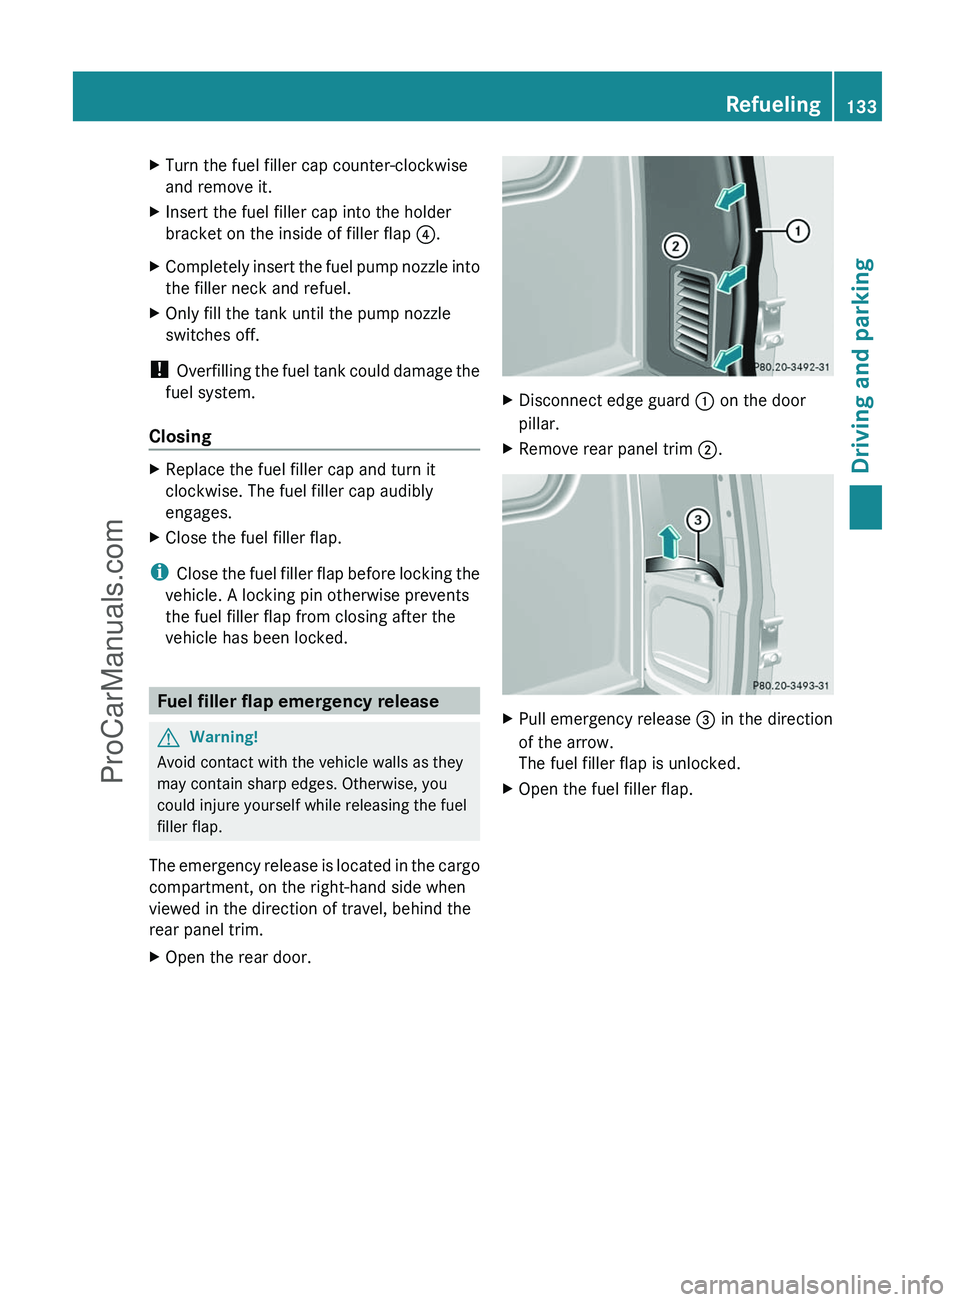
The emergency release is located in the cargo
compartment, on the right-hand side when
viewed in the direction of travel, behind the
rear panel trim.
XOpen the rear door.XDisconnect edge guard : on the door
pillar.XRemove rear panel trim ;.XPull emergency release = in the direction
of the arrow.
The fuel filler flap is unlocked.XOpen the fuel filler flap.Refueling133Driving and parkingZProCarManuals.com
Page 180 of 288
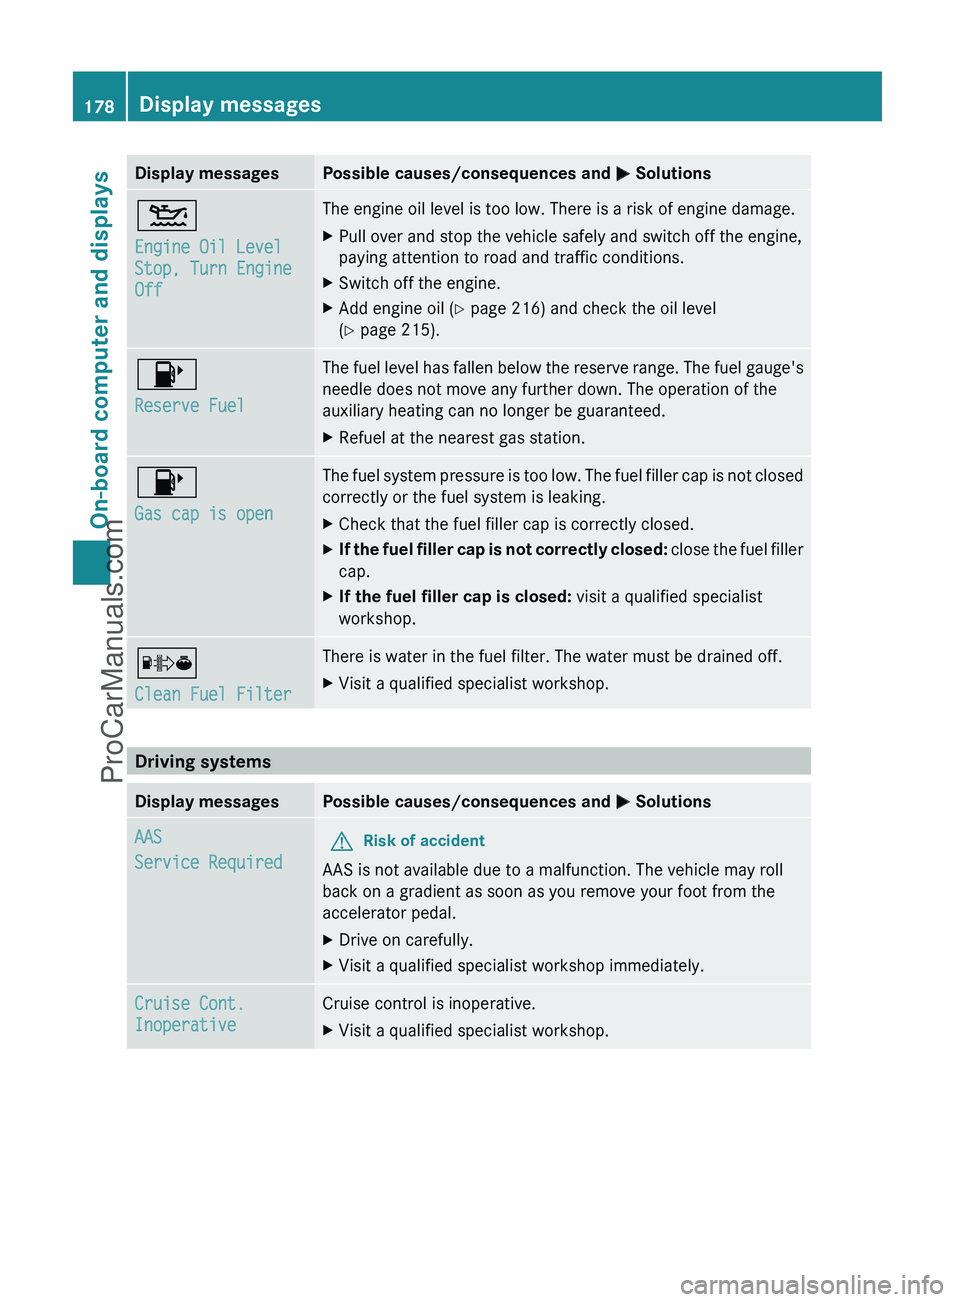
Display messagesPossible causes/consequences and M Solutions4
Engine Oil Level
Stop, Turn Engine
OffThe engine oil level is too low. There is a risk of engine damage.XPull over and stop the vehicle safely and switch off the engine,
paying attention to road and traffic conditions.XSwitch off the engine.XAdd engine oil ( Y page 216) and check the oil level
( Y page 215).8
Reserve FuelThe fuel level has fallen below the reserve range. The fuel gauge's
needle does not move any further down. The operation of the
auxiliary heating can no longer be guaranteed.XRefuel at the nearest gas station.8
Gas cap is openThe fuel system pressure is too low. The fuel filler cap is not closed
correctly or the fuel system is leaking.XCheck that the fuel filler cap is correctly closed.XIf the fuel filler cap is not correctly closed: close the fuel filler
cap.XIf the fuel filler cap is closed: visit a qualified specialist
workshop.´
Clean Fuel FilterThere is water in the fuel filter. The water must be drained off.XVisit a qualified specialist workshop.
Driving systems
Display messagesPossible causes/consequences and M SolutionsAAS
Service RequiredGRisk of accident
AAS is not available due to a malfunction. The vehicle may roll
back on a gradient as soon as you remove your foot from the
accelerator pedal.
XDrive on carefully.XVisit a qualified specialist workshop immediately.Cruise Cont.
InoperativeCruise control is inoperative.XVisit a qualified specialist workshop.178Display messagesOn-board computer and displays
ProCarManuals.com
Page 190 of 288
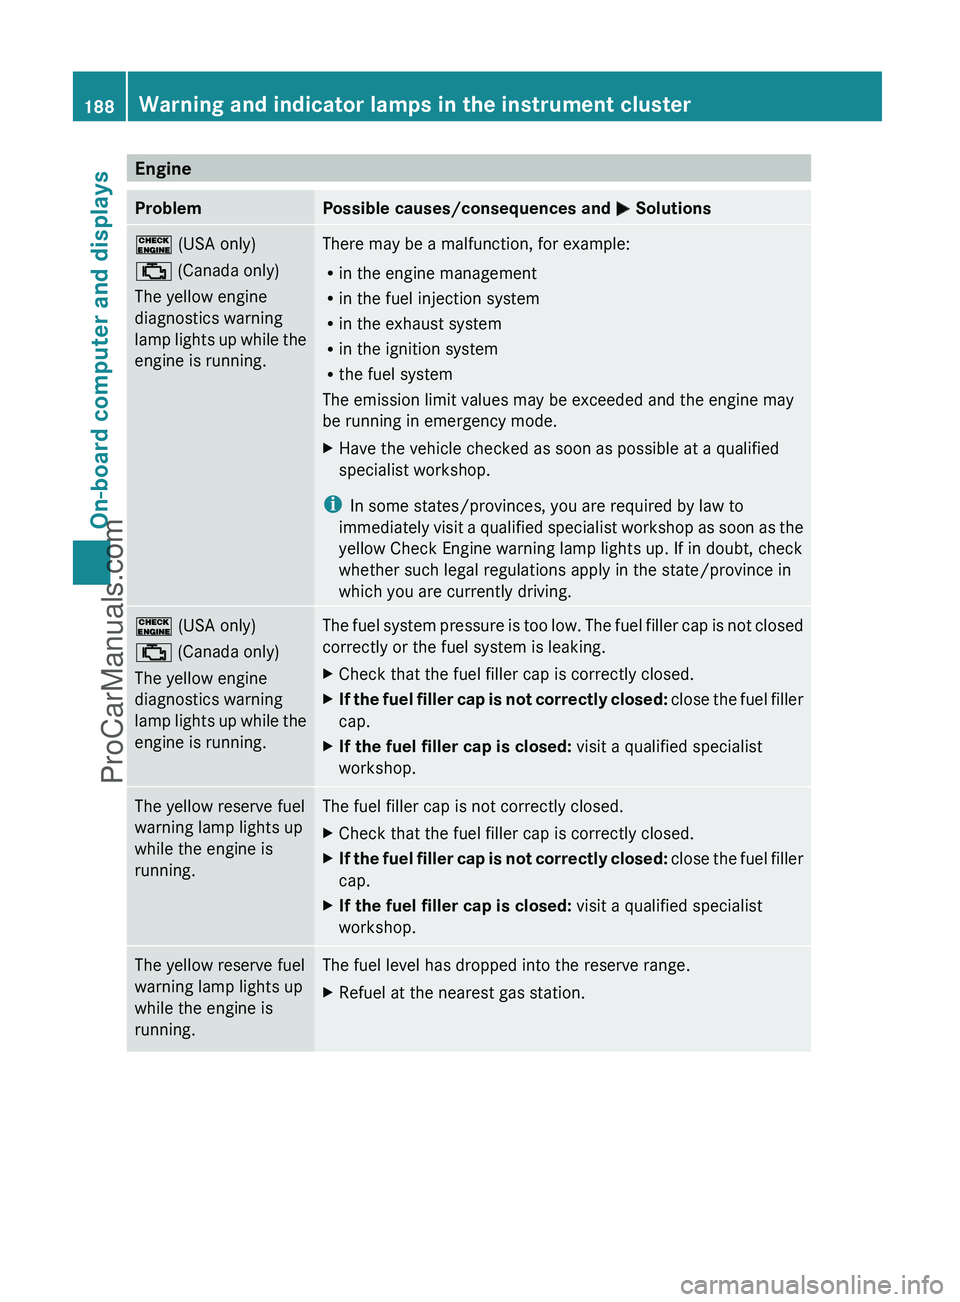
EngineProblemPossible causes/consequences and M Solutions! (USA only)
; (Canada only)
The yellow engine
diagnostics warning
lamp lights up while the
engine is running.There may be a malfunction, for example:
R in the engine management
R in the fuel injection system
R in the exhaust system
R in the ignition system
R the fuel system
The emission limit values may be exceeded and the engine may
be running in emergency mode.XHave the vehicle checked as soon as possible at a qualified
specialist workshop.
i In some states/provinces, you are required by law to
immediately visit a qualified specialist workshop as soon as the
yellow Check Engine warning lamp lights up. If in doubt, check
whether such legal regulations apply in the state/province in
which you are currently driving.
! (USA only)
; (Canada only)
The yellow engine
diagnostics warning
lamp lights up while the
engine is running.The fuel system pressure is too low. The fuel filler cap is not closed
correctly or the fuel system is leaking.XCheck that the fuel filler cap is correctly closed.XIf the fuel filler cap is not correctly closed: close the fuel filler
cap.XIf the fuel filler cap is closed: visit a qualified specialist
workshop.The yellow reserve fuel
warning lamp lights up
while the engine is
running.The fuel filler cap is not correctly closed.XCheck that the fuel filler cap is correctly closed.XIf the fuel filler cap is not correctly closed: close the fuel filler
cap.XIf the fuel filler cap is closed: visit a qualified specialist
workshop.The yellow reserve fuel
warning lamp lights up
while the engine is
running.The fuel level has dropped into the reserve range.XRefuel at the nearest gas station.188Warning and indicator lamps in the instrument clusterOn-board computer and displays
ProCarManuals.com
Page 252 of 288
about the tire pressure. On vehicles equipped
with the electronic tire pressure monitoring
system, the tire pressure can be checked
using the on-board computer.GWarning
Should the tire pressure drop repeatedly:
R check the tire for foreign bodies.
R check whether the wheel is losing air or the
valve is leaking.
R make sure that only a valve cap approved
by Mercedes-Benz is installed on the tire
valve.
Tire pressures that are too low have a
negative effect on vehicle safety, which could
lead you to cause an accident.
Only correct tire pressures when the tires are
cold. The tires are cold when the vehicle has
been parked for at least three hours or driven
for less than 1 mile (1.6 km). The tire
temperature changes depending on the
outside temperature, the vehicle speed and
the tire load. If the tire temperature changes
by 18 ‡ (10 †), the tire pressure changes by
approximately 10 kPa (0.1 bar/1.5 psi). Take
this into account when checking the pressure
of warm tires and only correct the tire
pressure if it is too low for the current
operating conditions. If you check the tire
pressure when the tires are warm, the
resulting value will be higher than if the tires
were cold. This is normal. Do not reduce the
tire pressure to the value specified for cold
tires. The tire pressure would otherwise be
too low.
Observe the recommended tire pressure
specifications for cold tires on the Tire and
Loading Information placard on the B-pillar on
the driver's side.
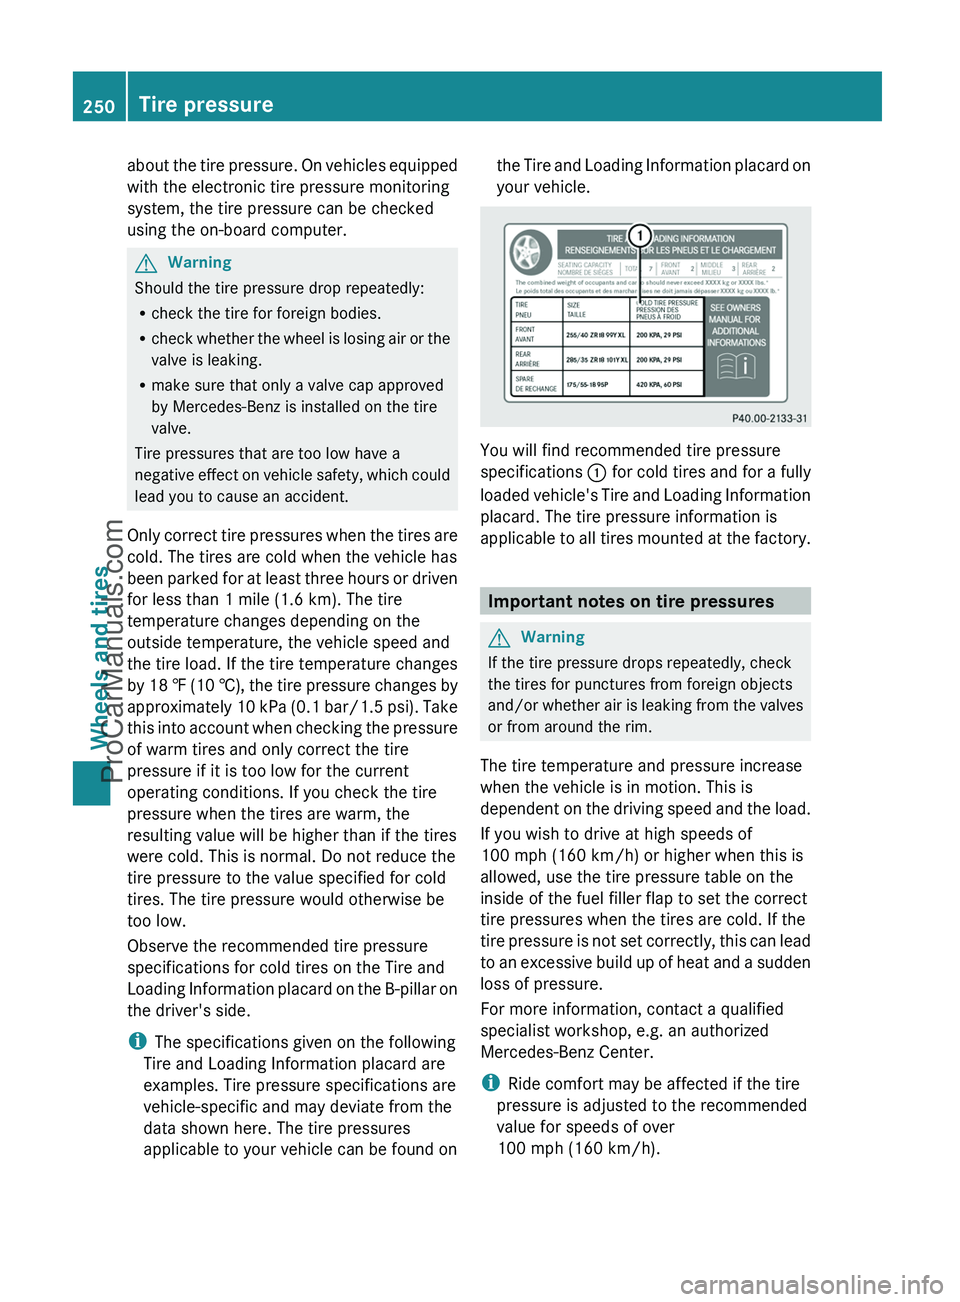
i The specifications given on the following
Tire and Loading Information placard are
examples. Tire pressure specifications are
vehicle-specific and may deviate from the
data shown here. The tire pressures
applicable to your vehicle can be found on
the Tire and Loading Information placard on
your vehicle.
You will find recommended tire pressure
specifications : for cold tires and for a fully
loaded vehicle's Tire and Loading Information
placard. The tire pressure information is
applicable to all tires mounted at the factory.
Important notes on tire pressures
GWarning
If the tire pressure drops repeatedly, check
the tires for punctures from foreign objects
and/or whether air is leaking from the valves
or from around the rim.
The tire temperature and pressure increase
when the vehicle is in motion. This is
dependent on the driving speed and the load.
If you wish to drive at high speeds of
100 mph (160 km/h) or higher when this is
allowed, use the tire pressure table on the
inside of the fuel filler flap to set the correct
tire pressures when the tires are cold. If the
tire pressure is not set correctly, this can lead
to an excessive build up of heat and a sudden
loss of pressure.
For more information, contact a qualified
specialist workshop, e.g. an authorized
Mercedes-Benz Center.
i Ride comfort may be affected if the tire
pressure is adjusted to the recommended
value for speeds of over
100 mph (160 km/h).
250Tire pressureWheels and tires
ProCarManuals.com