Page 145 of 353

Setting the centre air vents
:
Centre air vent,l eft
; Centre air vent,r ight
= Centre vent thumbwheel, right
? Centre vent thumbwheel, left
X To open/close: turn thumbwheels =
and ?up or down. Setting the side air vents
X
To open/close: turn thumbwheel =up or
down.
i Side window demister vent :is never
completely shut, even if side air vent ;is
shut. Setting the glove compartment air
vent
When automatic climate control is activated,
the glove compartmen tcan be ventilated, for
instance to cool its contents .The level of air- flow depends on the airflow and air distribu-
tion settings.
!
Close the air vent when heating the vehi-
cle.
At high outside temperatures, open the air
vent and activate the "cooling with air dehu-
midification" function. Otherwise, temper-
ature-sensitive items stored in the glove
compartmentc ould be damaged. :
Air vent thumbwheel
; Air vent
X To open/close: turn thumbwheel :
clockwise or anti-clockwise. Setting the rear-compartment air
vents
Setting the centre vents in the rear com-
partment :
Rear-compartment air vent thumbwheel
; Rear-compartment air vent,r ight142
Adjusting the air ventsClimate control
Page 146 of 353
=
Rear control panel for THERMOTRONIC
automatic climat econtrol
? Rear-compartmen tair vent, left
X To open/close: turnthumbwheel :up or
down. Setting the AIRSCARF vents
G
WARNING
Very hot air can flow out of the AIRSCARF
vents in the head restraintsw hen AIRSCARF
is in operation. This can cause burns on unpro-
tected skin near the AIRSCARF vents. Lower
the heating output in good time, when neces-
sary. You can adjust the blower output of AIR-
SCARF vents :using the AIRSCARF button
(Y page 107). Adjusting the air vents
143Climatecontrol Z
Page 147 of 353
Page 148 of 353
Useful information
............................146
Running-in notes ............................... 146
Driving ............................................... 146
Manual transmission ........................153
Automatic transmission ...................154
Refuelling ........................................... 160
Parking ............................................... 165
Driving tips ........................................ 166
Driving systems ................................ 169
Trailer towing .................................... 204 145Driving and parking
Page 149 of 353

Useful information
i This Owner's Manual describes all models
and all standard and optional equipment
available to your vehicle at the time of pub-
lication of the Owner's Manual. Country-
specific deviation sare possible. Please
not ethat your vehicle may not be equipped
with all feature sdescribed. This also
applies to safety-relevan tsystems and
functions.
i Pleas ereadt he information on qualified
specialist workshop s(Ypage 22). Running-i
nnotes Important safet
ynotes G
WARNING
New brake pads/lining sonlyh aveo ptimal
braking performanc eafter severa lhundred
kilometres .Until then, compensate for thi sby
applying greate rforce to the brake pedal. This
also applies when brake pads/linings or
brake discs have been changed. The first 1,500 km
The more you look after the engine when it is
new, the more satisfied you will be with its
performanc einthe future.
R Therefore, drive at varying speeds and
engine speeds for the first 1,500 km.
R Avoid heavy loads on the engine during this
period, e.g. driving at full throttle.
R Change gear in good time, at the latest
when the rev counter needle is 2
/ 3 of the
way to the red area in the rev counter dis-
play.
R Do not manually shift to alower gear to
brake the vehicle. Vehicles with automatic transmission:
R
If possible, do not depress the accelerator
pedal past the point of resistanc e(kick-
down).
R Only select shift ranges 3,2or 1when driv-
ing slowly, e.g. in mountainous terrain.
After 1,500 km, you may gradually bring the
vehicle up to full road and engine speeds.
i You should also observe these notes on
runnin ginift he engine or parts of the drive
train on your vehicle have been replaced. Driving
Important safety notes
G
WARNING
Do not place any object sinthe driver's foot-
well. If you use afloormat or carpet in the
driver's footwell, make sure that it is correctly
secured and that there is sufficient clearance
for the pedals.
Do not place several floormats on top of one
another.
Loose object sorthe floormats could other-
wise get caught between the pedals if you
accelerate or brake suddenly. You will then
not be able to brake, declutch or accelerate
as intended. This could lead to accident sand
injury. G
WARNING
Do not change down for additional engine
braking on aslippery road surface. This could
cause the drive wheels to lose their grip and
the vehicle could skid. This could cause you
to lose control of your vehicle and cause an
accident.
! Warm up the engine quickly. Do not use
the engine's full performanc euntil it has
reached operating temperature.
Only set the automatic transmission to the
respective drive positions when the vehicle
is stationary. 146
DrivingDriving and parking
Page 150 of 353

Where possible, avoid spinning the drive
wheels when pulling away on slippery
roads. Otherwise, you could damage the
drive train. Key positions
Key g
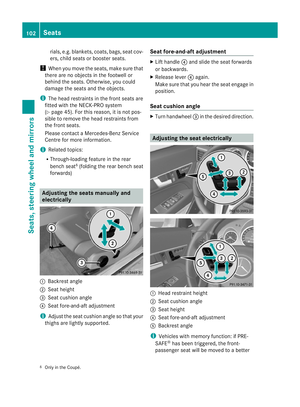
To remove the key
1 Power supply for some consumers, such
as the windscreen wipers
2 Ignition (power supply for all consumers)
and drive position
3 To start the engine
If the key is at position 0in the ignition lock
for alonger period, it can no longer be turned
in the ignition lock. The steerin gisthen
locked. To unlock it, remove the key and rein-
sert it into the ignition lock.
The steerin gwheel is locked when the key is
removed from the ignition lock.
i If the key does not belong to the vehicle
it can still be turned in the ignition lock.
However, the ignition will not be switched
on The engine cannot be started.
KEYLESS-GO General notes
Vehicles with KEYLESS-GO are equipped with
ak ey featurin ganintegrated KEYLESS-GO
function and adetachable Start/Stop button. The Start/Stop button must be inserted into
the ignition lock and the key must be in the
vehicle.
Pressing the Start/Stop button several times
in succession corresponds to the different
key position
sinthe ignition lock. This is only
the case if you are not depressing the brake
pedal.
If you depress the brake pedal and press the
Start/Stop button ,the engine start simmedi-
ately. X
Position 0:ifStart/Stop button :has not
yet been pressed, this corresponds to the
key being removed from the ignition.
X Position 1:press Start/Stop button :.
You can now activat ethe windscreen wip-
ers, for example.
i If you then open the driver's door when in
this position ,the power supply is deactiva-
ted.
X Position 2(ignition): press Start/Stop but-
ton :twice.
i If you press Start/Stop button :once
when in this position and the driver's door
is open, the power supply is deactivated
again.
Removing the Start/Stop button
You can remove the Start/Stop button from
the ignition lock and start the vehicle as nor-
mal using the key. Driving
147Driving and parking Z
Page 151 of 353

i
You do not have to remove the Start/ Stop
button fro mthe ignition lock when you
leave the vehicle. X
Remove Start/Stop button :fromi gnition
lock ;.
i When you insert Start/Stop button :
into ignition lock ;,the system needs
approximately two seconds recognition
time before you can use Start/Stop but-
ton :. Starting the engine
Important safety notes G
WARNING
Never leave the engine runnin ginenclosed
spaces. The exhaust gases contain carbon
monoxide. Inhaling exhaust fumes consti-
tutes ahealth hazard and could lead to loss
of consciousness or even death.
! Do not depress the accelerator pedal
when starting the engine.
i Vehicles with apetrol engine: thec at-
alytic converter is preheate dfor up to 30
second safter acold start .The sound of the
engine may change during this time. Manual transmission X
Depress the brake pedal and keep it
depressed.
X Fully depress the clutch pedal.
X Shift to neutral N.
i You can only start the engine when the
clutch pedal is fully depressed.
Automatic transmission X
Shift the transmission to position P.
The transmission position displayint he
multifunction displays howsP.
i You can also start the engine when the
transmission is in position N.
Starting procedurew ith the key i
To start the engine using the key instead
of KEYLESS-GO, pull the Start/Stop button
out of the ignition lock.
X To startap etrol engine: turn the key to
position 3in the ignition lock
(Y page 147) and release it as soon as the
engine is running.
X To startad iesel engine: turn the key to
position 2in the ignition lock
(Y page 147).
The % preglow indicator lamp in the
instrumen tcluster light sup.
X When the %preglo windicator lamp
goes out, tur nthe key to position 3
(Y page 147) and release it as soon as the
engine is running.
i You can start the engine without preglow
if the engine is warm.
i Vehicles with automatic transmis-
sion: you can also use the touch-start func-
tion. To do this, turn the key to position 3
(Y page 147) and release it immediately.
The engine then starts automatically. 148
DrivingDriving and parking
Page 152 of 353

Using KEYLESS-G
Otostart the engine G
WARNING
Your vehicle can be started using avalid KEY-
LESS-GO key. For this reason ,children should
neve rbel eft unsupervised in the vehicle.
Always take the key with you when leaving the
vehicle, even if you are only leaving it for a
short time.
i The Start/Stop button can be used to
start the vehicle manually without inserting
the key into the ignition lock. The key must
be in the vehicle and the Start/Stop button
must be inserted in the ignition lock. This
mode for starting the engine operates inde-
pendently of the ECO start/stop automatic
engine start function.
X Depress the brake pedal and keep it
depressed.
X To star tapetrol engine: pressthe Start/
Stop button (Y page 147) once.
The engine starts.
X To start adiesel engine: press the Start/
Stop button (Y page 147)once.
Preglow is activated and the engin estarts. Pulling away
Manual transmission X
Depress the brake pedal and keep it
depressed.
X Fully depress the clutch pedal.
X Shif ttoe itherfirst gear or reverse gear R.
X Release the parkin gbrake (Y page 166).
X Release the brake pedal.
X Slowly release the clutch pedal and gently
depress the accelerato rpedal.
! Change gear in good time and avoid spin-
ning the wheels. Otherwise, you could dam-
age the vehicle.
i Follow the shift recommendations in the
multifunction display for an economical
driving style (Y page 154). i
The vehicle locks centrally oncey ou have
pulled away. The lockin gknobs in the doors
drop down.
You can open the doors from the inside at
any time.
You can also deactivat ethe automatic lock-
ing feature (Y page 228).
Automatic transmission i
It is only possible to shift the transmission
from position Pto the desired position if
you depress the brake pedal. Only then is
the selector lever lock released.
X Depress the brake pedal and keep it
depressed.
X Shift the transmission to position Dor R.
X Release the parkin gbrake (Y page 166).
X Release the brake pedal.
X Carefully depress the accelerator pedal.
i The vehicle locks centrally oncey ou have
pulled away. The lockin gknobs in the doors
drop down.
You can open the doors from the inside at
any time.
You can also deactivat ethe automatic lock-
ing feature (Y page 228).
i Upshift stake place at higher engine
speeds after acold start .This helps the
catalytic converter to reach its operating
temperature more quickly.
Hill starta ssist Hill start assist helps you when pulling away
forwards or in reverse on an uphill gradient.
It holds the vehicle for
ashort time after you
have removed your foot from the brake pedal.
This gives you enough time to move your foot
from the brake pedal to the accelerator pedal
and depress it before the vehicle begins to
roll. Driving
149Driving and parking Z