2011 MERCEDES-BENZ E-CLASS CABRIOLET key
[x] Cancel search: keyPage 279 of 353

door opener depends on the garage door
drive system. You might require several
attempts
.You should test every position for
at least 25 seconds before trying another
position.
X Press and hold transmitter button Bon
garage door remote control Auntil indi-
cator lamp :lights up green.
The programming has been successful if
indicator lamp :lights up or flashes
green.
X Release transmitter button ;,=or? on
the integrated garage door opener and the
transmitter button on garage door remote
control B.
If indicator lamp :lights up red:
X Repeat the programming procedure for the
transmitter buttons. When doing so, vary
the distance between the garage door drive
remote control and the rear-view mirror.
i If the indicator lamp flashes green after
successful programming, the garage door
system is using arolling code. After pro-
gramming, you must synchronise the
garage door opener integrated in the rear-
view mirror with the receiver of the garage
door system.
Synchronising the rolling code
Your vehicle must be within reach of the
garage or gate opener drive. Make sure that
neither your vehicle nor any persons/objects
are present within the sweep of the door or
gate.
Observe the safety notes when performing
the rolling code synchronisation.
X Turn the key to position 2in the ignition
lock.
X Press the programming button of the door
or gate drive (see the door or gate drive
operating instructions, e.g. under "Pro-
gramming of additional remote controls"). i
Usually ,you now have 30 seconds to ini-
tiate the next step.
X Press the previously programmed button of
the integrated HomeLink ®
garage door
opener repeatedly until the door startsto
move.
The rolling code synchronisation is then
complete.
Problems when programming
If you have problems when programming the
integrated garage door opener, please note
the following:
R check the transmitter frequency of garage
door remote control A(this can usually be
found on the rear of the remote control).
R change the batteries in garage door remote
control A.This increases the likelihood
that garage door remote control Awill
send astronga nd precise signal to the
integrated remote control in the rear-view
mirror.
R when programming, hold garage door
remote control Aat different distances
and angles from the transmitter button that
you are programming. Try various angles at
ad istance of between 5and 30 cm or the
same angle but varying distances.
R if there is another remote control for the
same garage door drive, perform the pro-
gramming steps again using this remote
control. Before performing these steps,
make sure that new batteries have been
fitted in the garage door drive remote con-
trol.
R note that some remote controls transmit
only for alimited period (the indicator lamp
on the remote control goes out). Press the
button on the remote control again before
transmission ends.
R align the aerial cable of the garage door
opener unit. This can improve signal recep-
tion/transmission. 276
FeaturesStowing and features
Page 280 of 353
Opening or closing the garage door
Oncep
rogrammed, the integrated garage
door opener will assume the function of the
garage door system's remot econtrol. Please
also read the operatin ginstructions for the
garage door system.
X Turn the key to position 2in the ignition
lock.
X Press overhead control panel transmitter
button ;,=or? that you have pro-
grammed to operate the garage door.
Garage door system with afixed code: indi-
cator lamp :lights up green.
Garage door system with arolling code:
indicator lamp :flashes green.
i The transmitter will transmit asignal for
as long as the transmitter button is
pressed. The transmission is halted after a
maximum of 10 seconds, and indicator
lamp :flashes yellow. Press the transmit-
ter button again, if necessary.
Clearing the memory of the integrated
garage door opener in the rear-view mir-
ror X
Turn the key to position 2in the ignition
lock.
X Press transmitter buttons ;and ?.
The indicator lamp lights up yellow.
X Press and hold transmitter buttons ;
and ?until the indicator lamp turn sgreen.
i Make sure that you clear the memory of
the integrated garage door opener before
selling the vehicle. Features
277Stowing and features Z
Page 284 of 353
If you push the lidsb
ack, you willnotice a
resistance.
X Release bonnet :.
X Check whether the lidsofb onnet lifter;
are resting on housings =(arrow).
X The lids of bonnet lifter ; are resting
on the housings: close bonnet:
(Y page 282).
or
X The lids of bonnet lifter ; are not rest-
ing on the housings: first lift up bon-
net :on left-hand side ?and then on
right-hand side B.Lift up bonnet :until
the respective lid of bonnet lifter ;no lon-
ger moves.
The lidsofb onnet lifter;must rest on
housings =(arrow).
X Close bonnet :(Ypage 282).
If you cannot close bonnet :or the L
symbola ppears in the multifunction display,
repeatt he steps. G
WARNING
If the bonnet can still not be engaged properly
or the Lsymbol appears in the multifunc-
tion display,don ot continue driving. The bon-
net can then open when the vehicle is in
motion and obscure your field of vision. Con-
sult aqualified specialist workshop. Other-
wise, you may cause an accident and injure
yourself and others.
Opening the bonnet G
WARNING
Do not pull the release lever while the vehicle
is in motion. If you do so, the bonnet may open
up and block your view. G
WARNING
There is arisk of injury if the bonnet is open,
even if the engine is not running.
Some engine components can become very
hot. To avoid the risk of burns, only touch those
components described in the Owner's Manual
and observe the relevant safety notes.
G
WARNING
The radiator fan between the radiator and the
engine can start automatically, even if the key
has been removed from the ignition lock. For
this reason, you must not reach into the fan
rotation area. You could otherwise be injured.
Vehicles with apetrol engine: The elec-
tronic ignitio nsystem uses high voltage. For
this reason ,you mus tnever touch ignition
system components( ignition coil, ignition
cables, spark plug connectors or test socket)
while:
R the engine is running
R the engine is being started
R the ignition is switched on and the engine
is being cranked by hand
You could otherwise suffer an electric shock
and be seriously or even fatally injured.
Vehicles with adiesel engine: The elec-
tronic injection control uses high voltage. For
this reason ,you must never touc hinjection
system components while:
R the engin eisrunning
R the engin eisbeing started
R the ignition is switched on
You could otherwise suffer an electric shock
and be seriously or even fatally injured.
X Make sure that the windscreen wipers are
switched off. G
WARNING
The windscreen wipers and wiper linkage
could be set in motion.
When the bonnet is open, you or others could
be injured by the wiper linkage.
Make sure that the windscreen wipers are
switched off. Remove the key or make sure
that no ignition position has been selected
with KEYLESS-GO. All indicator lamps must be
off in the instrumen tpanel. Engine compartment
281Maintenance and care Z
Page 286 of 353

X
Slowl yslide oi ldipstick :into the guide
tub etot he stop ,and take it ou tagain.
The oil level is correc tifthe level is between
MIN mark =and MAX mark ;.
X Top up the oil if necessary.
Adding engine oil H
Environmental note
When topping up the oil, take care not to spill
any. If oil enters the soil or waterways, it is
harmful to the environment. G
WARNING
If engine oil comes into contact with hot
engine parts, it may ignite and you could burn
yourself. Do not spill any engine oil on hot
engine parts. Example: engine oil cap
X
Turn cap :anti-clockwise and remove it.
X Top up with the amount of oil required.
Fill carefully to the maximum mark on the oil
dipstick.
i Depending on the engine, the difference
between the minimum mark and the maxi-
mum mark is approximately 1.5 –2litres.
! Do not add too much oil. If the oil level is
above the "max" mark on the dipstick, too
much oil has been added. This can lead to
damage to the engine or the catalytic con-
verter. Have excess oil siphoned off.
For further information on engine oil, see
(Y page 335). X
Replace cap :on the filler neck and
tighten clockwise.
Ensure that the cap locks into place
securely. Checking and adding other service
products
Checking the coolant level Only check the coolant level when the vehicle
is on alevel surface and the engine has cooled
down.
X Turn the key to position 2(Y page 147) in
the ignition lock.
On vehicles with KEYLESS-GO, press the
Start/Stop button twice (Y page 147).
X Check the coolant temperature displayin
the instrumentc luster. G
WARNING
The cooling system is pressurised. Therefore,
only unscrew the cap once the engine has
cooled down. The coolant temperature gauge
must display less than 70 †.Otherwise, you
could be scalded if hot coolant escapes. X
Slowl yturnc ap : half aturna nti-clock-
wise and allow exces spressure to escape.
X Turn cap :further anti-clockwis eand
remove it.
If th ecoolan tisatt heleve lofm arkerbar
= in th efille rneck when cold, there is
enough coolant in coolant expansion
tank ;. Engine compartment
283Maintenance and care Z
Page 289 of 353
Use care products and cleaning agents rec-
ommended and approved by Mercedes-Benz.
! For cleaning your vehicle, do not use any
of the following:
R dry, rough or hard cloths
R abrasive cleaning agents
R solvents
R cleaning agents containing solvents
Do not scrub.
Do not touch the surfaces or protective
films with hard objects, e.g. aring or ice
scraper. You could otherwise scratch or
damage the surfaces and protective film. H
Environmental note
Dispose of empty packaging and cleaning
cloths in an environmentally responsible man-
ner.
! Do not park up the vehicle for an extended
period straight after cleaning it, particularly
after having cleaned the wheels with wheel
cleaner. Wheel cleaners could cause
increased corrosion of the brake discs and
brake pads/linings. For this reason, you
should drive for afew minutes after clean-
ing. Braking heats the brake discs and the
brake pads/linings, thus drying them. The
vehicle can then be parked up. Care of the exterior
Automatic car wash G
WARNING
Braking efficiency is reduced after washing
the vehicle. This could cause an accident. For
this reason, following acar wash, drive with
particular care until the brakes are dry. G
WARNING
The vehicle is braked when the HOLD function
or DISTRONIC PLUS is activated. Therefore,
deactivate the HOLD function and DISTRONIC PLUS before the vehicle is washed in an auto-
matic car wash.
You can wash the vehicle in an automatic car
wash from the very start.
! We recommend automatic car washes
with an adjustable 21
high-pressure pre-
cleaning program. In car washes that use
high water pressures, there is adanger that
as mall quantity of water may leak into the
vehicle.
! Cabriolet: do not treat the vehicle with
hot wax under any circumstances.
! Cabriolet: pull the key out of the ignition
lock when washing the vehicle. This
ensures that the wind deflector on the
windscreen is retracted. The wind deflector
may otherwise be damaged.
If the vehicle is very dirty, pre-wash it before
cleaning it in an automatic car wash.
! Make sure that the automatic transmis-
sion is in position Nwhen washing your
vehicle in atow-through car wash. The vehi-
cle could be damagedift he transmission is
in another position.
! Make sure that:
R the side windows and sliding sunroof or
soft top are closed completely.
R the blowerf or the ventilation/heatin gis
switched off (OFF button is depressed).
R the windscreen wiper switch is at posi-
tion 0.
The vehicle could otherwise be damaged.
After using an automatic car wash, wipe off
wax from the windscreen and the wiper
blades. This will prevent smears and reduce
wiping noises caused by residue on the wind-
screen.
21 In accordanc ewith the specification sfor Cabriolet programs. 286
CareMaintenance and care
Page 291 of 353
!
The following may cause the paint to
become shiny and thus reduce the matt
effect:
R Vigorous rubbing with unsuitablem ate-
rials.
R Frequent use of car washes.
R Washing the vehicle in direct sunlight.
! Never use paint cleaner, buffing or pol-
ishing products, or gloss preserver, e.g.
wax. These products are only suitablef or
high-gloss surfaces. Their use on vehicles
with matt finish leadstoc onsiderable sur-
face damage (shiny, spotted areas).
Alwaysh ave paintwork repairs performed
at aq ualified specialist workshop, e.g. a
Mercedes-Benz Service Centre.
! Do not use wash programs with ahot wax
treatment under any circumstances.
i The vehicle should preferably be washed
by hand using asoft sponge, car shampoo
and plenty of water.
i Use only insect remover and car shampoo
from the range of recommended and
approved Mercedes-Benz care products.
Cleaning the Cabriolets oft topX
Light soiling: you can clean th esoftt op
while it is dry or rinse it with clear water.
X Norma ltoheavy soiling: clean theroof
with abrush and clear water .Clean stains
and other dirt with abrush and aMercedes-
Ben zrecommended and approved cleaning
agent. Always brush from fron ttoback in
the direction of the fabric.
! Never use any of the following to clean the
soft top:
R petrol
R thinner
R tar or stain remover
R other organic solvents
! Remove bird droppings immediately as
they are corrosive and, therefore, can make the soft-top fabric leak. Do not use high-
pressure cleanin
gequipment to clean the
vehicle. Do not use sharp-edged equipment
to remove ice and snow.
Frequent cleanin greduces the resistance to
dirt of the soft top.
To restore this resistance to dirt, clean the
soft top using soft top cleanin gagents that
have been recommended and approved by
Mercedes-Benz.
Incorrec tcleanin gand care ,aswell as ageing,
can cause the soft top seams to leak. Have
the soft-top seams sealed at aqualified spe-
cialist workshop, e.g. at aMercedes-Benz
Servic eCentre.
i Cover the soft top with asuitable cover if
you plan to leave the vehicle outside for a
long period of time.
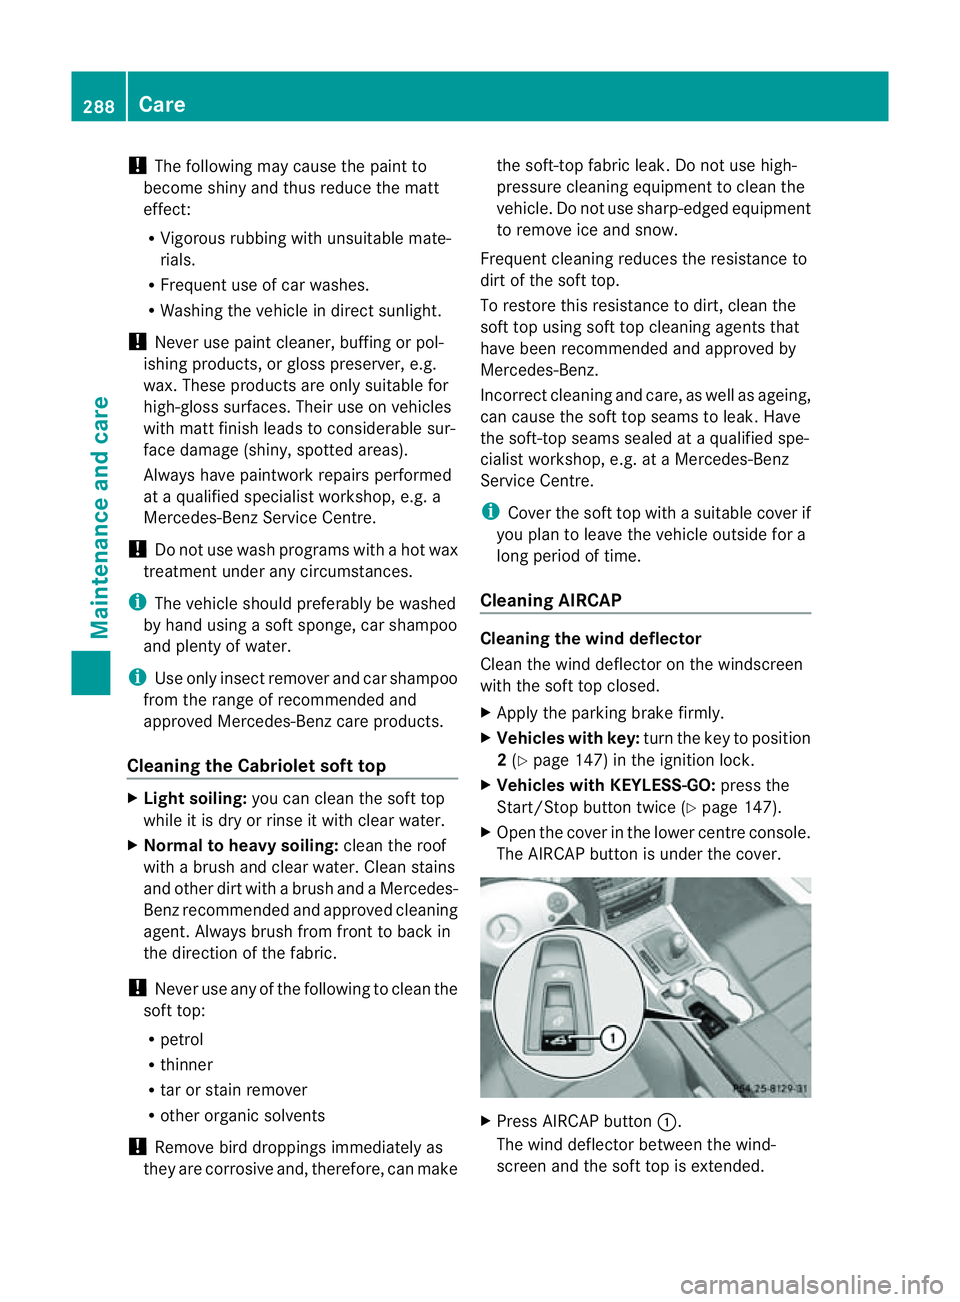
Cleaning AIRCAP Cleaning th
ewind deflector
Clean the wind deflector on the windscreen
with the soft top closed.
X Apply the parking brak efirmly.
X Vehicles with key: turnthe key to position
2 (Y page 147) in the ignition lock.
X Vehicles with KEYLESS-GO: press the
Start/Stop button twice (Y page 147).
X Open the cover in the lower centre console.
The AIRCAP button is under the cover. X
Press AIRCAP button :.
The wind deflector between the wind-
screen and the soft top is extended. 288
CareMaintenance and care
Page 292 of 353
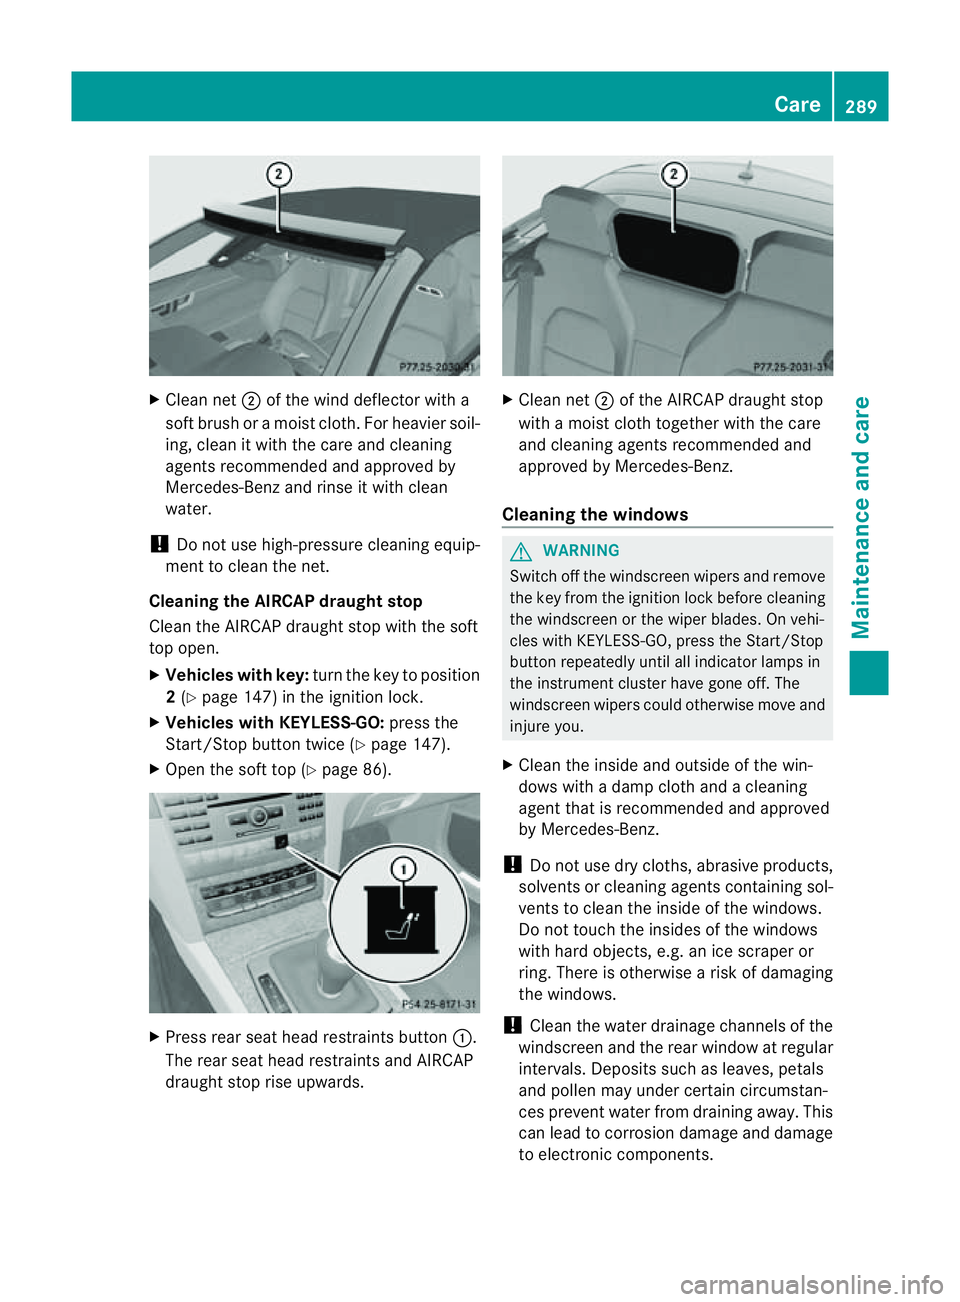
X
Clean net ;of th ewindd eflecto rwith a
soft brush or amoist cloth. For heavier soil-
ing, clean it with the care and cleaning
agent srecommende dand approved by
Mercedes-Ben zand rins eitwithc lean
water.
! Do not us ehigh-pressure cleaning equip-
ment to clean the net.
Cleanin gthe AIRCA Pdraught stop
Clea nthe AIRCAP draught stop with the soft
top open.
X Vehicles with key: turn the key to position
2 (Y page 147) in the ignition lock.
X Vehicles with KEYLESS-GO: press the
Start/Stop button twice (Y page 147).
X Open the soft top (Y page 86).X
Press rear seat head restraintsb utton:.
The rear seat head restraintsa nd AIRCAP
draught stop rise upwards. X
Cleann et; of the AIRCAP draught stop
with amoist clot htogether with the care
and cleanin gagents recommended and
approved by Mercedes-Benz.
Cleaning the windows G
WARNING
Switc hoff the windscreen wipers and remove
the key from the ignition lock before cleaning
the windscreen or the wiper blades. On vehi-
cles with KEYLESS-GO, press the Start/Stop
button repeatedly until all indicator lamps in
the instrument cluster have gone off. The
windscreen wipers could otherwise move and
injur eyou.
X Clean the inside and outside of the win-
dows with adamp cloth and acleaning
agent that is recommended and approved
by Mercedes-Benz.
! Do not use dry cloths, abrasive products,
solvent sorcleanin gagents containin gsol-
vent stoc lean the inside of the windows.
Do not touch the insides of the windows
with hard objects, e.g. an ice scraper or
ring. There is otherwise arisk of damaging
the windows.
! Clean the water drainage channels of the
windscreen and the rear window at regular
intervals. Deposit ssuch as leaves, petals
and pollen may under certain circumstan-
ces preven twate rfrom draining away.T his
can lead to corrosion damage and damage
to electronic components. Care
289Maintenance and care Z
Page 293 of 353
Cleaning th
ewiper blades G
WARNING
Switch off th ewindscree nwipers and remove
the key fro mthe ignition lock before cleaning
the windscreen or the wiper blades. On vehi-
cles with KEYLESS-GO, press the Start/Stop
button repeatedly until all indicator lamps in
the instrument cluster have gone off. The
windscreen wipers could otherwise move and
injure you.
! Do not pull on the wiper blade. Otherwise,
the wiper blade could be damaged.
! Do not clean wiper blades too often and
do not rub them too hard. Otherwise, the
graphite coating could be damaged. This
could cause wiper noise.
X Fold the wiper arms away from the wind-
screen.
X Cleant he wiper blades carefully using a
damp cloth.
X Fold the windscreen wipers back again
before switching on the ignition.
! Hold the wiper arm securely when folding
back. The windscreen could be damaged if
the wiper arm hits against it suddenly.
Cleaningt he exterior lighting X
Cleant he plastic lenses of the exterior
lighting using awet sponge and amild
cleaning agent, e.g. Mercedes-Ben zcar
shampoo or cleanin gcloths.
! Only use cleanin gagents or cleaning
cloth sthata re suitable for plastic lenses.
Unsuitable cleanin gagents or cleaning
cloth scould scratch or damag ethe plastic
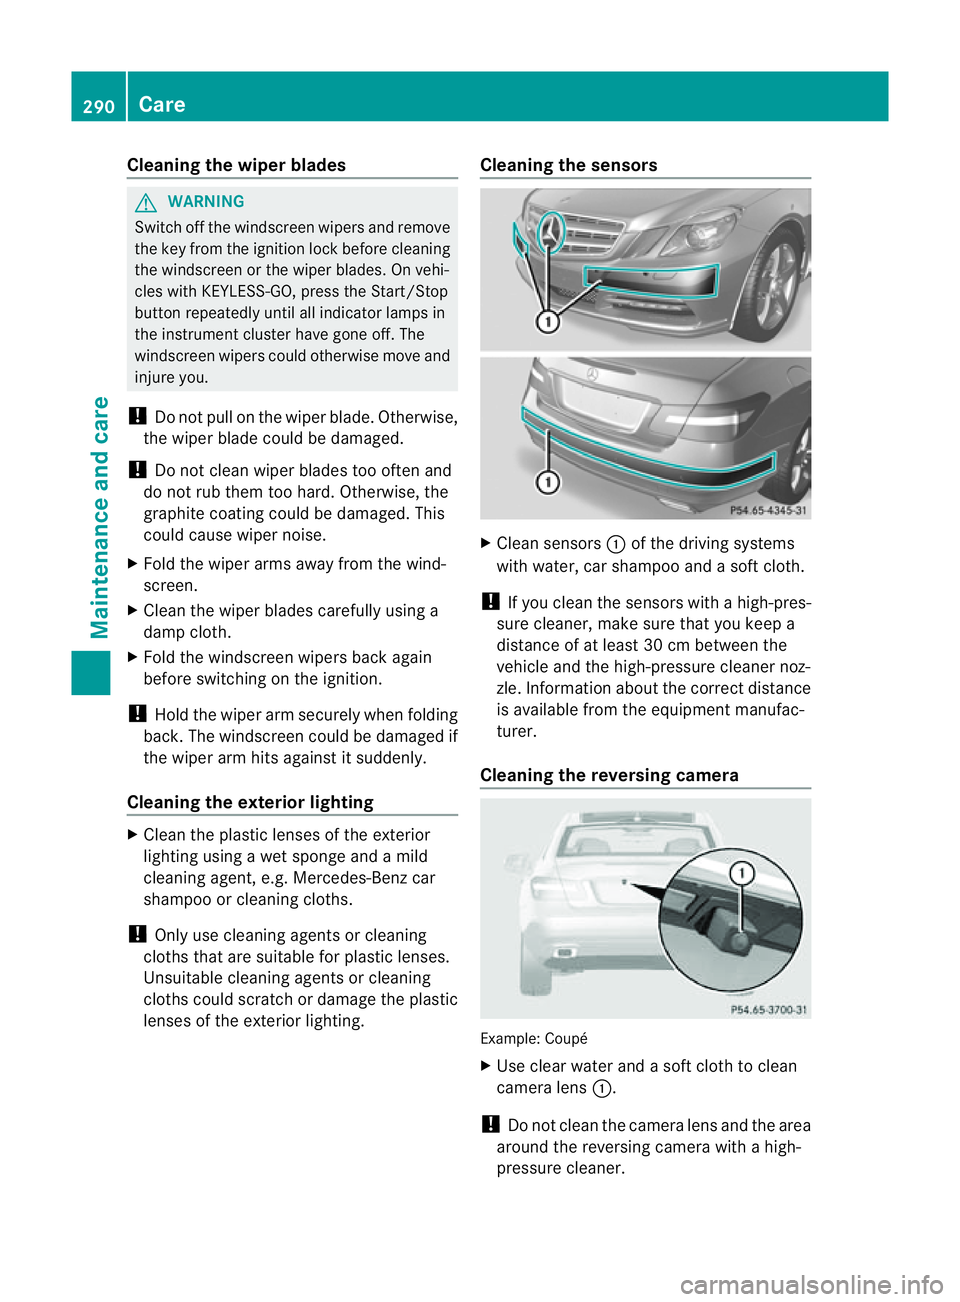
lenses of th eexteri or lighting. Cleaning th
esensors X
Clean sensors :of th edriving systems
wit hw ater, car shampoo and asoftc loth.
! If you clean the sensors with ahigh-pres-
sure cleaner, mak esure that you keep a
distanc eofatl east 30 cm between the
vehicle and the high-pressure cleaner noz-
zle. Information about the correc tdistance
is available fro mthe equipment manufac-
turer.
Cleaningt he reversing camera Example: Coupé
X
Use clear water and asoft cloth to clean
camera lens :.
! Do not clean the camera lens and the area
around the reversing camera with ahigh-
pressure cleaner. 290
CareMaintenance and care