2011 MERCEDES-BENZ E-CLASS CABRIOLET key
[x] Cancel search: keyPage 191 of 353

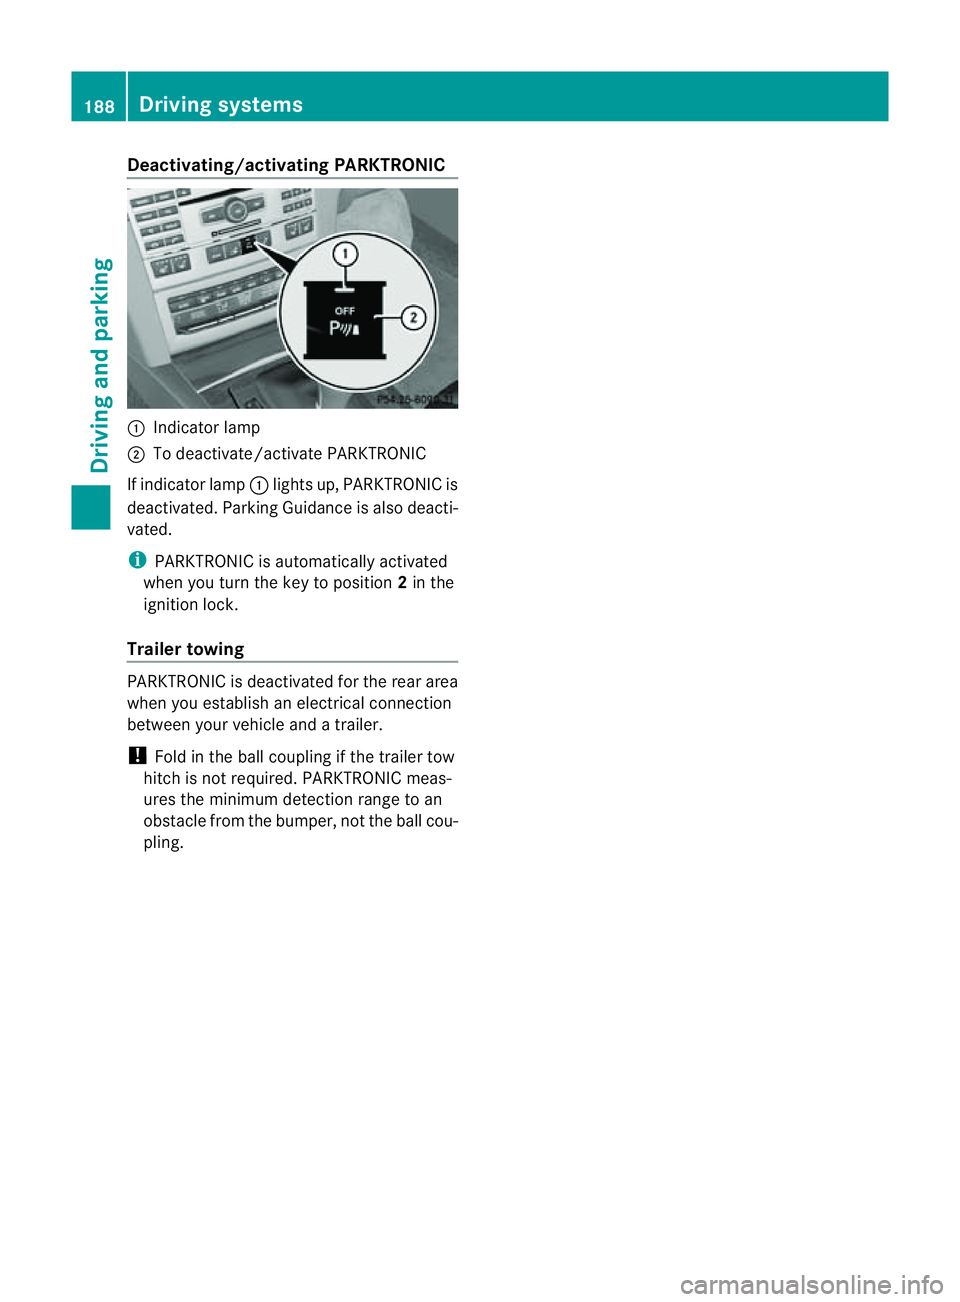
Deactivating/activating PARKTRONIC
:
Indicator lamp
; To deactivate/activat ePARKTRONIC
If indicator lamp :lights up, PARKTRONIC is
deactivated. Parking Guidance is also deacti-
vated.
i PARKTRONIC is automatically activated
when you turn th ekeyto position 2in the
ignition lock.
Trailer towing PARKTRONIC is deactivated fo
rthe rear area
when you establish an electrical connection
between your vehicle and atrailer.
! Fold in the ball coupling if the trailer tow
hitch is not required. PARKTRONIC meas-
ures the minimum detection range to an
obstacle from the bumper, not the ball cou-
pling. 188
Driving systemsDriving and parking
Page 196 of 353

manoeuvring. This appliestot
he areas
behind, in front of and next to the vehicle. You
could otherwise endange ryourself and oth-
ers. G
WARNING
Under the following circumstances, the
reversing camera will not function, or will
function in alimited manner:
R if the boot lid is open
R in heavy rain, snow or fog
R at night or in very dark places
R if the camera is exposed to very bright light
R if the area is lit by fluorescent light (the dis-
play may flicker)
R if there is asudden change in temperature,
e.g. when driving into aheated garage in
winter
R if the camera lens is dirty or obstructed
R if the rear of your vehicle is damaged. In this
event,h ave the camera position and setting
checked at aqualified specialist workshop.
Mercedes-Benz recommends that you use
aM ercedes-Benz Service Centre for this
purpose.
Do not use the reversing camera in these
types of situation. You could otherwise injure
others or damage object sand your vehicle
while you are parking.
Activating the reversing camera X
Make sure that the key is in position 2in
the ignition lock.
X Make sure that the "Reversing camera"
function is selected in COMAND APS (see
the separate operating instructions for
COMAND APS).
X Engage reverse gear.
The area behind the vehicle is shown in the
COMAND APS display. Guide lines in the COMAND APS display Depending on the date of manufacture of the
vehicle, the guide lines are shown in the
COMAND APS display.
G
WARNING
Using the reversing camera can be dangerous
if you are colour blind or if your ability to dis-
tinguish colours is impaired.
Only use the reversing camera if you can see
and distinguish between all the coloured
guide lines that are displayed by the reversing
camera in the COMAND APS display. G
WARNING
Please note that object snot at ground level
may appear to be further away than they
actually are. These include:
R the bumper of avehicle that is parked
behind your vehicle
R at railer drawbar
R the ball coupling of atrailer tow hitch
R the tail-end of alorry
R slanted posts
The lines are only guides, not accurate meas-
urements of the distance to an obstacle.
Therefore, you should never pass the red line
when approaching an obstacle. You could oth-
erwise cause an accident and injure yourself
and others. Information in the COMAND APS display (example)
Guide lines
;and =show the approximate
distance to the rear area. Yellow guide
line ;indicates adistance of approximately Driving systems
193Driving and parking Z
Page 201 of 353

the warning onl
yoccurs if the differenc ein
spee dislesst han1 2km/h.
The yellow indicator lamp goes out if reverse
gearise ngaged. Blind Spot Assist is then
deactivated.
The brightness of the indicator/warning
lamps is adjusted automaticallya ccording to
the ambient light. G
WARNING
Blind Spot Assist is not active at speeds below
30 km/h, and the indicator lamps in the exte-
rior mirrors are yellow. Vehicles in the moni-
toring range are then not indicated.
Always pay attention to traffic conditions and
your surroundings. Otherwise, you may fail to
recognise dangers in time, cause an accident
and injure yourselfa nd others.
Collisio nwarning
If av ehicl eisd etected in the monitoring range
of Blind Spo tAssist and you switch on the turn
signal, adoublew arning tone sounds. Red
warning lamp :flashes. If the turn signal
remains on, detected vehicles are indicated
by the flashing of red warning lamp :.There
are no further warning tones.
Switching on Blind Spot Assist
X Make sure that the radar sensor system
(Y page 229) and Blind Spot Assist
(Y page 224) are activated in the on-board
computer.
X Turn the key to position 2in the ignition
lock.
Warning lamps :light up red in the exte-
rior mirrors for approximately 1.5 seconds
and then turn yellow.
Trailer towing
If you attach atrailer, make sure you have
correctly established the electrical connec-
tion. This can be accomplished by checking
the trailer lighting. In this event, Blind Spot
Assist is deactivated. The indicator lamp in
the exterior mirrors lights up yellow, and the
Blind Spot Assist currently unavail‐ able See Owner's Manual message
appears in the multifunction display.
i You can deactivate the indicator lamps in
the exterior mirrors.
To do so, switch off Blind Spot Assist if:
R the key is in position 2in the ignition
lock.
R the engine is not running.
R the electrical connection to the trailer
has been established.
Lane Keeping Assist Important safety notes
Lane Keeping Assist monitors the area in
front of your vehicle by means of
acamera at
the top of the windscreen. Lane Keeping
Assist detectsl ane markings on the road and
warns you before you leave your lane unin-
tentionally.
If you have chosen the (Y page 225) function
in the on-board computer and select km as
the unit of measurement, Active Lane Keep-
ing Assist is active from speeds of 60 km/h.
If the displayu nit is selected, the assistance
range begins at 40 mph. G
WARNING
Lane Keeping Assist does not keep your vehi-
cle in its lane. It is only an aid and may detect
the lane markings on the road incorrectly or
not at all.
The system may be impaired or may not func-
tion if:
R there is poor visibility, e.g. due to insuffi-
cient illumination of the road, or due to
snow, rain, fog or spray.
R there is glare, e.g. from oncomingt raffic,
the sun, or reflection from other vehicles.
R the windscreen is dirty, misted up or cov-
ered, for instancebyas ticker, in the vicinity
of the camera
R several or no lane markings for asingle lane
are present. 198
Driving systemsDriving and parking
Page 205 of 353

R
ad riving safety system intervenes, suc has
ESP ®
or PRE-SAFE ®
Brake.
R ESP ®
is deactivated.
R al oss of tyr epressure or adefective tyr eis
detected.
Activating Activ eBlind Spot Assist
X Mak esure that th eradar sensor system
(Y page 229) and Activ eBlindS potA ssist
(Y page 224) are activated in th eon-bo ard
computer.
X Turn th ekeyto position 2in th eignition
lock.
Warning lamps :light up red in th eexte-
rior mirror sfor approximately 1. 5seconds
and then tur nyellow.
Trailer towing
If you attac hatrailer, make sure you have
correctly established the electrical connec-
tion .This can be accomplished by checking
the trailer lighting. Active Blind Spot Assist is
then deactivated. The indicator lamp in the
exterior mirrors lights up yellow, and the
Active Blind Spot Assist currently unavailable See Owner's Manual mes-
sage appears in the multifunction display.
Active Lane Keeping Assist Important safety notes
Active Lane Keeping Assist monitors the area
in front of your vehicle by means of
acamera
at the top of the windscreen. Active Lane
Keeping Assist detectsl ane markings on the
road and warns you before you leave your
lane unintentionally. If you do not react to the
warning, alane-correcting application of the
brakes can bring the vehicle back into the
original lane. :
Active Lane Keeping Assist camera
If you have selected the Display unit Speed-/odometer: (Y
page 225) function in
the on-board computer and select kmkm as
the unit of measurement, Active Lane Keep-
ing Assist is active from speeds of 60 km/h.
If the miles displayu
nit is selected, the assis-
tance range begins at 40 mph. G
WARNING
Active Lane Keeping Assist does not keep
your vehicle in its lane. It is only an aid and
may detect the lane markings on the road
incorrectly or not at all.
The system may be impaired or may not func-
tion if:
R several or no lane markings for asingle lane
are present.
R there is poor visibility, e.g. due to insuffi-
cient illumination of the road, or due to
snow, rain, fog or spray.
R there is glare, e.g. from oncomingt raffic,
the sun, or reflection from other vehicles.
R the windscreen is dirty, misted up or cov-
ered, for instancebyas ticker, in the vicinity
of the camera.
R the lane markings are worn away,d ark or
covered up, e.g. by dirt or snow.
R the distance to the vehicle in front is too
small and the lane markings thus cannot be
detected.
R the lane markings on the road are unclear,
e.g. near roadworks. 202
Driving systemsDriving and parking
Page 212 of 353

You can obtain further information about
installing the trailer electrics fro maqualified
specialist workshop, e.g. aMercedes-Benz
Service Centre.
X To switch the connected power supply
on or off: turn the key in the ignition lock
to position 2or 0respectively. Bulb failur
eindicator for LED lamps
i If LED lamps are fitted in the trailer, an
error message may appear in the multi-
function display even if ther eisnofault. The
reason for the error message may be that
the curren thas falle nbelow the minimum
of 50 milliamperes (mA).
To ensure reliable operation of the bulb failure
indicator, each LED chain in the trailer lighting
must be guaranteed aminimum curren tof
50 mA. Trailer with 7-pin connector
General information If your trailer has
a7-pin connector, you can
connectittot he 13-pin socket on the ball
coupling using an adapter or, if necessary, an
adapter cable. Bothoft hese can be obtained
at aq ualified specialist workshop, e.g. at a
Mercedes-Benz Service Centre.
Fitting the adapter X
Open the socket cover.
X Inser tthe connector with lug :into
groove ;on the socket and turn the con-
nector clockwise to the stop.
X Let the cover engage.
X If you are using an adapter cable, secure
the cable to the trailer with cable ties.
! Make sure that ther eissufficien tcable
play so that th ecabl ecanno tbecome
detached when cornering. Trailer towing
209Driving and parking Z
Page 216 of 353

!
Do not drive in the overrevving range.
Doing so will damage the engine.
The fuel supplyisi nterrupted to protect the
engine when the red band is reached. Outside temperatured
isplay
The outside temperature displayisint he mul-
tifunction display( Ypage 214). G
WARNING
At temperatures just above freezing point, the
street may be icy, especiallyinw ooded areas
or on bridges. If you do not adapty our driving
style to the conditions, the vehicle could skid.
For this reason, adapt your driving style and
speed to the weather conditions.
Changes in the outside temperature are dis-
playeda fterashort delay. Speedometer with segments
The segment sinthe speedometer indicate
which speed range is available.
Cruise control (Y page 169) activated:
The segment slight up from the stored speed
to the maximum speed.
Variable SPEEDTRONIC (Y page 180) activa-
ted:
The segment slight up from the start of the
scale to the selected limit speed.
DISTRONIC PLUS (Y page 171) activated:
One or two segment sinthe set speed range
light up.
DISTRONIC PLUS detect savehicle in front:
The segment sbetween the speed of the vehi-
cle in front and the stored speed light up. Operating the on-board computer
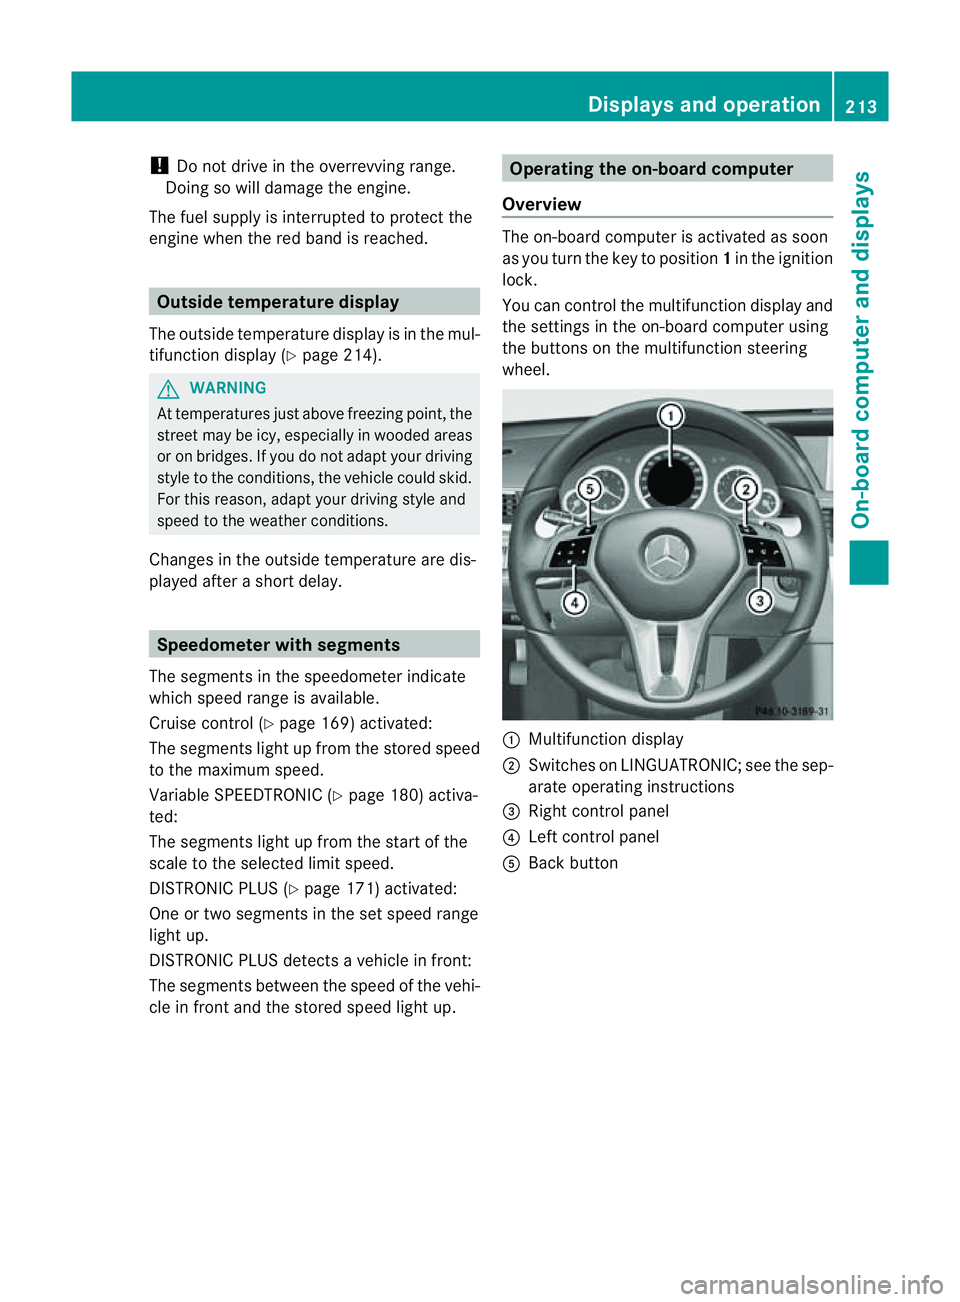
Overview The on-board computer is activated as soon
as you turn the key to position
1in the ignition
lock.
You can control the multifunction display and
the settings in the on-board computer using
the button sonthe multifunction steering
wheel. :
Multifunction display
; Switches on LINGUATRONIC; see the sep-
arate operating instructions
= Right control panel
? Left control panel
A Back button Displays and operation
213On-board computer and displays Z
Page 230 of 353

If you set the dipped-bea
mheadlamps for
driving on the right/left (Y page 227), the
multifunction display shows the Systeminoperative display message under the
image of the vehicle for the Intell. Light
Sys. function in the
Light submenu.
Setting the dipped-beam headlampsf or
driving on the right/left
This function is only available on vehicles with
the Intelligent Light System.
You can use this function to switch between
symmetrical beam and asymmetrical dipped
beam (Y page 114).
If you set the dipped-beam headlamps for
driving on the right/left, then motorway
mode and the extended range foglamps are
not available.
X Press the =or; button on the steer-
ing wheel to select the Settings menu.
X Press the :or9 button to select the
Light submenu.
X Press the abutton to confirm.
X Press :or9 to select the Dipped beams Setting for: function.
You will see the selected setting: Right-side traffic or
Left-side traffic .
X Press the abutton to save the setting.
When you change the setting, conversion
does not take place until the nextt ime the
vehicle is stationary.
You can also have the dipped-beam head-
lamps set for drivin gonthe right/lef tata
qualified specialist workshop, e.g. a
Mercedes-Ben zServic eCentre.
Switching Adaptive Highbeam Assist on/
off
X Press the =or; button on the steer-
ing wheel to selec tthe Settings menu.
X Press the :or9 button to select the
Light submenu.
X Press the abutton to confirm. X
Press :or9 to select the Adapt. main beam function.
If the Adapt. main beam function has
been switched on, the cone of light and the
_ symbol in the multifunction display
are shown in red.
X Press the abutton to save the setting.
Activating/deactivating the surround
lighting and exterior lighting delayed
switch-off
If you have activated the Surround light‐ ing function and the light switch is in the
à position,
R the exterior lighting remains on for another
40 seconds after you unlock the vehicle
using the key.
The exterior lighting switches off when you
open the driver’s door.
R the exterior lighting remains on for another
15 seconds after closing the doors when it
is dark.
If the engine is switched off and then none
of the doors are opened, or if an open door
is not closed, the exterior lighting goes out
after 60 seconds.
If you activate the Surround lighting func-
tion, the following light up depending on the
vehicle's equipment:
R the side lamps
R the foglamps
R the daytime driving lights
R the surround lighting in the exterior mirrors
X Press the =or; button on the steer-
ing wheel to select the Settings menu.
X Press the :or9 button to select the
Light submenu.
X Press the abutton to confirm.
X Press the :or9 button to select the
Surround lighting function.
When the Surround lighting function is
activated, the light cone and the area Menus and submenus
227On-board computer and displays Z
Page 231 of 353

aroun
dthe vehicle are displayed in red in
th em ultifunction display.
X Press the abuttontos ave th esetting.
Deactivating delayed switch-off of th eexte-
rior lighting temporarily:
X Before leaving th evehicle ,turn th ekeyto
position 0in th eignition lock.
X Turn th ekeyto position 2in th eignition
loc ka nd back to position 0.
The exterio rlighting delayed switch-off is
deactivated.
Delayed switch-off of the exterior lighting is
reactivated the nex ttim ey ou start the
engine.
Activating/deactivating th einterior light-
ing delayed switch-off
If you activat ethe Light. delay function,
the interior lighting remain sonfor 20 sec-
onds after you remove the key fro mthe igni-
tion lock.
X Press the =or; button on the steer-
ing wheel to selec tthe Settings menu.
X Press the :or9 button to select the
Light submenu.
X Press the abutton to confirm.
X Press the :or9 button to select the
Light. delay function.
When the Light. delay function is acti-
vated, the vehicle interior is displayed in
red in the multifunction display.
X Press the abutton to save the setting.
Vehicle Setting permanent SPEEDTRONIC
You can set permanent SPEEDTRONIC
(Y page 183) using the Limit speed (win‐ter tyres) function.
X Press the =or; button on the steer-
ing wheel to select the Settings menu.
X Press the :or9 button to select the
Vehicle submenu. X
Press the abutton to confirm.
X Press :or9 to select the Limit speed (winter tyres): function.
You will see the current setting.
X Press the abutton to confirm.
X Press :or9 to adjust permanent
SPEEDTRONIC in increments of 10
(240 km/h to
160 km/h ). The
Off setting
switches permanent SPEEDTRONIC off.
X Press the abutton to store the entry.
Switching the automatic locking feature
on/off
If you select the Automatic door lock func-
tion, the vehicle is centrally locked above a
speed of around 15 km/h.
i For further information on the automatic
locking feature, see (Y page 78).
X Press the =or; button on the steer-
ing wheel to select the Settings menu.
X Press the :or9 button to select the
Vehicle submenu.
X Press the abutton to confirm.
X Press the :or9 button to select the
Automatic door lock function.
When the Automatic door locks func-
tion is activated, the vehicle doors are dis-
played in red in the multifunction display.
X Press the abutton to save the setting.
Activating/deactivating the acoustic
locking confirmation
If you activate the Acoustic Lock function,
an audible signal sounds when the vehicle is
locked or unlocked. When unlocking, the sig-
nal sounds once. When locking, it sounds
three times.
X Press the =or; button on the steer-
ing wheel to select the Settings menu.
X Press the :or9 button to select the
Vehicle submenu.
X Press the abutton to confirm. 228
Menus and submenusOn-board computer and displays