2011 MERCEDES-BENZ E-CLASS CABRIOLET key
[x] Cancel search: keyPage 120 of 353

X
To indicate briefly: press the combination
switch briefl ytothe pressure point in the
direction of arrow ;or?.
The corresponding tur nsignal flashes three
times.
X To indicate: press the combination switch
beyond the pressure point in the direction
of arrow ;or?.
Main-bea mheadlamps X
To switch on th emain-bea mhead-
lamps: turnthe key in the ignition lock to
position 2or start the engine.
X Turn the light switc htoLorÃ.
X Press the combination switc hbeyond the
pressure point in the direction of
arrow :.
In the Ãposition ,the main-beam head-
lamps are only switched on when it is dark
and the engin eisrunning.
The K indicator lamp in the instrument
cluster lights up when the main-beam head-
lamps are switched on.
X To switch off the main-beam head-
lamps: move the combination switch back
to its normal position.
The K indicator lamp in the instrument
cluster goes out.
Headlamp flasher X
To switch on: turn the key in the ignition
lock to position 1or 2or start the engine.
X Pull the combination switch in the direction
of arrow =. Hazard warning lamps
The hazard warning lamps automatically
switch on if:
R
an airbag is deployed.
R the vehicle decelerates rapidly from a
speed of more than 70 km/ha nd comesto
as tandstill.
X To switc honthe hazard warning lamps:
press button :.
All tur nsignals flash. If you now switc hon
at urns ignal using the combination switch,
only the tur nsignal lamp on the corre-
sponding side of the vehicle will flash.
X To switch off th ehazar dwarning
lamps: press button :.
The hazar dwarnin glamps switc hoff auto-
matically if the vehicle reaches aspeed of
over 10 km/h again after full brak eapplica-
tion.
i The hazar dwarnin glamps still operat eif
the ignition is switched off. Exterior lighting
117Lightsand windscreen wipers Z
Page 123 of 353

The system may be impaired or deactivated:
R
if there is poor visibility, e.g. due to snow,
rain, fog or spray
R if the area of the windscreen around the
optical sensor is dirty, misted up or covered
up, e.g. by asticker
The system may not recognise the following
road users:
R road users that have no lighting, e.g. pedes-
trians
R road users that have poor lighting, e.g.
cyclists
R road users whose lighting is not clearly visi-
ble, e.g. road users behind acrash barrier
R on rare occasions :road users that have
lights that may be recognised too late or not
at all
The automatic main-beam headlamps will not
be deactivated, or they may be activated
despite road users travelling in front of or
approaching the vehicle.
Thus, you could cause an accident and injure
yourself and others. Always observe traffic
conditions and, if necessary, dip the lights
manually. Headlamps misted up inside
The headlamps may mist up on the inside if
there is high atmospheric humidity.
X Drive with the headlamps switched on.
The level of moisture diminishes, depend-
ing on the length of the journey and the
weather conditions (humidity and temper-
ature).
If the level of moisture does not diminish:
X Have the headlamps checked at aqualified
specialist workshop. Interior lighting
Overview of interior lighting
Overhead control panel (example: Coupé)
:
u To switch the rear interior lighting
on/off( Coupé only)
; | To switch th eautomatic interior
lighting control on/off
= p To switch th eright-hand reading
lamp on/off
? c To switch th efront interio rlighting
on/off
A p To switch th eleft-hand reading lamp
on/off Interior lightin
gcontrol
Important notes In order to preven
tthe vehicle's battery from
discharging, the interior lighting functions are
automatically deactivated after some time
except for when the key is in position 2in the
ignition lock.
Automatic interior lighting control X
To switch on/off: press the|button.
When the automatic interior lighting con-
trol is activated, the button is flush with the
overhead control panel. 120
Interior lightingLights and windscreen wipers
Page 124 of 353

The interior lighting automatically switches
on if you:
R unlock the vehicle
R open adoor
R remove the key from the ignition lock
The interior light is activated for ashort while
when the key is removed from the ignition
lock. You can activat ethis delayed switch-off
using the on-board computer (Y page 228).
Manual interior lighting control X
To switch the interior lighting on/off:
press the cbutton.
X To switch the reading lamps on/off:
press the pbutton. Crash-responsive emergency lighting
The interior lighting is activated automatically
if the vehicle is involved in an accident.
X To switch off the crash-responsive
emergency lighting: press the hazard
warning lamp button.
or
X Lock and then unlock the vehicle using the
key. Changing bulbs
Important safety notes
Xenon bulbs If your vehicle is equipped with xenon bulbs,
you can recognise this by the following: the
cone of light from the xenon bulbs moves
from the top to the bottom and back again
when you start the engine. For this to be
observed, the lights must be switched on
before startingt he engine. G
DANGER
Xenon bulbs carry ahigh voltage. You could
get an electric shock and be seriously or even
fatally injured if you touch the electric con- tacts on xenon bulbs. Therefore, never
remove the cover from xenon bulbs.
Do not change xenon bulbs yourself, but have
them replaced at
aqualified specialist work-
shop which has the necessary specialist
knowledge and tools to carry out the work
required.
Mercedes-Ben zrecommends that you use a
Mercedes-Benz Service Centr efor this pur-
pose. In particular, work relevant to safety or
on safety-related systems must be carried out
at aq ualified specialist workshop.
Bulbs and lamps are an important aspect of
vehicle safety. You must therefore make sure
that these function correctly at all times.
Have the headlamp setting checked regularly.
Other bulbs There are bulbs other than the xenon bulbs
that you cannot replace. Replace only the
bulbs listed (Y
page 122). Have the bulbs that
you cannot replace yourself changed at a
qualified specialist workshop.
Mercedes-Benz recommends that you use a
Mercedes-Benz Service Centr efor this pur-
pose. In particular, work relevant to safety or
on safety-related systems must be carried out
at aq ualified specialist workshop.
If you require assistanc echangin gbulbs, con-
sult aqualified specialist workshop.
Do not touch the glass tube of new bulbs with
your bare hands. Even minor contamination
can burn into the glass surface and reduce
the servic elife of the bulbs. Always use alint-
free cloth or only touch the base of the bulb
when fitting.
Only use bulbs of the correct type.
If the new bulb still does not light up, consult
aq ualified specialist workshop.
Bulbs and lamps are an important aspect of
vehicle safety. You must therefore make sure
that these function correctly at all times.
Have the headlamp setting checked regularly. Changing bulbs
121Lights and windscreen wipers Z
Page 127 of 353

X
Turn the bulb anti-clockwise, applying
slight pressure, and remove it from bulb
holder :.
X Insert the new bulb into bulb holder :and
turn it clockwise.
X Insert bulb holder :into the lamp and turn
it clockwise. Windscreen wipers
Switching the windscreen wipers on/
off
G
WARNING
The windscreen will not longer be wiped prop-
erly if the wiper blades are worn. This could
prevent you from observing the traffic condi-
tions, thereby causing an accident .Replace
the wiper blades twice ayear, ideally in spring
and autumn.
! Do not operate the windscreen wipers
when the windscreen is dry, as this could
damage the wiper blades. Moreover ,dust
that has collected on the windscreen can
scratch the glass if wiping takes place when
the windscreen is dry.
! If the windscreen wipers leave smears on
the windscreen after the vehicle has been
washed in an automatic car wash, this may
be due to wax or other residue. Clean the
windscreen with washer fluid after an auto-
matic car wash. Combination switch
1
$ Windscreen wipers off
2 Ä Intermittentw ipe, low10
3 Å Intermittentw ipe, high11
4 ° Continuous wipe, slow
5 ¯ Continuous wipe, fast
B í Single wipe/ îTo wipe the
windscreen using washer fluid
X Turn the key to position 1or 2in the ignition
lock.
X Turn the combination switch to the corre-
spondin gposition.
! Intermittentw iping with rain sensor :due
to optical influences and the windscreen
becomin gdirty in dry weather conditions,
the windscreen wipers may be activated
inadvertently. This could damage the wind-
screen wiper blades or scratch the wind-
screen.
For this reason, you should alway sswitch
off the windscreen wipers in dry weather.
In the ÄorÅ position ,the appropriate
wiping frequenc yisset automatically accord-
ing to the intensity of the rain. In the Å
position ,the rain sensor is more sensitive
than in the Äposition ,causing the wind-
screen wiper to wipe more frequently.
10 Rain sensor set to low sensitivity.
11 Rain sensor set to high sensitivity. 124
Windscreen wipersLights and windscreen wipers
Page 128 of 353

Replacing the wiper blades
Important safety notes G
WARNING
The wiper arm scould star tmoving and cause
an injury if you leave the windscreen wipers
switched on.
Remove the key from the ignition lock before
replacing the wiper blades.
! To avoid damaging the windscreen wiper
blades, make sure that you touch only the
wiper arm of the windscreen wiper.
! Never open the bonnet if awindscreen
wiper arm has been folded away from the
windscreen.
Never fold awindscreen wiper arm without
aw iper blade back ontot he windscreen.
Hold the windscreen wiper arm firmly when
you change the wiper blade. If you release
the windscreen wiper arm without awiper
blade and it falls ontot he windscreen, the
windscreen may be damaged by the force
of the impact.
Mercedes-Benz recommends that you have
the wiper blades replaced by aqualified
specialist workshop, e.g. at aMercedes-
Ben zServic eCentre.
Replacin gthe wiper blades Removing th
ewiper blades
X Remove th ekeyfrom th eignition loc kor
tur nthe key to position 0(KEYLESS-GO).
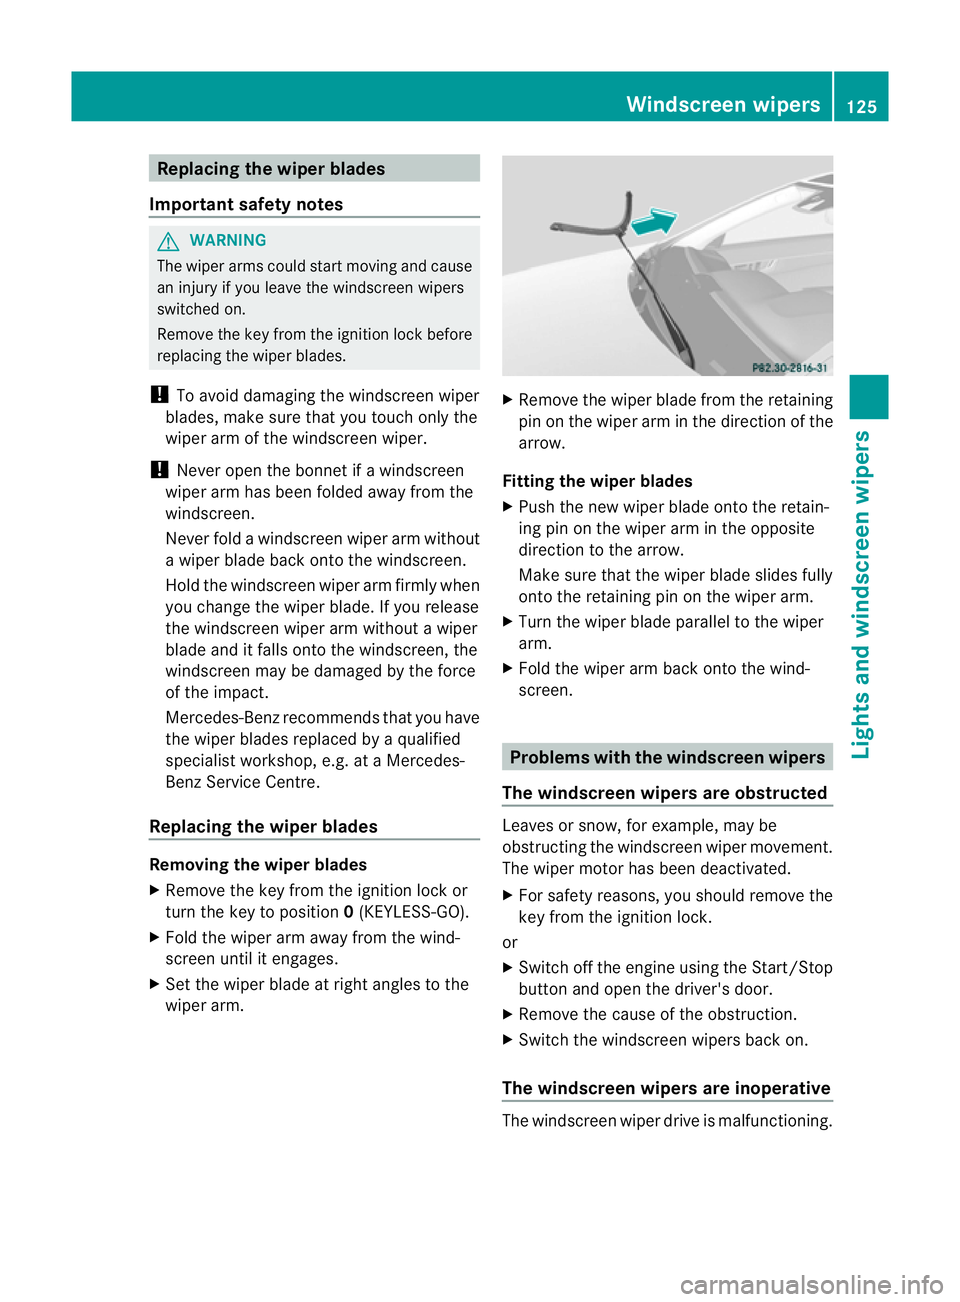
X Fold the wiper arm away from the wind-
screen until it engages.
X Set the wiper blade at right angles to the
wiper arm. X
Remove the wiper blade from the retaining
pin on the wiper arm in the direction of the
arrow.
Fitting the wiper blades
X Push the new wiper blade onto the retain-
ing pin on the wiper arm in the opposite
direction to the arrow.
Make sure that the wiper blade slides fully
onto the retaining pin on the wiper arm.
X Turn the wiper blade parallel to the wiper
arm.
X Fold the wiper arm back onto the wind-
screen. Problems with the windscreen wipers
The windscreen wipers are obstructed Leaves or snow, for example, may be
obstructing the windscreen wiper movement.
The wiper motor has been deactivated.
X For safety reasons, you should remove the
key from the ignition lock.
or
X Switch off the engine using the Start/Stop
button and open the driver's door.
X Remove the cause of the obstruction.
X Switch the windscreen wipers back on.
The windscreen wipers are inoperative The windscreen wiper drive is malfunctioning. Windscreen wipers
125Lights and windscreen wipers Z
Page 131 of 353

Useful information
i This Owner's Manual describes all models
and all standard and optional equipment
available to your vehicle at the time of pub-
lication of the Owner's Manual. Country-
specific deviation sare possible. Please
not ethat your vehicle may not be equipped
with all feature sdescribed. This also
applies to safety-relevan tsystems and
functions.
i Pleas ereadt he information on qualified
specialist workshop s(Ypage 22). Overview of climat
econtro lsystems Important safet
ynotes G
WARNING
Observ ethe setting srecommended on the
following pages. Otherwise ,the windows
could mist up. This may obstruct your view of
the traffic situation and, as aresult ,you may
cause an accident.
THERMATIC/THERMOTRONIC automatic cli-
mate control controls the temperature and
the humidit yofthe vehicle interior and filters
out undesirable substances fro mthe air.
THERMATIC/THERMOTRONIC automatic cli-
mate control is only operational when the
engine is running. 12
i Ventilate the vehicle for abrief period
during warm weather, e.g. using the con-
venience opening feature (Y page 83). This
will speed up the cooling process and the
desired vehicle interior temperature will be
reached more quickly.
i The integrated filter can filter out most
particles of dust and completely filters out
pollen. Aclogged filter reduces the amount
of air supplied to the vehicle interior .For
this reason, you should always observe the interval for replacing the filter, which is
specified in the Servic
eBooklet .Asit
depends on environmental conditions, e.g.
heavy air pollution, the interval may be
shorter than stated in the Service Booklet.
i It is possible that the residualh eat func-
tion may be activated automaticallyanh our
after the key is removed. The vehicle is then
ventilated for 30 minutes to dry the air-
conditioning system.
12 THERMOTRONIC automatic climate control: the residualh eat function can only be activated/deactivated
when the ignition is switched off. 128
Overview of climatec
ontrol systemsClimatecontrol
Page 134 of 353

Note
sonu sing THERMOTRONI Cauto-
matic climate control
Below ,you can find anumbe rofnotes and
recommendations to help you use
THERMOTRONIC automatic climate control
optimally.
R Activate climate control using the Ãand
¿ buttons. The indicator lamps above
the à and¿ button slight up. You
can also set the airflow and air distribution
of the automatic climate control to one of
three levels (FOCUS/MEDIUM/DIFFUSE).
You can set the desired level using button
G.T he MEDIUM level is recommended.
R Set the temperature to 22 †.
R Only use the demisting function briefly until
the windscreen is clear again.
R Only use air-recirculation mode briefly, e.g.
if there are unpleasant outside odours or
when in atunnel. The windows could oth-
erwise mist up, as in air-recirculation mode,
no fresh air is drawn into the vehicle.
R Use the ZONE function to adopt the tem-
perature settings on the driver's side for
the front-passenger side and the rear com-
partment as well. The indicator lamp above
the á button goes out.
R Use the residual heat function if you want
to heat or ventilate the vehicle interior
when the ignition is switched off. The resid-
ual heat function can only be activated or
deactivated with the ignition switched off. Operating the climate control system
Switching climate control on/off
Important information i
When climate control is switched off, the
air supply and air circulation are also
switched off. Only select this setting
briefly. Otherwise, the windows may mist
up. i
Switch on climate control primarily using
the à button (Y page 132).
Activating/deactivating X
Turn the key to position 2in the ignition
lock.
X To switch on: press theÃbutton.
The indicator lamp above the Ãbutton
lights up. Airflow and air distribution are set
to automatic mode.
or
X Press button ^.
The indicator lamp above the ^button
goes out. The previously selected settings
come into effect again.
X To switch off: press the^button.
The indicator lamp above the ^button
lights up. Activating/deactivating cooling with
air dehumidification
Important information The cooling with air dehumidification function
is only available when the engine is running.
The air inside the vehicle is cooled and dehu-
midified according to the temperature selec-
ted.
G
WARNING
If the "cooling with air dehumidification" func-
tion is deactivated, the air inside the vehicle
will not be cooled (during warm weather) or
dehumidified. The windows could mist up
more quickly. This may prevent you from
observing the traffic conditions, thereby caus-
ing an accident.
Condensation may drip from the underside of
the vehicle when THERMOTRONIC is in cool-
ing mode. This is normal and not asign that
there is amalfunction.
i The cooling with air dehumidification
function uses refrigerant R134a. This cool- Operating the climate control system
131Climatecontrol Z
Page 135 of 353

ant does no
tcontain chlorofluorocarbons,
and therefor edoes not damage the ozone
layer.
Activating/deactivating X
To activate: press the¿button.
The indicator lamp above the ¿button
lights up.
X To switch off: press the¿button.
The indicator lamp above the ¿button
goes out. The cooling with air dehumidifi-
cation function has adelayed switch-off
feature.
Problems with the cooling with air
dehumidification function When you press the
¿button ,the indica-
tor lamp in the button flashes three times or
remains off. You can no longer switch on the
cooling with air dehumidification function.
X Consult aqualified specialist workshop. Setting climate control to automatic
mode
In automatic mode, the set temperature is
maintained automatically at aconstant level.
The system automatically regulates the tem-
perature of the dispensed air, the airflow and
the air distribution.
Automatic mode will achieve optimal opera-
tion if cooling with air dehumidification is also
activated. If desired, cooling with air dehu-
midification can be deactivated.
X Turn the key to position 2in the ignition
lock.
X Set the desired temperature.
X To activate: press theÃbutton.
The indicator lamp above the Ãbutton
lights up. Automatic air distribution and air-
flow are activated.
i THERMOTRONIC automatic climate con-
trol: when automatic mode is activated, you can select
aclimate mode setting
(Y page 132).
X To deactivate: press the air distribution
button.
THERMATIC automatic climate control:
press button F(Ypage 129).
THERMOTRONIC automatic climate con-
trol: press button I(Ypage 130).
The indicator lamp above the Ãbutton
goes out.
or
X Press the airflow button.
THERMATIC automatic climate control:
press button G(Ypage 129).
THERMOTRONIC automatic climate con-
trol: press button H(Ypage 130).
The indicator lamp above the Ãbutton
goes out. Adjusting the climate control settings
This function is only available with the
THERMOTRONIC automatic climate control.
The climate control settings are especially
effective at high temperatures.
You can select the following climate control
settings in automatic mode:
FOCUS high airflow that is set slightly cooler
MEDIUM medium airflow, standard setting
DIFFUSE low airflow that is set slightly warmer and with alower rate of
airflow
X Turn the key to position 2in the ignition
lock.
X Press the Ãbutton.
X Press button Gup or down and select the
desired level (Y page 130)132
Operating the climate control systemClimate control