2011 MERCEDES-BENZ E-CLASS CABRIOLET warning light
[x] Cancel search: warning lightPage 271 of 353
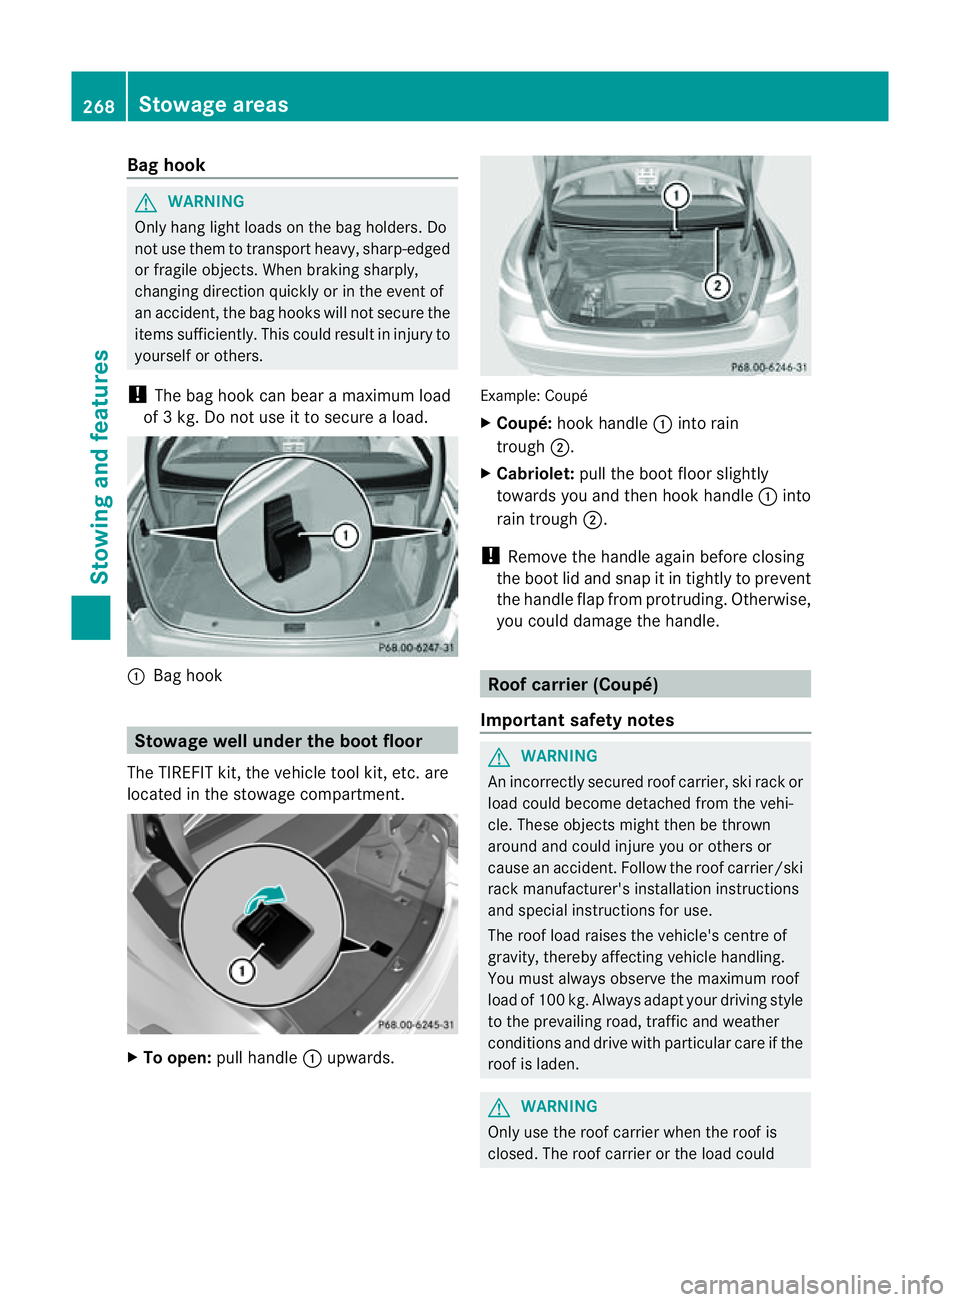
Bag hook
G
WARNING
Onl yhanglight load sonthe bagholders. Do
not us ethem to transport heavy ,sharp-edged
or fragile objects. Whe nbraking sharply,
changing directio nquickly or in the event of
an accident, the bag hooks willn ot secure the
items sufficiently. This could resul tininjury to
yoursel forothers.
! Theb aghoo kcan bear amaximum load
of 3k g.Do no tuse it to secure aload. :
Bag hook Stowage well under th
eboot floor
The TIREFI Tkit,t he vehicle tool kit ,etc. are
locate dinthe stowage compartment. X
To open: pull handle :upwards. Example: Coupé
X
Coupé: hook handle :into rain
trough ;.
X Cabriolet: pull the boot floo rslightly
towards you and the nhook handle :into
rain trough ;.
! Remove the handle again before closing
the boot lid and snap it in tightly to prevent
the handle flap from protruding. Otherwise,
you could damage the handle. Roof carrier (Coupé)
Important safety notes G
WARNING
An incorrectly secured roof carrier, ski rack or
load could become detached from the vehi-
cle. These object smight then be thrown
around and could injure you or others or
cause an accident .Follow the roof carrier/ski
rack manufacturer' sinstallation instructions
and special instructions for use.
The roof load raises the vehicle's centre of
gravity, thereby affecting vehicle handling.
You must alwayso bserve the maximum roof
load of 100 kg. Always adapt your driving style
to the prevailing road, traffic and weather
conditions and drive with particular care if the
roof is laden. G
WARNING
Only use the roof carrier when the roof is
closed. The roof carrier or the load could 268
Stowage areasStowing and features
Page 273 of 353
X
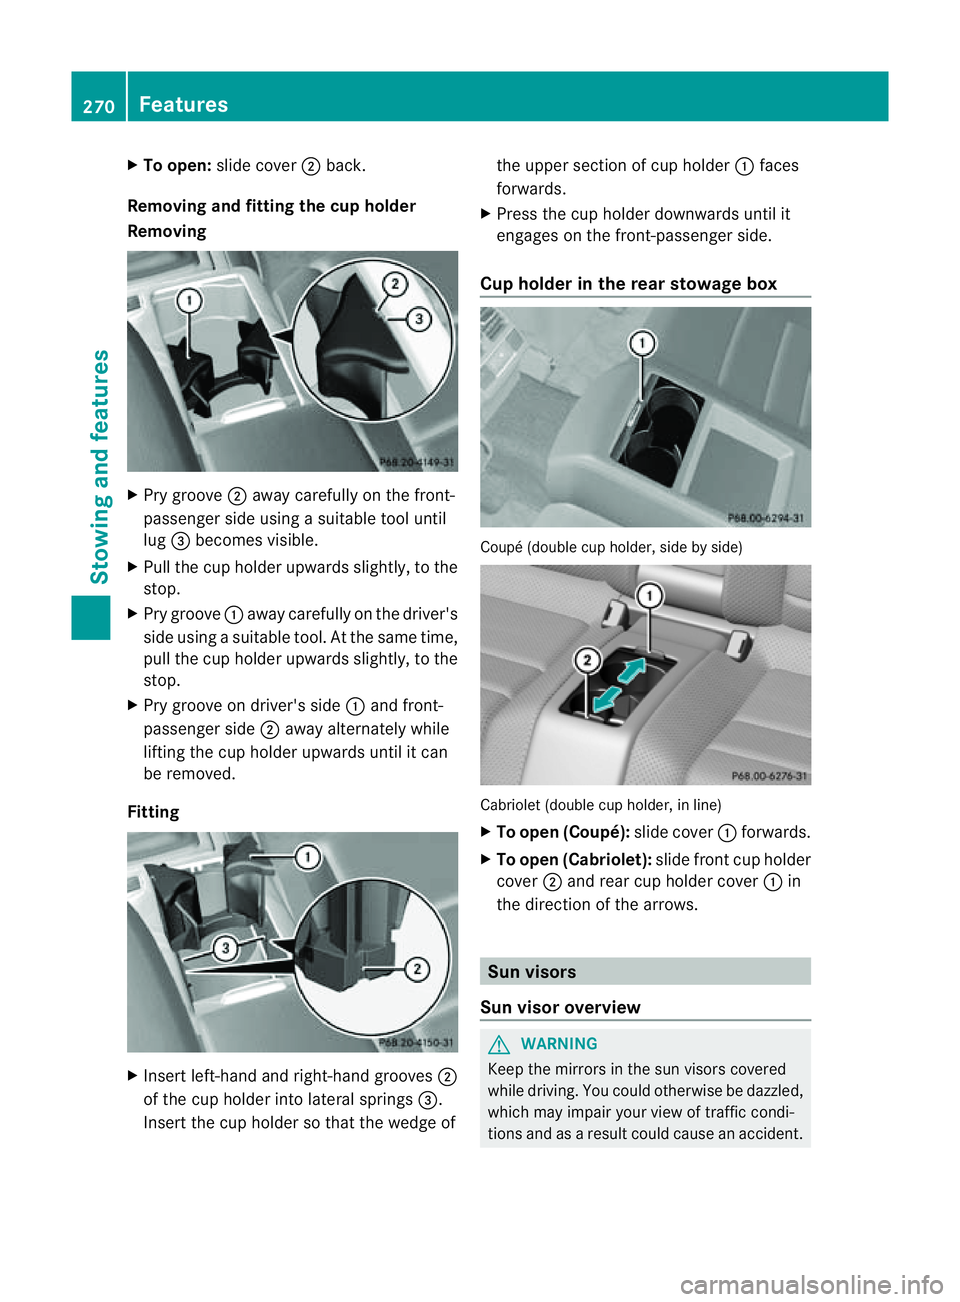
To open: slidecover ;back.
Removing and fitting the cu pholder
Removing X
Pry groove ;away carefull yonthe front-
passenge rside using asuitable too luntil
lug =becomes visible.
X Pull the cup holder upwards slightly, to the
stop.
X Pry groove :away carefully on the driver's
side using asuitable tool. At the same time,
pull the cup holder upwards slightly, to the
stop.
X Pry groove on driver's side :and front-
passenger side ;away alternately while
lifting the cup holder upwards until it can
be removed.
Fitting X
Insert left-han dand right-han dgrooves ;
of the cup holder int olateral springs =.
Insert the cup holder so that the wedge of the upper section of cup holder
:faces
forwards.
X Press the cup holder downwards until it
engages on the front-passenger side.
Cup holder in th erears towage box Coupé (double cup holder
,side by side) Cabriolet (double cup holder
,inline)
X To open (Coupé): slide cover:forwards.
X To open (Cabriolet): slide front cup holder
cover ;and rear cup holder cover :in
the direction of the arrows. Sun visors
Sun visor overview G
WARNING
Keep the mirrors in the sun visor scovered
while driving. You could otherwise be dazzled,
which may impair your view of traffic condi-
tion sand as aresult could cause an accident. 270
FeaturesStowing and features
Page 275 of 353
X
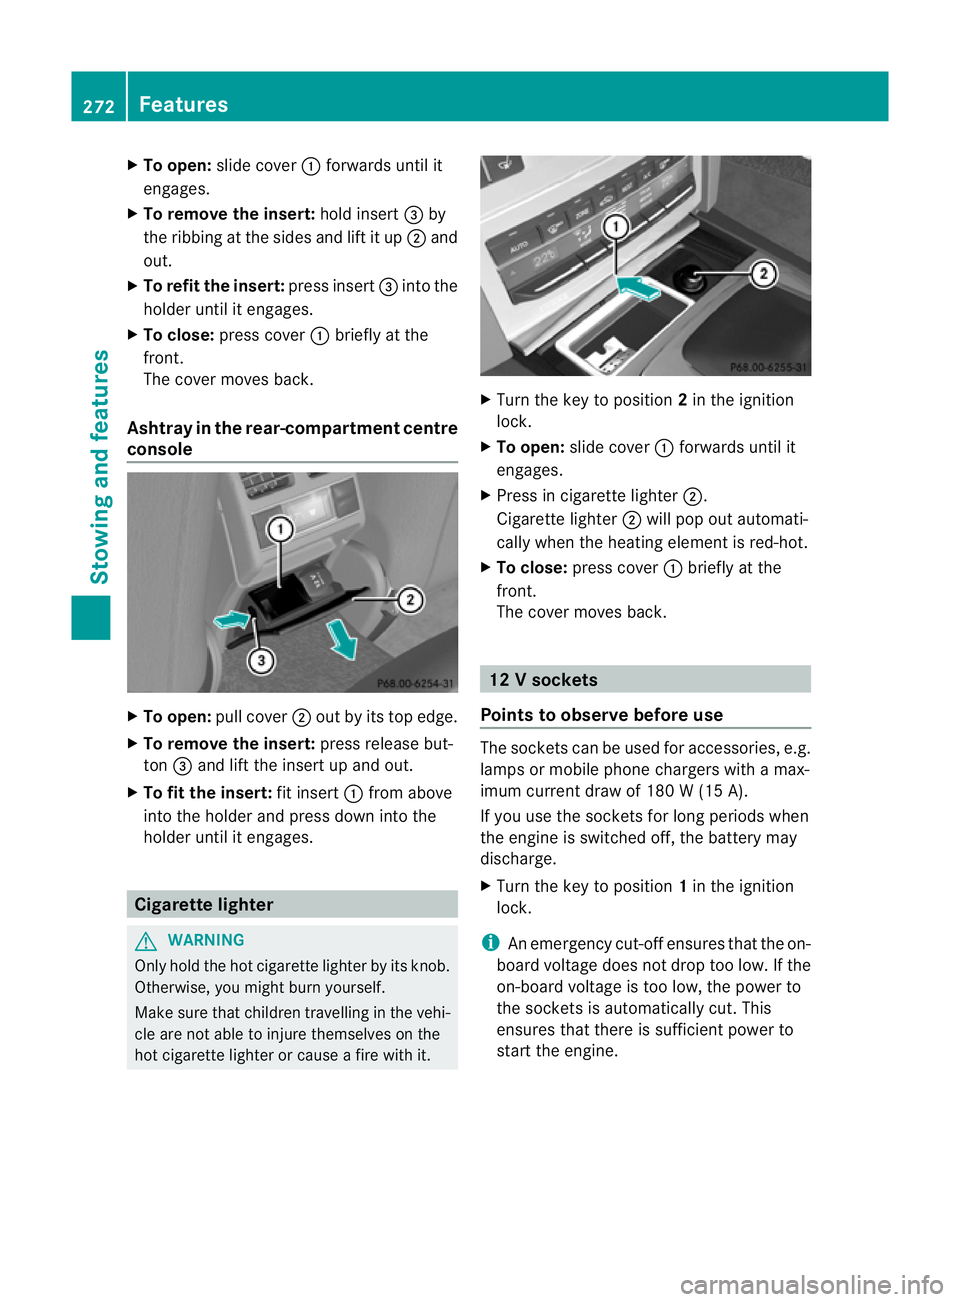
To open: slidecover :forwards unti lit
engages.
X To remove the insert: holdinsert =by
the ribbing at the side sand lift it up ;and
out.
X To refi tthe insert: press insert =into the
holder until it engages.
X To close: press cover :briefly at the
front.
The cover moves back.
Ashtray in the rear-compartment centre
console X
To open: pullcover ;out by its top edge.
X To remove the insert: press release but-
ton =and lift the insert up and out.
X To fit the insert: fit insert:from above
into the holder and press dow ninto the
holde runtil it engages. Cigarette lighter
G
WARNING
Onl yholdt he hot cigarette lighte rbyitsknob.
Otherwise ,you might burn yourself.
Mak esuret hatc hildren travellin ginthevehi-
cle are no table to injure themselves on the
hot cigarette lighter or cause afire with it. X
Turn the key to position 2in the ignition
lock.
X To open: slide cover :forwards until it
engages.
X Press in cigarette lighter ;.
Cigarett elighter ;will pop out automati-
cally when the heating element is red-hot.
X To close: press cover :briefly at the
front.
The cover moves back. 12
Vsockets
Point stoo bserve befor euse The socket
scan be used for accessories ,e.g.
lamps or mobile phon echargers with amax-
imum curren tdraw of 18 0W(15 A).
If you use th esocket sfor lon gperiods when
th ee ngine is switche doff,t he battery may
discharge.
X Turn the key to position 1in the ignition
lock.
i An emergency cut-offe nsures thatthe on-
board voltage does not drop too low. If the
on-board voltage is too low, the power to
the socketsisa utomatically cut. This
ensures that there is sufficient power to
start the engine. 272
FeaturesStowing and features
Page 276 of 353
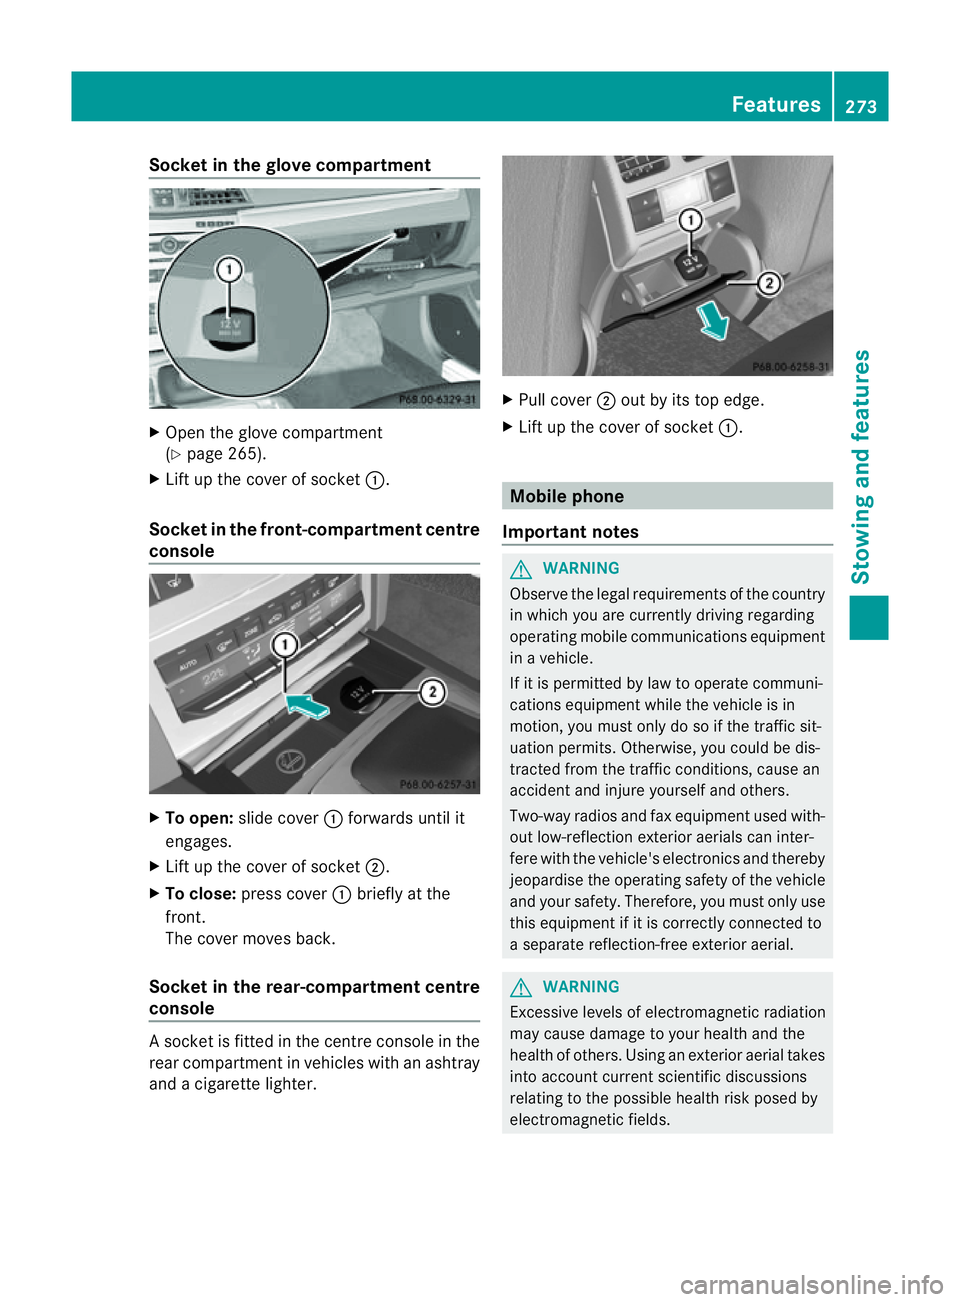
Socket in the glove compartment
X
Open the glove compartment
(Y page 265).
X Lift up the cover of socket :.
Socket in the front-compartment centre
console X
To open: slide cover :forwards until it
engages.
X Lift up the cover of socket ;.
X To close: press cover :briefly at the
front.
The cover moves back.
Socket in the rear-compartment centre
console As
ocket is fitted in the centre console in the
rear compartment in vehicles with an ashtray
and acigarett elighter. X
Pull cover ;out by its top edge.
X Lift up the cover of socket :. Mobile phone
Important notes G
WARNING
Observe the legal requirements of the country
in which you are currently driving regarding
operating mobile communications equipment
in av ehicle.
If it is permitted by law to operate communi-
cations equipment while the vehicle is in
motion ,you must only do so if the traffic sit-
uation permits. Otherwise, you could be dis-
tracted from the traffic conditions, cause an
accident and injure yourself and others.
Two-way radios and fax equipment used with-
out low-reflection exterior aerials can inter-
fere with the vehicle's electronics and thereby
jeopardise the operating safety of the vehicle
and your safety. Therefore, you must only use
this equipment if it is correctly connected to
as eparate reflection-free exterior aerial. G
WARNING
Excessive levels of electromagnetic radiation
may cause damage to your health and the
health of others. Using an exterior aerial takes
into account current scientific discussions
relating to the possible health risk posed by
electromagnetic fields. Features
273Stowing and features Z
Page 285 of 353

X
Pull release lever :on the bonnet.
The bonnet is released.
! Make sure that the windscreen wipers are
not folded away from the windscreen .Oth-
erwise, yo ucould damage the windscreen
wipers or the bonnet. X
Reach into the gap, pull bonnet catc hhan-
dle ;up and lift the bonnet.
If yo uliftt he bonnet by approximately
40 cm, the bonnet is opene dand held open
automaticall ybythe gas-filled strut.
Closin gthe bonnet G
WARNING
Make sure tha tnobody can become trapped
as you close the bonnet. X
Lower the bonnet and let it fall from a
height of approximately 20 cm.
X Check that the bonnet has engaged prop-
erly.
If the bonnet can be raised slightly, it is not
properly engaged. Open it again and close
it with alittle more force. Engine oil
Notes on the oil level Depending on driving style, the vehicle con-
sumes
amaximum of 0.8 loil per 1000 km.
The oil consumption may be higher than this
when the vehicle is new or if you frequently
drive at high engine speeds.
Checking the oil level using the oil dip-
stick Depending on the engine, the oil dipstick may
be installed at
adifferent location.
When checking the oil level:
R park the vehicle on alevel surface.
R the engine should be switched off for
approximately five minutes if the engine is
at normal operating temperature. Example:
E350
X Pull oil dipstick :out of the oil dipstick
tube.
X Wipe off oil dipstick :.282
Engine compartmentMaintenance and care
Page 290 of 353
High-pressure cleaning equipment
G
WARNING
Do not use high-pressure cleaners with circu-
lar-jet nozzles (dirt grinders) to clea nyour
vehicle, in particular the tyres. You could oth-
erwise damage the tyres and cause an acci-
dent.
! Always maintain adistance of at least
30 cm between the vehicle and the high-
pressure cleaner nozzle. Information about
the correc tdistanc eisavailable fro mthe
equipment manufacturer.
Move the high-pressure cleaner nozzle
around when cleaning your vehicle.
Do not aim directly at any of the following:
R tyres
R door gaps, jointse tc.
R soft top (Cabriolet)
R wind deflector net (Cabriolet)
R electrical components
R battery
R connectors
R lights
R seals
R trim elements
R ventilation slots
Damaged seals or electrical components
can lead to leaks or failures.
Cleaningt he wheels !
Do not use acidic wheel cleaning products
to remove brake dust. This could damage
wheel bolts and brake components.
! Do not park up the vehicle for an extended
period straight after cleaning it, particularly
after having cleaned the wheels with wheel
cleaner. Wheel cleaners could cause
increased corrosion of the brake discs and
brake pads/linings. For this reason, you
should drive for afew minutes after clean-
ing. Braking heats the brake discs and the brake pads/linings, thus drying them. The
vehicle can then be parked up.
Cleaningt he paintwork Scratches, corrosive deposits, areas affected
by corrosion and damage caused by inade-
quate care cannot always be completely
repaired. In such cases, visit aqualified spe-
cialist workshop, e.g. aMercedes-Benz
Service Centre.
X Remove impurities immediately, where
possible, whilst avoiding rubbing too hard.
X Soak insect remains with insect remover
and rinse off the treated areas afterwards.
X Soak bird droppings with water and rinse
off the treated areas afterwards.
X Remove coolant, brake fluid, tree resin,
oils, fuels and greases by rubbing gently
with acloth soaked in petroleum ether or
lighter fluid.
X Use tar remover to remove tar stains.
X Use silicone remover to remove wax.
! Do not affix:
R stickers
R films
R magnetic plates or similar items
to painted surfaces. You could otherwise
damage the paintwork.
Care and treatment of mattp aintwork If your vehicle has
aclear matt finish, observe
the following instructions in order to avoid
damage to the paintwork due to incorrect
care.
These notes also apply to light alloy wheels
with aclear matt finish.
! Never polish the vehicle or the light alloy
wheels. Polishing makes the paintwork
shiny. Care
287Maintenance and care Z
Page 293 of 353
Cleaning th
ewiper blades G
WARNING
Switch off th ewindscree nwipers and remove
the key fro mthe ignition lock before cleaning
the windscreen or the wiper blades. On vehi-
cles with KEYLESS-GO, press the Start/Stop
button repeatedly until all indicator lamps in
the instrument cluster have gone off. The
windscreen wipers could otherwise move and
injure you.
! Do not pull on the wiper blade. Otherwise,
the wiper blade could be damaged.
! Do not clean wiper blades too often and
do not rub them too hard. Otherwise, the
graphite coating could be damaged. This
could cause wiper noise.
X Fold the wiper arms away from the wind-
screen.
X Cleant he wiper blades carefully using a
damp cloth.
X Fold the windscreen wipers back again
before switching on the ignition.
! Hold the wiper arm securely when folding
back. The windscreen could be damaged if
the wiper arm hits against it suddenly.
Cleaningt he exterior lighting X
Cleant he plastic lenses of the exterior
lighting using awet sponge and amild
cleaning agent, e.g. Mercedes-Ben zcar
shampoo or cleanin gcloths.
! Only use cleanin gagents or cleaning
cloth sthata re suitable for plastic lenses.
Unsuitable cleanin gagents or cleaning
cloth scould scratch or damag ethe plastic
lenses of th eexteri or lighting. Cleaning th
esensors X
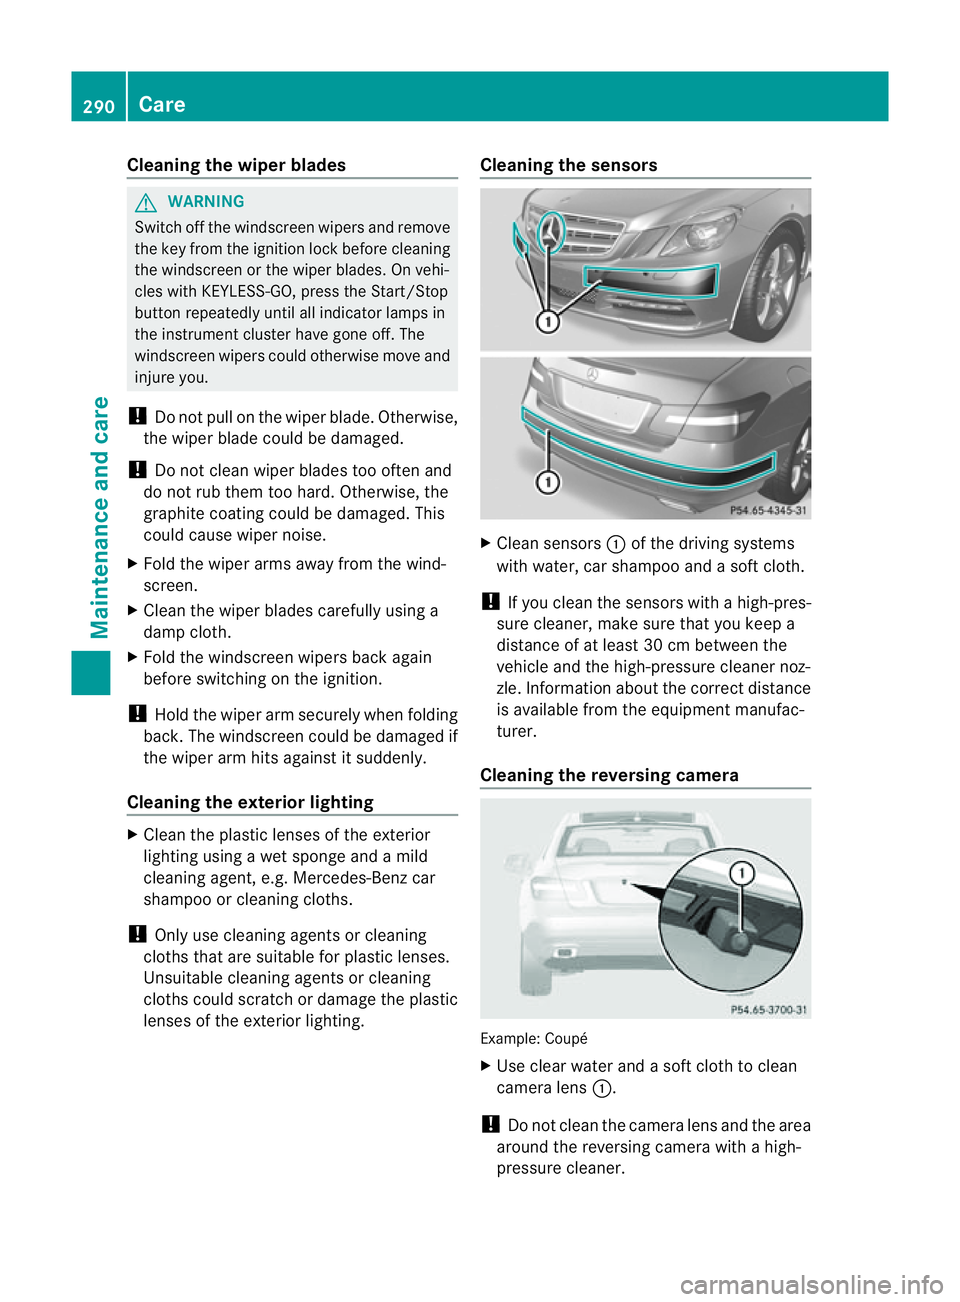
Clean sensors :of th edriving systems
wit hw ater, car shampoo and asoftc loth.
! If you clean the sensors with ahigh-pres-
sure cleaner, mak esure that you keep a
distanc eofatl east 30 cm between the
vehicle and the high-pressure cleaner noz-
zle. Information about the correc tdistance
is available fro mthe equipment manufac-
turer.
Cleaningt he reversing camera Example: Coupé
X
Use clear water and asoft cloth to clean
camera lens :.
! Do not clean the camera lens and the area
around the reversing camera with ahigh-
pressure cleaner. 290
CareMaintenance and care
Page 294 of 353

Cleaning th
eexhaust tail pipes Impurities combined wit
hthe effect sofroad
grit and corrosive environmental factors may
cause flash rust to form on the surface. You
can restore the original shine of the exhaust
tail pip ebycleaning it regularly ,especially in
winter and after washing.
! Do not clea nthe exhaust tail pipes with
alkaline-based cleaning agents, such as
wheel cleaner.
X Cleant he exhaust tail pipes with achrome
care product tested and approved by
Mercedes-Benz.
Cleaningt he trailer tow hitch The ball coupling must be cleaned if it
becomes dirty or corroded.
X Remove any rust using awire brush.
X Remove dirt with aclean, lint-free cloth or
ab rush.
! Do not clean the ball coupling with ahigh-
pressure cleaner. Do not use solvents. X
After cleaning, lightly oil or grease ball cou-
pling :.
X Check that the vehicle's trailer tow hitch is
working properly.
! Observe the note on care provided by the
trailer manufacturer.
i Maintenanceoft he ball coupling and
trailer tow hitch can also be performed at
aq ualified specialist workshop, e.g. a
Mercedes-Ben zService Centre. H
Environmental note
Dispose of oily and greasy cloths in an envi-
ronmentally-responsible manner. Interior care
Cleaningt he display X
Before cleaning the display, make sure that
it is switched off and has cooled down.
X Cleant he displays urface using acommer-
cially-available microfibre cloth and TFT/
LCD displayc leaner.
X Dry the displays urface usingadry micro-
fibre cloth.
! For cleaning, do not use any of the fol-
lowing:
R alcohol-based thinner or petrol
R abrasive cleaning agents
R commercially-available household clean-
ing agents
These may damage the displays urface. Do
not put pressure on the displays urface
when cleaning. This could lead to irrepara-
ble damage to the display.
Cleaningt he plastic trim G
WARNING
When cleaning the steering wheel boss and
dashboard, do not use cockpit sprays or
cleaning agents containing solvents. Cleaning
agents containing solvents cause the surface
to become porous, and as aresult plastic
parts may break away and be thrown around
the interior when an airbag is deployed, which
may result in severe injuries.
! Do not affix the following to plastic surfa-
ces:
R stickers
R films
R scented oil bottles or similar items
You could otherwise damage the plastic. Care
291Maintenance and care Z