2011 MERCEDES-BENZ E-CLASS CABRIOLET bonnet
[x] Cancel search: bonnetPage 9 of 353

Belt
see Sea tbelt
Belt force limiter s(activation) ...........39
Belt tensioner Activatio n......................................... 39
Function .......................................... .50
Blind Spo tAssist
Activating/deactivating .................224
Display message ............................ 246
Notes/function .............................. 196
Trailer towing ................................. 198
see Active Blind Spot Assist
Bonnet
Active bonnet (pedestrian protec-
tion) ............................................... 280
Closing .......................................... .282
Display message ............................ 250
Opening ......................................... 281
Boot
Emergency release ..........................81
Important safety guidelines .............79
Locking separatel y........................... 81
Opening (automatically from
inside) .............................................. 81
Opening (automatically from out-
side) ................................................ .80
Boo tlid
Display message ............................ 250
Opening/closing .............................. 79
Opening dimensions ......................343
Boot load (maximum)
see Technical data
Boot separator
Display message ............................ 251
General notes .................................. 92
Opening/closing .............................. 92
Brake Assist System
see BAS (Brake Assist System)
Brake fluid
Display message ............................ 235
Notes ............................................. 336
Brake lamps
Adaptive .......................................... .63
Display message ............................ 239
Brakes
ABS .................................................. 62
BAS .................................................. 62
BAS PLUS ........................................ 62Brake fluid (notes)
.........................336
Display message ............................ 233
Driving tips .................................... 167
Important safety notes ..................167
Parking brake ................................ 166
Warning lamp ................................. 257
Breakdown
see Flat tyre
see Towing away/tow-starting
Bulbs
see Changing bulbs C
Calling up afault
see Display messages
Capacities
see Technical data
Car
see Vehicle
Care
AIRCAP .......................................... 288
Automatic car wash .......................286
Cabriolet soft top ........................... 288
Display ........................................... 291
Draught stop .................................. 289
Exterior lighting ............................. 290
High-pressure cleaner .................... 287
Matt paintwork .............................. 287
Notes ............................................. 285
Paint .............................................. 287
Plastic trim .................................... 291
Reversing camera ..........................290
Seat bel t........................................ 292
Seat cover ..................................... 292
Sensors ......................................... 290
Tai lpipes ....................................... 291
Trim pieces .................................... 292
Wheels ........................................... 287
Wind deflector ............................... 288
Windows ........................................ 289
Wiper blades .................................. 290
Wooden trim .................................. 292
Car key
see Key
Car wash (care) ................................. 286
CD player/CD changer(on-board
computer) .......................................... 2206
Index
Page 29 of 353

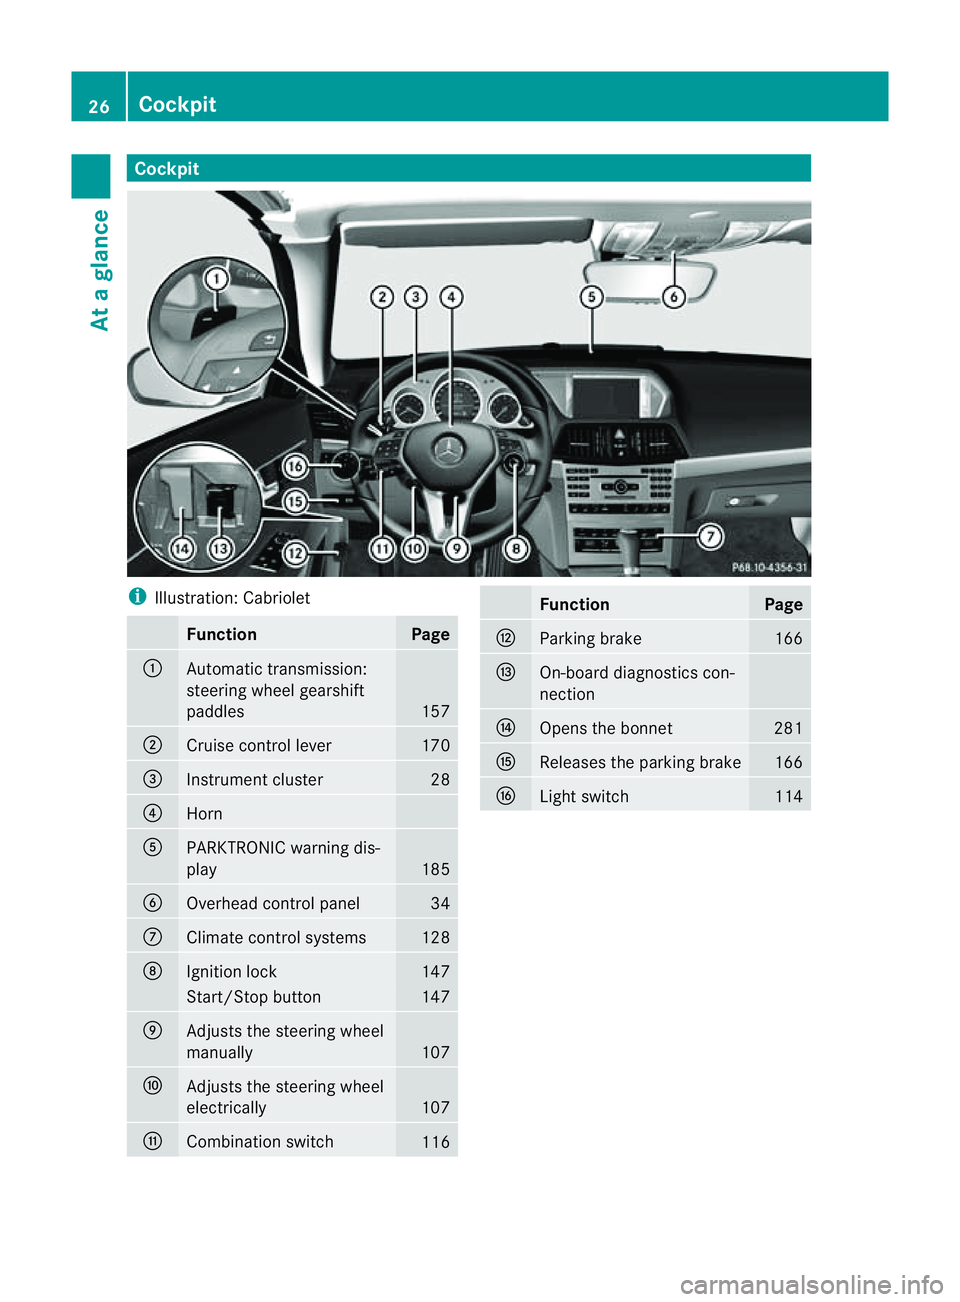
Cockpit
i
Illustration: Cabriolet Function Page
:
Automatic transmission:
steering wheel gearshift
paddles
157
;
Cruise control lever 170
=
Instrumen
tcluster 28
?
Horn
A
PARKTRONIC warning dis-
play
185
B
Overhead control panel 34
C
Climat
econtro lsystems 128
D
Ignition lock 147
Start/Sto
pbutton 147
E
Adjusts th
esteering wheel
manually 107
F
Adjusts th
esteering wheel
electrically 107
G
Combination switch
116 Function Page
H
Parking brake 166
I
On-board diagnostics con-
nection
J
Open
sthe bonnet 281
K
Release
sthe parking brake 166
L
Ligh
tswitch 11426
CockpitAt
ag lance
Page 30 of 353

i
Illustration: Coupé Function Page
:
Overhea
dcontrol panel 34
;
PARKTRONIC warning dis-
play
185
=
Cruise control lever 170
?
Instrument cluster 28
A
Horn
B
Automatic transmission:
steering wheelg
earshift
paddles 157
C
Light switch 114
D
Releasest
he parking brake 166 Function Page
E
Opens the bonnet 281
F
On-board diagnostics con-
nection
G
Ignition lock 147
Start/Stop button 147
H
Adjusts the steering wheel
manually
107
I
Adjusts the steering wheel
electrically
107
J
Combination switch 116
K
Parking brake 166
L
Climate control systems 128Cockpit
27Atag lance
Page 43 of 353

the front airba
gisfilledwith enoug hpropel-
lant ga storeducethe risk of injuries .The
front airbag is fully deployed if asecond
deployment threshold is exceeded within a
few milliseconds.
The belt tensioner and airbag triggering
thresholds are variable and are adapted to the
rate of deceleration or acceleration of the
vehicle. This process is pre-emptive in nature.
The triggering process must take place in
good time at the start of the collision.
i Airbags are not deployed in all types of
accidents. Also, not all airbags are
deployed together in an accident. The dif-
ferent airbag systems work independently
of each other.
How the airbag system works is deter-
mined by the severity of the collision detec-
ted, especiallyt he vehicle deceleration or
acceleration, and the apparent type of acci-
dent:
R head-on collision
R side impact
R rear impact
R Cabriolet: overturn
The rate of vehicle deceleration or accelera-
tion and the direction of the force are essen-
tially determined by:
R the distribution of forces during the colli-
sion
R the collision angle
R the deformation characteristics of the vehi-
cle
R the characteristics of the object with which
the vehicle has collided
Factors which can only be seen and measured
after acollision has occurred do not play a
decisive role in the deployment of an airbag,
nor do they provide an indication of airbag
deployment.
The vehicle may be deformed significantly,
e.g. the bonnet or the wing, without an airbag
being deployed. This is the case if only parts
which are relatively easily deformed are affec- ted and the rate of deceleration is not high.
Conversely, airbags may be deployed even
though the vehicle suffers only minor defor-
mation. This is the case if, for example, very
rigid vehicle parts such as longitudinal body
members are hit, and sufficient deceleration
occurs as
aresult. Airbags
Important safety notes Airbag deployment slows down and restricts
the movement of the vehicle occupant.
If the airbags are deployed, you will hear a
bang and asmall amount of powder may also
be released. Only in rare cases will the bang
affect your hearing. The powder that is
released generally does not constitute a
health hazard. The 6SRS warning lamp
lights up.
The airbag installation locations are identified
by the AIRBAG symbol. G
WARNING
Airbags provide additional protection; they
are not, however, asubstitute for seat belts.
Observe the following notes to reduce the risk
of serious or even fatal injury caused by airbag
deployment:
R All vehicle occupants –inparticular ,preg-
nan twome n–m ust wear their seat belt
correctly at all times and lean back against
th eb ackrest, whic hshoul dbep ositioned
as close to th evertical as possible. The
head restraint must support th eback of the
head at about eye level.
R Always secure childre nless than 1.50mt all
and unde r12years of age in suitable child
restraint systems.
R All vehicle occupant smust select aseat
position that is as far away from the airbag
as possible. The driver's seat position must
allow the vehicle to be driven safely. The
driver's chest should be as far away from 40
Occupant safetySafety
Page 71 of 353

Anti-thef
tsystems Immobiliser
The immobiliser prevents your vehicl efrom
bein gstarted without th ecorrect key.
X To activat ewith the key: remove the key
from the ignition lock.
X To activate with KEYLESS-GO: switch the
ignition off and open the driver's door.
X To deactivate: switch on the ignition.
i The immobiliser is alway sdeactivated
when you start the engine. ATA (Anti-Theft Alarm system)
Av isual and audible alarm is triggere difthe
alarm system is prime dand you open:
R ad oor
R the vehicle with the emergency key ele-
ment
R the boot lid
R the bonnet
The alarm is not switched off ,even if you
clos ethe open door that has triggere dit, for
example. X
To prime: lock the vehicle with the key or
KEYLESS-GO.
Indicator lamp :flashes .The alarm sys-
tem is primed after approximately 15 sec-
onds.
X To deactivate: unlock the vehicle with the
key or KEYLESS-GO. X
To stop the alarm using the key: insert
the key into the ignition lock.
The alarm is switched off.
or
X Press the %or& button on the key.
The alarm is switched off.
X To stop the alarm using KEYLESS-GO:
grasp the outside door handle. The key
must be outside the vehicle.
The alarm is switched off.
or
X Press the Start/Stop button on the dash-
board. The key must be inside the vehicle.
The alarm is switched off. Tow-away protection
An audible and visual alarm is triggered if your
vehicle's angle of inclination is altered while
tow-away protection is primed. This occurs if
the vehicle is jacked up on one side, for exam-
ple.
X To prime: lock the vehicle with the key or
KEYLESS-GO.
Tow-away protection is primed after
approximately 30 seconds.
X To deactivate: unlock the vehicle with the
key or KEYLESS-GO.
Tow-away protection is deactivated auto-
matically.
To prevent afalse alarm, deactivate tow-away
protection manually if your vehicle:
R is being transported
R is being loaded onto aferry or car trans-
porter, for example
R is parked on amovable surface, e.g. in a
split-level garage
Deactivating:
X Remove the key from the ignition lock. 68
Anti-theft systemsSafety
Page 125 of 353

G
WARNING
Bulb sand lights can become very hot. For this
reason, allow them to cool downb efore
changin gthem. Otherwise, you could burn
yourself when you touch them.
Keep bulbs out of the reach of children .Oth-
erwise, the ycould damage them, for example,
and injure themselves.
Never us eabulbw hich ha sbeend ropped.
Suc hab ulbm ayexplode and injure you.
Halogen bulb sarepressurised and could
explode when yo uchange them, especiall yif
the yarever yhot. Yo ushould therefore wear
eye protection and gloves when you are
changing them. Overview of bulb replacement
–bulbs
You can replace the following bulbs. The
details for the bul btype can be found in the
legend. Halogen headlamps
:
Dipped-bea mheadlamps 9
:H755W
; Main-beam headlamp: H7 55 W
= Side lamp/parkin glamp: W5W
? Turn signal lamp 9
:PY21W Bi-xenon headlamps
:
Cornering lamp: H7 55 W Changing the front bulbs
Dipped-beam headlamps (halogen
headlamps) Due to their location, have the bulbs in the
left-hand headlamp changed at
aqualified
specialist workshop, e.g. aMercedes-Benz
Service Centre.
X Switc hoff the lights.
X Open the bonnet.
X Turn housing cover :anti-clockwise and
pull it out.
X Turn bulb holder ;anti-clockwise and pull
it out.
X Take the bulb out of bulb holder ;.
X Inser tthe new bulb into bulb holder ;.
9 Due to their location, have the bulbs in the left-hand headlamp replaced at aqualified specialist workshop,
e.g. aMercedes-Ben zService Centre. 122
Changing bulbsLights and windscreen wipers
Page 126 of 353

X
Insert bulbh older;into the lamp and turn
it clockwise.
X Align housing cover :and turn it clock-
wise until it engages.
Main-beam headlamps (halogen head-
lamps)/cornering lamps (Intelligent
Light System) X
Switch off the lights.
X Open the bonnet.
X Turn housing cover :anti-clockwise and
pullito ut.
X Turn bulbh older;anti-clockwise and pull
it out.
X Take the bulbo ut of bulbholder;.
X Insert the new bulbi nto bulbholder;.
X Insert bulbh older;into the lamp and turn
it clockwise.
X Align housing cover :and turn it clock-
wise until it engages. Side lamps/parking lamps (halogen
headlamps) X
Switch off the lights.
X Open the bonnet.
X Turn housing cover :anti-clockwise and
pullito ut.
X Pullo ut bulbh older;.
X Take the bulbo ut of bulbholder;.
X Insert the new bulbi nto bulbholder;.
X Insert bulbh older;.
X Align housing cover :and turn it clock-
wise until it engages.
Turn signal lamp (halogen headlamps) Due to their location, have the bulbs in the
left-hand headlamp changed at aqualified
specialist workshop, e.g. aMercedes-Benz
Service Centre.
X Switc hoff the lights.
X Open the bonnet.
X Turn bulb holder :anti-clockwise and pull
it out. Changing bulbs
123Lights and windscreen wipers Z
Page 128 of 353

Replacing the wiper blades
Important safety notes G
WARNING
The wiper arm scould star tmoving and cause
an injury if you leave the windscreen wipers
switched on.
Remove the key from the ignition lock before
replacing the wiper blades.
! To avoid damaging the windscreen wiper
blades, make sure that you touch only the
wiper arm of the windscreen wiper.
! Never open the bonnet if awindscreen
wiper arm has been folded away from the
windscreen.
Never fold awindscreen wiper arm without
aw iper blade back ontot he windscreen.
Hold the windscreen wiper arm firmly when
you change the wiper blade. If you release
the windscreen wiper arm without awiper
blade and it falls ontot he windscreen, the
windscreen may be damaged by the force
of the impact.
Mercedes-Benz recommends that you have
the wiper blades replaced by aqualified
specialist workshop, e.g. at aMercedes-
Ben zServic eCentre.
Replacin gthe wiper blades Removing th
ewiper blades
X Remove th ekeyfrom th eignition loc kor
tur nthe key to position 0(KEYLESS-GO).
X Fold the wiper arm away from the wind-
screen until it engages.
X Set the wiper blade at right angles to the
wiper arm. X
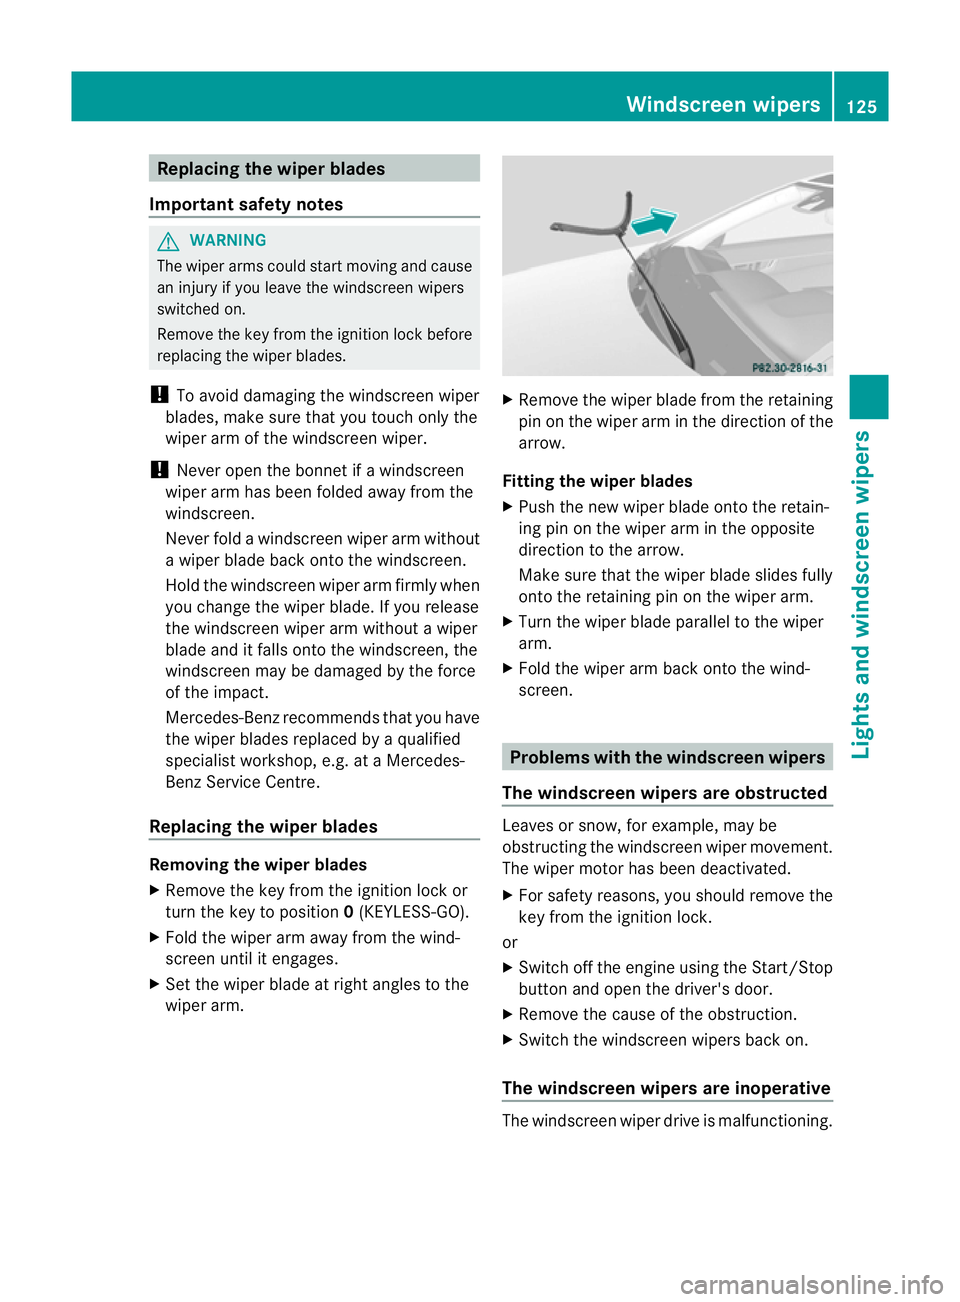
Remove the wiper blade from the retaining
pin on the wiper arm in the direction of the
arrow.
Fitting the wiper blades
X Push the new wiper blade onto the retain-
ing pin on the wiper arm in the opposite
direction to the arrow.
Make sure that the wiper blade slides fully
onto the retaining pin on the wiper arm.
X Turn the wiper blade parallel to the wiper
arm.
X Fold the wiper arm back onto the wind-
screen. Problems with the windscreen wipers
The windscreen wipers are obstructed Leaves or snow, for example, may be
obstructing the windscreen wiper movement.
The wiper motor has been deactivated.
X For safety reasons, you should remove the
key from the ignition lock.
or
X Switch off the engine using the Start/Stop
button and open the driver's door.
X Remove the cause of the obstruction.
X Switch the windscreen wipers back on.
The windscreen wipers are inoperative The windscreen wiper drive is malfunctioning. Windscreen wipers
125Lights and windscreen wipers Z