2011 MERCEDES-BENZ E-CLASS CABRIOLET low oil pressure
[x] Cancel search: low oil pressurePage 170 of 353

Engine oil
! Vehicles with adiesel particle filter:
If the vehicle is mostly driven for short dis-
tances, it is possible that malfunctions may
occur during the automatic cleaning of the
diesel particle filter. This can lead to engine
damage. Therefore, if you frequently drive
short distances, make sure to drive on
motorways or countr yroads for 20 minutes
at least every 500 km. Brakes
Important safet ynotes G
WARNING
Do not change down for additional engine
brakin gonas lippery road surface. This could
cause the drive wheels to lose their grip and
the vehicle could skid. G
WARNING
Make sure that other road users are not
endangered by your braking.
Downhill gradients On long and steep downhill gradients, espe-
cially if the vehicle is laden or towin gatrailer,
you must shift to alower gear in good tim eor,
on vehicles with automatic transmission,
select shift range 1,2or 3.
i This also applies if you have activated
cruise control, SPEEDTRONIC or DIS-
TRONIC PLUS.
This will use the brakin geffect of the engine,
so less brakin gwill be required to maintain
the speed. This relieves the load on the brake
syste mand prevent sthe brake sfrom over-
heatin gand wearing too quickly. Heavy and light loads G
WARNING
Never depress the brake pedal continuously
while the vehicle is in motion, e.g. never cause
the brake storub by applying constan tslight
pedal pressure. This causes the brak esystem
to overheat, increases the braking distance
and can lead to the brakes failing completely.
If the brakes have been subjected to aheavy
load, do not sto pthe vehicle immediately, but
drive on for ashor twhile. This allowst he air-
flow to cool the brakes more quickly.
If the brakes have been used only moderately,
you should occasionally test their effective-
ness. To do this, brake more firmly from a
higher speed. This improves the grip of the
brakes.
Wet road surface If driving in heavy rain for
aprolonged period
of time without braking, there may be a
delayed reaction from the brakes when brak-
ing for the first time. This may also occur after
the vehicle has been washed.
You have to depress the brake pedal more
firmly. Maintain agreater distance from the
vehicle in front.
After driving on awet road or having the vehi-
cle washed, brake firmly while paying atten-
tion to the traffic conditions. This will warm
up the brake discs, thereby drying them more
quickly and protecting them against corro-
sion.
Limited braking performance on salt
treated roads G
WARNING
The layerofs alt on thebrake discs and the
brake pads/linings may caus eadelay in the
brakin geffect, resultin ginasignificantly lon-
ger brakin gdistance, which could lead to an
accident.
To avoid this danger, you should: Driving tips
167Driving and parking
Z
Page 286 of 353

X
Slowl yslide oi ldipstick :into the guide
tub etot he stop ,and take it ou tagain.
The oil level is correc tifthe level is between
MIN mark =and MAX mark ;.
X Top up the oil if necessary.
Adding engine oil H
Environmental note
When topping up the oil, take care not to spill
any. If oil enters the soil or waterways, it is
harmful to the environment. G
WARNING
If engine oil comes into contact with hot
engine parts, it may ignite and you could burn
yourself. Do not spill any engine oil on hot
engine parts. Example: engine oil cap
X
Turn cap :anti-clockwise and remove it.
X Top up with the amount of oil required.
Fill carefully to the maximum mark on the oil
dipstick.
i Depending on the engine, the difference
between the minimum mark and the maxi-
mum mark is approximately 1.5 –2litres.
! Do not add too much oil. If the oil level is
above the "max" mark on the dipstick, too
much oil has been added. This can lead to
damage to the engine or the catalytic con-
verter. Have excess oil siphoned off.
For further information on engine oil, see
(Y page 335). X
Replace cap :on the filler neck and
tighten clockwise.
Ensure that the cap locks into place
securely. Checking and adding other service
products
Checking the coolant level Only check the coolant level when the vehicle
is on alevel surface and the engine has cooled
down.
X Turn the key to position 2(Y page 147) in
the ignition lock.
On vehicles with KEYLESS-GO, press the
Start/Stop button twice (Y page 147).
X Check the coolant temperature displayin
the instrumentc luster. G
WARNING
The cooling system is pressurised. Therefore,
only unscrew the cap once the engine has
cooled down. The coolant temperature gauge
must display less than 70 †.Otherwise, you
could be scalded if hot coolant escapes. X
Slowl yturnc ap : half aturna nti-clock-
wise and allow exces spressure to escape.
X Turn cap :further anti-clockwis eand
remove it.
If th ecoolan tisatt heleve lofm arkerbar
= in th efille rneck when cold, there is
enough coolant in coolant expansion
tank ;. Engine compartment
283Maintenance and care Z
Page 290 of 353

High-pressure cleaning equipment
G
WARNING
Do not use high-pressure cleaners with circu-
lar-jet nozzles (dirt grinders) to clea nyour
vehicle, in particular the tyres. You could oth-
erwise damage the tyres and cause an acci-
dent.
! Always maintain adistance of at least
30 cm between the vehicle and the high-
pressure cleaner nozzle. Information about
the correc tdistanc eisavailable fro mthe
equipment manufacturer.
Move the high-pressure cleaner nozzle
around when cleaning your vehicle.
Do not aim directly at any of the following:
R tyres
R door gaps, jointse tc.
R soft top (Cabriolet)
R wind deflector net (Cabriolet)
R electrical components
R battery
R connectors
R lights
R seals
R trim elements
R ventilation slots
Damaged seals or electrical components
can lead to leaks or failures.
Cleaningt he wheels !
Do not use acidic wheel cleaning products
to remove brake dust. This could damage
wheel bolts and brake components.
! Do not park up the vehicle for an extended
period straight after cleaning it, particularly
after having cleaned the wheels with wheel
cleaner. Wheel cleaners could cause
increased corrosion of the brake discs and
brake pads/linings. For this reason, you
should drive for afew minutes after clean-
ing. Braking heats the brake discs and the brake pads/linings, thus drying them. The
vehicle can then be parked up.
Cleaningt he paintwork Scratches, corrosive deposits, areas affected
by corrosion and damage caused by inade-
quate care cannot always be completely
repaired. In such cases, visit aqualified spe-
cialist workshop, e.g. aMercedes-Benz
Service Centre.
X Remove impurities immediately, where
possible, whilst avoiding rubbing too hard.
X Soak insect remains with insect remover
and rinse off the treated areas afterwards.
X Soak bird droppings with water and rinse
off the treated areas afterwards.
X Remove coolant, brake fluid, tree resin,
oils, fuels and greases by rubbing gently
with acloth soaked in petroleum ether or
lighter fluid.
X Use tar remover to remove tar stains.
X Use silicone remover to remove wax.
! Do not affix:
R stickers
R films
R magnetic plates or similar items
to painted surfaces. You could otherwise
damage the paintwork.
Care and treatment of mattp aintwork If your vehicle has
aclear matt finish, observe
the following instructions in order to avoid
damage to the paintwork due to incorrect
care.
These notes also apply to light alloy wheels
with aclear matt finish.
! Never polish the vehicle or the light alloy
wheels. Polishing makes the paintwork
shiny. Care
287Maintenance and care Z
Page 291 of 353

!
The following may cause the paint to
become shiny and thus reduce the matt
effect:
R Vigorous rubbing with unsuitablem ate-
rials.
R Frequent use of car washes.
R Washing the vehicle in direct sunlight.
! Never use paint cleaner, buffing or pol-
ishing products, or gloss preserver, e.g.
wax. These products are only suitablef or
high-gloss surfaces. Their use on vehicles
with matt finish leadstoc onsiderable sur-
face damage (shiny, spotted areas).
Alwaysh ave paintwork repairs performed
at aq ualified specialist workshop, e.g. a
Mercedes-Benz Service Centre.
! Do not use wash programs with ahot wax
treatment under any circumstances.
i The vehicle should preferably be washed
by hand using asoft sponge, car shampoo
and plenty of water.
i Use only insect remover and car shampoo
from the range of recommended and
approved Mercedes-Benz care products.
Cleaning the Cabriolets oft topX
Light soiling: you can clean th esoftt op
while it is dry or rinse it with clear water.
X Norma ltoheavy soiling: clean theroof
with abrush and clear water .Clean stains
and other dirt with abrush and aMercedes-
Ben zrecommended and approved cleaning
agent. Always brush from fron ttoback in
the direction of the fabric.
! Never use any of the following to clean the
soft top:
R petrol
R thinner
R tar or stain remover
R other organic solvents
! Remove bird droppings immediately as
they are corrosive and, therefore, can make the soft-top fabric leak. Do not use high-
pressure cleanin
gequipment to clean the
vehicle. Do not use sharp-edged equipment
to remove ice and snow.
Frequent cleanin greduces the resistance to
dirt of the soft top.
To restore this resistance to dirt, clean the
soft top using soft top cleanin gagents that
have been recommended and approved by
Mercedes-Benz.
Incorrec tcleanin gand care ,aswell as ageing,
can cause the soft top seams to leak. Have
the soft-top seams sealed at aqualified spe-
cialist workshop, e.g. at aMercedes-Benz
Servic eCentre.
i Cover the soft top with asuitable cover if
you plan to leave the vehicle outside for a
long period of time.
Cleaning AIRCAP Cleaning th
ewind deflector
Clean the wind deflector on the windscreen
with the soft top closed.
X Apply the parking brak efirmly.
X Vehicles with key: turnthe key to position
2 (Y page 147) in the ignition lock.
X Vehicles with KEYLESS-GO: press the
Start/Stop button twice (Y page 147).
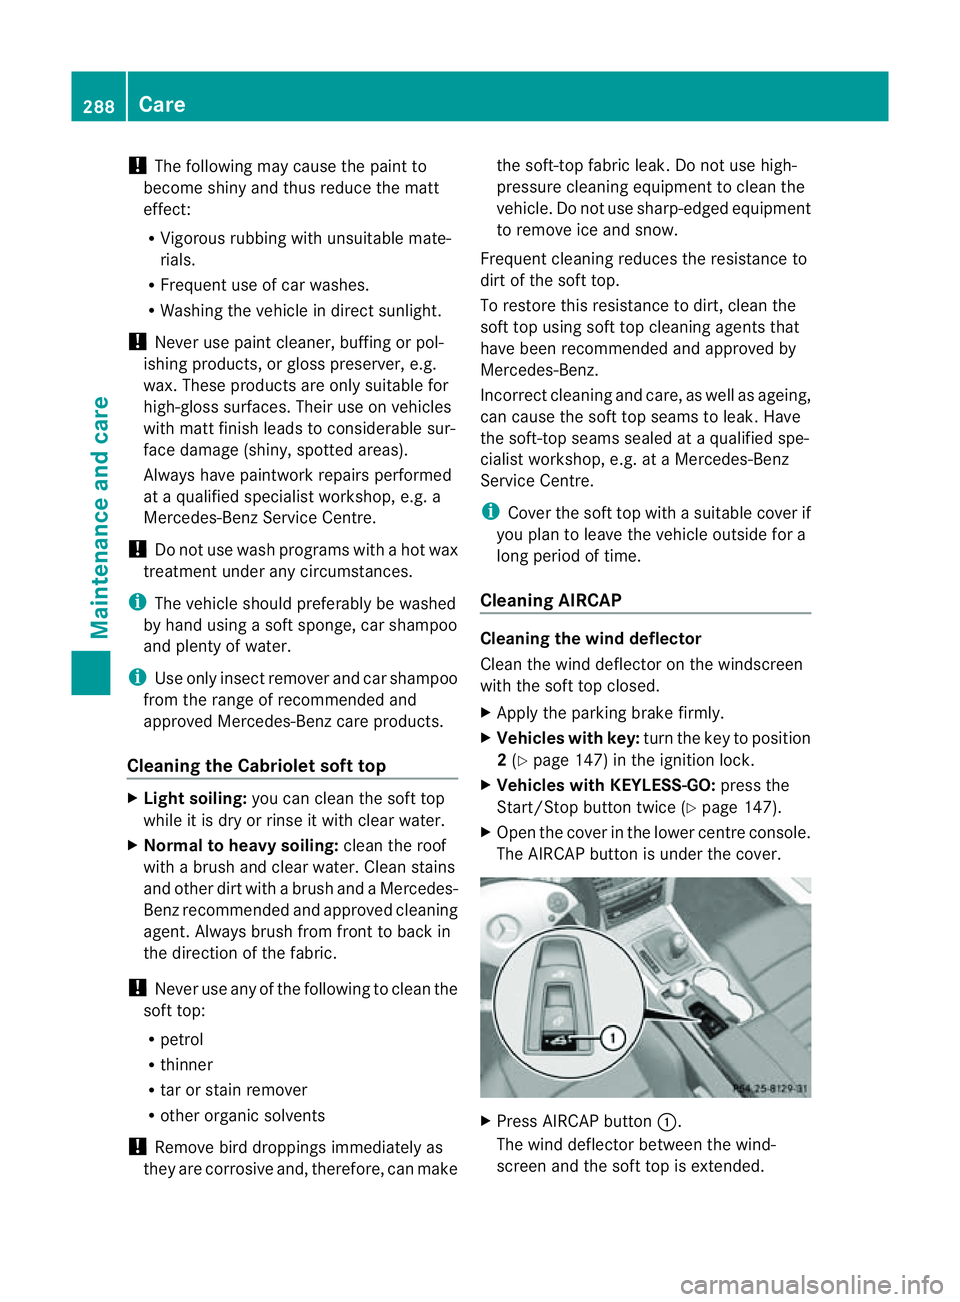
X Open the cover in the lower centre console.
The AIRCAP button is under the cover. X
Press AIRCAP button :.
The wind deflector between the wind-
screen and the soft top is extended. 288
CareMaintenance and care
Page 294 of 353

Cleaning th
eexhaust tail pipes Impurities combined wit
hthe effect sofroad
grit and corrosive environmental factors may
cause flash rust to form on the surface. You
can restore the original shine of the exhaust
tail pip ebycleaning it regularly ,especially in
winter and after washing.
! Do not clea nthe exhaust tail pipes with
alkaline-based cleaning agents, such as
wheel cleaner.
X Cleant he exhaust tail pipes with achrome
care product tested and approved by
Mercedes-Benz.
Cleaningt he trailer tow hitch The ball coupling must be cleaned if it
becomes dirty or corroded.
X Remove any rust using awire brush.
X Remove dirt with aclean, lint-free cloth or
ab rush.
! Do not clean the ball coupling with ahigh-
pressure cleaner. Do not use solvents. X
After cleaning, lightly oil or grease ball cou-
pling :.
X Check that the vehicle's trailer tow hitch is
working properly.
! Observe the note on care provided by the
trailer manufacturer.
i Maintenanceoft he ball coupling and
trailer tow hitch can also be performed at
aq ualified specialist workshop, e.g. a
Mercedes-Ben zService Centre. H
Environmental note
Dispose of oily and greasy cloths in an envi-
ronmentally-responsible manner. Interior care
Cleaningt he display X
Before cleaning the display, make sure that
it is switched off and has cooled down.
X Cleant he displays urface using acommer-
cially-available microfibre cloth and TFT/
LCD displayc leaner.
X Dry the displays urface usingadry micro-
fibre cloth.
! For cleaning, do not use any of the fol-
lowing:
R alcohol-based thinner or petrol
R abrasive cleaning agents
R commercially-available household clean-
ing agents
These may damage the displays urface. Do
not put pressure on the displays urface
when cleaning. This could lead to irrepara-
ble damage to the display.
Cleaningt he plastic trim G
WARNING
When cleaning the steering wheel boss and
dashboard, do not use cockpit sprays or
cleaning agents containing solvents. Cleaning
agents containing solvents cause the surface
to become porous, and as aresult plastic
parts may break away and be thrown around
the interior when an airbag is deployed, which
may result in severe injuries.
! Do not affix the following to plastic surfa-
ces:
R stickers
R films
R scented oil bottles or similar items
You could otherwise damage the plastic. Care
291Maintenance and care Z
Page 307 of 353

Fitting
anew wheel G
WARNING
Replac edamage dorcorrode dwheel bolts.
Never oil or greas ewheel bolts. This could
cause th eboltstol oosenint he wheel hub. G
WARNING
If aw heel hub thread is damaged, you must
not drive the vehicle any further. Consult a
qualified specialist workshop which has the
necessary specialist knowledge and tools to
carry out the work required. Mercedes-Benz
recommends that you use aMercedes-Benz
Service Centr eorService 24h for this pur-
pose. In particular, work relevant to safety or
on safety-related systems must be carried out
at aq ualified specialist workshop. G
WARNING
Only use wheel bolts that have been designed
for the wheel and the vehicle. For safety rea-
sons, Mercedes-Benz recommends that you
only use wheel bolts which have been
approved for Mercedes-Benz vehicles and the
respective wheel. Other wheel bolts could
work loose or damage the brake system.
Do not tighten the wheel bolts completely
while the vehicle is still jacked up. The vehicle
could topple off the jack.
X Clean the wheel and wheel hub contact
surfaces. X
Slide the emergency spare wheel ontot he
centring pin and push it on. X
Tighten the wheel bolts until they are fin-
ger-tight.
X Unscrew the centring pin.
X Tighten the last wheel bolt until it is finger-
tight.
Lowering the vehicle X
Turn the cran kofthe jack anti-clockwise
until the vehicle is oncea gain standing
firmly on the ground.
X Place the jack to one side. X
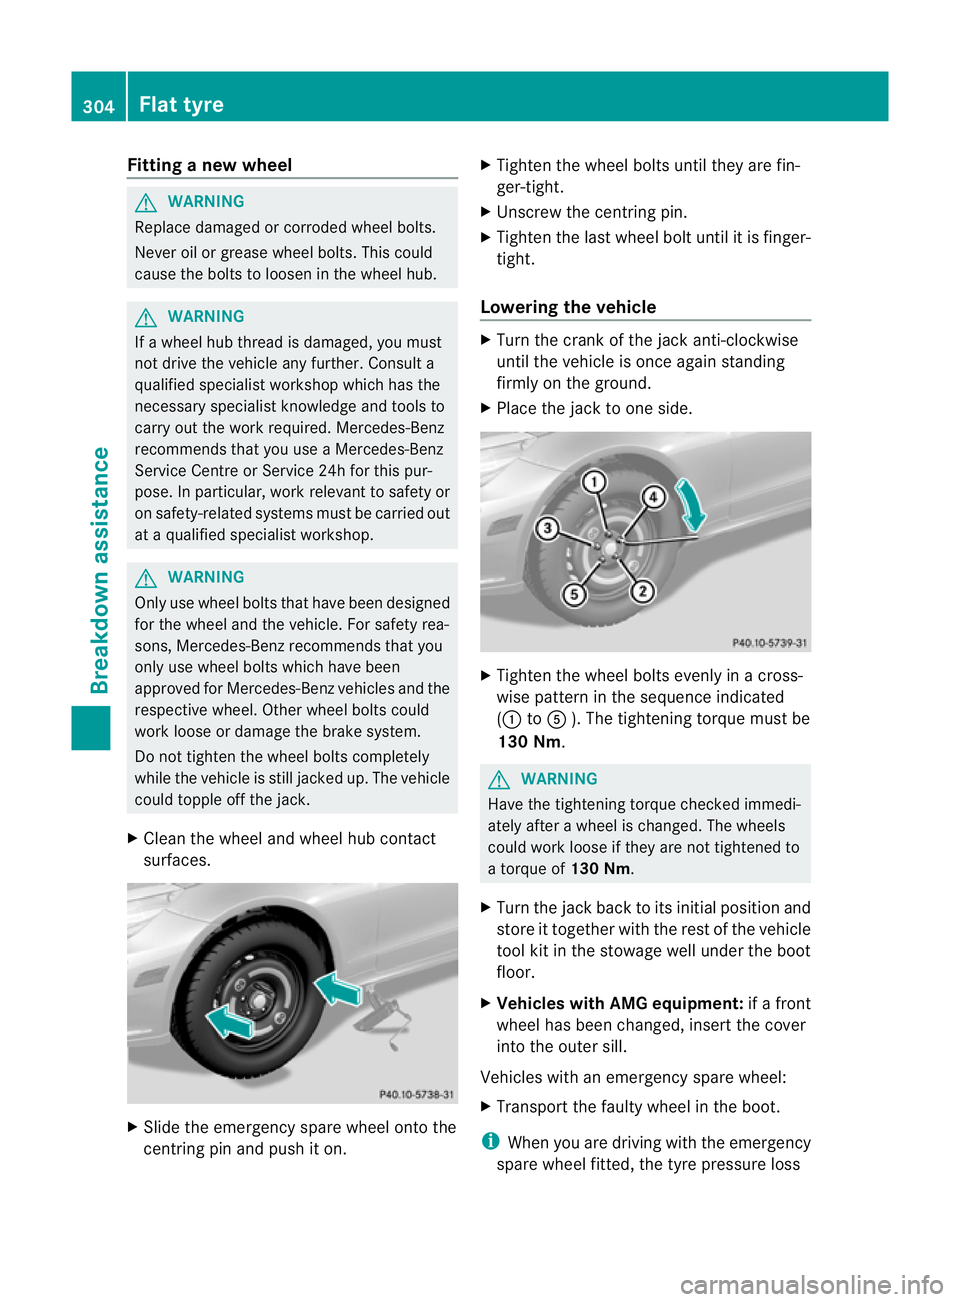
Tighten the wheel bolts evenly in across-
wise patter ninthe sequence indicated
(: toA ). The tightening torque must be
130 Nm. G
WARNING
Have the tightening torque checked immedi-
ately after awheel is changed. The wheels
could work loose if they are not tightened to
at orque of 130 Nm.
X Turn the jack back to its initial position and
store it together with the rest of the vehicle
tool kit in the stowage well under the boot
floor.
X Vehicles with AMG equipment: ifaf ront
wheel has been changed, insert the cover
into the outer sill.
Vehicles with an emergency spare wheel:
X Transport the faulty wheel in the boot.
i When you are driving with the emergency
spare wheel fitted, the tyre pressure loss 304
Flat tyreBreakdown assistance
Page 327 of 353

the work required
.Mercedes-Benz recom-
mend stha tyou use aMercedes-Benz Service
Centre for this purpose. In particular, work
relevant to safety or on safety-related sys-
tems must be carried out at aqualified spe-
cialist workshop.
The wheels could work loose if they are not
tightened to atorque of 130 Nm.
For safety reasons, Mercedes-Benz recom-
mends that you only use wheel bolts of the
correc tsize which have been approved for
Mercedes-Ben zvehicles.
The wear patterns on the fron tand rea rtyres
differ ,dependin gontheoperatin gconditi ons.
Interchange th ewheels befor eaclear wear
pattern ha sforme dont he tyres. Front tyres
typicall ywearm ore on the shoulder sand the
rea rtyre sint he centre.
On vehicle sthat have the same size front and
rea rwheels, you can interchange the wheels
every 5000 km to 10,000 km depending on
the degree of tyre wear. Do not reverse the
direction of tyre rotation.
Cleant he contact surfaces of the wheel and
the brake disc thoroughly every time awheel
is interchanged. Check the tyre pressure and,
if necessary, restart the tyre pressure loss
warning system or the tyre pressure monitor.
! On vehicles fitted with atyre pressure
monitor, electronic components are loca-
ted in the wheel.
Tyre-fitting tools should not be applied in
the area of the valve, as this could damage
the electronic components.
Always have the tyres changed at aquali-
fied specialist workshop, e.g. aMercedes-
Benz Service Centre. Direction of rotation
Tyres with aspecified direction of rotation
have additional benefits, e.g. if there is arisk
of aquaplaning. You will only gain these ben-
efits if the correct direction of rotation is
observed. An arrow on the sidewall of the tyre indicates
its correct direction of rotation.
You may fit an emergency spare wheel/spare
wheel against the direction of rotation.
Observe the time restriction on use as well as
the speed limitation specified on the emer-
gency spare wheel/spare wheel.
Storing wheels
Storew heels that are not being used in acool,
dry and preferably dark place. Protect the
tyres against oil, grease, petrol and diesel. Cleaningt
he wheels G
WARNING
Do not use high-pressure cleaners with circu-
lar-jet nozzles (dirt grinders) to clean your
vehicle, in particular the tyres. You could oth-
erwise damage the tyres and cause an acci-
dent. Wheel and tyrec
ombinations Please bear the following in mind
! For safety reasons, Mercedes-Ben zrec-
ommends that you only use tyres and
wheels which have been approved by
Mercedes-Benzs pecifically for your vehi-
cle.
These tyres have been specially adapted
for use with the contro lsystems ,suc has
AB SorE SP®
,a nd are marke dasfollows:
R MO =Mercedes-BenzO riginal
R MOE =Mercedes-BenzO riginal Extended
(tyres with run-flat characteristics)
R MO1 =Mercedes-BenzO riginal (only cer-
tain AMG tyres)
Mercedes-Benz Original Extended tyres
may only be usedonw heels that have been
specifically approved by Mercedes-Benz.
Only use tyres, wheels or accessories tes-
ted and approved by Mercedes-Benz. Cer- 324
Wheel and tyre combinationsWheels and tyres