2011 MERCEDES-BENZ E-CLASS CABRIOLET wiper blades
[x] Cancel search: wiper bladesPage 9 of 353

Belt
see Sea tbelt
Belt force limiter s(activation) ...........39
Belt tensioner Activatio n......................................... 39
Function .......................................... .50
Blind Spo tAssist
Activating/deactivating .................224
Display message ............................ 246
Notes/function .............................. 196
Trailer towing ................................. 198
see Active Blind Spot Assist
Bonnet
Active bonnet (pedestrian protec-
tion) ............................................... 280
Closing .......................................... .282
Display message ............................ 250
Opening ......................................... 281
Boot
Emergency release ..........................81
Important safety guidelines .............79
Locking separatel y........................... 81
Opening (automatically from
inside) .............................................. 81
Opening (automatically from out-
side) ................................................ .80
Boo tlid
Display message ............................ 250
Opening/closing .............................. 79
Opening dimensions ......................343
Boot load (maximum)
see Technical data
Boot separator
Display message ............................ 251
General notes .................................. 92
Opening/closing .............................. 92
Brake Assist System
see BAS (Brake Assist System)
Brake fluid
Display message ............................ 235
Notes ............................................. 336
Brake lamps
Adaptive .......................................... .63
Display message ............................ 239
Brakes
ABS .................................................. 62
BAS .................................................. 62
BAS PLUS ........................................ 62Brake fluid (notes)
.........................336
Display message ............................ 233
Driving tips .................................... 167
Important safety notes ..................167
Parking brake ................................ 166
Warning lamp ................................. 257
Breakdown
see Flat tyre
see Towing away/tow-starting
Bulbs
see Changing bulbs C
Calling up afault
see Display messages
Capacities
see Technical data
Car
see Vehicle
Care
AIRCAP .......................................... 288
Automatic car wash .......................286
Cabriolet soft top ........................... 288
Display ........................................... 291
Draught stop .................................. 289
Exterior lighting ............................. 290
High-pressure cleaner .................... 287
Matt paintwork .............................. 287
Notes ............................................. 285
Paint .............................................. 287
Plastic trim .................................... 291
Reversing camera ..........................290
Seat bel t........................................ 292
Seat cover ..................................... 292
Sensors ......................................... 290
Tai lpipes ....................................... 291
Trim pieces .................................... 292
Wheels ........................................... 287
Wind deflector ............................... 288
Windows ........................................ 289
Wiper blades .................................. 290
Wooden trim .................................. 292
Car key
see Key
Car wash (care) ................................. 286
CD player/CD changer(on-board
computer) .......................................... 2206
Index
Page 23 of 353

ESP
®
OFF ....................................... 258
LIM (cruise control) ........................ 170
LIM (DISTRONI CPLUS) .................. 173
LIM (variable SPEEDTRONIC )......... 181
Overview .......................................... 30
PASSENGER AIRBAG OFF ................53
Reserve fuel ................................... 260
Seat bel t........................................ 255
SRS ................................................ 259
Warning triangle ................................ 294
Washer fluid Display message ............................ 253
see Windscreen washer system
Weight
see Technical data
Whee lboltt ightening torque ...........304
Whee lchock ...................................... 301
Wheels Changing/replacing .......................323
Changing awheel .......................... 301
Checking ........................................ 318
Cleaning ......................................... 287
Fitting awheel ............................... 304
Important safety notes ..................318
Removing awheel .......................... 303
Storing ........................................... 324
Tightening torqu e........................... 304
Whee lsize/tyre size ...................... 324
Wind deflector
see AIRCAP
Wind deflector (cleaning instruc-
tions) .................................................. 288
Windowbag Display message ............................ 238
Operation ........................................ .44
Windows
Cleaning ......................................... 289
see Side windows
Windscreen
Demisting ...................................... 134
Windscreen washe rsystem ............. 284
Windscree nwipers
Problem (malfunction) ...................125
Replacing the wiper blades ............125
Switching on/off ........................... 124Winte
rdriving
Important safety note s.................. 319
Slippery road surfaces ...................169
Snow chains .................................. 320
Winte rtyres
Limiting the spee d(on-board com-
puter) ............................................. 228
M+S tyres ...................................... 319
Wiper blades
Cleaning ......................................... 290
Important safety notes ..................125
Replacing ....................................... 125
Wooden trim (cleaning instruc-
tions) .................................................. 29220
Index
Page 127 of 353

X
Turn the bulb anti-clockwise, applying
slight pressure, and remove it from bulb
holder :.
X Insert the new bulb into bulb holder :and
turn it clockwise.
X Insert bulb holder :into the lamp and turn
it clockwise. Windscreen wipers
Switching the windscreen wipers on/
off
G
WARNING
The windscreen will not longer be wiped prop-
erly if the wiper blades are worn. This could
prevent you from observing the traffic condi-
tions, thereby causing an accident .Replace
the wiper blades twice ayear, ideally in spring
and autumn.
! Do not operate the windscreen wipers
when the windscreen is dry, as this could
damage the wiper blades. Moreover ,dust
that has collected on the windscreen can
scratch the glass if wiping takes place when
the windscreen is dry.
! If the windscreen wipers leave smears on
the windscreen after the vehicle has been
washed in an automatic car wash, this may
be due to wax or other residue. Clean the
windscreen with washer fluid after an auto-
matic car wash. Combination switch
1
$ Windscreen wipers off
2 Ä Intermittentw ipe, low10
3 Å Intermittentw ipe, high11
4 ° Continuous wipe, slow
5 ¯ Continuous wipe, fast
B í Single wipe/ îTo wipe the
windscreen using washer fluid
X Turn the key to position 1or 2in the ignition
lock.
X Turn the combination switch to the corre-
spondin gposition.
! Intermittentw iping with rain sensor :due
to optical influences and the windscreen
becomin gdirty in dry weather conditions,
the windscreen wipers may be activated
inadvertently. This could damage the wind-
screen wiper blades or scratch the wind-
screen.
For this reason, you should alway sswitch
off the windscreen wipers in dry weather.
In the ÄorÅ position ,the appropriate
wiping frequenc yisset automatically accord-
ing to the intensity of the rain. In the Å
position ,the rain sensor is more sensitive
than in the Äposition ,causing the wind-
screen wiper to wipe more frequently.
10 Rain sensor set to low sensitivity.
11 Rain sensor set to high sensitivity. 124
Windscreen wipersLights and windscreen wipers
Page 128 of 353

Replacing the wiper blades
Important safety notes G
WARNING
The wiper arm scould star tmoving and cause
an injury if you leave the windscreen wipers
switched on.
Remove the key from the ignition lock before
replacing the wiper blades.
! To avoid damaging the windscreen wiper
blades, make sure that you touch only the
wiper arm of the windscreen wiper.
! Never open the bonnet if awindscreen
wiper arm has been folded away from the
windscreen.
Never fold awindscreen wiper arm without
aw iper blade back ontot he windscreen.
Hold the windscreen wiper arm firmly when
you change the wiper blade. If you release
the windscreen wiper arm without awiper
blade and it falls ontot he windscreen, the
windscreen may be damaged by the force
of the impact.
Mercedes-Benz recommends that you have
the wiper blades replaced by aqualified
specialist workshop, e.g. at aMercedes-
Ben zServic eCentre.
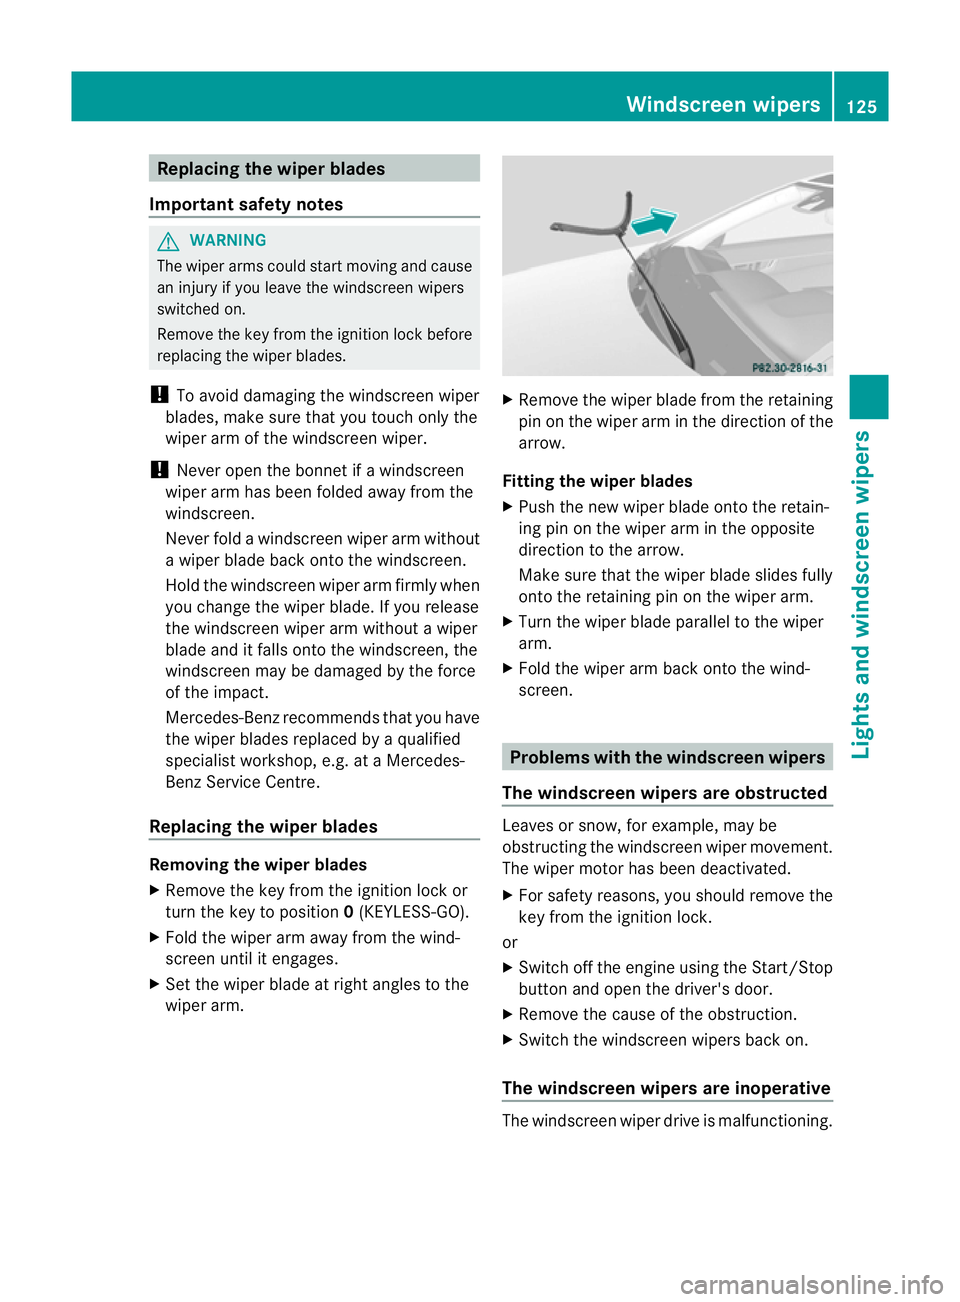
Replacin gthe wiper blades Removing th
ewiper blades
X Remove th ekeyfrom th eignition loc kor
tur nthe key to position 0(KEYLESS-GO).
X Fold the wiper arm away from the wind-
screen until it engages.
X Set the wiper blade at right angles to the
wiper arm. X
Remove the wiper blade from the retaining
pin on the wiper arm in the direction of the
arrow.
Fitting the wiper blades
X Push the new wiper blade onto the retain-
ing pin on the wiper arm in the opposite
direction to the arrow.
Make sure that the wiper blade slides fully
onto the retaining pin on the wiper arm.
X Turn the wiper blade parallel to the wiper
arm.
X Fold the wiper arm back onto the wind-
screen. Problems with the windscreen wipers
The windscreen wipers are obstructed Leaves or snow, for example, may be
obstructing the windscreen wiper movement.
The wiper motor has been deactivated.
X For safety reasons, you should remove the
key from the ignition lock.
or
X Switch off the engine using the Start/Stop
button and open the driver's door.
X Remove the cause of the obstruction.
X Switch the windscreen wipers back on.
The windscreen wipers are inoperative The windscreen wiper drive is malfunctioning. Windscreen wipers
125Lights and windscreen wipers Z
Page 289 of 353

Use care products and cleaning agents rec-
ommended and approved by Mercedes-Benz.
! For cleaning your vehicle, do not use any
of the following:
R dry, rough or hard cloths
R abrasive cleaning agents
R solvents
R cleaning agents containing solvents
Do not scrub.
Do not touch the surfaces or protective
films with hard objects, e.g. aring or ice
scraper. You could otherwise scratch or
damage the surfaces and protective film. H
Environmental note
Dispose of empty packaging and cleaning
cloths in an environmentally responsible man-
ner.
! Do not park up the vehicle for an extended
period straight after cleaning it, particularly
after having cleaned the wheels with wheel
cleaner. Wheel cleaners could cause
increased corrosion of the brake discs and
brake pads/linings. For this reason, you
should drive for afew minutes after clean-
ing. Braking heats the brake discs and the
brake pads/linings, thus drying them. The
vehicle can then be parked up. Care of the exterior
Automatic car wash G
WARNING
Braking efficiency is reduced after washing
the vehicle. This could cause an accident. For
this reason, following acar wash, drive with
particular care until the brakes are dry. G
WARNING
The vehicle is braked when the HOLD function
or DISTRONIC PLUS is activated. Therefore,
deactivate the HOLD function and DISTRONIC PLUS before the vehicle is washed in an auto-
matic car wash.
You can wash the vehicle in an automatic car
wash from the very start.
! We recommend automatic car washes
with an adjustable 21
high-pressure pre-
cleaning program. In car washes that use
high water pressures, there is adanger that
as mall quantity of water may leak into the
vehicle.
! Cabriolet: do not treat the vehicle with
hot wax under any circumstances.
! Cabriolet: pull the key out of the ignition
lock when washing the vehicle. This
ensures that the wind deflector on the
windscreen is retracted. The wind deflector
may otherwise be damaged.
If the vehicle is very dirty, pre-wash it before
cleaning it in an automatic car wash.
! Make sure that the automatic transmis-
sion is in position Nwhen washing your
vehicle in atow-through car wash. The vehi-
cle could be damagedift he transmission is
in another position.
! Make sure that:
R the side windows and sliding sunroof or
soft top are closed completely.
R the blowerf or the ventilation/heatin gis
switched off (OFF button is depressed).
R the windscreen wiper switch is at posi-
tion 0.
The vehicle could otherwise be damaged.
After using an automatic car wash, wipe off
wax from the windscreen and the wiper
blades. This will prevent smears and reduce
wiping noises caused by residue on the wind-
screen.
21 In accordanc ewith the specification sfor Cabriolet programs. 286
CareMaintenance and care
Page 292 of 353

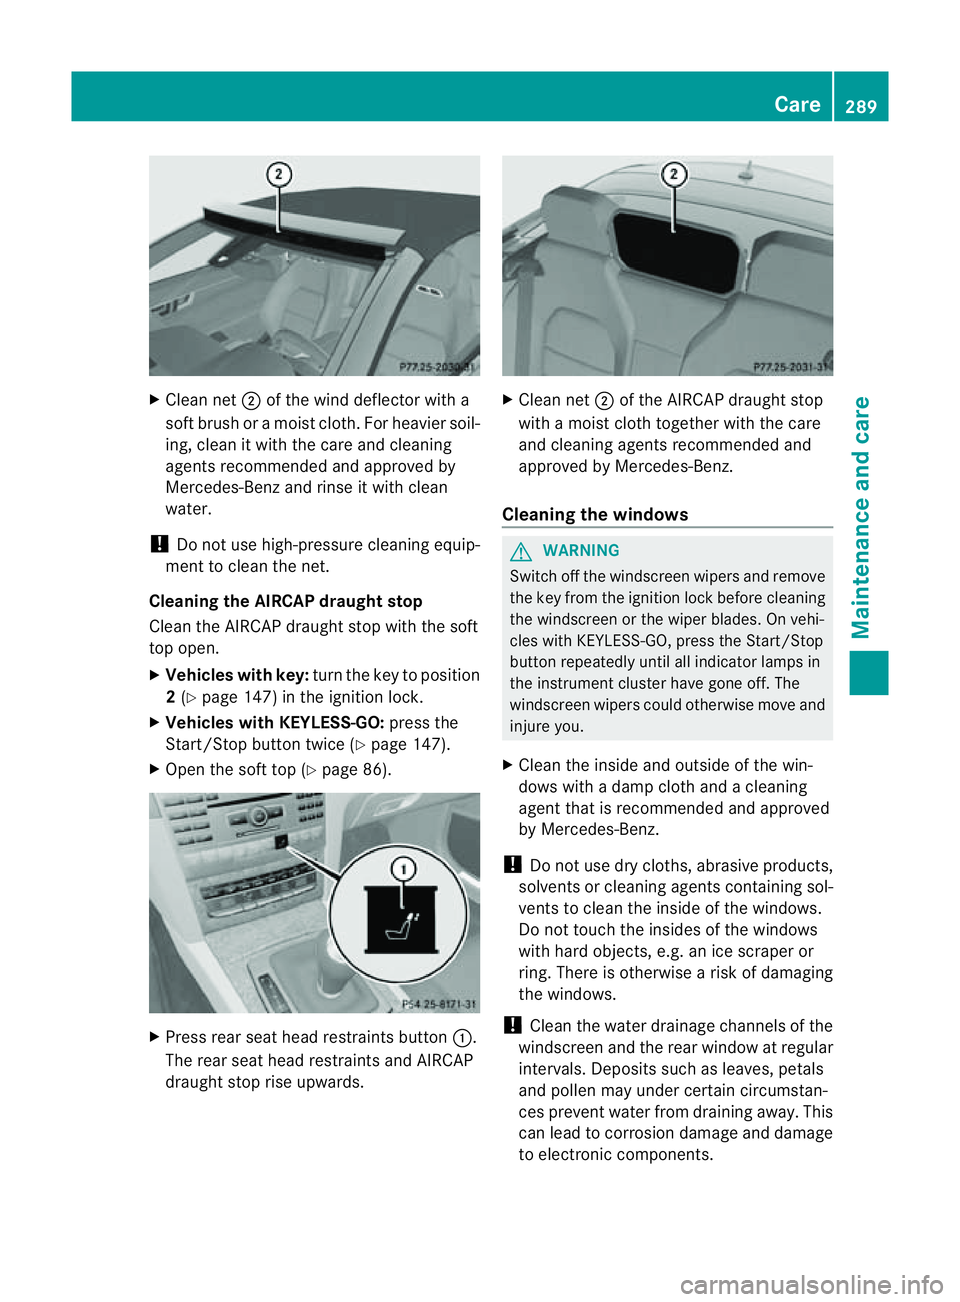
X
Clean net ;of th ewindd eflecto rwith a
soft brush or amoist cloth. For heavier soil-
ing, clean it with the care and cleaning
agent srecommende dand approved by
Mercedes-Ben zand rins eitwithc lean
water.
! Do not us ehigh-pressure cleaning equip-
ment to clean the net.
Cleanin gthe AIRCA Pdraught stop
Clea nthe AIRCAP draught stop with the soft
top open.
X Vehicles with key: turn the key to position
2 (Y page 147) in the ignition lock.
X Vehicles with KEYLESS-GO: press the
Start/Stop button twice (Y page 147).
X Open the soft top (Y page 86).X
Press rear seat head restraintsb utton:.
The rear seat head restraintsa nd AIRCAP
draught stop rise upwards. X
Cleann et; of the AIRCAP draught stop
with amoist clot htogether with the care
and cleanin gagents recommended and
approved by Mercedes-Benz.
Cleaning the windows G
WARNING
Switc hoff the windscreen wipers and remove
the key from the ignition lock before cleaning
the windscreen or the wiper blades. On vehi-
cles with KEYLESS-GO, press the Start/Stop
button repeatedly until all indicator lamps in
the instrument cluster have gone off. The
windscreen wipers could otherwise move and
injur eyou.
X Clean the inside and outside of the win-
dows with adamp cloth and acleaning
agent that is recommended and approved
by Mercedes-Benz.
! Do not use dry cloths, abrasive products,
solvent sorcleanin gagents containin gsol-
vent stoc lean the inside of the windows.
Do not touch the insides of the windows
with hard objects, e.g. an ice scraper or
ring. There is otherwise arisk of damaging
the windows.
! Clean the water drainage channels of the
windscreen and the rear window at regular
intervals. Deposit ssuch as leaves, petals
and pollen may under certain circumstan-
ces preven twate rfrom draining away.T his
can lead to corrosion damage and damage
to electronic components. Care
289Maintenance and care Z
Page 293 of 353

Cleaning th
ewiper blades G
WARNING
Switch off th ewindscree nwipers and remove
the key fro mthe ignition lock before cleaning
the windscreen or the wiper blades. On vehi-
cles with KEYLESS-GO, press the Start/Stop
button repeatedly until all indicator lamps in
the instrument cluster have gone off. The
windscreen wipers could otherwise move and
injure you.
! Do not pull on the wiper blade. Otherwise,
the wiper blade could be damaged.
! Do not clean wiper blades too often and
do not rub them too hard. Otherwise, the
graphite coating could be damaged. This
could cause wiper noise.
X Fold the wiper arms away from the wind-
screen.
X Cleant he wiper blades carefully using a
damp cloth.
X Fold the windscreen wipers back again
before switching on the ignition.
! Hold the wiper arm securely when folding
back. The windscreen could be damaged if
the wiper arm hits against it suddenly.
Cleaningt he exterior lighting X
Cleant he plastic lenses of the exterior
lighting using awet sponge and amild
cleaning agent, e.g. Mercedes-Ben zcar
shampoo or cleanin gcloths.
! Only use cleanin gagents or cleaning
cloth sthata re suitable for plastic lenses.
Unsuitable cleanin gagents or cleaning
cloth scould scratch or damag ethe plastic
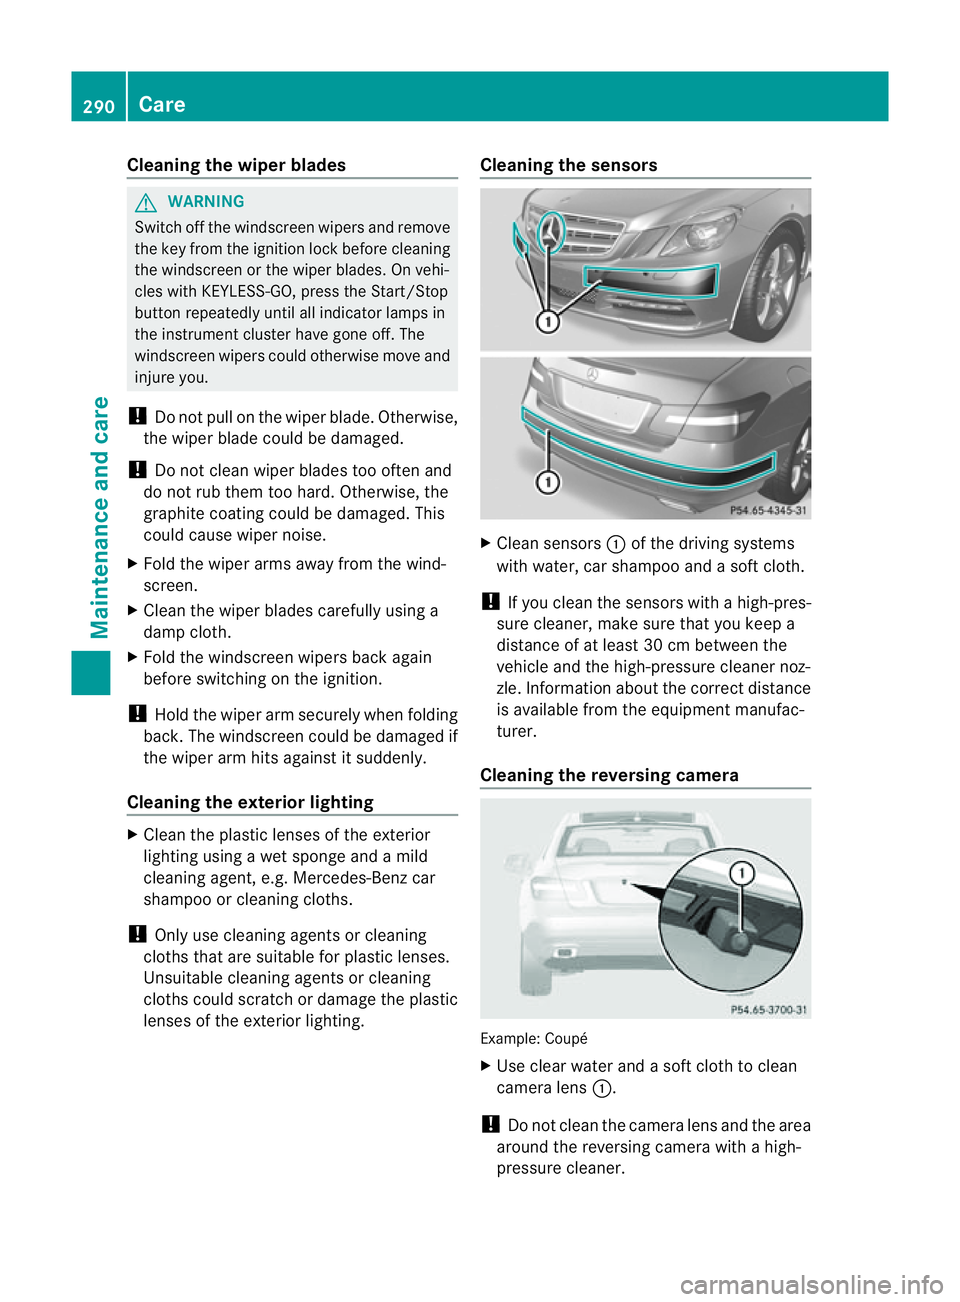
lenses of th eexteri or lighting. Cleaning th
esensors X
Clean sensors :of th edriving systems
wit hw ater, car shampoo and asoftc loth.
! If you clean the sensors with ahigh-pres-
sure cleaner, mak esure that you keep a
distanc eofatl east 30 cm between the
vehicle and the high-pressure cleaner noz-
zle. Information about the correc tdistance
is available fro mthe equipment manufac-
turer.
Cleaningt he reversing camera Example: Coupé
X
Use clear water and asoft cloth to clean
camera lens :.
! Do not clean the camera lens and the area
around the reversing camera with ahigh-
pressure cleaner. 290
CareMaintenance and care