Page 25 of 62
25
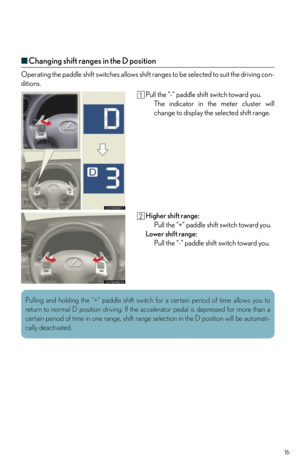
Headlights
The daytime running lights turn on.
The instrument panel, side marker, tail, day-
time running lights and license plate lights turn
on.
The headlights and all lights listed above
(except daytime running lights) turn on.
The headlights, parking lights/daytime running
lights and other lights turn on/off automatically
in accordance with ambient light levels.
To engage the high beams, push the lever forward.
To flash the high beams temporarily, pull the lever
toward you.
Headlight Cleaner (If Equipped)
The headlight cleaner can be used only when the
“ENGINE START STOP” switch is in IGNITION
ON mode and the headlights are on.
Canada
U.S.A.
1
2
3
4
Page 26 of 62
26
Fog Lights
The fog lights can be used only when the head-
lights (low beam) are on.
Windshield Wipers and Washer
Automatic operation
Low speed
High speed
Single wipe
Wash and wipe
When the wipers are set to automatic operation,
sensor sensitivity can be adjusted by turning the
band.
Increases the sensitivity (+)
Decreases the sensitivity (-)1
2
3
4
5
1
2
Page 27 of 62
27
Rear Window and Outside Rear View
Mirror Defoggers
Without navigation system
To defog the rear window and the outside rear
view mirrors, press the switch.
Press again to cancel.
With navigation system
Instrument Panel Light Control
Darker
Brighter
The system turns off automatically after 15 to 60 minutes.
1
2
Page 28 of 62
28
Audio System (without navigation system)
Owners of models equipped with a navigation system should refer to the “Navigation System
Owner's Manual”.
■Basic operation
Ty p e A Sound quality modes
Automatic Sound Levelizer (ASL)
Mute
Audio sources
AM•FM: AM radio/FM radio
SAT: Satellite radio
CD•AUX: CD player/Auxiliary audio
device/USB memory/iPod/
Bluetooth
® audio player
Pow e r/ Vo l u m e
Ty p e B
Sound quality modes
Automatic Sound Levelizer (ASL)
Mute
Audio sources
AM: AM radio
FM: FM radio
CD: CD player
AUX: Auxiliary audio device/USB mem-
ory/iPod
Pow e r/ Vo l u m e
1
2
3
4
5
1
2
3
4
5
Page 29 of 62
29
■Radio
Ty p e A
Traffic information
Station presets
Te x t m e s s a g e s
Radio tuner
RDS genre select
Scanning radio stations
Seek
Ty p e B
Traffic information
Station presets
Radio tuner
Station select
Seek
■Entering station presets
Press the desired station by using the tune, the seek or the scan function.
Press and hold one of the preset buttons (1-6) until you hear a beep, indicating that the
station is set.
1
2
3
4
5
6
7
1
2
3
4
5
Page 30 of 62
30
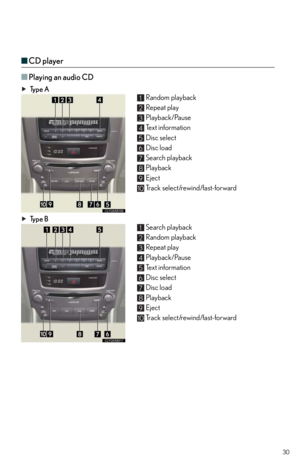
■CD player
■
Playing an audio CD
Ty p e A
Random playback
Repeat play
Playback/Pause
Text information
Disc select
Disc load
Search playback
Playback
Eject
Track select/rewind/fast-forward
Ty p e B
Search playback
Random playback
Repeat play
Playback/Pause
Text information
Disc select
Disc load
Playback
Eject
Track select/rewind/fast-forward
1
2
3
4
5
6
7
8
9
10
1
2
3
4
5
6
7
8
9
10
Page 31 of 62
31
■Playing a CD with MP3/WMA files
Ty p e A
Random playback
Repeat play
Playback/Pause
Folder select
Text information
File select
Disc select
Disc load
Search playback
Playback
Eject
Ty p e B
Search playback
Random playback
Repeat play
Playback/Pause
Folder select
Text information
File select
Disc select
Disc load
Playback
Eject
1
2
3
4
5
6
7
8
9
10
11
1
2
3
4
5
6
7
8
9
10
11
Page 32 of 62
32
■Loading a CD
Press the “LOAD” button.
“WAIT” is shown on the display.
Insert a CD when the indicators on the slot turn from amber to green.
The display changes from “WAIT” to “LOAD”.
■Loading multiple CDs
Press and hold the “LOAD” button until you hear a beep.
“WAIT” is shown on the display.
Insert a CD when the indicators on the slot turn from amber to green.
The display changes from “WAIT” to “LOAD”.
The indicators on the slot turn to amber when the CD is inserted.
Insert the next CD when the indicators on the slot turn from amber to green again.
Repeat the procedure for the remaining CDs.
To cancel the operation, press the “LOAD” button. If you do not insert a CD within 15
seconds, loading will cancelled automatically.


 25
Headlights
The daytime running lights turn on.
The instrument panel, side marker, tail, day-
time running lights and license plate lights turn
on.
The headlights and all lights listed above
(except")
 26
Fog Lights
The fog lights can be used only when the head-
lights (low beam) are on.
Windshield Wipers and Washer
Automatic operation
Low speed
High speed
Single wipe
Wash and wipe
When the wipers a")
 27
Rear Window and Outside Rear View
Mirror Defoggers
Without navigation system
To defog the rear window and the outside rear
view mirrors, press the switch.
Press again to cancel.
With navigation")
 28
Audio System (without navigation system)
Owners of models equipped with a navigation system should refer to the “Navigation System
Owners Manual”.
■Basic operation
Ty p e A Sound quality mo")
 29
■Radio
Ty p e A
Traffic information
Station presets
Te x t m e s s a g e s
Radio tuner
RDS genre select
Scanning radio stations
Seek
Ty p e B
Traffic information
Station presets
Radio tuner
St")
 30
■CD player
■
Playing an audio CD
Ty p e A
Random playback
Repeat play
Playback/Pause
Text information
Disc select
Disc load
Search playback
Playback
Eject
Track select/rewind/fast-forward
Ty")
 31
■Playing a CD with MP3/WMA files
Ty p e A
Random playback
Repeat play
Playback/Pause
Folder select
Text information
File select
Disc select
Disc load
Search playback
Playback
Eject
Ty p e B
Sea")
 32
■Loading a CD
Press the “LOAD” button.
“WAIT” is shown on the display.
Insert a CD when the indicators on the slot turn from amber to green.
The display changes from “WAIT” to “LO")