2011 INFINITI QX56 ECU
[x] Cancel search: ECUPage 5025 of 5598
ST-38
< REMOVAL AND INSTALLATION >
STEERING SHAFT
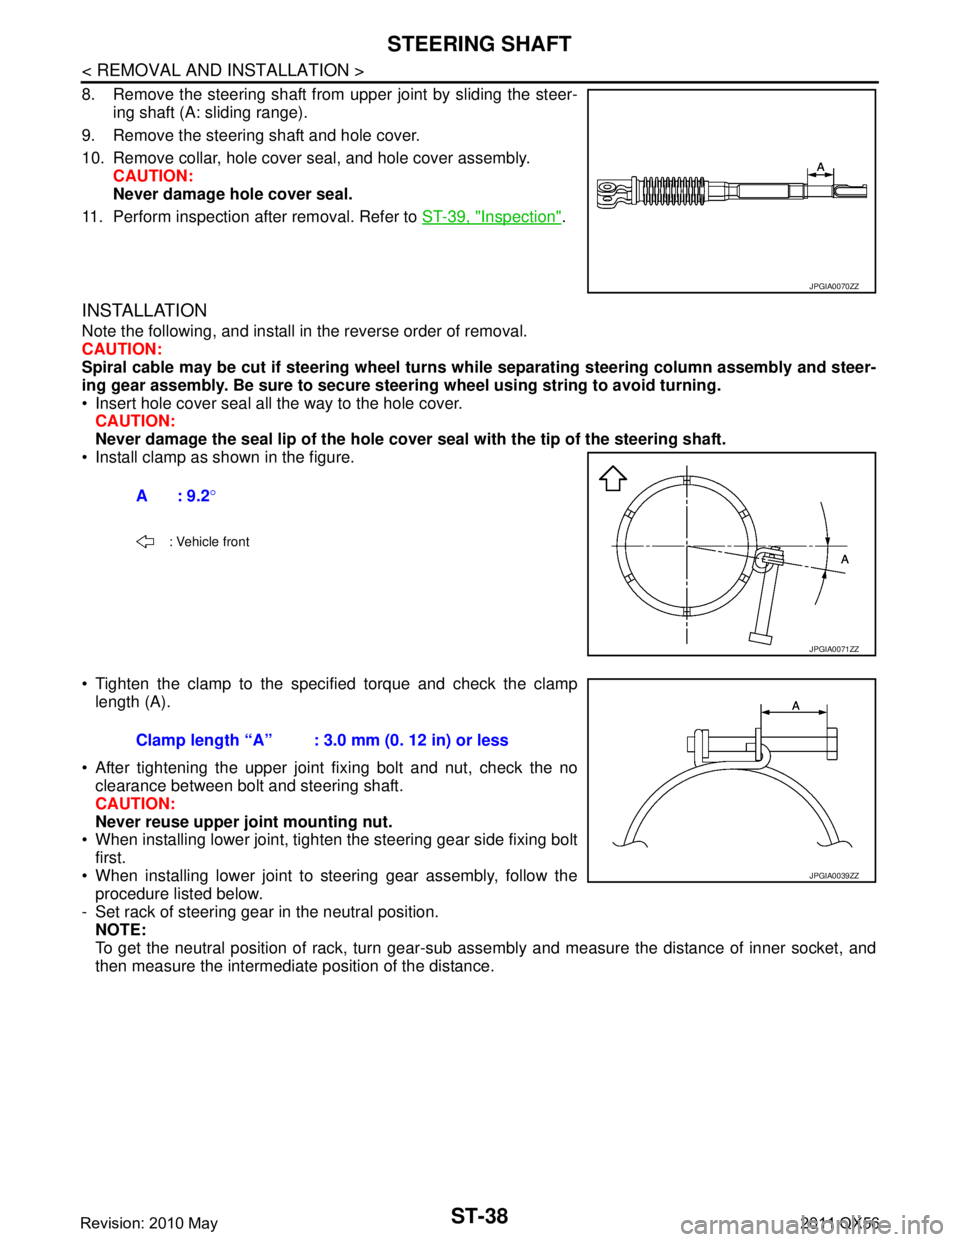
8. Remove the steering shaft from upper joint by sliding the steer-ing shaft (A: sliding range).
9. Remove the steering shaft and hole cover.
10. Remove collar, hole cover seal, and hole cover assembly. CAUTION:
Never damage hole cover seal.
11. Perform inspection after removal. Refer to ST-39, "
Inspection".
INSTALLATION
Note the following, and install in the reverse order of removal.
CAUTION:
Spiral cable may be cut if steering wheel turns while separating steering column assembly and steer-
ing gear assembly. Be sure to secure steer ing wheel using string to avoid turning.
Insert hole cover seal all the way to the hole cover. CAUTION:
Never damage the seal lip of the hole cover seal with the tip of the steering shaft.
Install clamp as shown in the figure.
Tighten the clamp to the spec ified torque and check the clamp
length (A).
After tightening the upper joint fixing bolt and nut, check the no clearance between bolt and steering shaft.
CAUTION:
Never reuse upper joint mounting nut.
When installing lower joint, tighten the steering gear side fixing bolt
first.
When installing lower joint to steering gear assembly, follow the procedure listed below.
- Set rack of steering gear in the neutral position. NOTE:
To get the neutral position of rack, turn gear-sub as sembly and measure the distance of inner socket, and
then measure the intermediate position of the distance.
JPGIA0070ZZ
A: 9.2 °
: Vehicle front
JPGIA0071ZZ
Clamp length “A” : 3.0 mm (0. 12 in) or less
JPGIA0039ZZ
Revision: 2010 May2011 QX56
Page 5030 of 5598
STEERING GEAR AND LINKAGEST-43
< REMOVAL AND INSTALLATION >
C
DE
F
H I
J
K L
M A
B
ST
N
O P
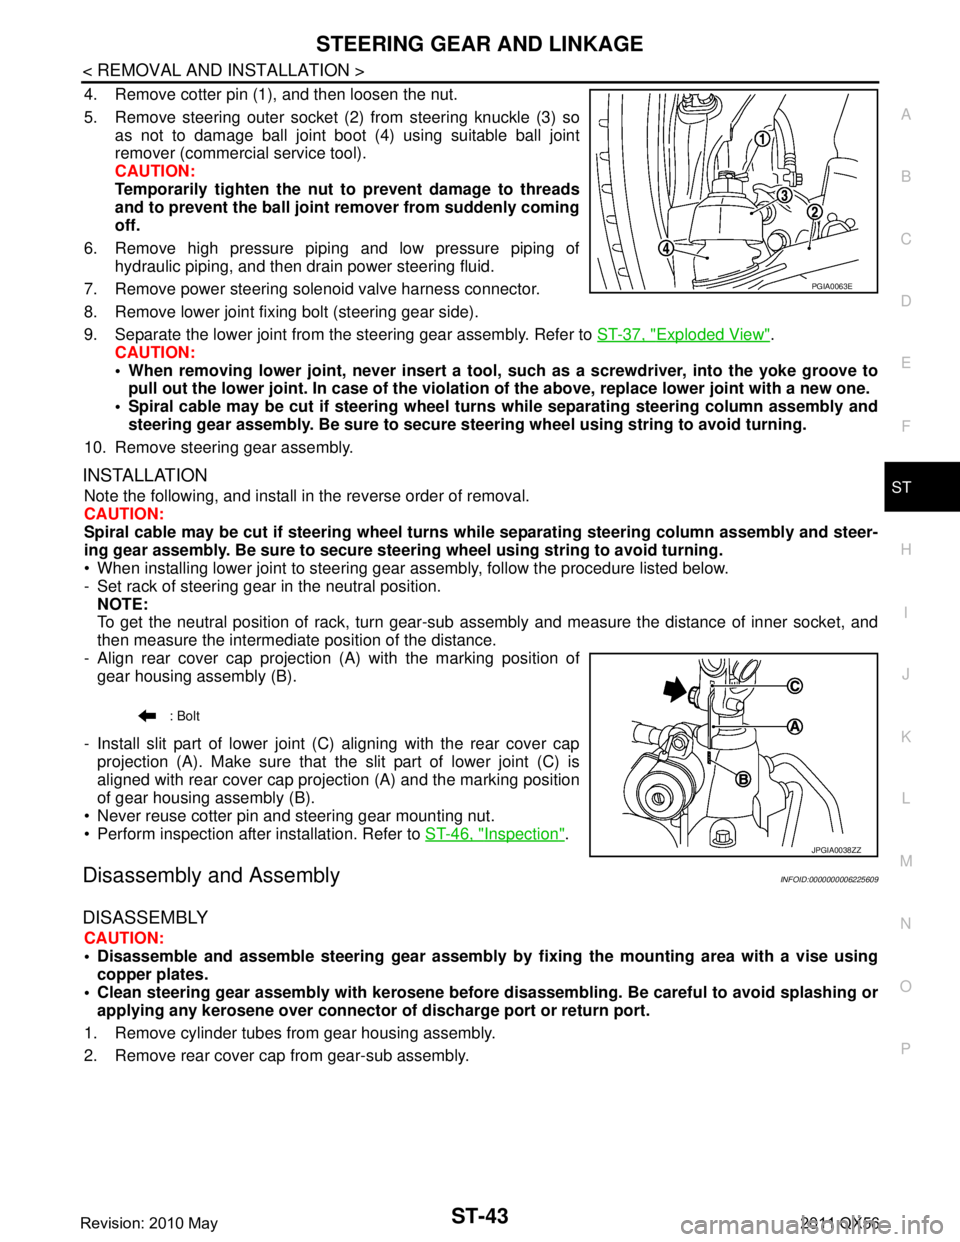
4. Remove cotter pin (1), and then loosen the nut.
5. Remove steering outer socket (2) from steering knuckle (3) so as not to damage ball joint boot (4) using suitable ball joint
remover (commercial service tool).
CAUTION:
Temporarily tighten the nut to prevent damage to threads
and to prevent the ball joint remover from suddenly coming
off.
6. Remove high pressure piping and low pressure piping of hydraulic piping, and then drain power steering fluid.
7. Remove power steering solenoid valve harness connector.
8. Remove lower joint fixing bolt (steering gear side).
9. Separate the lower joint from the steering gear assembly. Refer to ST-37, "
Exploded View".
CAUTION:
When removing lower joint, n ever insert a tool, such as a screw driver, into the yoke groove to
pull out the lower joint. In case of the violation of the above, replace lower joint with a new one.
Spiral cable may be cut if steering wheel tu rns while separating steering column assembly and
steering gear assembly. Be sure to secure st eering wheel using string to avoid turning.
10. Remove steering gear assembly.
INSTALLATION
Note the following, and install in the reverse order of removal.
CAUTION:
Spiral cable may be cut if steering wheel turns while separating steering column assembly and steer-
ing gear assembly. Be sure to secure steer ing wheel using string to avoid turning.
When installing lower joint to steering gear assembly, follow the procedure listed below.
- Set rack of steering gear in the neutral position.
NOTE:
To get the neutral position of rack, turn gear-sub a ssembly and measure the distance of inner socket, and
then measure the intermediat e position of the distance.
- Align rear cover cap projection (A) with the marking position of gear housing assembly (B).
- Install slit part of lower joint (C) aligning with the rear cover cap projection (A). Make sure that the slit part of lower joint (C) is
aligned with rear cover cap projection (A) and the marking position
of gear housing assembly (B).
Never reuse cotter pin and steering gear mounting nut.
Perform inspection after installation. Refer to ST-46, "
Inspection".
Disassembly and AssemblyINFOID:0000000006225609
DISASSEMBLY
CAUTION:
Disassemble and assemble steering gear assembly by fixing the mounting area with a vise using
copper plates.
Clean steering gear assembly with kerosene before disassembling. Be careful to avoid splashing or
applying any kerosene over connector of discharge port or return port.
1. Remove cylinder tubes from gear housing assembly.
2. Remove rear cover cap from gear-sub assembly.
PGIA0063E
: Bolt
JPGIA0038ZZ
Revision: 2010 May2011 QX56
Page 5037 of 5598
ST-50
< REMOVAL AND INSTALLATION >
POWER STEERING OIL PUMP
Note the following, and install in the reverse order of removal.
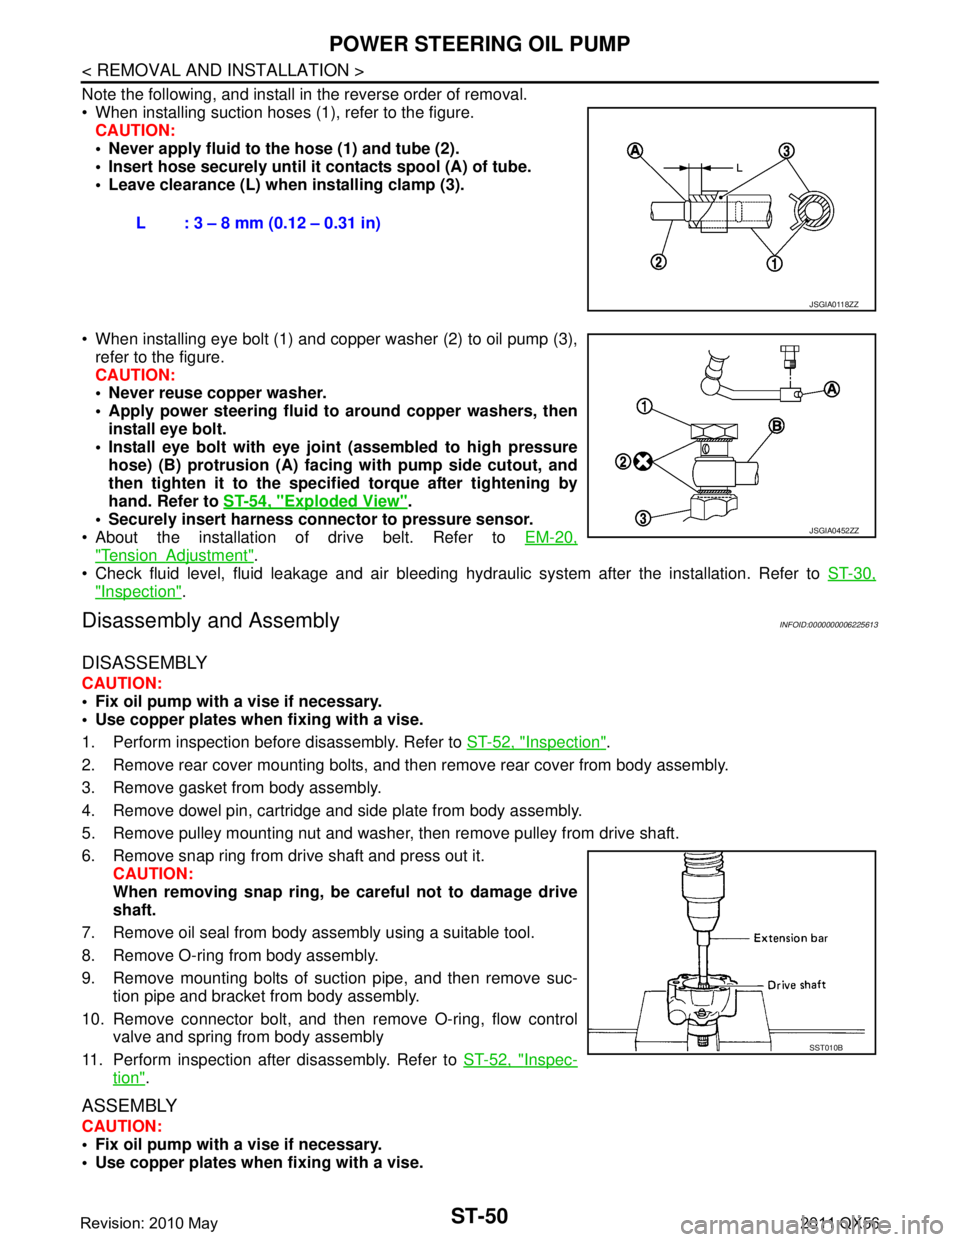
When installing suction hoses (1), refer to the figure.CAUTION:
Never apply fluid to the hose (1) and tube (2).
Insert hose securely until it contacts spool (A) of tube.
Leave clearance (L) when installing clamp (3).
When installing eye bolt (1) and copper washer (2) to oil pump (3), refer to the figure.
CAUTION:
Never reuse copper washer.
Apply power steering fluid to around copper washers, then
install eye bolt.
Install eye bolt with eye join t (assembled to high pressure
hose) (B) protrusion (A) facing with pump side cutout, and
then tighten it to the specifi ed torque after tightening by
hand. Refer to ST-54, "
Exploded View".
Securely insert harness connector to pressure sensor.
About the installation of drive belt. Refer to EM-20,
"TensionAdjustment".
Check fluid level, fluid leakage and air bleeding hydr aulic system after the installation. Refer to ST-30,
"Inspection".
Disassembly and AssemblyINFOID:0000000006225613
DISASSEMBLY
CAUTION:
Fix oil pump with a vise if necessary.
Use copper plates when fixing with a vise.
1. Perform inspection before disassembly. Refer to ST-52, "
Inspection".
2. Remove rear cover mounting bolts, and then remove rear cover from body assembly.
3. Remove gasket from body assembly.
4. Remove dowel pin, cartridge and side plate from body assembly.
5. Remove pulley mounting nut and washer, then remove pulley from drive shaft.
6. Remove snap ring from drive shaft and press out it. CAUTION:
When removing snap ring, be careful not to damage drive
shaft.
7. Remove oil seal from body assembly using a suitable tool.
8. Remove O-ring from body assembly.
9. Remove mounting bolts of suction pipe, and then remove suc- tion pipe and bracket from body assembly.
10. Remove connector bolt, and then remove O-ring, flow control
valve and spring from body assembly
11. Perform inspection after disassembly. Refer to ST-52, "
Inspec-
tion".
ASSEMBLY
CAUTION:
Fix oil pump with a vise if necessary.
Use copper plates when fixing with a vise.L : 3 – 8 mm (0.12 – 0.31 in)
JSGIA0118ZZ
JSGIA0452ZZ
SST010B
Revision: 2010 May2011 QX56
Page 5040 of 5598
![INFINITI QX56 2011 Factory Service Manual
POWER STEERING OIL PUMPST-53
< REMOVAL AND INSTALLATION >
C
DE
F
H I
J
K L
M A
B
ST
N
O P
1. Connect the oil pressure gauge [SST: KV48103500 (J-26357)] and the oil pressure gauge adapter [SST: KV4810 INFINITI QX56 2011 Factory Service Manual
POWER STEERING OIL PUMPST-53
< REMOVAL AND INSTALLATION >
C
DE
F
H I
J
K L
M A
B
ST
N
O P
1. Connect the oil pressure gauge [SST: KV48103500 (J-26357)] and the oil pressure gauge adapter [SST: KV4810](/manual-img/42/57033/w960_57033-5039.png)
POWER STEERING OIL PUMPST-53
< REMOVAL AND INSTALLATION >
C
DE
F
H I
J
K L
M A
B
ST
N
O P
1. Connect the oil pressure gauge [SST: KV48103500 (J-26357)] and the oil pressure gauge adapter [SST: KV48102500 (J-
33914)] between oil pump discharge connector and high-pres-
sure hose. Bleed air from the hydraulic circuit while opening
valve fully. Refer to ST-30, "
Inspection".
2. Start engine. Run engine until oil temperature reaches 50 to 80°C (122 to 176 °F).
CAUTION:
Leave the valve of the oil pressure gauge fully open while
starting and running engine. If engine is started with the
valve closed, the hydraulic pressure in oil pump goes up
to the relief pressure along with unusual increase of oil
temperature.
Be sure to keep hose clear of belts and other parts when engine is started.
3. Fully close the oil pressure gauge valve with engine at idle and measure the relief oil pressure.
CAUTION:
Never keep valve closed for 10 seconds or longer.
4. Open the valve slowly after measuring. Repair oil pump if the relief oil pressure is outside the standard. Refer to ST-50, "
Disassembly and Assembly".
5. Disconnect the oil pressure gauge from hydraulic circuit.
6. When installing eye bolt (1) and copper washer (2) to oil pump (3), refer to the figure.
CAUTION:
Never reuse copper washers.
Apply power steering fluid to around copper washer, theninstall eye bolt.
Install eye bolt with eye join t (assembled to high pressure
hose) (B) protrusion (A) facing with pump side cutout, and
then tighten it to the specifi ed torque after tightening by
hand. Refer to ST-54, "
Exploded View".
Securely insert harness connector to pressure sensor.
7. Check fluid level, fluid leakage and air bleeding hydraulic sys- tem after the installation. Refer to ST-30, "
Inspection".
Relief oil pressure : Refer to
ST-58, "
Relief Oil Pres-
sure".
SGIA1225E
JSGIA0452ZZ
Revision: 2010 May2011 QX56
Page 5046 of 5598
STC-1
STEERING
C
DE
F
H I
J
K L
M
SECTION STC
A
B
STC
N
O P
CONTENTS
STEERING CONTROL SYSTEM
PRECAUTION ................ ...............................2
PRECAUTIONS .............................................. .....2
Precaution for Supplemental Restraint System
(SRS) "AIR BAG" and "SEAT BELT PRE-TEN-
SIONER" ............................................................. ......
2
Precaution Necessary for Steering Wheel Rota-
tion after Battery Disconnect .....................................
2
SYSTEM DESCRIPTION ..............................4
COMPONENT PARTS ................................... .....4
Component Parts Location .................................. ......4
Component Description .............................................4
Power Steering Control Unit ......................................4
Power Steering Solenoid Valve .................................4
SYSTEM ..............................................................5
EPS SYSTEM ........................................ ......................5
EPS SYSTEM : System De scription .........................5
EPS SYSTEM : Fail-Safe ..........................................6
ECU DIAGNOSIS INFO RMATION ...............8
POWER STEERING CONTROL UNIT ........... .....8
Reference Value ................................................. ......8
Fail-Safe ....................................................................9
WIRING DIAGRAM ......................................10
ELECTRONICALLY CONTROLLED POWER
STEERING SYSTEM ...................................... ....
10
Wiring Diagram ................................................... ....10
BASIC INSPECTION ...................................13
DIAGNOSIS AND REPAIR WORK FLOW .......13
Work Flow ............................................................ ....13
DTC/CIRCUIT DIAGNOSIS .........................14
POWER SUPPLY AND GROUND CIRCUIT ....14
Diagnosis Procedure ........................................... ....14
POWER STEERING SOLENOID VALVE .........16
Component Function Check ....................................16
Diagnosis Procedure ...............................................16
Component Inspection .............................................17
ENGINE SPEED SIGNAL CIRCUIT ..................18
Diagnosis Procedure ........................................... ....18
VEHICLE SPEED SIGNAL CIRCUIT ................20
Diagnosis Procedure ...............................................20
SYMPTOM DIAGNOSIS ..............................22
UNBALANCE STEERING WHEEL TURNING
FORCE (TORQUE VARIATION) .......................
22
Description ........................................................... ....22
Diagnosis Procedure ...............................................22
REMOVAL AND INSTALLATION ...............23
POWER STEERING CONTROL UNIT ..............23
Removal and Installation ..................................... ....23
Revision: 2010 May2011 QX56
Page 5053 of 5598
STC-8
< ECU DIAGNOSIS INFORMATION >
POWER STEERING CONTROL UNIT
ECU DIAGNOSIS INFORMATION
POWER STEERING CONTROL UNIT
Reference Value INFOID:0000000006256121
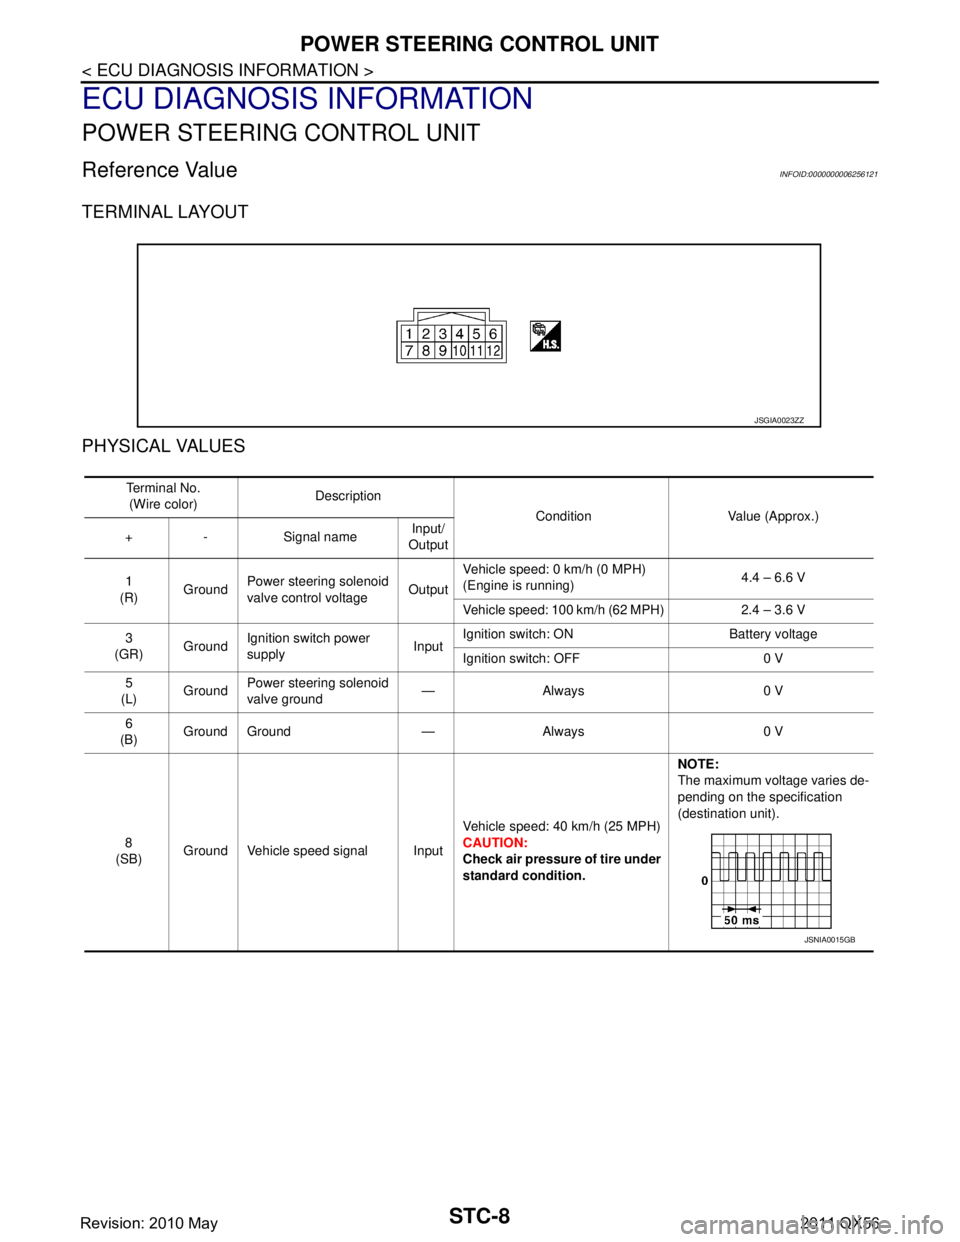
TERMINAL LAYOUT
PHYSICAL VALUES
JSGIA0023ZZ
Te r m i n a l N o .(Wire color) Description
Condition Value (Approx.)
+ - Signal name Input/
Output
1
(R) GroundPower steering
solenoid
valve control voltage OutputVehicle speed: 0 km/h (0 MPH)
(Engine is running)
4.4 – 6.6 V
Vehicle speed: 100 km/h (62 MPH) 2.4 – 3.6 V
3
(GR) GroundIgnition switch power
supply InputIgnition switch: ON Battery voltage
Ignition switch: OFF 0 V
5
(L) Ground
Power steering
solenoid
valve ground —Always 0 V
6
(B) Ground Ground — Always 0 V
8
(SB) Ground Vehicle speed signal Input Vehicle speed: 40 km/h (25 MPH)
CAUTION:
Check air pressure of tire under
standard condition.NOTE:
The maximum voltage varies de-
pending on the specification
(destination unit).
JSNIA0015GB
Revision: 2010 May2011 QX56
Page 5054 of 5598
POWER STEERING CONTROL UNITSTC-9
< ECU DIAGNOSIS INFORMATION >
C
DE
F
H I
J
K L
M A
B
STC
N
O PCAUTION:
When using circuit tester or osci lloscope to measure voltage for in spection, be sure not to forcibly
extend any connector terminals.
Fail-Safe INFOID:0000000006256122
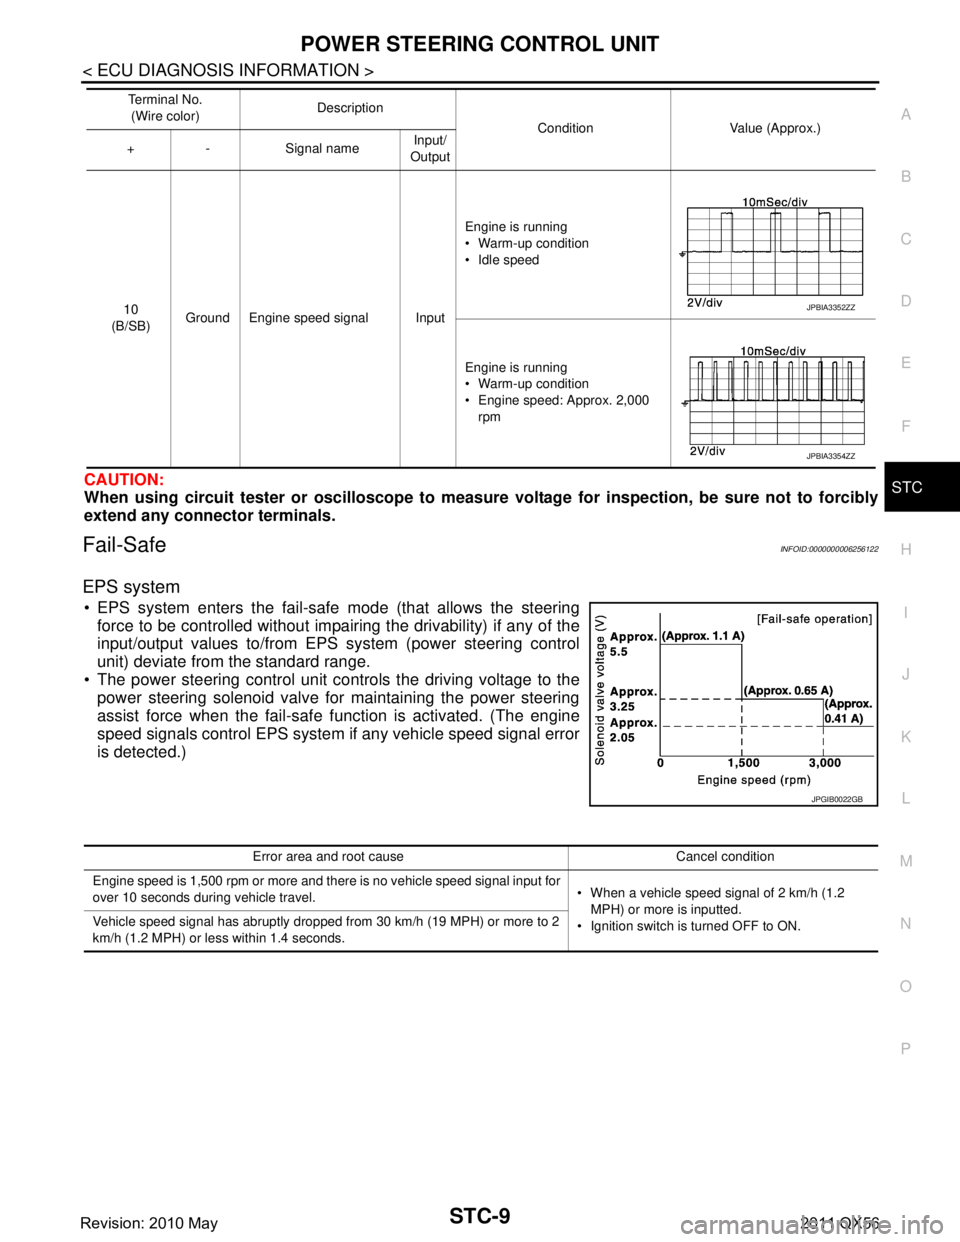
EPS system
EPS system enters the fail-safe mode (that allows the steering
force to be controlled without impair ing the drivability) if any of the
input/output values to/from EPS system (power steering control
unit) deviate from the standard range.
The power steering control unit controls the driving voltage to the
power steering solenoid valve for maintaining the power steering
assist force when the fail-safe function is activated. (The engine
speed signals control EPS system if any vehicle speed signal error
is detected.)
10
(B/SB) Ground Engine speed signal Input Engine is running
Warm-up condition
Idle speed
Engine is running
Warm-up condition
Engine speed: Approx. 2,000
rpm
Te r m i n a l N o .
(Wire color) Description
Condition Value (Approx.)
+ - Signal name Input/
OutputJPBIA3352ZZ
JPBIA3354ZZ
JPGIB0022GB
Error area and root cause Cancel condition
Engine speed is 1,500 rpm or more and there is no vehicle speed signal input for
over 10 seconds during vehicle travel. When a vehicle speed signal of 2 km/h (1.2
MPH) or more is inputted.
Ignition switch is turned OFF to ON.
Vehicle speed signal has abruptly dropped from 30 km/h (19 MPH) or more to 2
km/h (1.2 MPH) or less within 1.4 seconds.
Revision: 2010 May2011 QX56
Page 5090 of 5598

TM-2
A/T CONTROL SYSTEM : System Diagram ..........44
A/T CONTROL SYSTEM : System Description ......44
A/T CONTROL SYSTEM : Fail-Safe ......................45
A/T CONTROL SYSTEM : Protection Control ..... ...47
LINE PRESSURE CONTROL ................................ ...48
LINE PRESSURE CONTROL : System Diagram ...48
LINE PRESSURE CONTROL : System Descrip-
tion ....................................................................... ...
48
SHIFT CHANGE CONTROL .................................. ...49
SHIFT CHANGE CONTROL : System Diagram .....50
SHIFT CHANGE CONTROL : System Description
...
50
SHIFT PATTERN CONTROL ................................. ...53
SHIFT PATTERN CONTROL : System Diagram ...54
SHIFT PATTERN CONTROL : System Descrip-
tion ..........................................................................
54
LOCK-UP CONTROL ............................................. ...56
LOCK-UP CONTROL : System Diagram ................56
LOCK-UP CONTROL : System Description ...........56
A/T SHIFT LOCK SYSTEM .......................................57
A/T SHIFT LOCK SYSTEM : System Description ...58
ON BOARD DIAGNOSTIC (OBD) SYSTEM .....60
Diagnosis Description .......................................... ...60
DIAGNOSIS SYSTEM (TCM) ............................61
CONSULT-III Function (TRANSMISSION) .......... ...61
ECU DIAGNOSIS INFORMATION ..............68
TCM ................................................................. ...68
Reference Value .................................................. ...68
Fail-Safe .................................................................74
Protection Control ...................................................76
DTC Inspection Priority Chart .................................77
DTC Index ..............................................................78
WIRING DIAGRAM .....................................80
A/T CONTROL SYSTEM ................................ ...80
Wiring Diagram .................................................... ...80
A/T SHIFT LOCK SYSTEM ...............................85
Wiring Diagram .................................................... ...85
BASIC INSPECTION ...................................88
DIAGNOSIS AND REPAIR WORK FLOW ..... ...88
Diagnosis Flow .................................................... ...88
Question sheet .......................................................89
ADDITIONAL SERVICE WHEN REPLACING
TRANSMISSION ASSEMBLY ...........................
91
Description ........................................................... ...91
Special Repair Requirement ...................................91
ADDITIONAL SERVICE WHEN REPLACING
CONTROL VALVE & TCM ................................
92
Description ........................................................... ...92
Special Repair Requirement ...................................92
CALIBRATION OF DECEL G SENSOR ...........93
Description ........................................................... ...93
Special Repair Requirement ...................................93
A/T FLUID ..........................................................94
Changing .............................................................. ...94
Adjustment ..............................................................95
A/T FLUID COOLER .........................................97
Cleaning ............................................................... ...97
Inspection ................................................................99
STALL TEST ....................................................100
Inspection and Judgment ..................................... .100
A/T POSITION ..................................................101
Inspection ............................................................. .101
Adjustment ............................................................101
DTC/CIRCUIT DIAGNOSIS .......................102
U0300 CAN COMMUNICATION DATA ......... ..102
Description ........................................................... .102
DTC Logic .............................................................102
Diagnosis Procedure .............................................102
U1000 CAN COMM CIRCUIT ...........................103
Description ........................................................... .103
DTC Logic .............................................................103
Diagnosis Procedure .............................................103
P0615 STARTER RELAY .................................104
Description ........................................................... .104
DTC Logic .............................................................104
Diagnosis Procedure .............................................104
P0705 TRANSMISSION RANGE SWITCH A ..106
DTC Logic .............................................................106
Diagnosis Procedure .............................................106
P0710 TRANSMISSION FLUID TEMPERA-
TURE SENSOR A .............................................
107
DTC Logic ............................................................ .107
Diagnosis Procedure .............................................107
P0717 INPUT SPEED SENSOR A ...................109
DTC Logic ............................................................ .109
Diagnosis Procedure .............................................109
P0720 OUTPUT SPEED SENSOR ...................110
DTC Logic ............................................................ .110
Diagnosis Procedure .............................................110
P0725 ENGINE SPEED ....................................112
Description ........................................................... .112
DTC Logic .............................................................112
Diagnosis Procedure .............................................112
P0729 6GR INCORRECT RATIO .....................114
Revision: 2010 May2011 QX56