Page 3838 of 5598

PARKING BRAKE SHOEPB-7
< REMOVAL AND INSTALLATION >
C
DE
G H
I
J
K L
M A
B
PB
N
O P
PARKING BRAKE SHOE
Exploded ViewINFOID:0000000006222515
Removal and InstallationINFOID:0000000006222516
REMOVAL
WARNING:
Clean any dust from the parking brake shoes an d back plates with a vacuum dust collector. Never
blow with compressed air.
1. Remove rear tires with power tool.
2. Remove disc rotor. Refer to RAX-7, "
Removal and Installation".
3. Remove anti-rattle pins, retainers, anti-rattle springs, return spring and adjuster spring. CAUTION:
Never drop the removed parts.
4. Remove parking brake shoes, adjuster assembly, and toggle lever. CAUTION:
Never drop the removed parts.
5. For the removal of back plate, refer to RAX-7, "
Removal and Installation".
6. Perform inspection after removal. Refer to PB-8, "
Inspection and Adjustment".
INSTALLATION
Note the following, install in the reverse order of removal.
Apply PBC (Poly Butyl Cuprysil) grease or silicone- based grease to the back plate and brake shoe. Refer to
PB-7, "
Exploded View".
1. Back plate 2. Parking brake shoe 3. Toggle lever
4. Return spring 5. Anti-rattle spring 6. Retainer
7. Anti-rattle pin 8. Adjuster spring 9. Adjuster
: Apply PBC (Poly Butyl Cuprysil) grease or silicone-based grease.
JPFIB0116ZZ
Revision: 2010 May2011 QX56
Page 3840 of 5598
PARKING BRAKE SHOEPB-9
< REMOVAL AND INSTALLATION >
C
DE
G H
I
J
K L
M A
B
PB
N
O P
Toggle lever for excessive wear, damage and rust.
Visually check inside of the drum for excessive wear, cracks, and damage with a pair of vernier calipers.
ADJUSTMENT AFTER INSTALLATION
1. Adjust the parking brake pedal stroke. Refer to PB-3, "Inspection and Adjustment".
2. Rotate the disc rotor to check that there is no drag. Install the plug. If any drag is found, follow the proce-
dure described below.
a. Adjust parking brake stroke again.
b. Check rear disc brake. Refer to BR-45, "
BRAKE CALIPER ASSEMBLY : Inspection".
Revision: 2010 May2011 QX56
Page 4203 of 5598

REAR WHEEL HUB AND HOUSINGRAX-7
< REMOVAL AND INSTALLATION >
CEF
G H
I
J
K L
M A
B
RAX
N
O P
REMOVAL AND INSTALLATION
REAR WHEEL HUB AND HOUSING
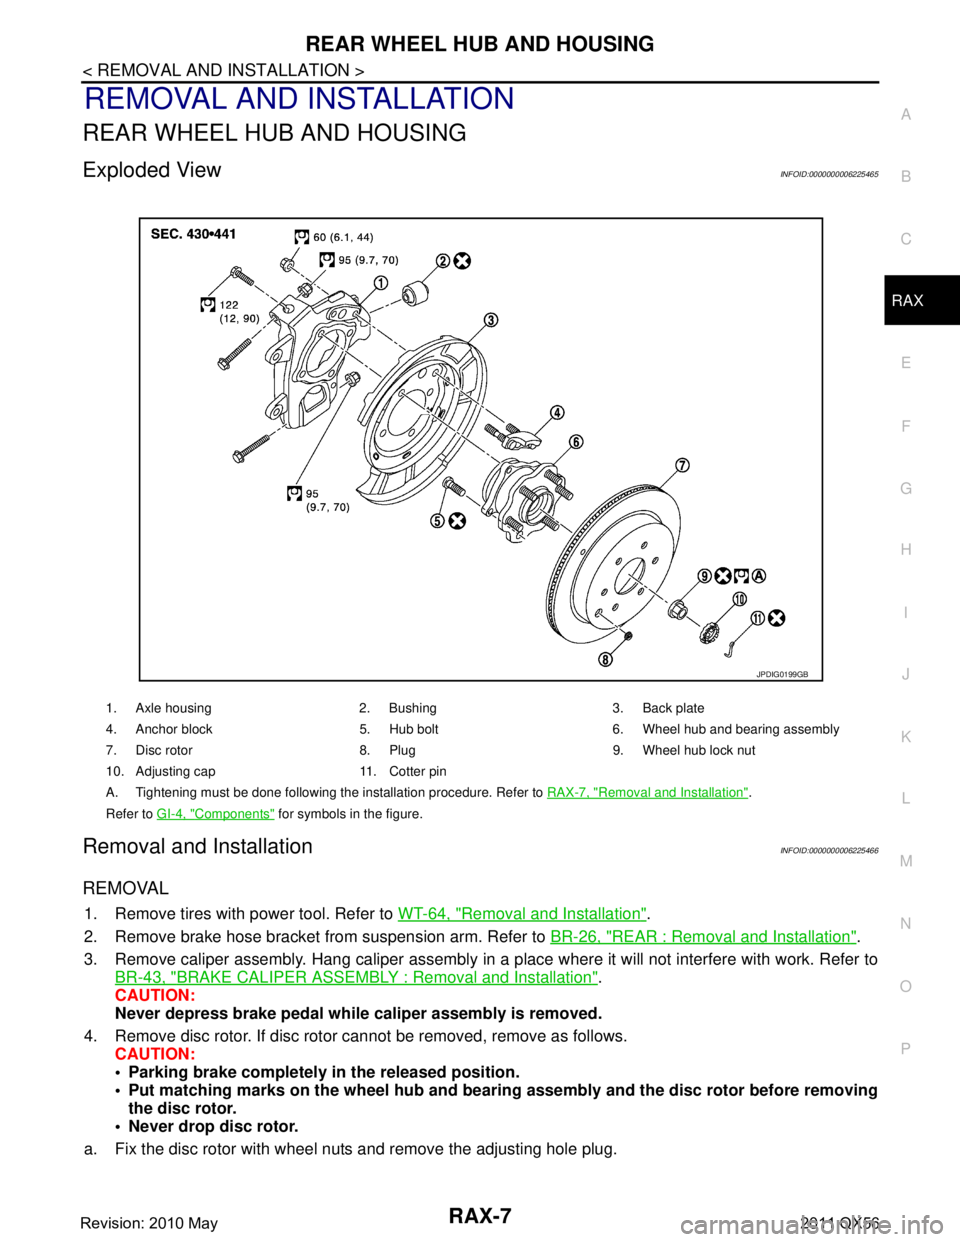
Exploded ViewINFOID:0000000006225465
Removal and InstallationINFOID:0000000006225466
REMOVAL
1. Remove tires with power tool. Refer to WT-64, "Removal and Installation".
2. Remove brake hose bracket from suspension arm. Refer to BR-26, "
REAR : Removal and Installation".
3. Remove caliper assembly. Hang caliper assembly in a place where it will not interfere with work. Refer to BR-43, "
BRAKE CALIPER ASSEMBLY : Removal and Installation".
CAUTION:
Never depress brake pedal while caliper assembly is removed.
4. Remove disc rotor. If disc rotor cannot be removed, remove as follows. CAUTION:
• Parking brake completely in the released position.
Put matching marks on the wheel hub and bear ing assembly and the disc rotor before removing
the disc rotor.
Never drop disc rotor.
a. Fix the disc rotor with wheel nuts and remove the adjusting hole plug.
1. Axle housing 2. Bushing 3. Back plate
4. Anchor block 5. Hub bolt 6. Wheel hub and bearing assembly
7. Disc rotor 8. Plug 9. Wheel hub lock nut
10. Adjusting cap 11. Cotter pin
A. Tightening must be done following the installation procedure. Refer to RAX-7, "
Removal and Installation".
Refer to GI-4, "
Components" for symbols in the figure.
JPDIG0199GB
Revision: 2010 May2011 QX56
Page 4273 of 5598

RSU-18
< UNIT REMOVAL AND INSTALLATION >
REAR SUSPENSION MEMBER
UNIT REMOVAL AND INSTALLATION
REAR SUSPENSION MEMBER
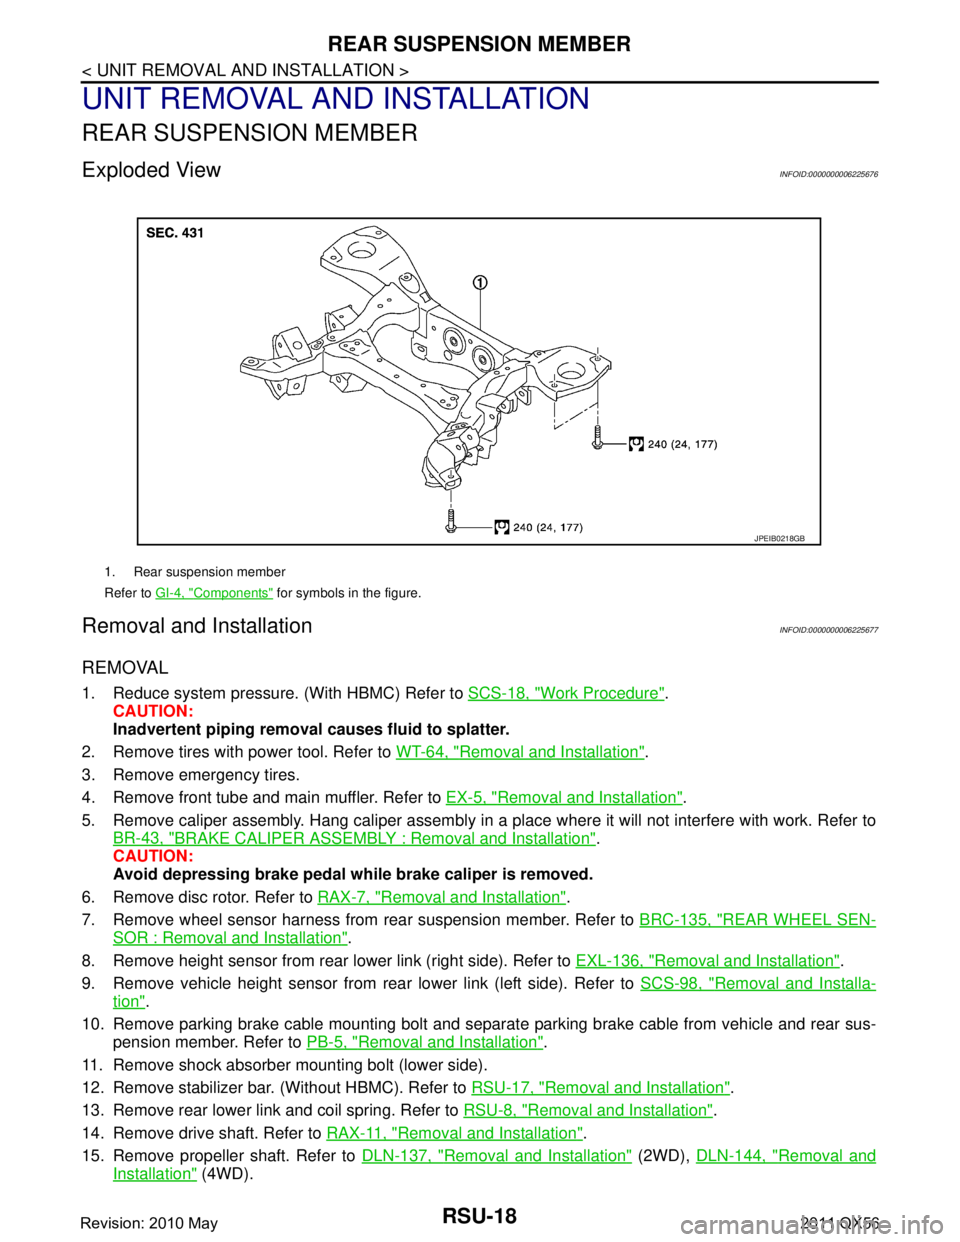
Exploded ViewINFOID:0000000006225676
Removal and InstallationINFOID:0000000006225677
REMOVAL
1. Reduce system pressure. (With HBMC) Refer to SCS-18, "Work Procedure".
CAUTION:
Inadvertent piping removal causes fluid to splatter.
2. Remove tires with power tool. Refer to WT-64, "
Removal and Installation".
3. Remove emergency tires.
4. Remove front tube and main muffler. Refer to EX-5, "
Removal and Installation".
5. Remove caliper assembly. Hang caliper assembly in a place where it will not interfere with work. Refer to BR-43, "
BRAKE CALIPER ASSEMBLY : Removal and Installation".
CAUTION:
Avoid depressing brake pedal wh ile brake caliper is removed.
6. Remove disc rotor. Refer to RAX-7, "
Removal and Installation".
7. Remove wheel sensor harness from rear suspension member. Refer to BRC-135, "
REAR WHEEL SEN-
SOR : Removal and Installation".
8. Remove height sensor from rear lower link (right side). Refer to EXL-136, "
Removal and Installation".
9. Remove vehicle height sensor from rear lower link (left side). Refer to SCS-98, "
Removal and Installa-
tion".
10. Remove parking brake cable mounting bolt and separa te parking brake cable from vehicle and rear sus-
pension member. Refer to PB-5, "
Removal and Installation".
11. Remove shock absorber mounting bolt (lower side).
12. Remove stabilizer bar. (Without HBMC). Refer to RSU-17, "
Removal and Installation".
13. Remove rear lower link and coil spring. Refer to RSU-8, "
Removal and Installation".
14. Remove drive shaft. Refer to RAX-11, "
Removal and Installation".
15. Remove propeller shaft. Refer to DLN-137, "
Removal and Installation" (2WD), DLN-144, "Removal and
Installation" (4WD).
1. Rear suspension member
Refer to GI-4, "
Components" for symbols in the figure.
JPEIB0218GB
Revision: 2010 May2011 QX56