2011 INFINITI QX56 Ignition coil assembly
[x] Cancel search: Ignition coil assemblyPage 2041 of 5598
![INFINITI QX56 2011 Factory Service Manual
COMPONENT PARTSEC-17
< SYSTEM DESCRIPTION > [VK56VD]
C
D
E
F
G H
I
J
K L
M A
EC
NP
O
EXHAUST COMPARTMENT
1. VVEL actuator motor (bank 2) 2. Ignition coil (with power transistor)
and spark plug (bank INFINITI QX56 2011 Factory Service Manual
COMPONENT PARTSEC-17
< SYSTEM DESCRIPTION > [VK56VD]
C
D
E
F
G H
I
J
K L
M A
EC
NP
O
EXHAUST COMPARTMENT
1. VVEL actuator motor (bank 2) 2. Ignition coil (with power transistor)
and spark plug (bank](/manual-img/42/57033/w960_57033-2040.png)
COMPONENT PARTSEC-17
< SYSTEM DESCRIPTION > [VK56VD]
C
D
E
F
G H
I
J
K L
M A
EC
NP
O
EXHAUST COMPARTMENT
1. VVEL actuator motor (bank 2) 2. Ignition coil (with power transistor)
and spark plug (bank 2)3. Camshaft position sensor (bank 2)
4. High pressure fuel pump 5. Intake valve timing control solenoid valve (bank 2)6. Electric-viscous fan assembly
7. Engine oil temperature sensor 8. Intake valve timing control solenoid valve (bank 1)9. Camshaft position sensor (bank 1)
10. Ignition coil (with power transistor) and spark plug (bank 1) 11. VVEL actuator motor (bank 1) 12. Low fuel pressure sensor
13. Positive crankcase ventilation (PCV) valve 14. Fuel injector (bank 2) 15. Knock sensor (bank 2)
16. Knock sensor (bank 1) 17. Fuel injector (bank 1) 18. Fuel rail pressure sensor
19. Manifold absolute pressure sensor 20. VVEL control shaft position sensor (bank 1)21. Crankshaft position sensor
22. Engine coolant temperature sensor 23. VVEL control shaft position sensor (bank 2)
A. Top view of the engine (View with intake manifold is re-
moved) B. Rear view of the engine
:Engine front
JPBIA3972ZZ
Revision: 2010 May2011 QX56
Page 2043 of 5598
![INFINITI QX56 2011 Factory Service Manual
COMPONENT PARTSEC-19
< SYSTEM DESCRIPTION > [VK56VD]
C
D
E
F
G H
I
J
K L
M A
EC
NP
O
Component DescriptionINFOID:0000000006217657
1. ASCD steering switch
ICC steering switch 2. Snow mode switch 3. Fu INFINITI QX56 2011 Factory Service Manual
COMPONENT PARTSEC-19
< SYSTEM DESCRIPTION > [VK56VD]
C
D
E
F
G H
I
J
K L
M A
EC
NP
O
Component DescriptionINFOID:0000000006217657
1. ASCD steering switch
ICC steering switch 2. Snow mode switch 3. Fu](/manual-img/42/57033/w960_57033-2042.png)
COMPONENT PARTSEC-19
< SYSTEM DESCRIPTION > [VK56VD]
C
D
E
F
G H
I
J
K L
M A
EC
NP
O
Component DescriptionINFOID:0000000006217657
1. ASCD steering switch
ICC steering switch 2. Snow mode switch 3. Fuel level sensor unit and fuel pump
assembly (with fuel tank temperature
sensor)
4. Fuel pump control module (FPCM) 5. EVAP canister vent control valve 6. EVAP canister
7. EVAP control system pressure sen- sor 8. Stop lamp switch 9. ASCD brake switch
ICC brake switch
10. Accelerator pedal position sensor
JSBIA0606ZZ
Component Reference
ECM EC-23, "
ECM"
Malfunction indicator lamp (MIL)EC-30, "Malfunction Indicator Lamp (MIL)"
Ignition coil with power transistorEC-29, "Ignition Coil With Power Transistor"
Accelerator pedal position sensorEC-21, "Accelerator Pedal Position Sensor"
Mass air flow sensor
EC-31, "Mass Air Flow Sensor (With Intake Air Temperature Sen-
sor)"Intake air temperature sensor
Electric throttle control actuator
EC-23, "
Electric Throttle Control Actuator"Throttle control motor relay
Throttle control motor
Throttle position sensor
Crankshaft position sensorEC-23, "
Crankshaft Position Sensor"
Camshaft position sensorEC-22, "Camshaft Position Sensor"
Engine coolant temperature sensorEC-25, "Engine Coolant Temperature Sensor"
Revision: 2010 May2011 QX56
Page 2335 of 5598
![INFINITI QX56 2011 Factory Service Manual
P0420, P0430 THREE WAY CATALYST FUNCTIONEC-311
< DTC/CIRCUIT DIAGNOSIS > [VK56VD]
C
D
E
F
G H
I
J
K L
M A
EC
NP
O
NO >> Replace spark plug(s) with standard type one(s). For spark plug type, refer to INFINITI QX56 2011 Factory Service Manual
P0420, P0430 THREE WAY CATALYST FUNCTIONEC-311
< DTC/CIRCUIT DIAGNOSIS > [VK56VD]
C
D
E
F
G H
I
J
K L
M A
EC
NP
O
NO >> Replace spark plug(s) with standard type one(s). For spark plug type, refer to](/manual-img/42/57033/w960_57033-2334.png)
P0420, P0430 THREE WAY CATALYST FUNCTIONEC-311
< DTC/CIRCUIT DIAGNOSIS > [VK56VD]
C
D
E
F
G H
I
J
K L
M A
EC
NP
O
NO >> Replace spark plug(s) with standard type one(s). For spark plug type, refer to
EM-132, "Spar k
Plug".
10.CHECK FUEL INJECTOR
1. Turn ignition switch OFF.
2. Remove fuel injector assembly. Refer to EM-49, "
Removal and Installation".
Keep fuel hose and all fuel injectors connected to fuel tube.
3. Disconnect all ignition coil harness connectors.
4. Reconnect all fuel injector harness connectors disconnected.
5. Turn ignition switch ON.
6. Check that fuel does not drip from fuel injector.
Does fuel drip from fuel injector?
YES >> Replace the fuel injector(s) from which fuel is dripping.
NO >> GO TO 11.
11 .CHECK INTERMITTENT INCIDENT
Refer to GI-40, "
Intermittent Incident".
Is the inspection result normal?
YES >> Replace three way catalyst assembly.
NO >> Repair or replace harness or connector.
Revision: 2010 May2011 QX56
Page 2563 of 5598

EM-1
ENGINE
C
DE
F
G H
I
J
K L
M
SECTION EM
A
EM
N
O P
CONTENTS
ENGINE MECHANICAL
PRECAUTION ................ ...............................3
PRECAUTIONS .............................................. .....3
Precaution for Procedure without Cowl Top Cover ......3
Precaution for Supplemental Restraint System
(SRS) "AIR BAG" and "SEAT BELT PRE-TEN-
SIONER" ...................................................................
3
Precaution Necessary for Steering Wheel Rota-
tion after Battery Disconnect .....................................
3
Precaution for Drain Engine Coolant and Engine
Oil ..............................................................................
4
Precaution for Disconnecting Fuel Piping .................4
Precaution for Handling High Pressure Fuel Sys-
tem ............................................................................
4
Precaution for Removal and Disassembly ................4
Precaution for Inspection, Repair and Replace-
ment ..........................................................................
4
Precaution for Assembly and Installation ..................4
Parts Requiring Angle Tightening .............................5
Precaution for Liquid Gasket .....................................5
Definitions of Bank Names ........................................6
PREPARATION ............................................7
PREPARATION .............................................. .....7
Special Service Tool ........................................... ......7
Commercial Service Tool ..........................................9
BASIC INSPECTION ...................................12
CAMSHAFT VALVE CLEARANCE ............... ....12
Inspection ............................................................ ....12
COMPRESSION PRESSURE ............................16
Inspection ............................................................ ....16
SYMPTOM DIAGNOSIS ..............................18
NOISE, VIBRATION AND HARSHNESS
(NVH) TROUBLESHOOTING ........................ ....
18
NVH Troubleshooting - Engine Noise .............. ....18
Use the Chart Below to Help You Find the C
ause of the Symptom ........................................ ....
19
PERIODIC MAINTENANCE ........................20
DRIVE BELTS ...................................................20
Exploded View ..................................................... ....20
Checking ..................................................................20
Tension Adjustment ................................................20
Removal and Installation .........................................20
Inspection ................................................................21
AIR CLEANER FILTER .....................................22
Exploded View .........................................................22
Removal and Installation .........................................22
SPARK PLUG ...................................................23
Exploded View .........................................................23
Removal and Installation .........................................23
Inspection ................................................................24
REMOVAL AND INSTALLATION ...............25
ENGINE COVER ...............................................25
Exploded View ..................................................... ....25
Removal and Installation .........................................25
DRIVE BELT AUTO TENSIONER AND IDLER
PULLEY .............................................................
26
Exploded View .........................................................26
Removal and Installation .........................................26
AIR CLEANER AND AIR DUCT .......................27
Exploded View .........................................................27
Removal and Installation .........................................27
Inspection ................................................................28
IGNITION COIL .................................................29
Exploded View .........................................................29
Removal and Installation .........................................29
INTAKE MANIFOLD .........................................30
Exploded View .........................................................30
Revision: 2010 May2011 QX56
Page 2578 of 5598

EM-16
< BASIC INSPECTION >
COMPRESSION PRESSURE
COMPRESSION PRESSURE
InspectionINFOID:0000000006289521
1. Warm up engine thoroughly. Then, stop it.
2. Release fuel pressure. Refer to EC-153, "
Work Procedure".
CAUTION:
If CONSULT-III is not used to release fuel pr essure leave the fuel pump fuse disconnected until
step 7.
3. Remove fuel pump fuse in IPDM E/R. NOTE:
For the fuse number, refer to EC-114, "
Wiring Diagram".
For the fuse arrangement, refer to PG-143, "
Fuse, Connector and Terminal Arrangement".
4. Remove engine cover. Refer to EM-25, "
Exploded View".
5. Remove ignition coil and spark plug from each cylinder. Refer to EM-29, "
Exploded View".
6. Connect engine tachometer (not required in use of CONSULT-III).
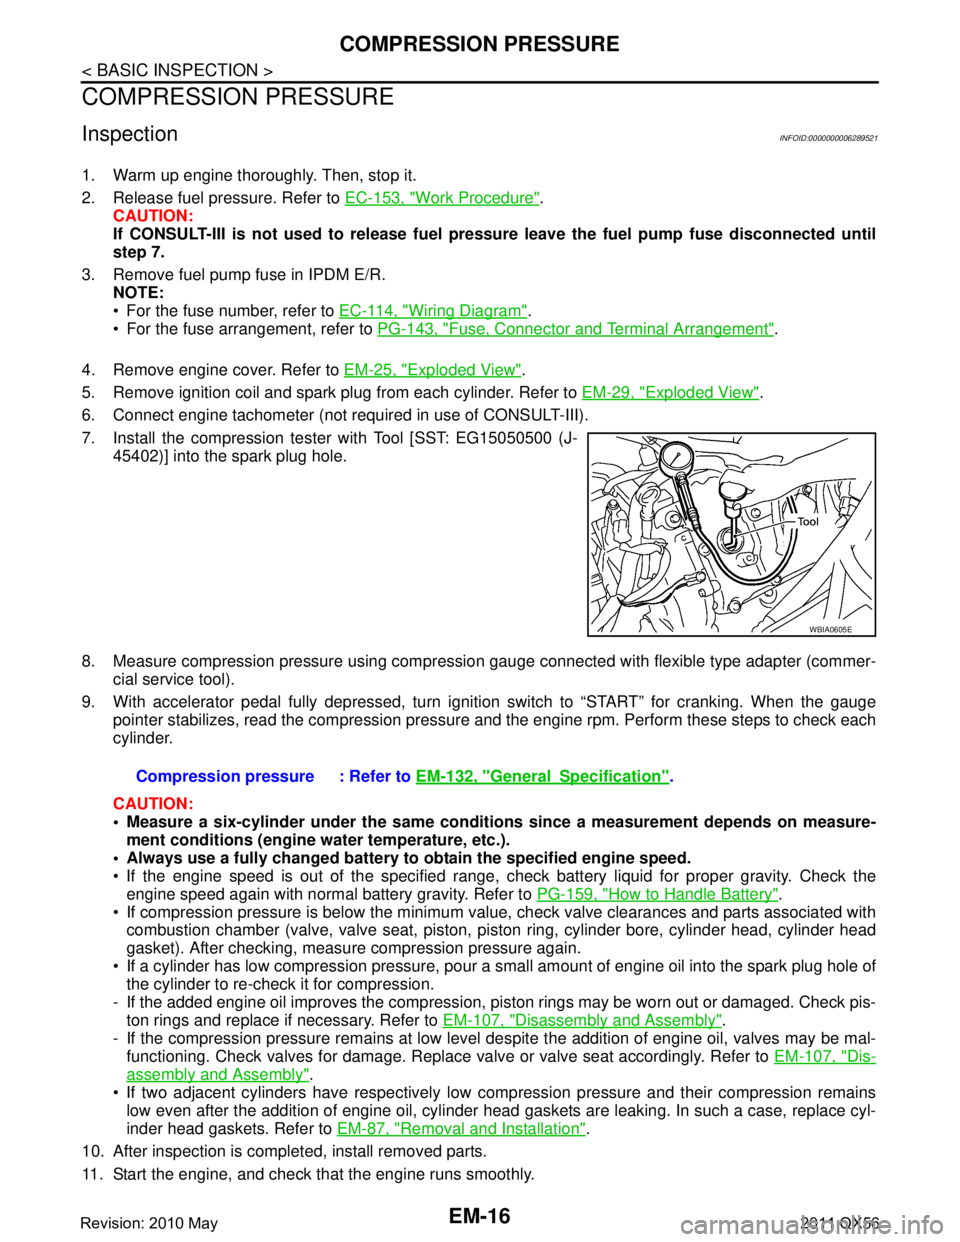
7. Install the compression tester with Tool [SST: EG15050500 (J- 45402)] into the spark plug hole.
8. Measure compression pressure using compressi on gauge connected with flexible type adapter (commer-
cial service tool).
9. With accelerator pedal fully depressed, turn ignition switch to “START” for cranking. When the gauge pointer stabilizes, read the compression pressure and the engine rpm. Perform these steps to check each
cylinder.
CAUTION:
Measure a six-cylinder under the same conditio ns since a measurement depends on measure-
ment conditions (engine water temperature, etc.).
Always use a fully changed battery to obtain the specified engine speed.
If the engine speed is out of the specified range, c heck battery liquid for proper gravity. Check the
engine speed again with normal battery gravity. Refer to PG-159, "
How to Handle Battery".
If compression pressure is below the minimum value, check valve clearances and parts associated with combustion chamber (valve, valve seat, piston, pi ston ring, cylinder bore, cylinder head, cylinder head
gasket). After checking, measure compression pressure again.
If a cylinder has low compression pressure, pour a small amount of engine oil into the spark plug hole of the cylinder to re-check it for compression.
- If the added engine oil improves the compression, pi ston rings may be worn out or damaged. Check pis-
ton rings and replace if necessary. Refer to EM-107, "
Disassembly and Assembly".
- If the compression pressure remains at low level despite the addition of engine oil, valves may be mal- functioning. Check valves for damage. Replace valve or valve seat accordingly. Refer to EM-107, "
Dis-
assembly and Assembly".
If two adjacent cylinders have respectively low co mpression pressure and their compression remains
low even after the addition of engine oil, cylinder head gaskets are leaking. In such a case, replace cyl-
inder head gaskets. Refer to EM-87, "
Removal and Installation".
10. After inspection is completed, install removed parts.
11. Start the engine, and check that the engine runs smoothly.
WBIA0605E
Compression pressure : Refer to EM-132, "GeneralSpecification".
Revision: 2010 May2011 QX56
Page 2595 of 5598

ROCKER COVEREM-33
< REMOVAL AND INSTALLATION >
C
DE
F
G H
I
J
K L
M A
EM
NP
O
ROCKER COVER
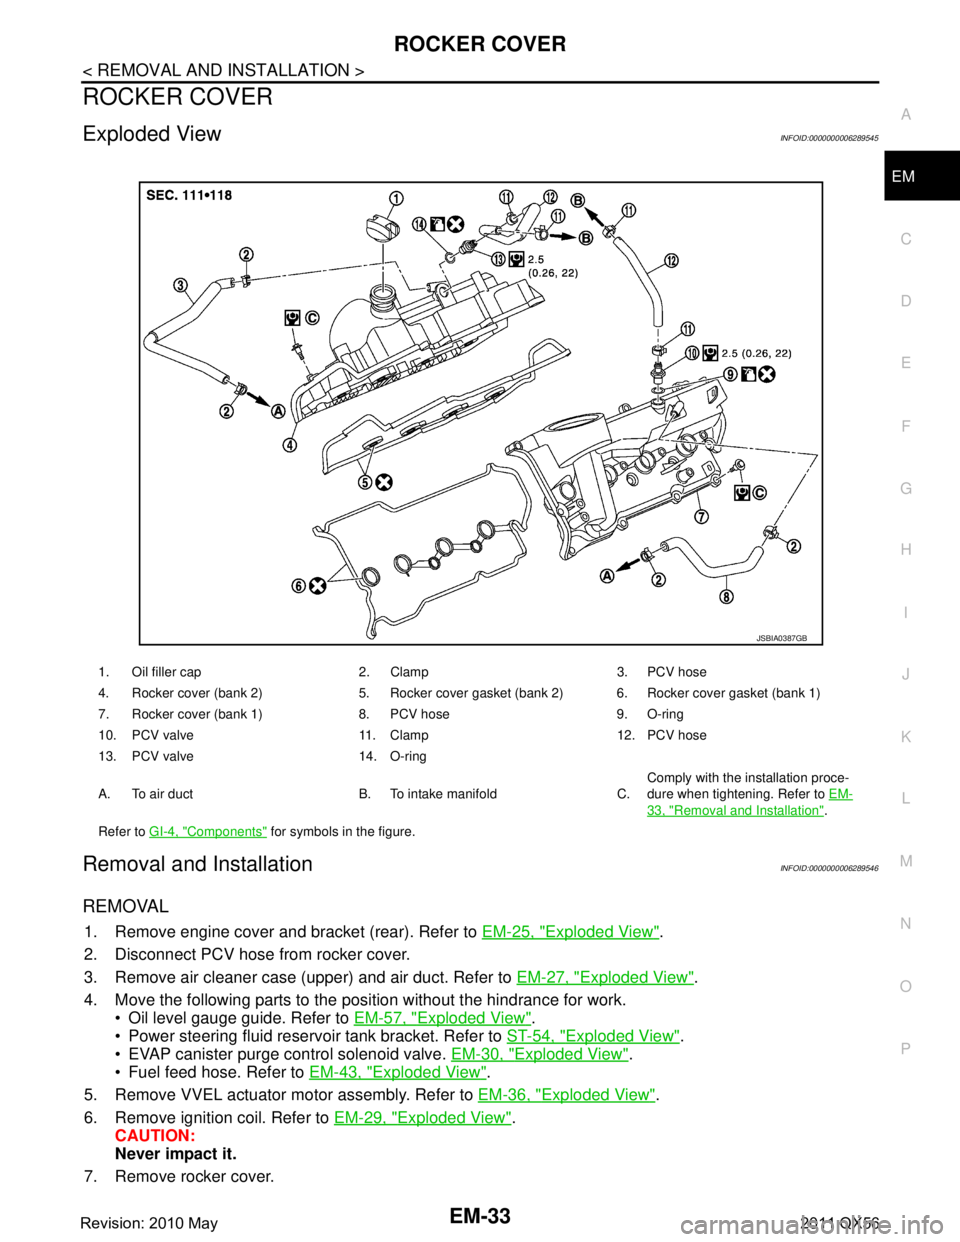
Exploded ViewINFOID:0000000006289545
Removal and InstallationINFOID:0000000006289546
REMOVAL
1. Remove engine cover and bracket (rear). Refer to
EM-25, "Exploded View".
2. Disconnect PCV hose from rocker cover.
3. Remove air cleaner case (upper) and air duct. Refer to EM-27, "
Exploded View".
4. Move the following parts to the position without the hindrance for work. Oil level gauge guide. Refer to EM-57, "
Exploded View".
Power steering fluid reservoir tank bracket. Refer to ST-54, "
Exploded View".
EVAP canister purge control solenoid valve. EM-30, "
Exploded View".
Fuel feed hose. Refer to EM-43, "
Exploded View".
5. Remove VVEL actuator motor assembly. Refer to EM-36, "
Exploded View".
6. Remove ignition coil. Refer to EM-29, "
Exploded View".
CAUTION:
Never impact it.
7. Remove rocker cover.
1. Oil filler cap 2. Clamp 3. PCV hose
4. Rocker cover (bank 2) 5. Rocker cover gasket (bank 2) 6. Rocker cover gasket (bank 1)
7. Rocker cover (bank 1) 8. PCV hose 9. O-ring
10. PCV valve 11. Clamp 12. PCV hose
13. PCV valve 14. O-ring
A. To air duct B. To intake manifold C. Comply with the installation proce-
dure when tightening. Refer to
EM-
33, "Removal and Installation".
Refer to GI-4, "
Components" for symbols in the figure.
JSBIA0387GB
Revision: 2010 May2011 QX56
Page 2597 of 5598

ROCKER COVEREM-35
< REMOVAL AND INSTALLATION >
C
DE
F
G H
I
J
K L
M A
EM
NP
O
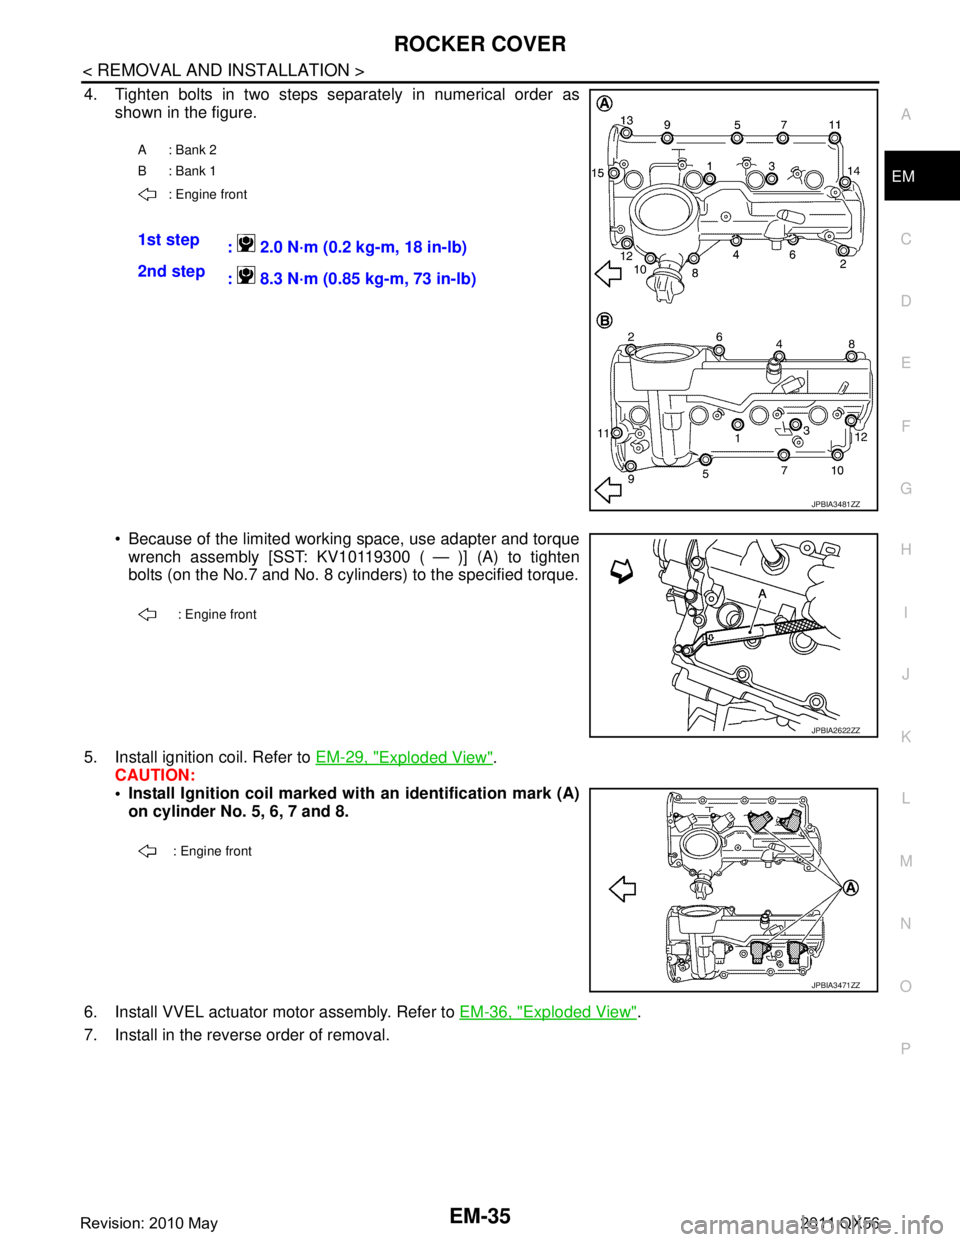
4. Tighten bolts in two steps separately in numerical order as
shown in the figure.
Because of the limited working space, use adapter and torquewrench assembly [SST: KV10119300 ( — )] (A) to tighten
bolts (on the No.7 and No. 8 cylinders) to the specified torque.
5. Install ignition coil. Refer to EM-29, "
Exploded View".
CAUTION:
Install Ignition coil marked with an identification mark (A)
on cylinder No. 5, 6, 7 and 8.
6. Install VVEL actuator motor assembly. Refer to EM-36, "
Exploded View".
7. Install in the reverse order of removal.
A: Bank 2
B: Bank 1
: Engine front
1st step : 2.0 N·m (0.2 kg-m, 18 in-lb)
2nd step : 8.3 N·m (0.85 kg-m, 73 in-lb)
JPBIA3481ZZ
: Engine front
JPBIA2622ZZ
: Engine front
JPBIA3471ZZ
Revision: 2010 May2011 QX56
Page 2646 of 5598

EM-84
< REMOVAL AND INSTALLATION >
CAMSHAFT
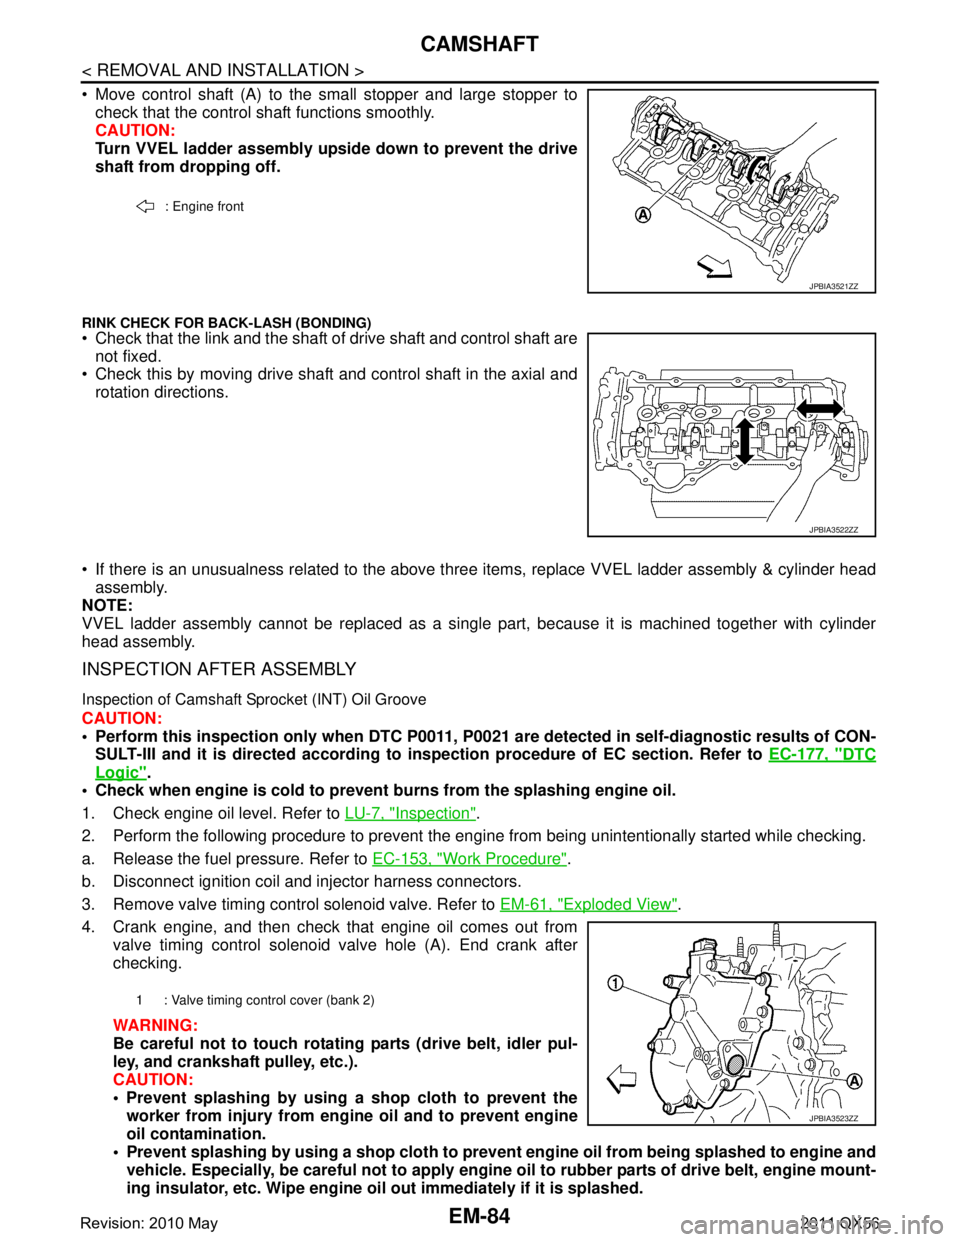
Move control shaft (A) to the small stopper and large stopper tocheck that the control shaft functions smoothly.
CAUTION:
Turn VVEL ladder assembly upside down to prevent the drive
shaft from dropping off.
RINK CHECK FOR BACK-LASH (BONDING) Check that the link and the shaft of drive shaft and control shaft are
not fixed.
Check this by moving drive shaft and control shaft in the axial and
rotation directions.
If there is an unusualness related to the above three items, replace VVEL ladder assembly & cylinder head
assembly.
NOTE:
VVEL ladder assembly cannot be replaced as a singl e part, because it is machined together with cylinder
head assembly.
INSPECTION AFTER ASSEMBLY
Inspection of Camshaft Sprocket (INT) Oil Groove
CAUTION:
Perform this inspection only when DTC P0011, P 0021 are detected in self-diagnostic results of CON-
SULT-III and it is directed according to inspection procedure of EC section. Refer to EC-177, "
DTC
Logic".
Check when engine is cold to prevent burns from the splashing engine oil.
1. Check engine oil level. Refer to LU-7, "
Inspection".
2. Perform the following procedure to prevent the engine from being unintentionally started while checking.
a. Release the fuel pressure. Refer to EC-153, "
Work Procedure".
b. Disconnect ignition coil and injector harness connectors.
3. Remove valve timing control solenoid valve. Refer to EM-61, "
Exploded View".
4. Crank engine, and then check that engine oil comes out from valve timing control solenoid valve hole (A). End crank after
checking.
WARNING:
Be careful not to touch rotati ng parts (drive belt, idler pul-
ley, and crankshaft pulley, etc.).
CAUTION:
Prevent splashing by using a shop cloth to prevent the worker from injury from en gine oil and to prevent engine
oil contamination.
Prevent splashing by using a shop cloth to prevent engine oil from being splashed to engine and
vehicle. Especially, be careful not to apply engine oil to rubber parts of drive belt, engine mount-
ing insulator, etc. Wipe engine oil out immediately if it is splashed.
: Engine front
JPBIA3521ZZ
JPBIA3522ZZ
1 : Valve timing control cover (bank 2)
JPBIA3523ZZ
Revision: 2010 May2011 QX56