2011 INFINITI QX56 lock
[x] Cancel search: lockPage 3683 of 5598
ENGINE MAINTENANCEMA-13
< PERIODIC MAINTENANCE >
C
DE
F
G H
I
J
K L
M B
MA
N
O A
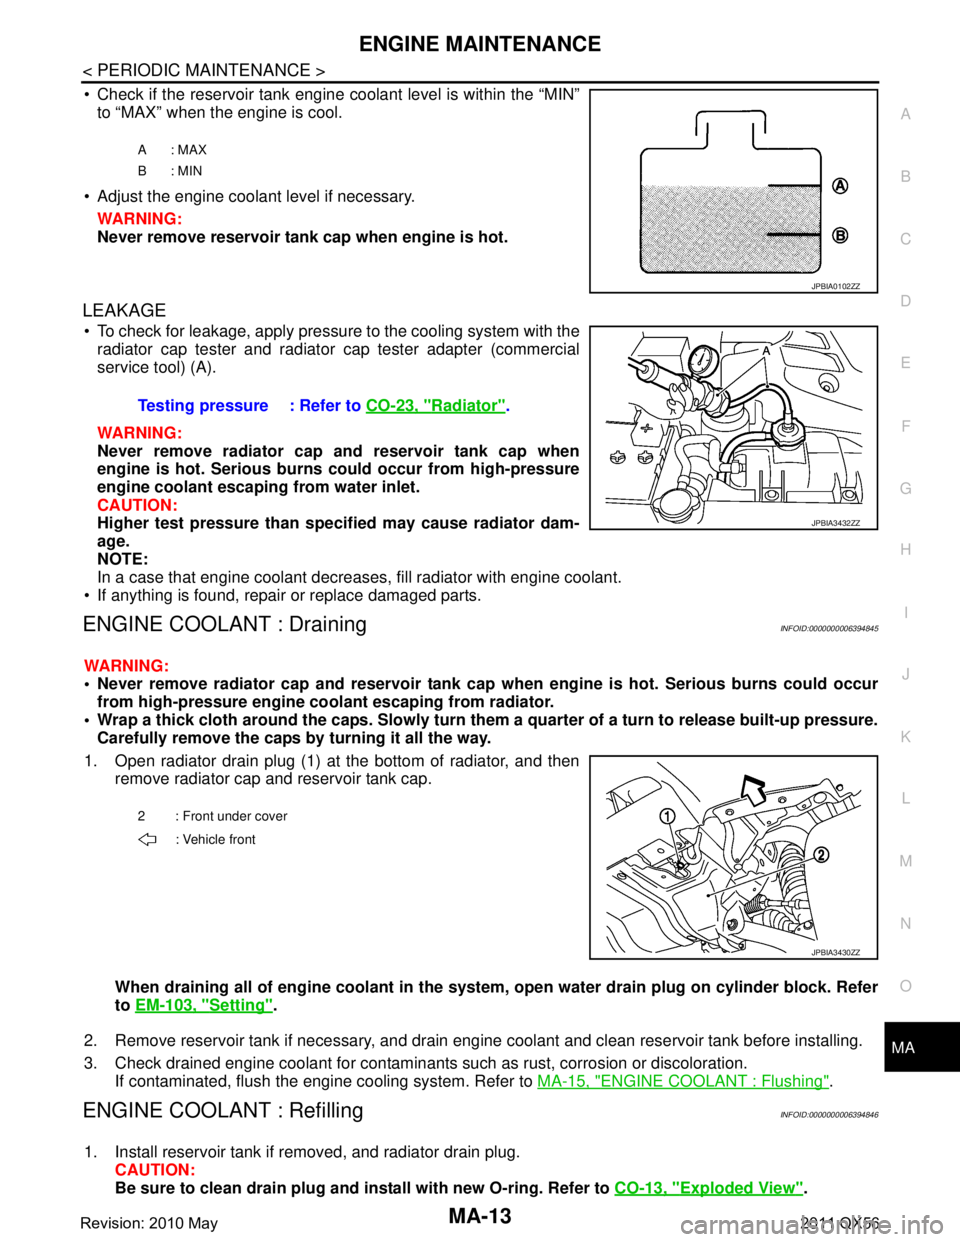
Check if the reservoir tank engine coolant level is within the “MIN”
to “MAX” when the engine is cool.
Adjust the engine coolant level if necessary. WARNING:
Never remove reservoir tank cap when engine is hot.
LEAKAGE
To check for leakage, apply pressure to the cooling system with theradiator cap tester and radiator cap tester adapter (commercial
service tool) (A).
WARNING:
Never remove radiator cap and reservoir tank cap when
engine is hot. Serious burns could occur from high-pressure
engine coolant escaping from water inlet.
CAUTION:
Higher test pressure than specified may cause radiator dam-
age.
NOTE:
In a case that engine coolant decreas es, fill radiator with engine coolant.
If anything is found, repair or replace damaged parts.
ENGINE COOLANT : DrainingINFOID:0000000006394845
WARNING:
Never remove radiator cap and reservoir tank cap when engine is hot. Serious burns could occur
from high-pressure engine co olant escaping from radiator.
Wrap a thick cloth around the caps. Slowly turn them a quarter of a turn to release built-up pressure.
Carefully remove the caps by turning it all the way.
1. Open radiator drain plug (1) at the bottom of radiator, and then remove radiator cap and reservoir tank cap.
When draining all of engine cool ant in the system, open water drai n plug on cylinder block. Refer
to EM-103, "
Setting".
2. Remove reservoir tank if necessary, and drain engine coolant and clean reservoir tank before installing.
3. Check drained engine coolant for contaminants such as rust, corrosion or discoloration. If contaminated, flush the engine cooling system. Refer to MA-15, "
ENGINE COOLANT : Flushing".
ENGINE COOLANT : RefillingINFOID:0000000006394846
1. Install reservoir tank if removed, and radiator drain plug.
CAUTION:
Be sure to clean drain plug and install with new O-ring. Refer to CO-13, "
Exploded View".
A: MAX
B: MIN
JPBIA0102ZZ
Testing pressure : Refer to CO-23, "Radiator".
JPBIA3432ZZ
2 : Front under cover
: Vehicle front
JPBIA3430ZZ
Revision: 2010 May2011 QX56
Page 3684 of 5598
MA-14
< PERIODIC MAINTENANCE >
ENGINE MAINTENANCE
If water drain plug on cylinder block is removed, close and tighten it. Refer to EM-107, "Disassem-
bly and Assembly".
2. Check that each hose clamp is firmly tightened.
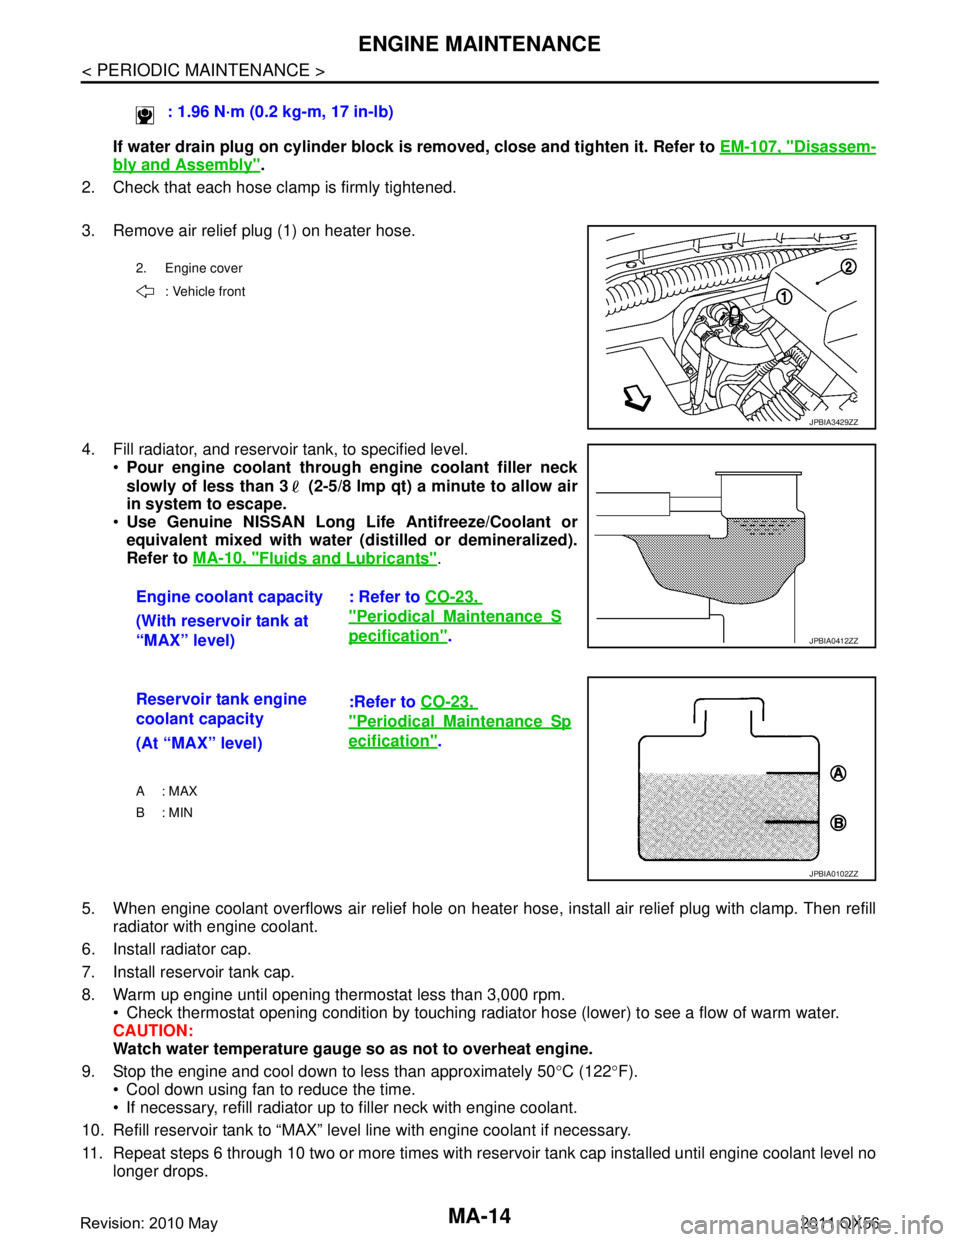
3. Remove air relief plug (1) on heater hose.
4. Fill radiator, and reservoir tank, to specified level. Pour engine coolant through engine coolant filler neck
slowly of less than 3 (2-5/8 lmp qt) a minute to allow air
in system to escape.
Use Genuine NISSAN Long Life Antifreeze/Coolant or
equivalent mixed with water (d istilled or demineralized).
Refer to MA-10, "
Fluids and Lubricants".
5. When engine coolant overflows air relief hole on heater hose, install air relief plug with clamp. Then refill
radiator with engine coolant.
6. Install radiator cap.
7. Install reservoir tank cap.
8. Warm up engine until opening thermostat less than 3,000 rpm. Check thermostat opening condition by touching radiator hose (lower) to see a flow of warm water.
CAUTION:
Watch water temperature gauge so as not to overheat engine.
9. Stop the engine and cool down to less than approximately 50 °C (122 °F).
Cool down using fan to reduce the time.
If necessary, refill radiator up to filler neck with engine coolant.
10. Refill reservoir tank to “MAX” level line with engine coolant if necessary.
11. Repeat steps 6 through 10 two or more times with reservoir tank cap installed until engine coolant level no longer drops. : 1.96 N·m (0.2 kg-m, 17 in-lb)
2. Engine cover
: Vehicle front
JPBIA3429ZZ
Engine coolant capacity : Refer to CO-23,
"PeriodicalMaintenanceS
pecification".
(With reservoir tank at
“MAX” level)JPBIA0412ZZ
Reservoir tank engine
coolant capacity :Refer to
CO-23,
"PeriodicalMaintenanceSp
ecification".
(At “MAX” level)
A : MAX
B: MIN
JPBIA0102ZZ
Revision: 2010 May2011 QX56
Page 3685 of 5598
ENGINE MAINTENANCEMA-15
< PERIODIC MAINTENANCE >
C
DE
F
G H
I
J
K L
M B
MA
N
O A
12. Check cooling system for leakage with engine running.
13. Warm up the engine, and check for sound of engine coolant flow while running engine from idle up to
3,000 rpm with heater temperature controller se t at several position between “COOL” and “WARM”.
Sound may be noticeable at heater unit.
14. Repeat step 13 three times.
15. If sound is heard, bleed air from cooling system by repeating step 4, and steps from 6 to 14 until engine
coolant level no longer drops.
ENGINE COOLANT : FlushingINFOID:0000000006394847
1. Install reservoir tank if removed, and radiator drain plug. CAUTION:
Be sure to clean drain plug and install with new O-ring. Refer to CO-13, "
Exploded View".
If water drain plug on cylinder block is removed, close and tighten it. Refer to EM-107, "
Disassem-
bly and Assembly".
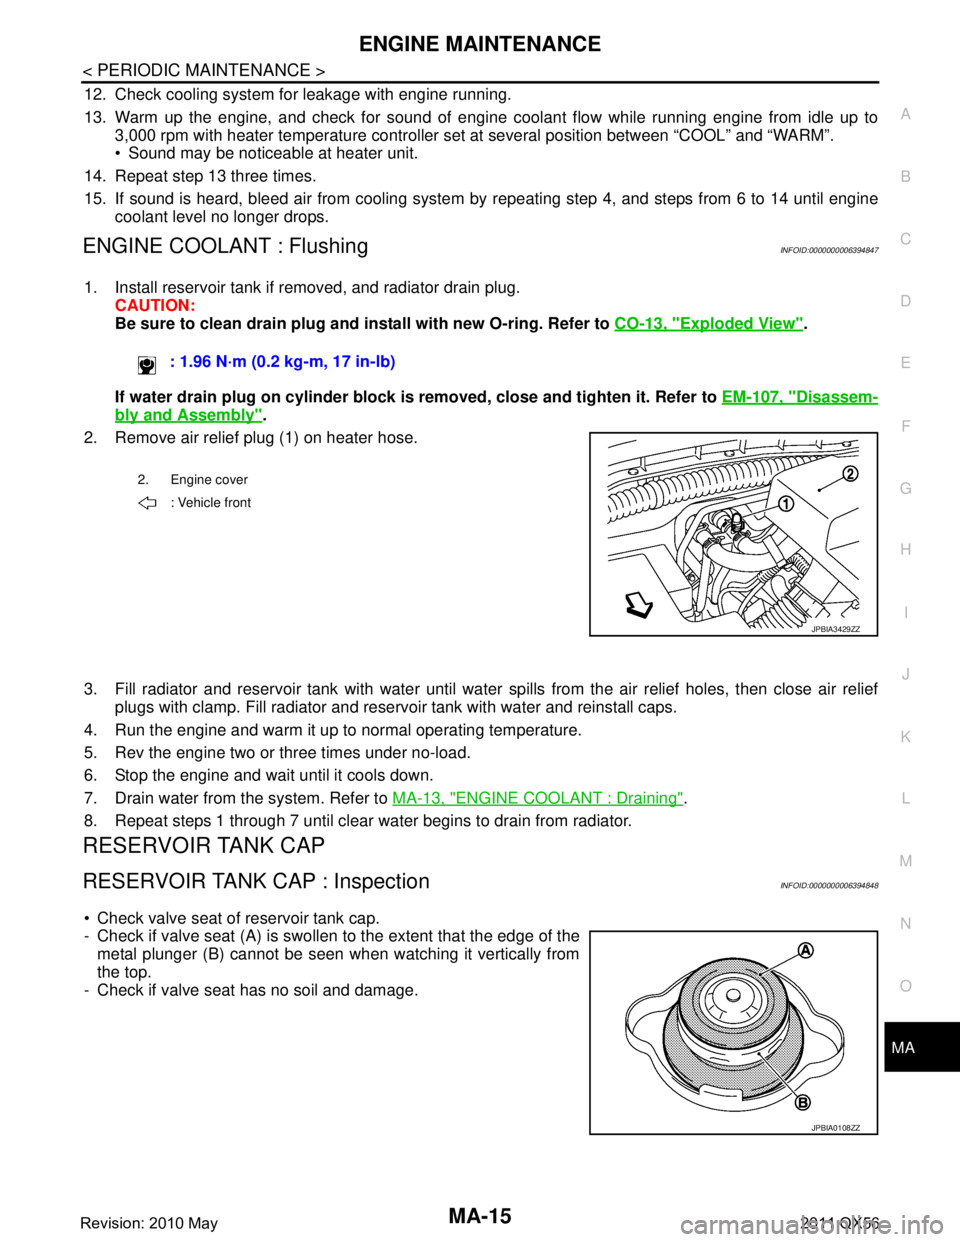
2. Remove air relief plug (1) on heater hose.
3. Fill radiator and reservoir tank with water until water spills from the air relief holes, then close air relief
plugs with clamp. Fill radiator and rese rvoir tank with water and reinstall caps.
4. Run the engine and warm it up to normal operating temperature.
5. Rev the engine two or three times under no-load.
6. Stop the engine and wait until it cools down.
7. Drain water from the system. Refer to MA-13, "
ENGINE COOLANT : Draining".
8. Repeat steps 1 through 7 until clear water begins to drain from radiator.
RESERVOIR TANK CAP
RESERVOIR TANK CAP : InspectionINFOID:0000000006394848
Check valve seat of reservoir tank cap.
- Check if valve seat (A) is swollen to the extent that the edge of the metal plunger (B) cannot be seen when watching it vertically from
the top.
- Check if valve seat has no soil and damage. : 1.96 N·m (0.2 kg-m, 17 in-lb)
2. Engine cover
: Vehicle front
JPBIA3429ZZ
JPBIA0108ZZ
Revision: 2010 May2011 QX56
Page 3704 of 5598
MA-34
< PERIODIC MAINTENANCE >
BODY MAINTENANCE
BODY MAINTENANCE
LOCKS, HINGES AND HOOD LATCH
LOCKS, HINGES AND HOOD LATCH : LubricatingINFOID:0000000006220949
For hood and hood lock illustration.
Hood: Refer to DLK-215, "
Exploded View".
Hood lock: Refer to DLK-238, "
Exploded View".
For front door and front door lock illustration.
Front door: Refer to DLK-224, "
Exploded View".
Front door lock: Refer to DLK-240, "
Exploded View".
For rear door and rear door lock illustration.
Rear door: Refer to DLK-228, "
Exploded View".
Rear door lock: Refer to DLK-243, "
Exploded View".
For back door and back door lock illustration.
Back door: Refer to DLK-232, "
Exploded View".
Back door lock: Refer to DLK-246, "
Exploded View".
SEAT BELT, BUCKLES, RETRACTORS, ANCHORS AND ADJUSTERS
SEAT BELT, BUCKLES, RETRACTORS, ANCHORS AND ADJUSTERS : Inspection
INFOID:0000000006220950
For front seat belt illustration. Refer to SB-6, "SEAT BELT RETRACTOR : Exploded View".
For second seat belt illustration. Refer to SB-11, "
SEAT BELT RETRACTOR : Exploded View".
For third seat belt illustration. Refer to SB-19, "
SEAT BELT RETRACTOR : Exploded View".
CAUTION:
After any collision, inspect all seat belt assembli es, including retractors and other attached hard-
wares (I.e. anchor bolt, guide ra il set). Nissan recommends to replace all seat belt assemblies in use
during a collision, unless not damaged and pr operly operating after minor collision.
Also inspect seat belt assemblies not in use during a collision, and replace if damaged or improperly
operating.
Seat belt pre-tensioner should be replaced even if th e seat belts are not in use during a frontal colli-
sion where the driver and passenger air bags are deployed.
If any component of seat belt assembl y is questionable, do not repair.
Replace as seat belt assembly.
If webbing is cut, frayed, or damaged, replace belt assembly.
Never oil tongue and buckle.
Use a genuine NISSAN seat belt assembly.
For details, refer to SB-4, "
SEAT BELT RETRACTOR : Inspection", SB-10, "SEAT BELT RETRACTOR :
Inspection", SB-17, "SEAT BELT RETRACTOR : Inspection" in SB section.
Check anchors for loose mounting
Check belts for damage
Check retractor for smooth operation
Check function of buckles and tongues when buckled and released
Revision: 2010 May2011 QX56
Page 3706 of 5598

MIR-1
DRIVER CONTROLS
C
DE
F
G H
I
J
K
M
SECTION MIR
A
B
MIR
N
O P
CONTENTS
MIRRORS
PRECAUTION ................ ...............................3
PRECAUTIONS .............................................. .....3
Precaution for Supplemental Restraint System
(SRS) "AIR BAG" and "SEAT BELT PRE-TEN-
SIONER" ............................................................. ......
3
Precaution Necessary for Steering Wheel Rota-
tion after Battery Disconnect .....................................
3
PREPARATION ............................................5
PREPARATION .............................................. .....5
Commercial Service Tools ................................. ......5
SYSTEM DESCRIPTION ..............................6
COMPONENT PARTS ................................... .....6
DOOR MIRROR ..................................................... ......6
DOOR MIRROR : Component Parts Location ..........6
DOOR MIRROR : Component Description ...............6
INSIDE MIRROR .................................................... ......7
INSIDE MIRROR : Component Description ..............7
SYSTEM ..............................................................8
DOOR MIRROR SYSTEM ..................................... ......8
DOOR MIRROR SYSTEM : System Diagram ..........8
DOOR MIRROR SYSTEM : System Description ......8
AUTO ANTI-DAZZLING INSIDE MIRROR SYS-
TEM ........................................................................ ......
9
AUTO ANTI-DAZZLING INSIDE MIRROR SYS-
TEM : System Description .........................................
9
ECU DIAGNOSIS INFORMATION ..............10
DRIVER SEAT CONTROL UNIT, AUTOMAT-
IC DRIVE POSITIONER CONTROL UNIT ..... ....
10
List of ECU Reference ........................................ ....10
WIRING DIAGRAM ......................................11
DOOR MIRROR SYSTEM .................................11
Wiring Diagram .................................................... ....11
AUTO ANTI-DAZZLING INSIDE MIRROR
SYSTEM ............................................................
19
Wiring Diagram - INSIDE MIRROR SYSTEM - ... ....19
BASIC INSPECTION ....... ............................21
DIAGNOSIS AND REPAIR WORKFLOW ........21
Work Flow ............................................................ ....21
DTC/CIRCUIT DIAGNOSIS .........................22
DOOR MIRROR REMOTE CONTROL
SWITCH .............................................................
22
OPEN/CLOSE SWITCH ......................................... ....22
OPEN/CLOSE SWITCH : Component Inspection ....22
SYMPTOM DIAGNOSIS ..............................23
REVERSE INTERLOCK DOOR MIRROR
DOES NOT OPERATE ......................................
23
Diagnosis Procedure ........................................... ....23
SQUEAK AND RATTLE TROUBLE DIAG-
NOSES ..............................................................
24
Work Flow ................................................................24
Inspection Procedure ...............................................26
Diagnostic Worksheet ..............................................28
REMOVAL AND INSTALLATION ...............30
INSIDE MIRROR ...............................................30
Exploded View ..................................................... ....30
Removal and Installation .........................................30
OUTSIDE MIRROR ...........................................32
Exploded View .........................................................32
DOOR MIRROR ASSEMBLY ....................................32
Revision: 2010 May2011 QX56
Page 3708 of 5598
PRECAUTIONSMIR-3
< PRECAUTION >
C
DE
F
G H
I
J
K
M A
B
MIR
N
O P
PRECAUTION
PRECAUTIONS
Precaution for Supplemental Restraint System (SRS) "AIR BAG" and "SEAT BELT
PRE-TENSIONER"
INFOID:0000000006257245
The Supplemental Restraint System such as “A IR BAG” and “SEAT BELT PRE-TENSIONER”, used along
with a front seat belt, helps to reduce the risk or severi ty of injury to the driver and front passenger for certain
types of collision. This system includes seat belt switch inputs and dual stage front air bag modules. The SRS
system uses the seat belt switches to determine the front air bag deployment, and may only deploy one front
air bag, depending on the severity of a collision and whether the front occupants are belted or unbelted.
Information necessary to service the system safely is included in the “SRS AIR BAG” and “SEAT BELT” of this
Service Manual.
WARNING:
• To avoid rendering the SRS inoper ative, which could increase the risk of personal injury or death in
the event of a collision that would result in air ba g inflation, all maintenance must be performed by
an authorized NISSAN/INFINITI dealer.
Improper maintenance, including in correct removal and installation of the SRS, can lead to personal
injury caused by unintentional act ivation of the system. For removal of Spiral Cable and Air Bag
Module, see the “SRS AIR BAG”.
Do not use electrical test equipm ent on any circuit related to the SRS unless instructed to in this
Service Manual. SRS wiring harnesses can be identi fied by yellow and/or orange harnesses or har-
ness connectors.
PRECAUTIONS WHEN USING POWER TOOLS (AIR OR ELECTRIC) AND HAMMERS
WARNING:
When working near the Air Bag Diagnosis Sensor Unit or other Air Bag System sensors with the
ignition ON or engine running, DO NOT use air or electric power tools or strike near the sensor(s)
with a hammer. Heavy vibration could activate the sensor(s) and deploy the air bag(s), possibly
causing serious injury.
When using air or electric power tools or hammers , always switch the ignition OFF, disconnect the
battery, and wait at least 3 minutes before performing any service.
Precaution Necessary for Steering Wh eel Rotation after Battery Disconnect
INFOID:0000000006257246
NOTE:
Before removing and installing any control units, first tu rn the push-button ignition switch to the LOCK posi-
tion, then disconnect both battery cables.
After finishing work, confirm that all control unit connectors are connected properly, then re-connect both
battery cables.
Always use CONSULT-III to perform self-diagnosis as a part of each function inspection after finishing work.
If a DTC is detected, perform trouble diagnos is according to self-diagnosis results.
For vehicle with steering lock unit, if the battery is disconnected or discharged, the steering wheel will lock and
cannot be turned.
If turning the steering wheel is required with the batte ry disconnected or discharged, follow the operation pro-
cedure below before starting the repair operation.
OPERATION PROCEDURE
1. Connect both battery cables. NOTE:
Supply power using jumper cables if battery is discharged.
2. Turn the push-button ignition switch to ACC position. (At this time, the steering lock will be released.)
3. Disconnect both battery cables. The steering lock wil l remain released with both battery cables discon-
nected and the steering wheel can be turned.
4. Perform the necessary repair operation.
Revision: 2010 May2011 QX56
Page 3709 of 5598

MIR-4
< PRECAUTION >
PRECAUTIONS
5. When the repair work is completed, re-connect both battery cables. With the brake pedal released, turn
the push-button ignition switch from ACC position to ON position, then to LOCK position. (The steering
wheel will lock when the push-button igniti on switch is turned to LOCK position.)
6. Perform self-diagnosis check of all control units using CONSULT-III.
Revision: 2010 May2011 QX56
Page 3713 of 5598

MIR-8
< SYSTEM DESCRIPTION >
SYSTEM
SYSTEM
DOOR MIRROR SYSTEM
DOOR MIRROR SYSTEM : System DiagramINFOID:0000000006257222
DOOR MIRROR SYSTEM : System DescriptionINFOID:0000000006257223
MANUAL FUNCTION
Description
Automatic drive positioner control unit controls door mirror.
Automatic drive positioner control unit inputs changeover switch signal and perform the LH/RH control of
door mirror motor supplying electric power when changeover switch is operated.
Automatic drive positioner control unit inputs mirror s witch signal and supplies electric power to door mirror.
The ignition switch signal (ACC/ON) is transmitted from BCM to driver seat control unit via CAN communica-
tion and from driver seat control unit to automatic drive positioner control unit via UART communication.
Operation Conditions
If the following conditions are not satisfied, operation is not performed.
Ignition switch: ON or ACC
Changeover switch: Select either left or right
REVERSE INTERLOCK DOOR MIRROR SYSTEM
Description
Select either of the door mirror faces by changeover switch, and then set mirror face downward.
When ignition switch is ON position and A/T shift selector is in R position, TCM sends the R signal to driver
seat control unit.
The R signal is transmitted to automatic drive positioner control unit from driver seat control unit via UART
communication.
When the R signal is detected, automatic drive positioner control unit activated mirror motor.
Operation Conditions
If the following conditions are not satisfied, operation is not performed.
Ignition switch: ON
JMLIA0872GB
Revision: 2010 May2011 QX56