2011 INFINITI QX56 lock
[x] Cancel search: lockPage 3799 of 5598

MWI-56
< WIRING DIAGRAM >
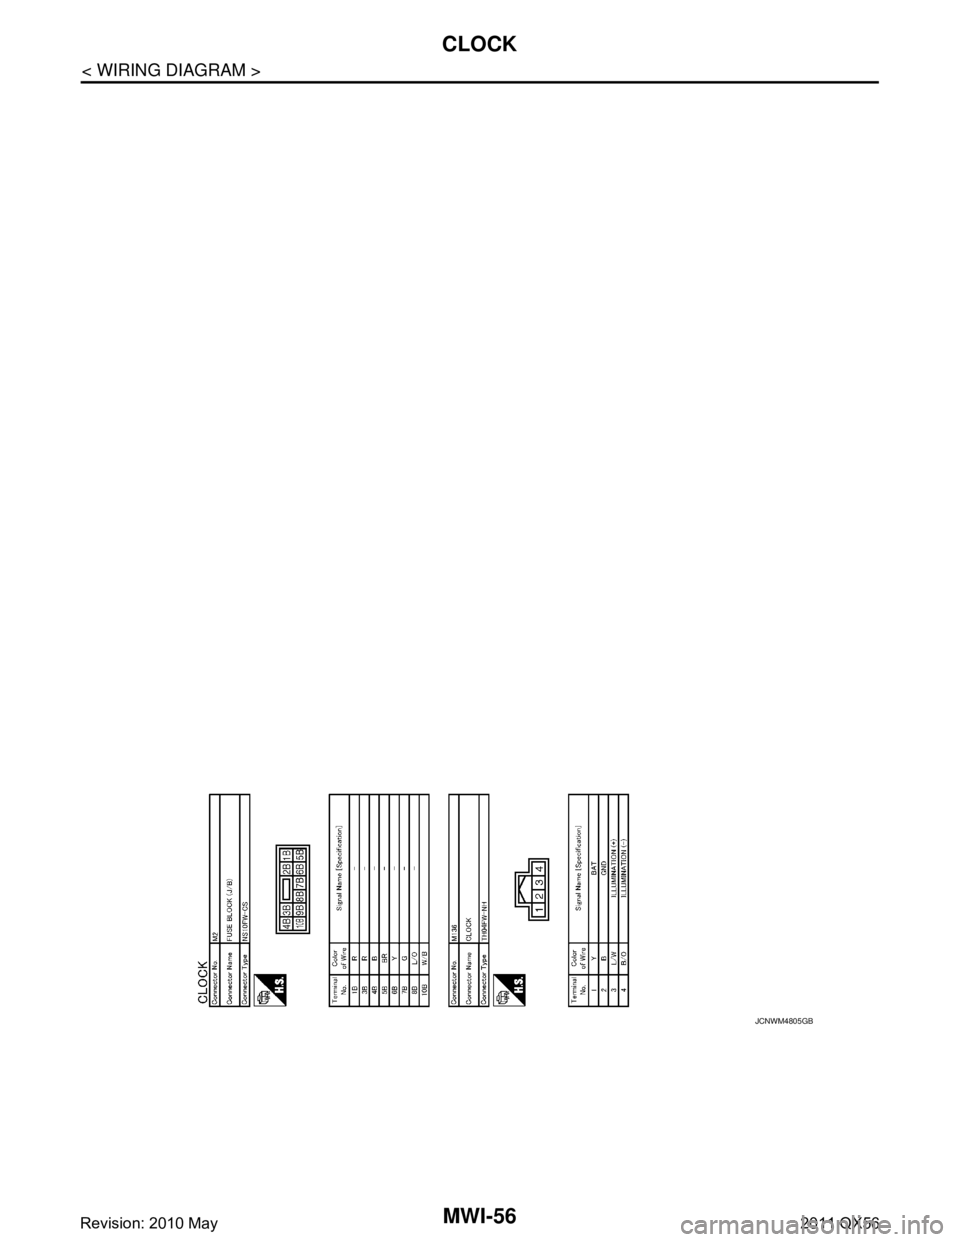
CLOCK
JCNWM4805GB
Revision: 2010 May2011 QX56
Page 3831 of 5598

MWI-88
< REMOVAL AND INSTALLATION >
CLOCK
CLOCK
Exploded ViewINFOID:0000000006221783
REMOVAL
Refer to IP-13, "Exploded View".
Removal and InstallationINFOID:0000000006221784
REMOVAL
1. Remove cluster lid C assembly. Refer to IP-14, "Removal and Installation".
2. Disengage the tabs to separate clock.
INSTALLATION
Install in the reverse order of removal.
Revision: 2010 May2011 QX56
Page 3834 of 5598

PARKING BRAKE SYSTEMPB-3
< PERIODIC MAINTENANCE >
C
DE
G H
I
J
K L
M A
B
PB
N
O P
PERIODIC MAINTENANCE
PARKING BRAKE SYSTEM
Inspection and AdjustmentINFOID:0000000006222510
INSPECTION
1. Operate the parking brake pedal with a force of 196 N ( 20 kg, 44 lb). Check that the pedal stroke is within
the specified number of notches. (Check it by listening to clicks of ratchet.)
2. When brake warning lamp turns ON, check that the pedal stroke is within the specified number of
notches. (Check it by listening to clicks of ratchet.)
Inspect Components
Check the following items and replace if necessary.
• Check each component for installation condition such as looseness.
Check the parking brake pedal assembly for bend, damage and cracks.
Check the cables and equalizer for wear, damage and cracks.
Check the parking brake switch. Refer to BRC-118, "
Component Inspection".
ADJUSTMENT
1. Remove the rear tires with power tool.
2. Fix the disc rotor using wheel nuts (2 points at least).
3. Release the parking brake pedal by turning the adjusting nut and loosening the cable.
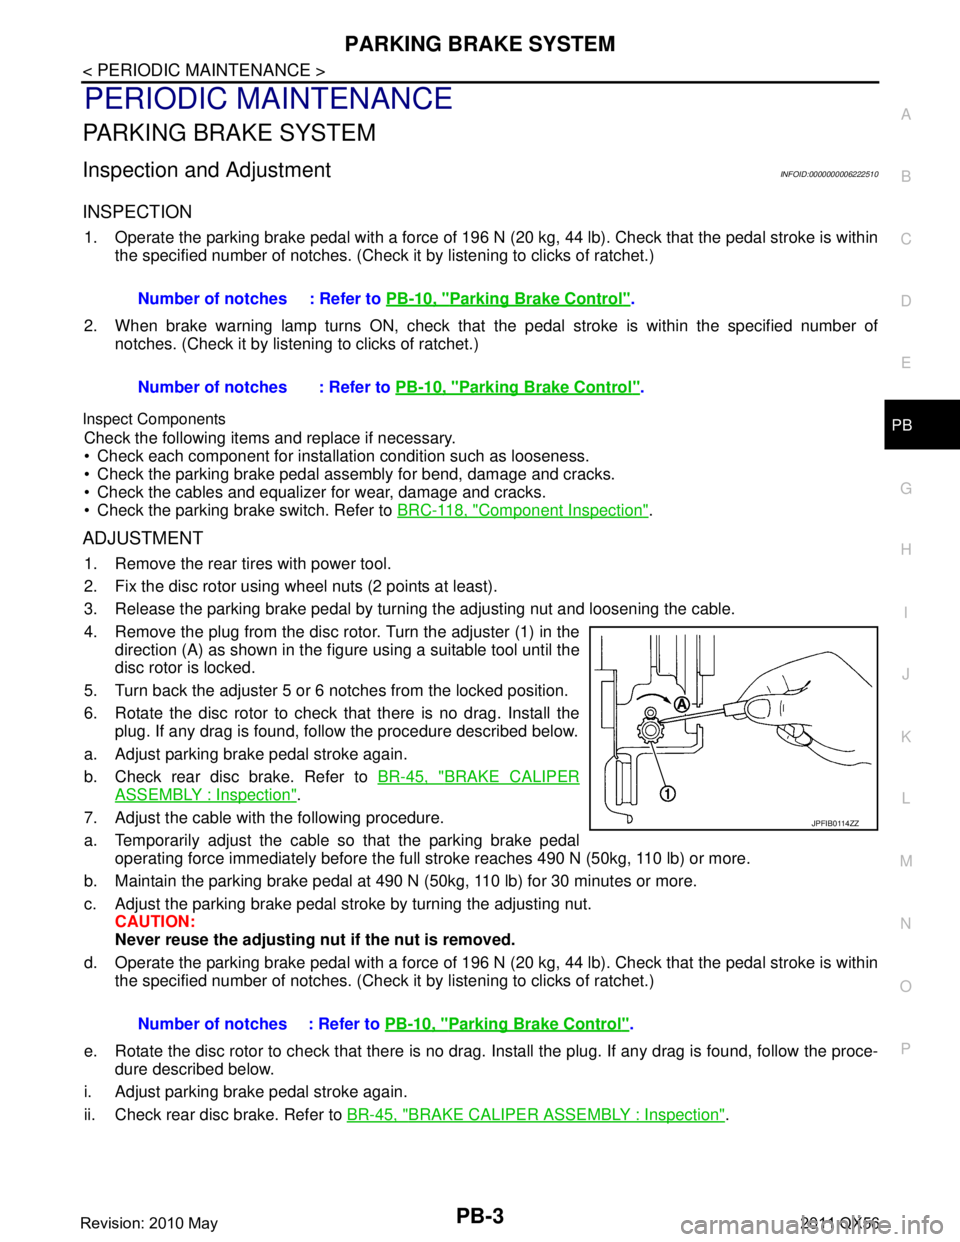
4. Remove the plug from the disc rotor. Turn the adjuster (1) in the
direction (A) as shown in the figure using a suitable tool until the
disc rotor is locked.
5. Turn back the adjuster 5 or 6 notches from the locked position.
6. Rotate the disc rotor to check that there is no drag. Install the plug. If any drag is found, follow the procedure described below.
a. Adjust parking brake pedal stroke again.
b. Check rear disc brake. Refer to BR-45, "
BRAKE CALIPER
ASSEMBLY : Inspection".
7. Adjust the cable with the following procedure.
a. Temporarily adjust the cable so that the parking brake pedal operating force immediately before the full stroke reaches 490 N (50kg, 110 lb) or more.
b. Maintain the parking brake pedal at 490 N (50kg, 110 lb) for 30 minutes or more.
c. Adjust the parking brake pedal st roke by turning the adjusting nut.
CAUTION:
Never reuse the adjusting nu t if the nut is removed.
d. Operate the parking brake pedal with a force of 196 N ( 20 kg, 44 lb). Check that the pedal stroke is within
the specified number of notches. (Check it by listening to clicks of ratchet.)
e. Rotate the disc rotor to check that there is no drag. Install the plug. If any drag is found, follow the proce-
dure described below.
i. Adjust parking brake pedal stroke again.
ii. Check rear disc brake. Refer to BR-45, "
BRAKE CALIPER ASSEMBLY : Inspection".
Number of notches : Refer to
PB-10, "
Parking Brake Control".
Number of notches : Refer to PB-10, "
Parking Brake Control".
Number of notches : Refer to PB-10, "
Parking Brake Control".
JPFIB0114ZZ
Revision: 2010 May2011 QX56
Page 3836 of 5598

PARKING BRAKE CONTROLPB-5
< REMOVAL AND INSTALLATION >
C
DE
G H
I
J
K L
M A
B
PB
N
O P
REMOVAL AND INSTALLATION
PARKING BRAKE CONTROL
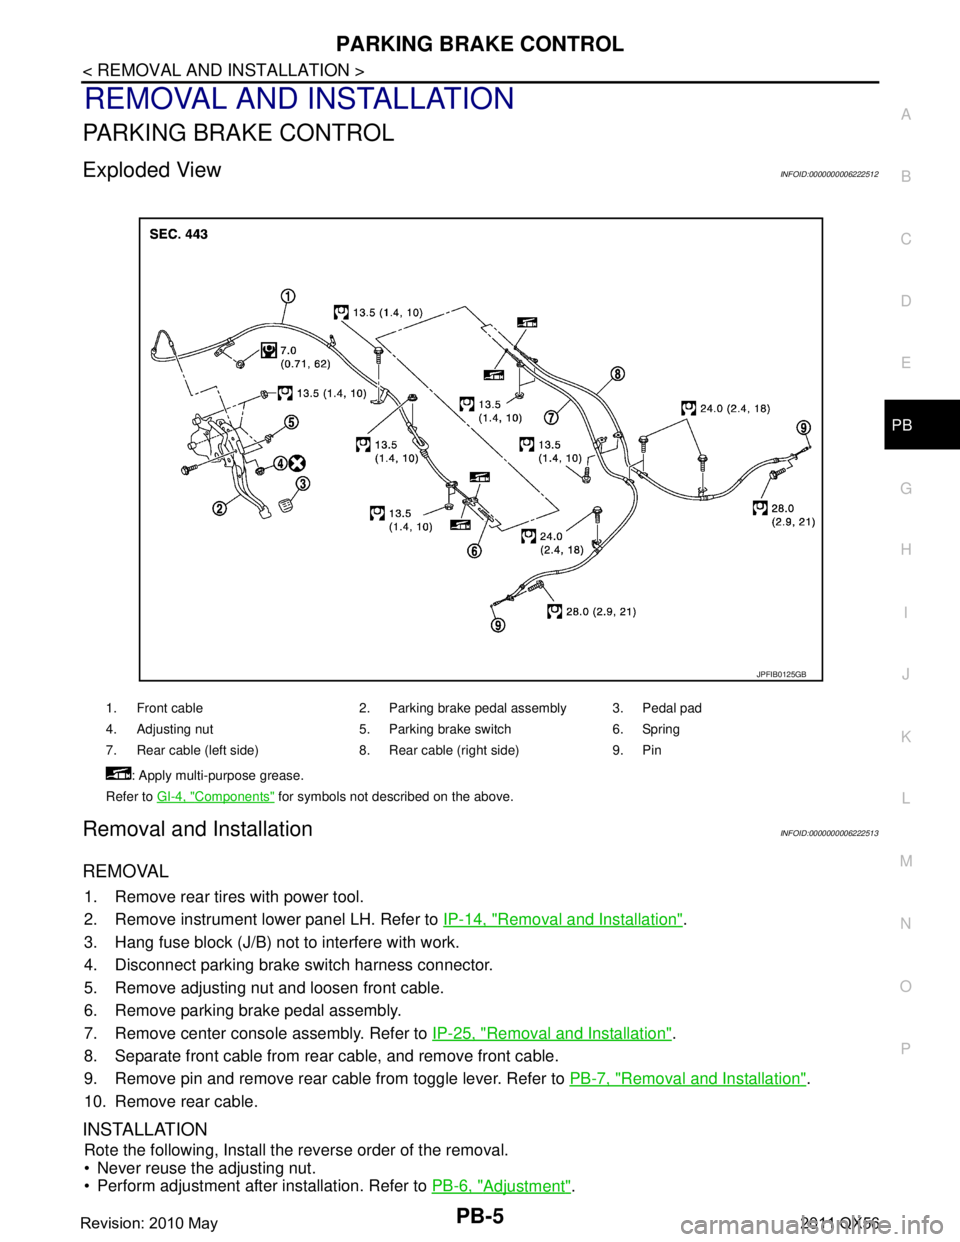
Exploded ViewINFOID:0000000006222512
Removal and InstallationINFOID:0000000006222513
REMOVAL
1. Remove rear tires with power tool.
2. Remove instrument lower panel LH. Refer to IP-14, "
Removal and Installation".
3. Hang fuse block (J/B) not to interfere with work.
4. Disconnect parking brake switch harness connector.
5. Remove adjusting nut and loosen front cable.
6. Remove parking brake pedal assembly.
7. Remove center console assembly. Refer to IP-25, "
Removal and Installation".
8. Separate front cable from rear cable, and remove front cable.
9. Remove pin and remove rear cable from toggle lever. Refer to PB-7, "
Removal and Installation".
10. Remove rear cable.
INSTALLATION
Rote the following, Install the reverse order of the removal.
Never reuse the adjusting nut.
Perform adjustment after installation. Refer to PB-6, "
Adjustment".
1. Front cable 2. Parking brake pedal assembly 3. Pedal pad
4. Adjusting nut 5. Parking brake switch 6. Spring
7. Rear cable (left side) 8. Rear cable (right side) 9. Pin
: Apply multi-purpose grease.
Refer to GI-4, "
Components" for symbols not described on the above.
JPFIB0125GB
Revision: 2010 May2011 QX56
Page 3847 of 5598
![INFINITI QX56 2011 Factory Service Manual
PCS-6
< SYSTEM DESCRIPTION >[IPDM E/R]
SYSTEM
NOTE:
BCM controls the starter relay.
RELAY CONTROL SYSTEM : Fail-SafeINFOID:0000000006220163
CAN COMMUNICATION CONTROL
When CAN communication with ECM a INFINITI QX56 2011 Factory Service Manual
PCS-6
< SYSTEM DESCRIPTION >[IPDM E/R]
SYSTEM
NOTE:
BCM controls the starter relay.
RELAY CONTROL SYSTEM : Fail-SafeINFOID:0000000006220163
CAN COMMUNICATION CONTROL
When CAN communication with ECM a](/manual-img/42/57033/w960_57033-3846.png)
PCS-6
< SYSTEM DESCRIPTION >[IPDM E/R]
SYSTEM
NOTE:
BCM controls the starter relay.
RELAY CONTROL SYSTEM : Fail-SafeINFOID:0000000006220163
CAN COMMUNICATION CONTROL
When CAN communication with ECM and BCM is impossible,
IPDM E/R performs fail-safe control. After CAN
communication recovers normally, it also returns to normal control.
If No CAN Communication Is Available With ECM
If No CAN Communication Is Available With BCM
Control relay Input/output Transmi t unit Control part Reference page
Headlamp low relay
Headlamp high relay Low beam request signal
High beam request signal
BCM (CAN)
Headlamp (LO)
Headlamp (HI) EXL-10
Front fog lamp relay Front fog light request signal BCM (CAN) Front fog lamp
EXL-20
Tail lamp relay Position light request signal BCM (CAN) Parking lamp
License plate
lamp
Tail lamp
Side marker lamp EXL-18
Illuminations
INL-6
Front wiper relay
Front wiper high relayFront wiper request signal BCM (CAN)
Front wiper motorWW-7Front wiper stop position sig-
nal Front wiper motor
Rear window defogger
relay Rear window defogger control
signal
BCM (CAN)
Rear window defog-
ger
DEF-6
Horn relay
Theft warning horn
relay Theft warning horn request
signal
Horn reminder signal BCM (CAN)
Horn (high)
Horn (low) SEC-17
Starter relayNOTE
Starter control relayStarter control rela
y signal BCM (CAN)
Starter motorSEC-10
,
SEC-10Steering lock unit condition
signal Steering lock unit
Starter relay control signal TCM
Steering lock relay Steering lock relay signal BCM (CAN)
Steering lock unitSEC-10
Steering lock unit condition
signal Steering lock unit
A/T shift selector (detention
switch) signal A/T shift selector
(detention switch)
A/C relay A/C compressor request sig-
nal ECM (CAN)
A/C compressor
(Magnet clutch) HAC-17
Headlamp washer relay
Headlamp washer request
signal BCM (CAN)Headlamp washer
pump WW-13
Ignition relay
Ignition relay-2
Ignition relay-3Ignition switch ON signal BCM (CAN)
Each control unit,
sensor, actuator and
relay (ignition power
supply)PCS-29Vehicle speed signal
Combination meter
(CAN)
Push-button ignition switch
signal Push-button ignition
switch
Control part Fail-safe operation
Cooling fan Transmits the pulse duty signal (PWM signal) 100% when the ignition switch is turned ON.
Transmits the pulse duty signal (PWM signal) 0% when the ignition switch is turned OFF.
A/C compressor A/C relay OFF
Alternator Transmits the power generation command signal (PWM signal) 0%
Revision: 2010 May2011 QX56
Page 3848 of 5598
![INFINITI QX56 2011 Factory Service Manual
PCS
SYSTEMPCS-7
< SYSTEM DESCRIPTION > [IPDM E/R]
C
D
E
F
G H
I
J
K L
B A
O P
N
IGNITION RELAY MALFUNCTION DETECTION FUNCTION
IPDM E/R monitors the voltage at the contact circuit and
excitation co INFINITI QX56 2011 Factory Service Manual
PCS
SYSTEMPCS-7
< SYSTEM DESCRIPTION > [IPDM E/R]
C
D
E
F
G H
I
J
K L
B A
O P
N
IGNITION RELAY MALFUNCTION DETECTION FUNCTION
IPDM E/R monitors the voltage at the contact circuit and
excitation co](/manual-img/42/57033/w960_57033-3847.png)
PCS
SYSTEMPCS-7
< SYSTEM DESCRIPTION > [IPDM E/R]
C
D
E
F
G H
I
J
K L
B A
O P
N
IGNITION RELAY MALFUNCTION DETECTION FUNCTION
IPDM E/R monitors the voltage at the contact circuit and
excitation coil circuit of the ignition relay inside it.
IPDM E/R judges the ignition relay error if the volt age differs between the contact circuit and the excitation
coil circuit.
If the ignition relay cannot turn OFF due to contact seizure, it activates the tail lamp relay for 10 minutes to alert the user to the ignition relay malfunc tion when the ignition switch is turned OFF.
FRONT WIPER PROTECTION FUNCTION
IPDM E/R detects front wiper stop position by a front wiper stop position signal.
When a front wiper stop position signal is in the conditi ons listed below, IPDM E/R stops power supply to wiper
after repeating a front wiper 10 seconds activation and 20 seconds stop.
NOTE:
This operation status can be confirmed on the IPDM E/ R “Data Monitor” that displays “BLOCK” for the item
“WIP PROT” while the wiper is stopped.
STARTER MOTOR PROTECTION FUNCTION
IPDM E/R turns OFF the starter control relay to protect the starter motor when the starter control relay remains
active for 90 seconds.
POWER CONTROL SYSTEM
Control part Fail-safe operation
Headlamp Turns ON the headlamp low relay when the ignition switch is turned ON
Turns OFF the headlamp low relay when the ignition switch is turned OFF
Headlamp high relay OFF
Parking lamp
License plate lamp
Illumination
Tail lamp Turns ON the tail lamp relay when the ignition switch is turned ON
Turns OFF the tail lamp relay when the ignition switch is turned OFF
Front wiper motor The status just before activation of fail-safe control is maintained until the ignition switch is
turned OFF while the front wiper is operating at LO or HI speed.
The wiper is operated at LO speed until the ignition switch is turned OFF if the fail-safe con- trol is activated while the front wiper is set in the INT mode and the front wiper motor is op-
erating.
Return automatically wiper to stop position when ignition switch is turned ON if fail-safe con- trol is activated while front wiper motor is operated and wiper stops in the other position than
stop position.
Front fog lamp Front fog lamp relay OFF
Horn Horn OFF
Ignition relay The status just before activation of fail-safe is maintained.
Starter motor Starter control relay OFF
Steering lock unit Steering lock relay OFF
Voltage judgment IPDM E/R judgment Operation
Ignition relay contact side Ignition relay excitation coil
side
ON ON Ignition relay ON normal —
OFF OFF Ignition relay OFF normal —
ON OFF Ignition relay ON stuck Detects DTC “B2098: IGN RELAY ON”
Turns ON the tail lamp relay for 10 min-
utes
OFF ON Ignition relay OFF stuck Detects DTC “B2099: IGN RELAY OFF”
Ignition switch Front wiper switch Front wiper stop position signal
ON OFF
The front wiper stop position signal (stop position) cannot be input for
10 seconds.
ON The front wiper stop position signal does not change for 10 seconds.
Revision: 2010 May2011 QX56
Page 3853 of 5598
![INFINITI QX56 2011 Factory Service Manual
PCS-12
< SYSTEM DESCRIPTION >[IPDM E/R]
DIAGNOSIS SYSTEM (IPDM E/R)
CONSULT-III Function (IPDM E/R)
INFOID:0000000006220171
APPLICATION ITEM
CONSULT-III performs the following functions via CAN commu INFINITI QX56 2011 Factory Service Manual
PCS-12
< SYSTEM DESCRIPTION >[IPDM E/R]
DIAGNOSIS SYSTEM (IPDM E/R)
CONSULT-III Function (IPDM E/R)
INFOID:0000000006220171
APPLICATION ITEM
CONSULT-III performs the following functions via CAN commu](/manual-img/42/57033/w960_57033-3852.png)
PCS-12
< SYSTEM DESCRIPTION >[IPDM E/R]
DIAGNOSIS SYSTEM (IPDM E/R)
CONSULT-III Function (IPDM E/R)
INFOID:0000000006220171
APPLICATION ITEM
CONSULT-III performs the following functions via CAN communication with IPDM E/R.
SELF DIAGNOSTIC RESULT
Refer to PCS-22, "DTCIndex".
DATA MONITOR
Monitor item
Oil pressure warning lamp does not operate Perform auto active test.
Does the oil pressure warning
lamp blink?YES
Harness or connector be-
tween IPDM E/R and oil
pressure switch
Oil pressure switch
IPDM E/R
NO CAN communication signal
between IPDM E/R and
BCM
CAN communication signal
between BCM and combi-
nation meter
Combination meter
Symptom Inspection contents Possible cause
Diagnosis mode Description
Ecu Identification Allows confirmation of IPDM E/R part number.
Self Diagnostic Result Displays the diagnosis results judged by IPDM E/R.
Data Monitor Displays the real-time input/output data from IPDM E/R input/output data.
Active Test IPDM E/R can provide a drive signal to electronic components to check their operations.
CAN Diag Support Monitor The results of transmit/receive diagnosis of CAN communication can be read.
Monitor Item [Unit] MAIN SIG-
NALS Description
RAD FAN REQ
[1/2/3/4] ×Displays the value of the cooling fan speed request signal received from ECM via
CAN communication.
AC COMP REQ
[Off/On] ×Displays the status of the A/C compressor request signal received from ECM via
CAN communication.
TA I L & C L R R E Q
[Off/On] ×
Displays the status of the position light request signal received from BCM via CAN
communication.
HL LO REQ
[Off/On] ×Displays the status of the low beam request signal received from BCM via CAN
communication.
HL HI REQ
[Off/On] ×Displays the status of the high beam request signal received from BCM via CAN
communication.
FR FOG REQ
[Off/On] ×Displays the status of the front fog light request signal received from BCM via
CAN communication.
FR WIP REQ
[Stop/1LOW/Low/Hi] ×
Displays the status of the front wiper request signal received from BCM via CAN
communication.
WIP AUTO STOP
[STOP P/ACT P] ×
Displays the status of the front wiper auto stop signal judged by IPDM E/R.
WIP PROT
[Off/BLOCK] ×
Displays the status of the front wiper fail-safe operation judged by IPDM E/R.
IGN RLY1 -REQ
[Off/On] Displays the status of the ignition switch ON signal received from BCM via CAN
communication.
IGN RLY
[Off/On] ×
Displays the status of the ignition relay judged by IPDM E/R.
Revision: 2010 May2011 QX56
Page 3854 of 5598
![INFINITI QX56 2011 Factory Service Manual
PCS
DIAGNOSIS SYSTEM (IPDM E/R)PCS-13
< SYSTEM DESCRIPTION > [IPDM E/R]
C
D
E
F
G H
I
J
K L
B A
O P
N
ACTIVE TEST
Te s t i t e m
PUSH SW
[Off/On]
Displays the status of the push-button ignition swit INFINITI QX56 2011 Factory Service Manual
PCS
DIAGNOSIS SYSTEM (IPDM E/R)PCS-13
< SYSTEM DESCRIPTION > [IPDM E/R]
C
D
E
F
G H
I
J
K L
B A
O P
N
ACTIVE TEST
Te s t i t e m
PUSH SW
[Off/On]
Displays the status of the push-button ignition swit](/manual-img/42/57033/w960_57033-3853.png)
PCS
DIAGNOSIS SYSTEM (IPDM E/R)PCS-13
< SYSTEM DESCRIPTION > [IPDM E/R]
C
D
E
F
G H
I
J
K L
B A
O P
N
ACTIVE TEST
Te s t i t e m
PUSH SW
[Off/On]
Displays the status of the push-button ignition switch judged by IPDM E/R.
INTER/NP SW
[Off/On] Displays the status of the shift position judged by IPDM E/R.
ST RLY CONT
[Off/On] Displays the status of the starter relay status signal received from BCM via CAN
communication.
IHBT RLY -REQ
[Off/On] Displays the status of the starter control relay signal received from BCM via CAN
communication.
ST/INHI RLY
[Off/ ST ON/INHI ON/UNKWN] Displays the status of the starter relay and starter control relay judged by IPDM
E/R.
DETENT SW
[Off/On] Displays the status of the A/T shift selector (detention switch) judged by IPDM E/
R.
S/L RLY -REQ
[Off/On] Displays the status of the steering lock relay signal received from BCM via CAN
communication.
S/L STATE
[LOCK/UNLK/UNKWN] Displays the status of the steering lock judged by IPDM E/R.
OIL P SW
[Open/Close] Displays the status of the oil pressure switch judged by IPDM E/R.
HOOD SW
[Off/On] Displays the status of the hood switch judged by IPDM E/R.
HL WASHER REQ
[Off/On] Displays the status of the headlamp washer request signal received from BCM via
CAN communication.
THFT HRN REQ
[Off/On] Displays the status of the theft warning horn request signal received from BCM
via CAN communication.
HORN CHIRP
[Off/On] Displays the status of the horn reminder signal received from BCM via CAN com-
munication.
Monitor Item
[Unit] MAIN SIG-
NALS Description
Test item Operation Description
CORNERING LAMP LH
NOTE:
This item is indicated, but cannot be tested.
RH
HORN On Operates horn relay for 20 ms.
REAR DEFOGGER Off OFF
On Operates the rear window defogger relay.
FRONT WIPER Off OFF
Lo Operates the front wiper relay.
Hi Operates the front wiper relay and front wiper high relay.
MOTOR FAN* 1OFF
2 Transmits 50% pulse duty signal (PWM signal) to the cooling fan control module.
3 Transmits 75% pulse duty signal (PWM signal) to the cooling fan control module.
4
Transmits 100% pulse duty signal (PWM signal) to the cooling fan control mod-
ule.
HEAD LAMP WASHER On Operates the headlamp washer relay for 1 second.
Revision: 2010 May2011 QX56