2011 INFINITI QX56 BATTERY
[x] Cancel search: BATTERYPage 3282 of 5598

DIAGNOSIS SYSTEM (BCM)INL-15
< SYSTEM DESCRIPTION >
C
DE
F
G H
I
J
K
M A
B
INL
N
O P
ACTIVE TEST
BATTERY SAVER
BATTERY SAVER : CONSULT-III Function (BCM - BATTERY SAVER)INFOID:0000000006216060
WORK SUPPORT
*:Factory setting PUSH SW
[On/Off]
The switch status input from push-button ignition switch
UNLK SEN -DR
[On/Off] Driver door unlock status input from unlock sensor
DOOR SW-DR
[On/Off] The switch status input from door switch (driver side)
DOOR SW-AS
[On/Off] The switch status input from door switch (passenger side)
DOOR SW-RR
[On/Off] The switch status input from rear door switch RH
DOOR SW- RL
[On/Off] The switch status input from rear door switch LH
DOOR SW- BK
[On/Off] The switch status input from back door switch
CDL LOCK SW
[On/Off] Lock switch status input from door lock and unlock switch
CDL UNLOCK SW
[On/Off] Unlock switch status input from door lock and unlock switch
KEY CYL LK-SW
[On/Off] Lock switch status received from door key cylinder switch
KEY CYL UN-SW
[On/Off] Unlock switch status received from door key cylinder switch
TRNK/HAT MNTR
[On/Off] NOTE:
The item is indicated, but not monitored.
RKE-LOCK
[On/Off] Lock signal status received from remote keyless entry receiver
RKE-UNLOCK
[On/Off] Unlock signal status received from remote keyless entry receiver
Monitor item
[Unit] Description
Test item Operation Description
INT LAMP OnOutputs the interior room lamp control signal to turn the interior room lamps ON.
[Map lamp, personal lamp, foot lamp (when applicable lamps switch is in DOOR po-
sition.)]
Off Stops the interior room lamp control signal to turn the interior room lamps OFF.
STEP LAMP TEST On Outputs the step lamp control signal to turn the step lamps ON.
Off Stops the step lamp control signal to turn the step lamps ON.
Service item Setting item Setting
ROOM LAMP TIMER SET MODE 1
*30 min.
Sets the interior room lamp battery saver timer operating
time.
MODE 2 60 min.
BATTERY SAVER SET On
*With the exterior lamp battery saver function
Off Without the exterior lamp battery saver function
Revision: 2010 May2011 QX56
Page 3283 of 5598
![INFINITI QX56 2011 Factory Service Manual
INL-16
< SYSTEM DESCRIPTION >
DIAGNOSIS SYSTEM (BCM)
DATA MONITOR
ACTIVE TEST
*: Each lamp switch is in ON position.Monitor item
[Unit] Description
REQ SW-DR
[On/Off] The switch status input from doo INFINITI QX56 2011 Factory Service Manual
INL-16
< SYSTEM DESCRIPTION >
DIAGNOSIS SYSTEM (BCM)
DATA MONITOR
ACTIVE TEST
*: Each lamp switch is in ON position.Monitor item
[Unit] Description
REQ SW-DR
[On/Off] The switch status input from doo](/manual-img/42/57033/w960_57033-3282.png)
INL-16
< SYSTEM DESCRIPTION >
DIAGNOSIS SYSTEM (BCM)
DATA MONITOR
ACTIVE TEST
*: Each lamp switch is in ON position.Monitor item
[Unit] Description
REQ SW-DR
[On/Off] The switch status input from door request switch (driver side)
REQ SW-AS
[On/Off] The switch status input from door request switch (passenger side)
REQ SW-RR
[On/Off] NOTE:
The item is indicated, but not monitored.
REQ SW-RL
[On/Off]
PUSH SW
[On/Off] The switch status input from push-button ignition switch
UNLK SEN-DR
[On/Off] Driver door unlock status input from unlock sensor
DOOR SW-DR
[On/Off] The switch status input from door switch (driver side)
DOOR SW-AS
[On/Off] The switch status input from door switch (passenger side)
DOOR SW-RR
[On/Off] The switch status input from rear door switch RH
DOOR SW- RL
[On/Off] The switch status input from rear door switch LH
DOOR SW- BK
[On/Off] The switch status input from back door switch
CDL LOCK SW
[On/Off] Lock switch status input from door lock and unlock switch
CDL UNLOCK SW
[On/Off] Unlock switch status input from door lock and unlock switch
KEY CYL LK-SW
[On/Off] Lock switch status received from door key cylinder switch
KEY CYL UN-SW
[On/Off] Unlock switch status received from door key cylinder switch
TRNK/HAT MNTR
[On/Off] NOTE:
The item is indicated, but not monitored.
RKE-LOCK
[On/Off] Lock signal status received from remote keyless entry receiver
RKE-UNLOCK
[On/Off] Unlock signal status received from remote keyless entry receiver
Test item Operation Description
BATTERY SAVER Off Cuts the interior room lamp power supply to turn interior room lamps OFF.
On Outputs the interior room lamp power supply to turn interior room lamps ON.*
Revision: 2010 May2011 QX56
Page 3323 of 5598

INL-56
< DTC/CIRCUIT DIAGNOSIS >
INTERIOR ROOM LAMP POWER SUPPLY CIRCUIT
DTC/CIRCUIT DIAGNOSIS
INTERIOR ROOM LAMP PO WER SUPPLY CIRCUIT
DescriptionINFOID:0000000006216065
Provides the interior room lamp power supply. Also cu ts the power supply when the interior room lamp battery
saver activating.
Component Function CheckINFOID:0000000006216066
1.CHECK INTERIOR ROOM LAMP POWER SUPPLY FUNCTION
CONSULT-III ACTIVE TEST
1. Turn ignition switch ON.
2. Turn each interior room lamp ON.
- Personal lamp
- Map lamp
- Foot lamp
- Luggage room lamp
- Automatic back door close switch illumination
- Step lamp
- Puddle lamp
- Vanity mirror lamp
3. Select “BATTERY SAVER” of BCM (BATTERY SAVER) active test item.
4. With operating the test items, check t hat each interior room lamp turns ON/OFF.
Does the interior room lamp turn ON/OFF?
YES >> Interior room lamp power supply circuit is normal.
NO >> Refer to INL-56, "
Diagnosis Procedure".
Diagnosis ProcedureINFOID:0000000006216067
1.CHECK INTERIOR ROOM LAMP POWER SUPPLY OUTPUT
CONSULT-III ACTIVE TEST
1. Turn ignition switch OFF.
2. Disconnect the following connectors.
- Personal lamp
- Map lamp
- Foot lamp (both sides)
- Luggage room lamp
- Automatic back door close switch illumination
- Step lamp (ALL)
- Puddle lamp (both sides)
- Vanity mirror lamp (both sides)
3. Turn ignition switch ON.
4. Select “BATTERY SAVER” of BCM (BATTERY SAVER) active test item.
5. With operating the test item, check voltage between BCM harness connector and ground.
Is the inspection result normal?
Off : Interior room lamp OFF
On : Interior room lamp ON
BCM (–) Test item Vo l ta g e
(Approx.)
(+)
Connector Terminal
M70 56 Ground BATTERY SAVER Off 0 V
On 12 V
Revision: 2010 May2011 QX56
Page 3334 of 5598

INTERIOR LIGHTING SYSTEM SYMPTOMSINL-67
< SYMPTOM DIAGNOSIS >
C
DE
F
G H
I
J
K
M A
B
INL
N
O P
SYMPTOM DIAGNOSIS
INTERIOR LIGHTING SYSTEM SYMPTOMS
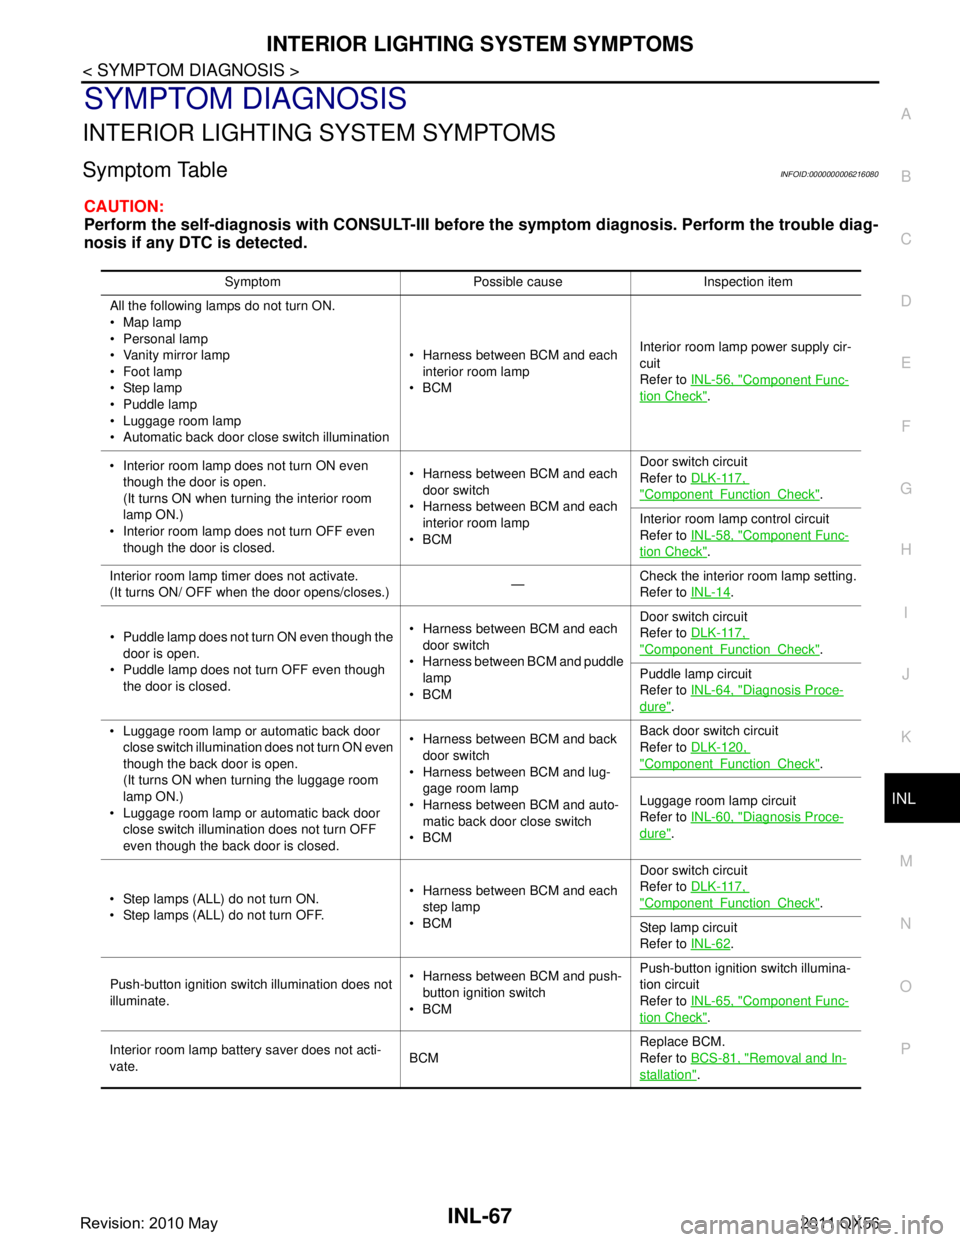
Symptom TableINFOID:0000000006216080
CAUTION:
Perform the self-diagnosis with CONS ULT-III before the symptom diagnosis. Perform the trouble diag-
nosis if any DTC is detected.
Symptom Possible cause Inspection item
All the following lamps do not turn ON.
Map lamp
Personal lamp
Vanity mirror lamp
Foot lamp
Step lamp
Puddle lamp
Luggage room lamp
Automatic back door close switch illumination Harness between BCM and each
interior room lamp
BCM Interior room lamp
power supply cir-
cuit
Refer to INL-56, "
Component Func-
tion Check".
Interior room lamp does not turn ON even though the door is open.
(It turns ON when turning the interior room
lamp ON.)
Interior room lamp does not turn OFF even
though the door is closed. Harness between BCM and each
door switch
Harness between BCM and each
interior room lamp
BCM Door switch circuit
Refer to
DLK-117,
"ComponentFunctionCheck".
Interior room lamp control circuit
Refer to INL-58, "
Component Func-
tion Check".
Interior room lamp timer does not activate.
(It turns ON/ OFF when the door opens/closes.) —Check the interior room lamp setting.
Refer to
INL-14
.
Puddle lamp does not turn ON even though the door is open.
Puddle lamp does not turn OFF even though the door is closed. Harness between BCM and each
door switch
Harness between BCM and puddle lamp
BCM Door switch circuit
Refer to
DLK-117,
"ComponentFunctionCheck".
Puddle lamp circuit
Refer to INL-64, "
Diagnosis Proce-
dure".
Luggage room lamp or automatic back door close switch illumination does not turn ON even
though the back door is open.
(It turns ON when turning the luggage room
lamp ON.)
Luggage room lamp or automatic back door
close switch illumination does not turn OFF
even though the back door is closed. Harness between BCM and back
door switch
Harness between BCM and lug- gage room lamp
Harness between BCM and auto- matic back door close switch
BCM Back door switch circuit
Refer to
DLK-120,
"ComponentFunctionCheck".
Luggage room lamp circuit
Refer to INL-60, "
Diagnosis Proce-
dure".
Step lamps (ALL) do not turn ON.
Step lamps (ALL) do not turn OFF. Harness between BCM and each
step lamp
BCM Door switch circuit
Refer to
DLK-117,
"ComponentFunctionCheck".
Step lamp circuit
Refer to INL-62
.
Push-button ignition switch illumination does not
illuminate. Harness between BCM and push-
button ignition switch
BCM Push-button ignition switch illumina-
tion circuit
Refer to
INL-65, "
Component Func-
tion Check".
Interior room lamp battery saver does not acti-
vate. BCMReplace BCM.
Refer to
BCS-81, "
Removal and In-
stallation".
Revision: 2010 May2011 QX56
Page 3335 of 5598

INL-68
< REMOVAL AND INSTALLATION >
MAP LAMP
REMOVAL AND INSTALLATION
MAP LAMP
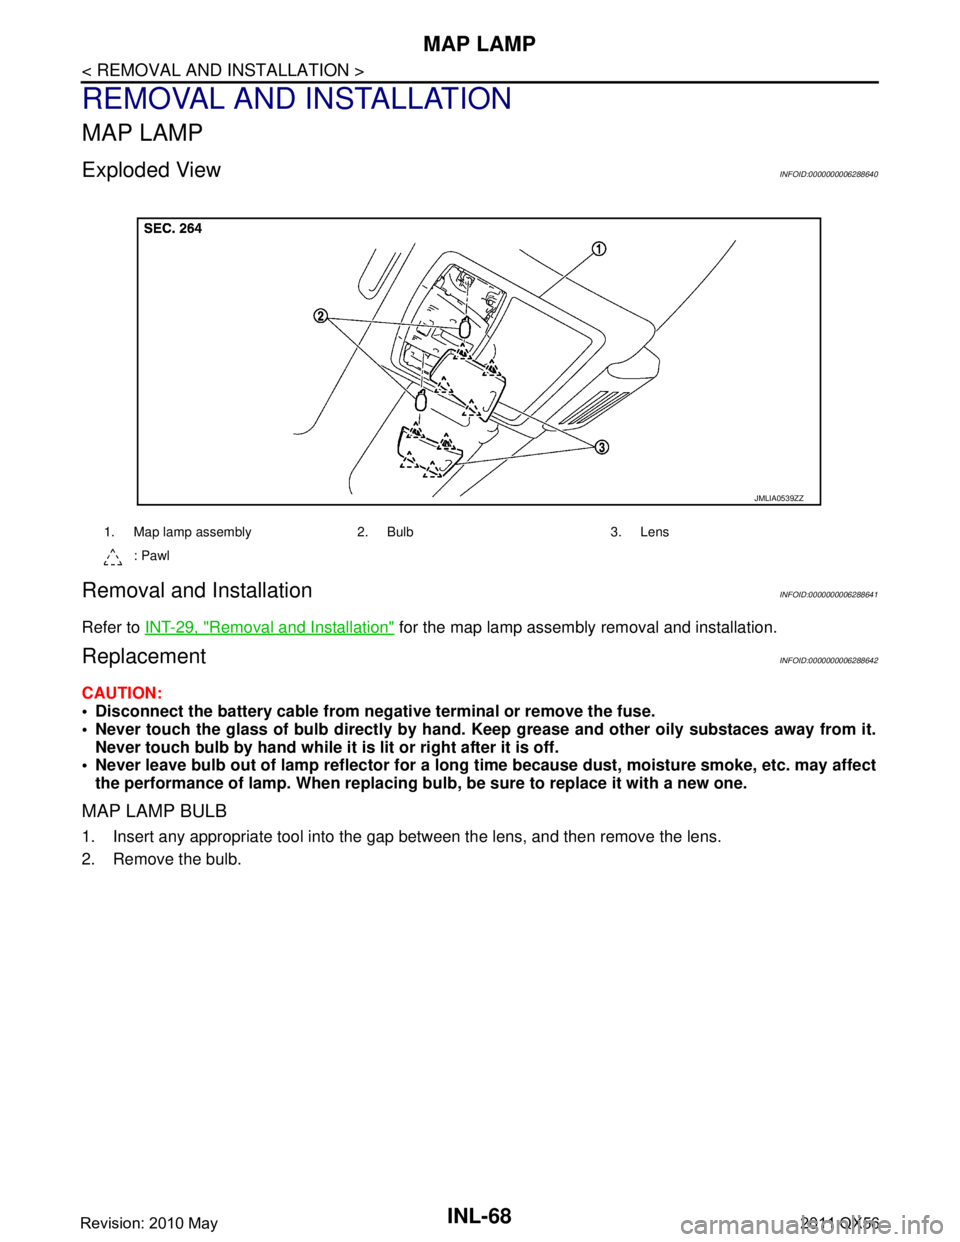
Exploded ViewINFOID:0000000006288640
Removal and InstallationINFOID:0000000006288641
Refer to INT-29, "Removal and Installation" for the map lamp assembly removal and installation.
ReplacementINFOID:0000000006288642
CAUTION:
Disconnect the battery cable from negative terminal or remove the fuse.
Never touch the glass of bulb directly by hand. Keep grease and other oily substaces away from it.
Never touch bulb by hand while it is lit or right after it is off.
Never leave bulb out of lamp reflector for a long ti me because dust, moisture smoke, etc. may affect
the performance of lamp. When replacing bu lb, be sure to replace it with a new one.
MAP LAMP BULB
1. Insert any appropriate tool into the gap between the lens, and then remove the lens.
2. Remove the bulb.
1. Map lamp assembly 2. Bulb 3. Lens
: Pawl
JMLIA0539ZZ
Revision: 2010 May2011 QX56
Page 3336 of 5598

VANITY MIRROR LAMPINL-69
< REMOVAL AND INSTALLATION >
C
DE
F
G H
I
J
K
M A
B
INL
N
O P
VANITY MIRROR LAMP
Exploded ViewINFOID:0000000006288643
ReplacementINFOID:0000000006288644
CAUTION:
Disconnect the battery cable from negative terminal or remove the fuse.
Never touch the glass of bulb directly by hand. Keep grease and other oily substaces away from it.
Never touch bulb by hand while it is lit or right after it is off.
Never leave bulb out of lamp reflector for a long time because dust, moisture smoke, etc. may affect
the performance of lamp. When replacing bu lb, be sure to replace it with a new one.
VANITY MIRROR LAMP BULB
1. Insert any appropriate tool into the gap between the lens, and then remove the lens.
2. Remove the bulb.
1. Lens 2. Bulb
: Pawl
JMLIA1048ZZ
Revision: 2010 May2011 QX56
Page 3337 of 5598

INL-70
< REMOVAL AND INSTALLATION >
GLOVE BOX LAMP
GLOVE BOX LAMP
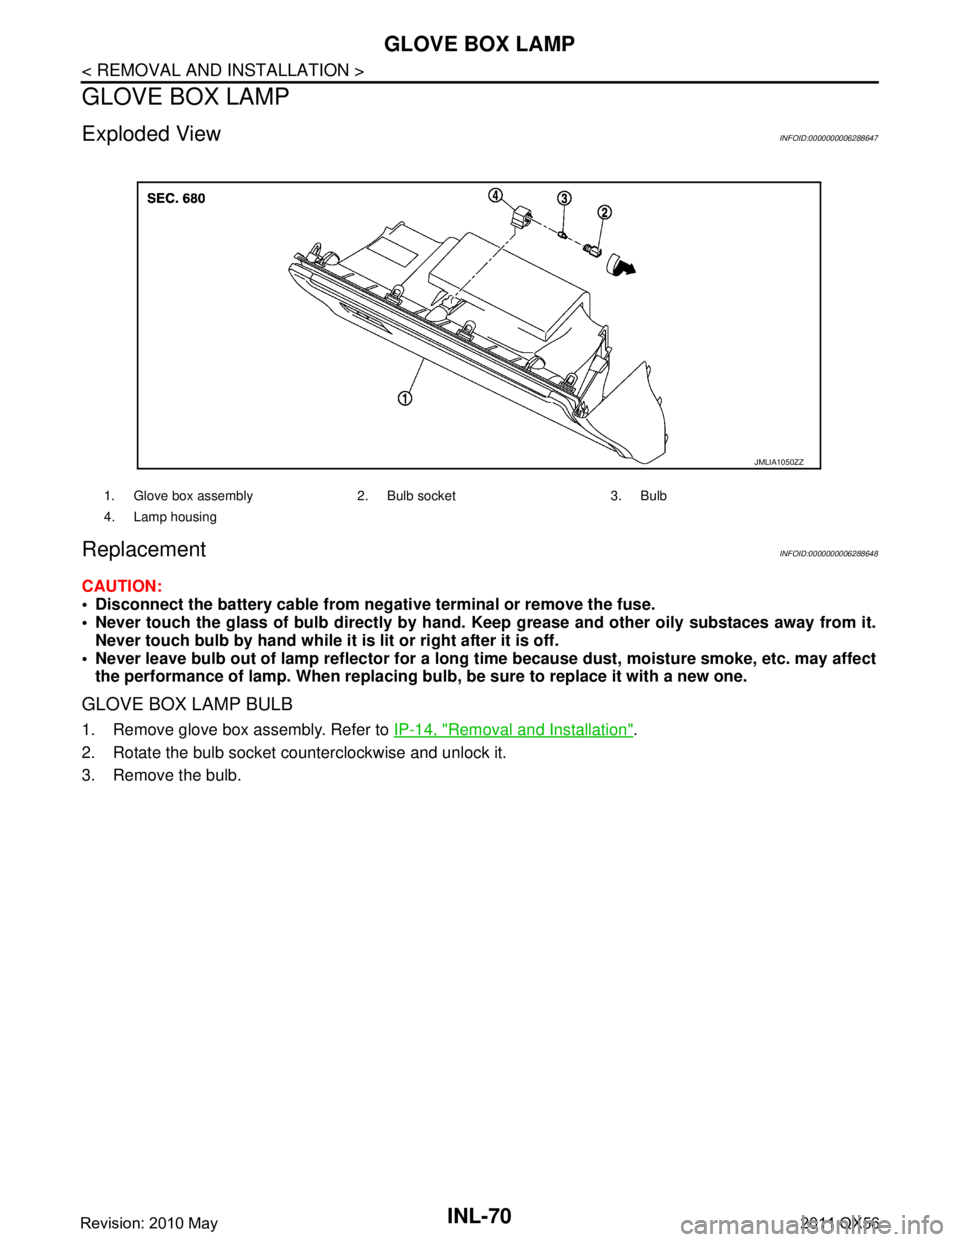
Exploded ViewINFOID:0000000006288647
ReplacementINFOID:0000000006288648
CAUTION:
Disconnect the battery cable from negative terminal or remove the fuse.
Never touch the glass of bulb directly by hand. Keep grease and other oily substaces away from it.
Never touch bulb by hand while it is lit or right after it is off.
Never leave bulb out of lamp reflector for a long ti me because dust, moisture smoke, etc. may affect
the performance of lamp. When replacing bu lb, be sure to replace it with a new one.
GLOVE BOX LAMP BULB
1. Remove glove box assembly. Refer to IP-14, "Removal and Installation".
2. Rotate the bulb socket counterclockwise and unlock it.
3. Remove the bulb.
1. Glove box assembly 2. Bulb socket 3. Bulb
4. Lamp housing
JMLIA1050ZZ
Revision: 2010 May2011 QX56
Page 3338 of 5598

FOOT LAMPINL-71
< REMOVAL AND INSTALLATION >
C
DE
F
G H
I
J
K
M A
B
INL
N
O P
FOOT LAMP
DRIVER SIDE
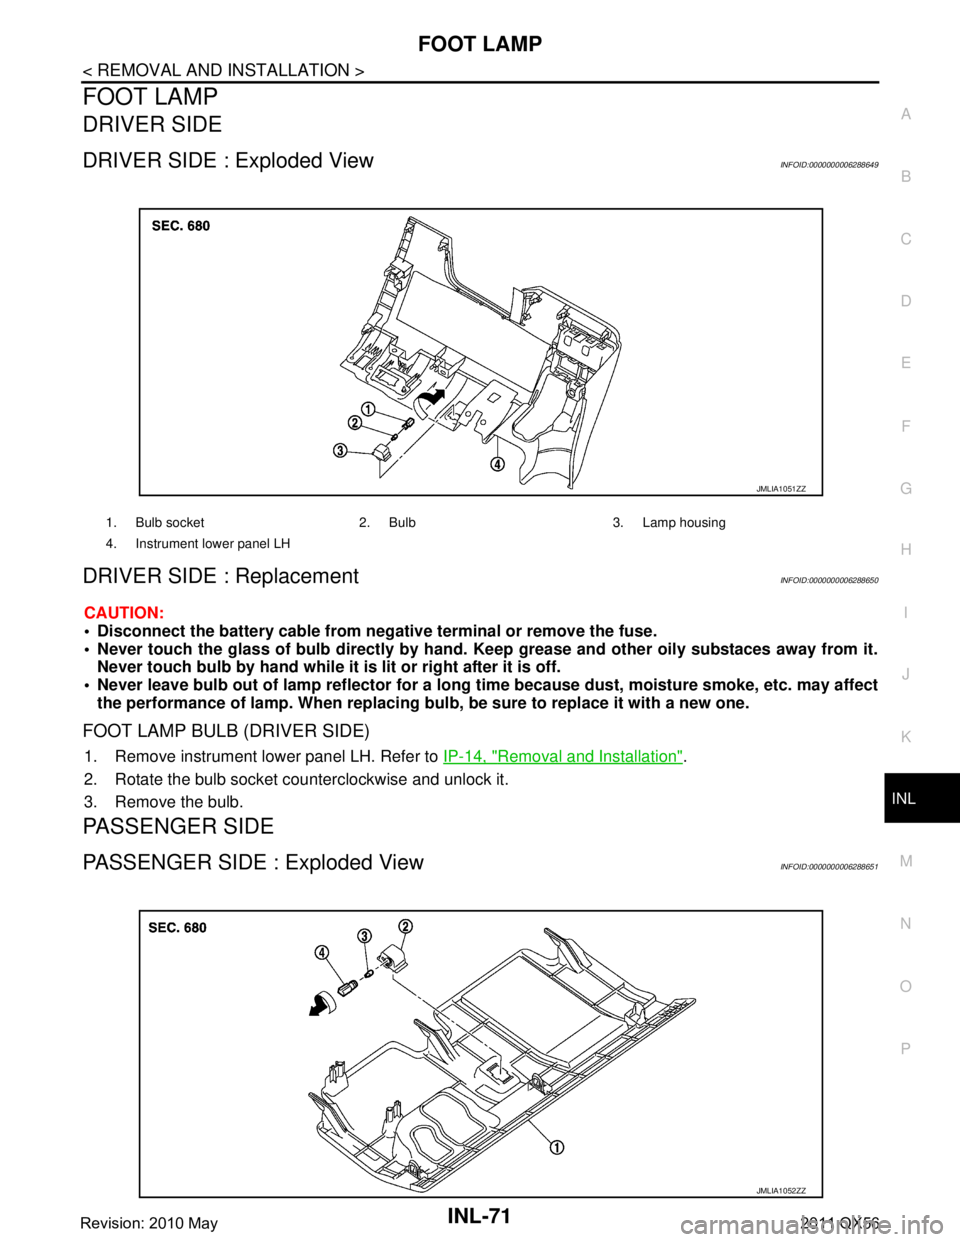
DRIVER SIDE : Exploded ViewINFOID:0000000006288649
DRIVER SIDE : ReplacementINFOID:0000000006288650
CAUTION:
Disconnect the battery cable from negative terminal or remove the fuse.
Never touch the glass of bulb directly by hand. Keep grease and other oily substaces away from it.
Never touch bulb by hand while it is lit or right after it is off.
Never leave bulb out of lamp reflector for a long time because dust, moisture smoke, etc. may affect
the performance of lamp. When replacing bu lb, be sure to replace it with a new one.
FOOT LAMP BULB (DRIVER SIDE)
1. Remove instrument lower panel LH. Refer to IP-14, "Removal and Installation".
2. Rotate the bulb socket counterclockwise and unlock it.
3. Remove the bulb.
PASSENGER SIDE
PASSENGER SIDE : Exploded ViewINFOID:0000000006288651
1. Bulb socket 2. Bulb 3. Lamp housing
4. Instrument lower panel LH
JMLIA1051ZZ
JMLIA1052ZZ
Revision: 2010 May2011 QX56