Page 3254 of 5598
![INFINITI QX56 2011 Factory Service Manual
HAC-148
< REMOVAL AND INSTALLATION >[AUTOMATIC AIR CONDITIONING]
IN-VEHICLE SENSOR
IN-VEHICLE SENSOR
FRONT A/C UNIT ASSEMBLY
FRONT A/C UNIT ASSEMBLY :
Removal and InstallationINFOID:0000000006276001 INFINITI QX56 2011 Factory Service Manual
HAC-148
< REMOVAL AND INSTALLATION >[AUTOMATIC AIR CONDITIONING]
IN-VEHICLE SENSOR
IN-VEHICLE SENSOR
FRONT A/C UNIT ASSEMBLY
FRONT A/C UNIT ASSEMBLY :
Removal and InstallationINFOID:0000000006276001](/manual-img/42/57033/w960_57033-3253.png)
HAC-148
< REMOVAL AND INSTALLATION >[AUTOMATIC AIR CONDITIONING]
IN-VEHICLE SENSOR
IN-VEHICLE SENSOR
FRONT A/C UNIT ASSEMBLY
FRONT A/C UNIT ASSEMBLY :
Removal and InstallationINFOID:0000000006276001
REMOVAL
1. Remove instrument lower panel LH. Refer to IP-14, "Removal and Installation".
2. Remove fixing screw, and then remove in-vehicle sensor.
INSTALLATION
Install in the reverse order of removal.
REAR A/C UNIT ASSEMBLY
REAR A/C UNIT ASSEMBLY : Removal and InstallationINFOID:0000000006276002
REMOVAL
1. Remove rear A/C unit assembly. Refer to HA-47, "REAR A/C UNIT ASSEMBLY : Removal and Installa-
tion".
2. Remove the intake sensor from rear A/C unit assembly.
INSTALLATION
Note the following items, and install in the reverse order of removal.
CAUTION:
Replace O-rings with new ones. Then apply the compressor oil to them when installing.
Mark the mounting position of intake sensor bracket prior to removal so that the reinstalled sensor
can be located in the same position.
Never rotate the bracket insertion part when removing and installing the intake sensor.
Check for leakages when recharging refrigerant. Refer to HA-18, "
Leak Test".
Revision: 2010 May2011 QX56
Page 3256 of 5598
HAC-150
< REMOVAL AND INSTALLATION >[AUTOMATIC AIR CONDITIONING]
INTAKE SENSOR
INTAKE SENSOR
Exploded ViewINFOID:0000000006276004
Refer to
HA-41, "Exploded View".
Removal and InstallationINFOID:0000000006276005
REMOVAL
1. Remove the front evaporator assembly. Refer to HA-43, "EVAPORATOR : Removal and Installation".
2. Remove the intake sensor from front evaporator.
INSTALLATION
Note the following items, and install in the reverse order of removal.
CAUTION:
Replace O-rings with new ones. Then apply the compressor oil to them when installing.
Mark the mounting position of intake sensor bracket prior to removal so that the reinstalled sensor
can be located in the same position.
Never rotate the bracket insertion part when removing and installing the intake sensor.
Check for leakages when recharging refrigerant. Refer to HA-18, "
Leak Test".
Revision: 2010 May2011 QX56
Page 3335 of 5598
INL-68
< REMOVAL AND INSTALLATION >
MAP LAMP
REMOVAL AND INSTALLATION
MAP LAMP
Exploded ViewINFOID:0000000006288640
Removal and InstallationINFOID:0000000006288641
Refer to INT-29, "Removal and Installation" for the map lamp assembly removal and installation.
ReplacementINFOID:0000000006288642
CAUTION:
Disconnect the battery cable from negative terminal or remove the fuse.
Never touch the glass of bulb directly by hand. Keep grease and other oily substaces away from it.
Never touch bulb by hand while it is lit or right after it is off.
Never leave bulb out of lamp reflector for a long ti me because dust, moisture smoke, etc. may affect
the performance of lamp. When replacing bu lb, be sure to replace it with a new one.
MAP LAMP BULB
1. Insert any appropriate tool into the gap between the lens, and then remove the lens.
2. Remove the bulb.
1. Map lamp assembly 2. Bulb 3. Lens
: Pawl
JMLIA0539ZZ
Revision: 2010 May2011 QX56
Page 3336 of 5598
VANITY MIRROR LAMPINL-69
< REMOVAL AND INSTALLATION >
C
DE
F
G H
I
J
K
M A
B
INL
N
O P
VANITY MIRROR LAMP
Exploded ViewINFOID:0000000006288643
ReplacementINFOID:0000000006288644
CAUTION:
Disconnect the battery cable from negative terminal or remove the fuse.
Never touch the glass of bulb directly by hand. Keep grease and other oily substaces away from it.
Never touch bulb by hand while it is lit or right after it is off.
Never leave bulb out of lamp reflector for a long time because dust, moisture smoke, etc. may affect
the performance of lamp. When replacing bu lb, be sure to replace it with a new one.
VANITY MIRROR LAMP BULB
1. Insert any appropriate tool into the gap between the lens, and then remove the lens.
2. Remove the bulb.
1. Lens 2. Bulb
: Pawl
JMLIA1048ZZ
Revision: 2010 May2011 QX56
Page 3337 of 5598
INL-70
< REMOVAL AND INSTALLATION >
GLOVE BOX LAMP
GLOVE BOX LAMP
Exploded ViewINFOID:0000000006288647
ReplacementINFOID:0000000006288648
CAUTION:
Disconnect the battery cable from negative terminal or remove the fuse.
Never touch the glass of bulb directly by hand. Keep grease and other oily substaces away from it.
Never touch bulb by hand while it is lit or right after it is off.
Never leave bulb out of lamp reflector for a long ti me because dust, moisture smoke, etc. may affect
the performance of lamp. When replacing bu lb, be sure to replace it with a new one.
GLOVE BOX LAMP BULB
1. Remove glove box assembly. Refer to IP-14, "Removal and Installation".
2. Rotate the bulb socket counterclockwise and unlock it.
3. Remove the bulb.
1. Glove box assembly 2. Bulb socket 3. Bulb
4. Lamp housing
JMLIA1050ZZ
Revision: 2010 May2011 QX56
Page 3338 of 5598

FOOT LAMPINL-71
< REMOVAL AND INSTALLATION >
C
DE
F
G H
I
J
K
M A
B
INL
N
O P
FOOT LAMP
DRIVER SIDE
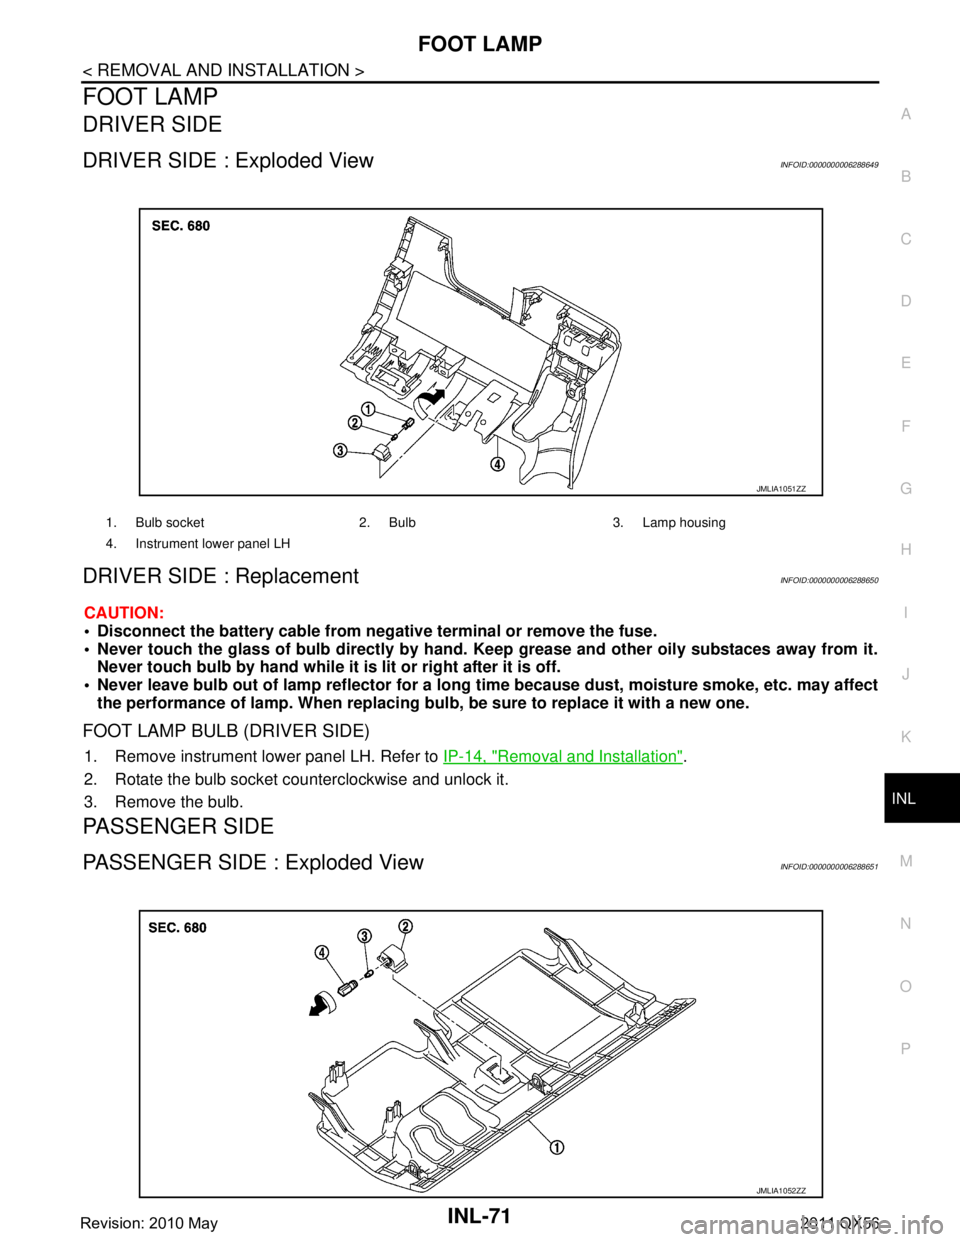
DRIVER SIDE : Exploded ViewINFOID:0000000006288649
DRIVER SIDE : ReplacementINFOID:0000000006288650
CAUTION:
Disconnect the battery cable from negative terminal or remove the fuse.
Never touch the glass of bulb directly by hand. Keep grease and other oily substaces away from it.
Never touch bulb by hand while it is lit or right after it is off.
Never leave bulb out of lamp reflector for a long time because dust, moisture smoke, etc. may affect
the performance of lamp. When replacing bu lb, be sure to replace it with a new one.
FOOT LAMP BULB (DRIVER SIDE)
1. Remove instrument lower panel LH. Refer to IP-14, "Removal and Installation".
2. Rotate the bulb socket counterclockwise and unlock it.
3. Remove the bulb.
PASSENGER SIDE
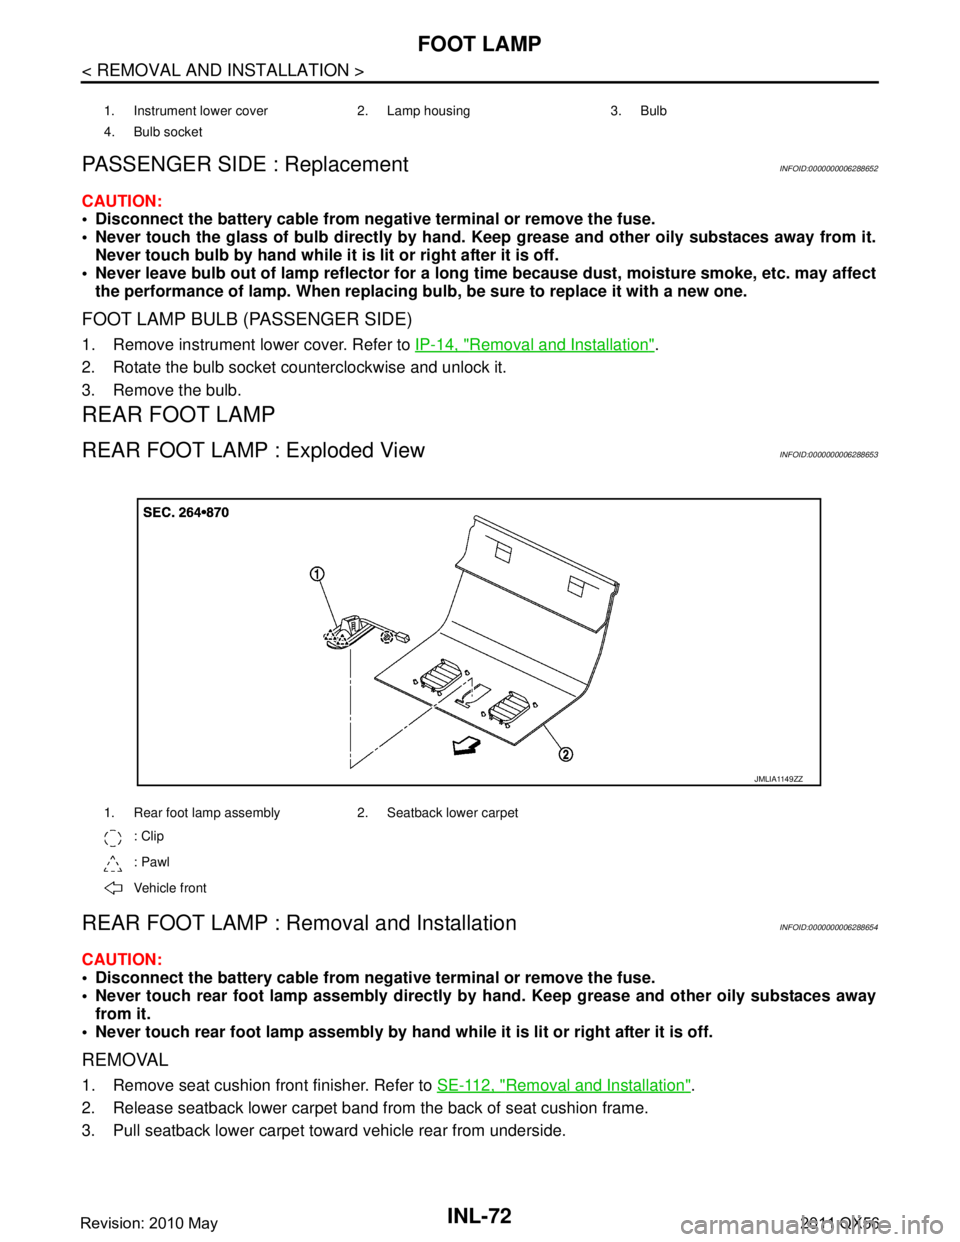
PASSENGER SIDE : Exploded ViewINFOID:0000000006288651
1. Bulb socket 2. Bulb 3. Lamp housing
4. Instrument lower panel LH
JMLIA1051ZZ
JMLIA1052ZZ
Revision: 2010 May2011 QX56
Page 3339 of 5598

INL-72
< REMOVAL AND INSTALLATION >
FOOT LAMP
PASSENGER SIDE : Replacement
INFOID:0000000006288652
CAUTION:
Disconnect the battery cable from negative terminal or remove the fuse.
Never touch the glass of bulb directly by hand. Keep grease and other oily substaces away from it.
Never touch bulb by hand while it is lit or right after it is off.
Never leave bulb out of lamp reflector for a long ti me because dust, moisture smoke, etc. may affect
the performance of lamp. When replacing bu lb, be sure to replace it with a new one.
FOOT LAMP BULB (PASSENGER SIDE)
1. Remove instrument lower cover. Refer to IP-14, "Removal and Installation".
2. Rotate the bulb socket counterclockwise and unlock it.
3. Remove the bulb.
REAR FOOT LAMP
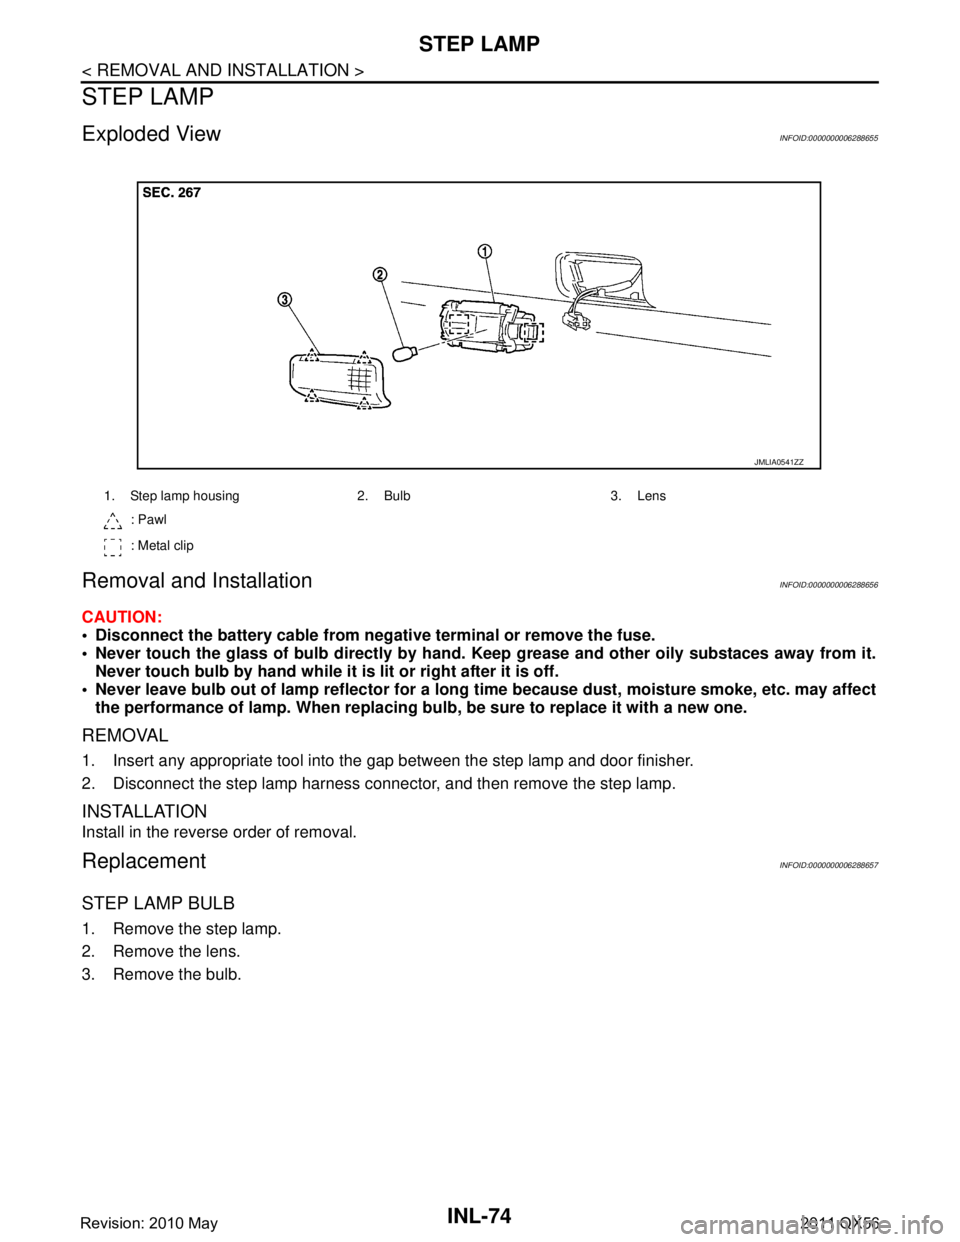
REAR FOOT LAMP : Exploded ViewINFOID:0000000006288653
REAR FOOT LAMP : Re moval and InstallationINFOID:0000000006288654
CAUTION:
Disconnect the battery cable from negative terminal or remove the fuse.
Never touch rear foot lamp assembly directly by hand. Keep grease and other oily substaces away
from it.
Never touch rear foot lamp assembly by hand while it is lit or right after it is off.
REMOVAL
1. Remove seat cushion front finisher. Refer to SE-112, "Removal and Installation".
2. Release seatback lower carpet band fr om the back of seat cushion frame.
3. Pull seatback lower carpet toward vehicle rear from underside.
1. Instrument lower cover 2. Lamp housing 3. Bulb
4. Bulb socket
1. Rear foot lamp assembly 2. Seatback lower carpet
: Clip
: Pawl
Vehicle front
JMLIA1149ZZ
Revision: 2010 May2011 QX56
Page 3341 of 5598

INL-74
< REMOVAL AND INSTALLATION >
STEP LAMP
STEP LAMP
Exploded ViewINFOID:0000000006288655
Removal and InstallationINFOID:0000000006288656
CAUTION:
Disconnect the battery cable from negative terminal or remove the fuse.
Never touch the glass of bulb directly by hand. Keep grease and other oily substaces away from it.
Never touch bulb by hand while it is lit or right after it is off.
Never leave bulb out of lamp reflector for a long ti me because dust, moisture smoke, etc. may affect
the performance of lamp. When replacing bu lb, be sure to replace it with a new one.
REMOVAL
1. Insert any appropriate tool into the gap between the step lamp and door finisher.
2. Disconnect the step lamp harness connector, and then remove the step lamp.
INSTALLATION
Install in the reverse order of removal.
ReplacementINFOID:0000000006288657
STEP LAMP BULB
1. Remove the step lamp.
2. Remove the lens.
3. Remove the bulb.
1. Step lamp housing 2. Bulb 3. Lens
: Pawl
: Metal clip
JMLIA0541ZZ
Revision: 2010 May2011 QX56