Page 3342 of 5598
MOOD LAMPINL-75
< REMOVAL AND INSTALLATION >
C
DE
F
G H
I
J
K
M A
B
INL
N
O P
MOOD LAMP
FRONT DOOR ARMREST
FRONT DOOR ARMREST : Exploded ViewINFOID:0000000006288658
FRONT DOOR ARMREST : ReplacementINFOID:0000000006288659
CAUTION:
Disconnect the battery cable from negative terminal or remove the fuse.
Never touch the glass of bulb directly by hand. Keep grease and other oily substaces away from it.
Never touch bulb by hand while it is lit or right after it is off.
Never leave bulb out of lamp reflector for a long time because dust, moisture smoke, etc. may affect
the performance of lamp. When replacing bu lb, be sure to replace it with a new one.
MOOD LAMP
1. Remove front door finisher. Refer to INT-14, "Removal and Installation".
2. Remove the mood lamp from front door finisher.
REAR DOOR ARMREST
REAR DOOR ARMREST : Exploded ViewINFOID:0000000006288660
1. Mood lamp
JMLIA1054ZZ
1. Mood lamp
JMLIA1055ZZ
Revision: 2010 May2011 QX56
Page 3343 of 5598
INL-76
< REMOVAL AND INSTALLATION >
MOOD LAMP
REAR DOOR ARMREST : Replacement
INFOID:0000000006288661
CAUTION:
Disconnect the battery cable from negative terminal or remove the fuse.
Never touch the glass of bulb directly by hand. Keep grease and other oily substaces away from it.
Never touch bulb by hand while it is lit or right after it is off.
Never leave bulb out of lamp reflector for a long ti me because dust, moisture smoke, etc. may affect
the performance of lamp. When replacing bu lb, be sure to replace it with a new one.
MOOD LAMP
1. Remove rear door finisher. Refer to INT-14, "Removal and Installation".
2. Remove the mood lamp from rear door finisher.
Revision: 2010 May2011 QX56
Page 3344 of 5598
PERSONAL LAMPINL-77
< REMOVAL AND INSTALLATION >
C
DE
F
G H
I
J
K
M A
B
INL
N
O P
PERSONAL LAMP
Exploded ViewINFOID:0000000006288662
Removal and InstallationINFOID:0000000006288663
CAUTION:
Disconnect the battery cable from negative terminal or remove the fuse.
Never touch the glass of bulb directly by hand. Keep grease and other oily substaces away from it.
Never touch bulb by hand while it is lit or right after it is off.
Never leave bulb out of lamp reflector for a long time because dust, moisture smoke, etc. may affect
the performance of lamp. When replacing bu lb, be sure to replace it with a new one.
Replace the personal lamp case as a set (LH a nd RH). After removing the headlining assembly,
remove the personal lamp case.
REMOVAL
1. Remove headlining assembly. Refer to INT-29, "Removal and Installation".
1. Personal lamp case 2. Bulb 3. Lens
4. Personal lamp finisher
: Pawl
JMLIA1053ZZ
Revision: 2010 May2011 QX56
Page 3345 of 5598
INL-78
< REMOVAL AND INSTALLATION >
PERSONAL LAMP
2. Press the pawls (B) on both sides as shown in the figure using asmall flat-bladed screwdriver (A), and then pull out personal
lamp case (2) from personal lamp finisher (1).
INSTALLATION
Install in the reverse order of removal.
ReplacementINFOID:0000000006288664
CAUTION:
Disconnect the battery negative terminal or remove the fuse.
Never touch the glass of bu lb directly by hand. Keep grease an d other oily matters away from it.
Never touch bulb by hand while it is lit or right after being turned off.
Never leave bulb out of lamp reflector for a long ti me because dust, moisture smoke, etc. may affect
the performance of lamp. When replacing bulb, be sure to replace it with new one.
PERSONAL LAMP BULB
1. Insert any appropriate tool into the gap between the lens, and then remove the lens.
2. Remove the bulb.
JMLIA1058ZZ
Revision: 2010 May2011 QX56
Page 3346 of 5598

PUDDLE LAMPINL-79
< REMOVAL AND INSTALLATION >
C
DE
F
G H
I
J
K
M A
B
INL
N
O P
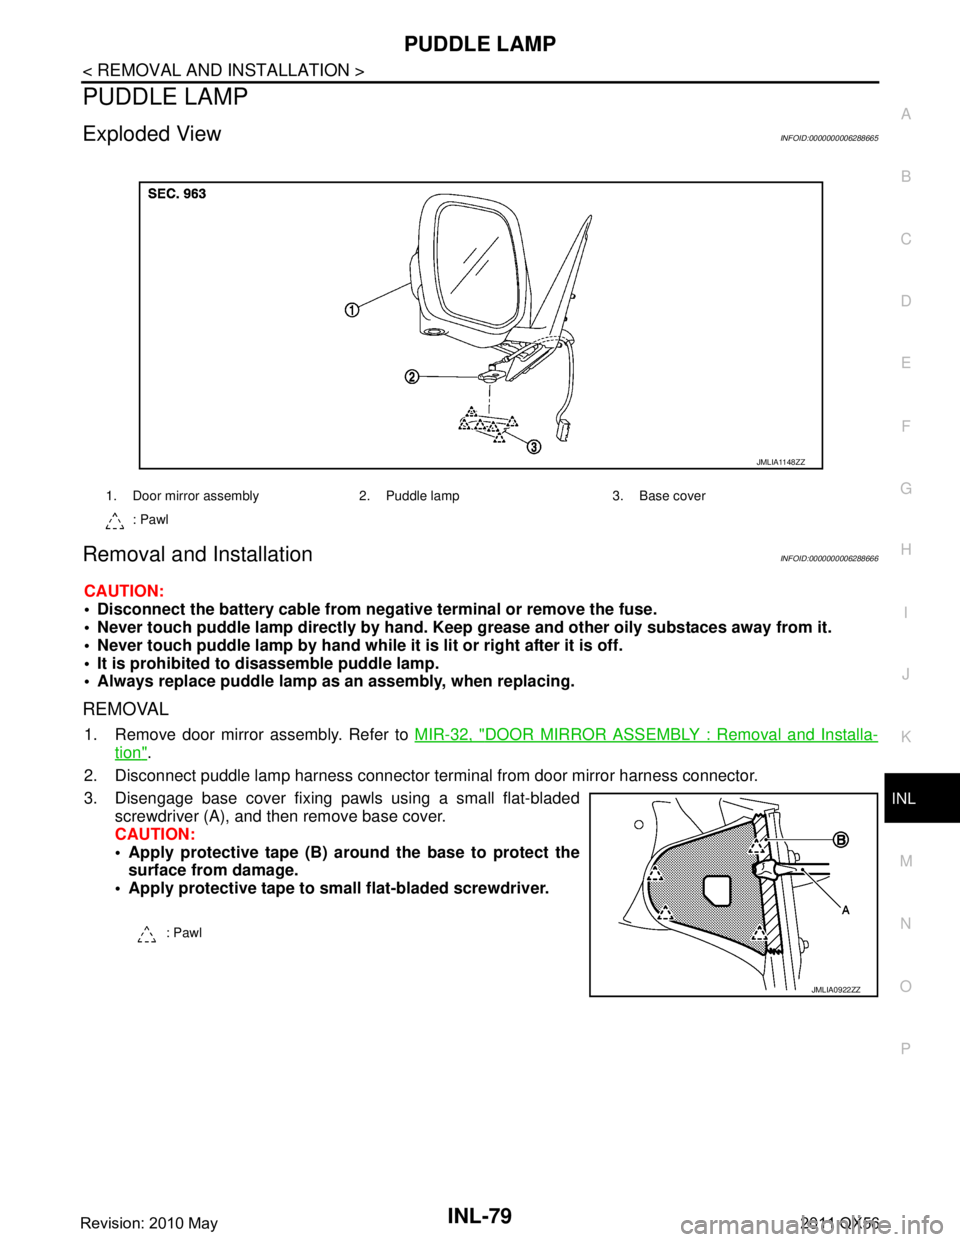
PUDDLE LAMP
Exploded ViewINFOID:0000000006288665
Removal and InstallationINFOID:0000000006288666
CAUTION:
Disconnect the battery cable from negative terminal or remove the fuse.
Never touch puddle lamp directly by hand. Keep grease and other oily substaces away from it.
Never touch puddle lamp by hand while it is lit or right after it is off.
It is prohibited to disassemble puddle lamp.
Always replace puddle lamp as an assembly, when replacing.
REMOVAL
1. Remove door mirror assembly. Refer to MIR-32, "DOOR MIRROR ASSEMBLY : Removal and Installa-
tion".
2. Disconnect puddle lamp harness connector te rminal from door mirror harness connector.
3. Disengage base cover fixing pawls using a small flat-bladed screwdriver (A), and then remove base cover.
CAUTION:
Apply protective tape (B) around the base to protect thesurface from damage.
Apply protective tape to small flat-bladed screwdriver.
1. Door mirror assembly 2. Puddle lamp 3. Base cover
: Pawl
JMLIA1148ZZ
: Pawl
JMLIA0922ZZ
Revision: 2010 May2011 QX56
Page 3348 of 5598

LUGGAGE ROOM LAMPINL-81
< REMOVAL AND INSTALLATION >
C
DE
F
G H
I
J
K
M A
B
INL
N
O P
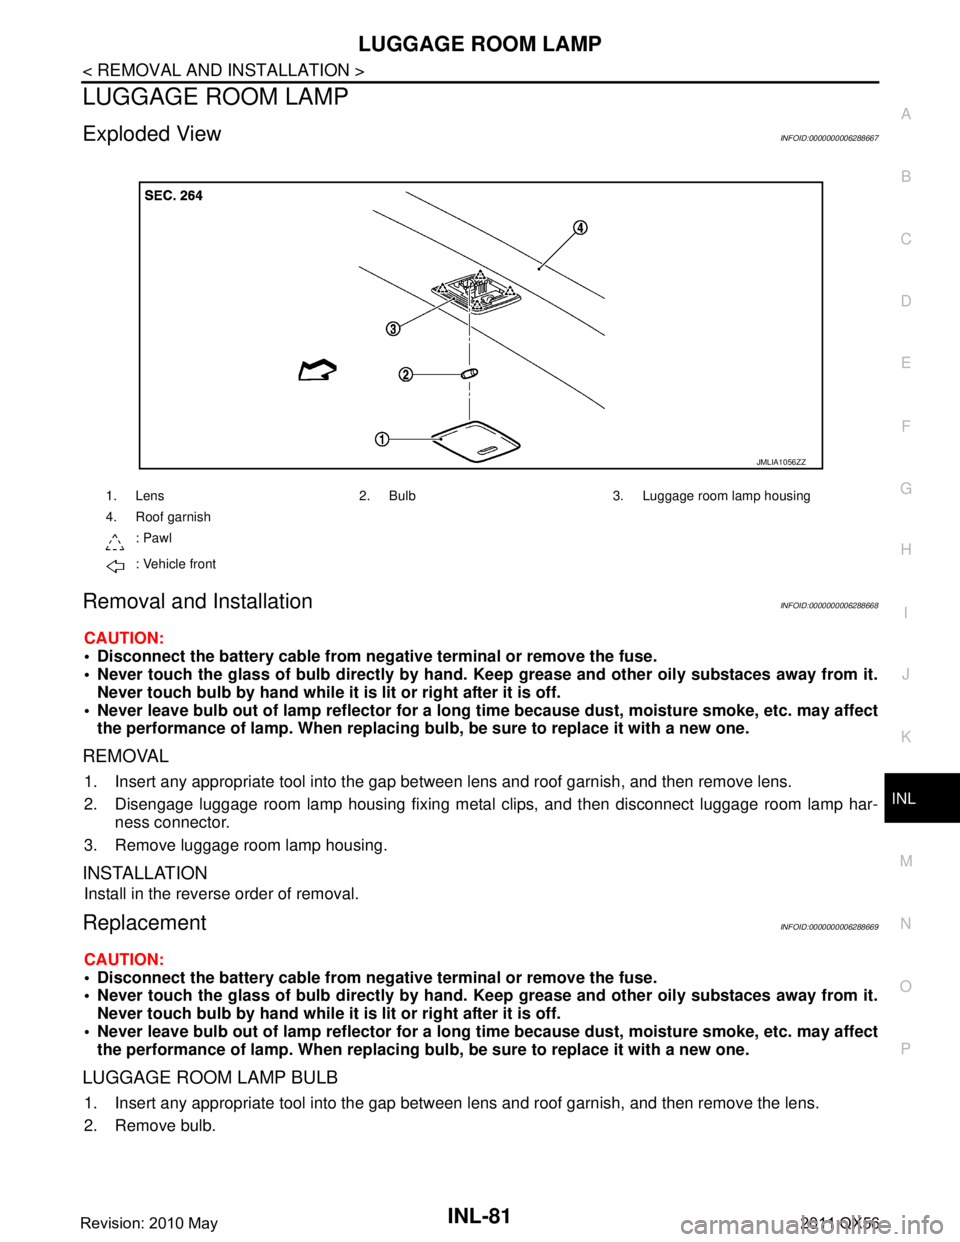
LUGGAGE ROOM LAMP
Exploded ViewINFOID:0000000006288667
Removal and InstallationINFOID:0000000006288668
CAUTION:
Disconnect the battery cable from negative terminal or remove the fuse.
Never touch the glass of bulb directly by hand. Keep grease and other oily substaces away from it.
Never touch bulb by hand while it is lit or right after it is off.
Never leave bulb out of lamp reflector for a long time because dust, moisture smoke, etc. may affect
the performance of lamp. When replacing bu lb, be sure to replace it with a new one.
REMOVAL
1. Insert any appropriate tool into the gap betw een lens and roof garnish, and then remove lens.
2. Disengage luggage room lamp housing fixing metal clips, and then disconnect luggage room lamp har- ness connector.
3. Remove luggage room lamp housing.
INSTALLATION
Install in the reverse order of removal.
ReplacementINFOID:0000000006288669
CAUTION:
Disconnect the battery cable from negative terminal or remove the fuse.
Never touch the glass of bulb directly by hand. Keep grease and other oily substaces away from it.
Never touch bulb by hand while it is lit or right after it is off.
Never leave bulb out of lamp reflector for a long time because dust, moisture smoke, etc. may affect
the performance of lamp. When replacing bu lb, be sure to replace it with a new one.
LUGGAGE ROOM LAMP BULB
1. Insert any appropriate tool into the gap between lens and roof garnish, and then remove the lens.
2. Remove bulb.
1. Lens 2. Bulb 3. Luggage room lamp housing
4. Roof garnish
: Pawl
: Vehicle front
JMLIA1056ZZ
Revision: 2010 May2011 QX56
Page 3393 of 5598

PRECAUTIONSIP-3
< PRECAUTION >
C
DE
F
G H
I
K L
M A
B
IP
N
O P
5. When the repair work is completed, re-connect both battery cables. With the brake pedal released, turn
the push-button ignition switch from ACC position to ON position, then to LOCK position. (The steering
wheel will lock when the push-button ignition switch is turned to LOCK position.)
6. Perform self-diagnosis check of a ll control units using CONSULT-III.
ServiceINFOID:0000000006113090
Disconnect battery negative terminal in advance.
Disconnect air bag system line in advance.
Never tamper with or force air bag lid open, as this may adversely affect air bag performance.
Be careful not to scratch pad and other parts.
When removing or disassembling any part, be careful not to damage or deform it. Protect parts, that may get
in the way with a shop cloth.
When removing parts with a screwdriver or other tool, cover the tool surface with vinyl tape to protect parts.
Keep removed parts protected with a shop cloth.
If a clip is deformed or damaged, replace it.
If an unreusable part is removed, replace it with a new one.
Tighten bolts and nuts firmly to the specified torque.
After reassembly is complete, check that each part functions correctly.
Remove stains via the following procedure.
Water-soluble stains:
Dip a soft cloth in warm water, and then squeeze it tightly. After wiping off the stain, wipe with a soft dry cloth.
Oil stain:
Dissolve a synthetic detergent in warm water (density of 2 to 3%), dip the cloth, then wipe off the stain with the
cloth. Next, dip the cloth in fresh water and squeeze it tightly. Then wipe off the detergent completely. Then
wipe the area with a soft dry cloth.
Never use any organic solvent, such as thinner or benzine.
Revision: 2010 May2011 QX56
Page 3451 of 5598
![INFINITI QX56 2011 Factory Service Manual
LAN
SYSTEMLAN-31
< SYSTEM DESCRIPTION > [CAN]
C
D
E
F
G H
I
J
K L
B A
O P
N
Meter display signal
TR
RT
Oil pressure switch signal TR
RT
Position light request signal T R R
Rear fog light status signa INFINITI QX56 2011 Factory Service Manual
LAN
SYSTEMLAN-31
< SYSTEM DESCRIPTION > [CAN]
C
D
E
F
G H
I
J
K L
B A
O P
N
Meter display signal
TR
RT
Oil pressure switch signal TR
RT
Position light request signal T R R
Rear fog light status signa](/manual-img/42/57033/w960_57033-3450.png)
LAN
SYSTEMLAN-31
< SYSTEM DESCRIPTION > [CAN]
C
D
E
F
G H
I
J
K L
B A
O P
N
Meter display signal
TR
RT
Oil pressure switch signal TR
RT
Position light request signal T R R
Rear fog light status signal T R
Rear window defogger con-
trol signal TR
RT
Sleep wake up signal T R R R R R R
Starter control relay signal T R
Starter relay status signal TRR
RT
Starting mode signal T R
Steering lock relay signal TRR
RT
Theft warning horn request
signal TR
Turn indicator signal R T R R
A/C display signal R T
A/C ON signal R T
Ambient temperature signal T R
Blower fan ON signal R T
Distance to empty signal R T
Fuel level low warning sig-
nal RT
Fuel level sensor signal R T
Manual mode shift down
signal RT
Manual mode shift up sig-
nal RT
Manual mode signal R T
Non-manual mode signal R T
Odometer signal R T
Parking brake switch signal R R T R R
Sleep-ready signal RT
RT
RT
Tow mode switch signal R T
Wake up signal RT
RT
Steering angle sensor mal-
function signal RR T R R
Steering angle sensor sig-
nal RR RR T R R
Steering angle speed signal R T R R Signal name
ECM
4WD
ABS
TCM
A-BAG AFS
AV
BCM
CGW
HVAC M&A
STRG
TPMS
IPDM-E
ADPPSB
E-SUS ICC
PWBD
Revision: 2010 May2011 QX56