Page 2576 of 5598
EM-14
< BASIC INSPECTION >
CAMSHAFT VALVE CLEARANCE
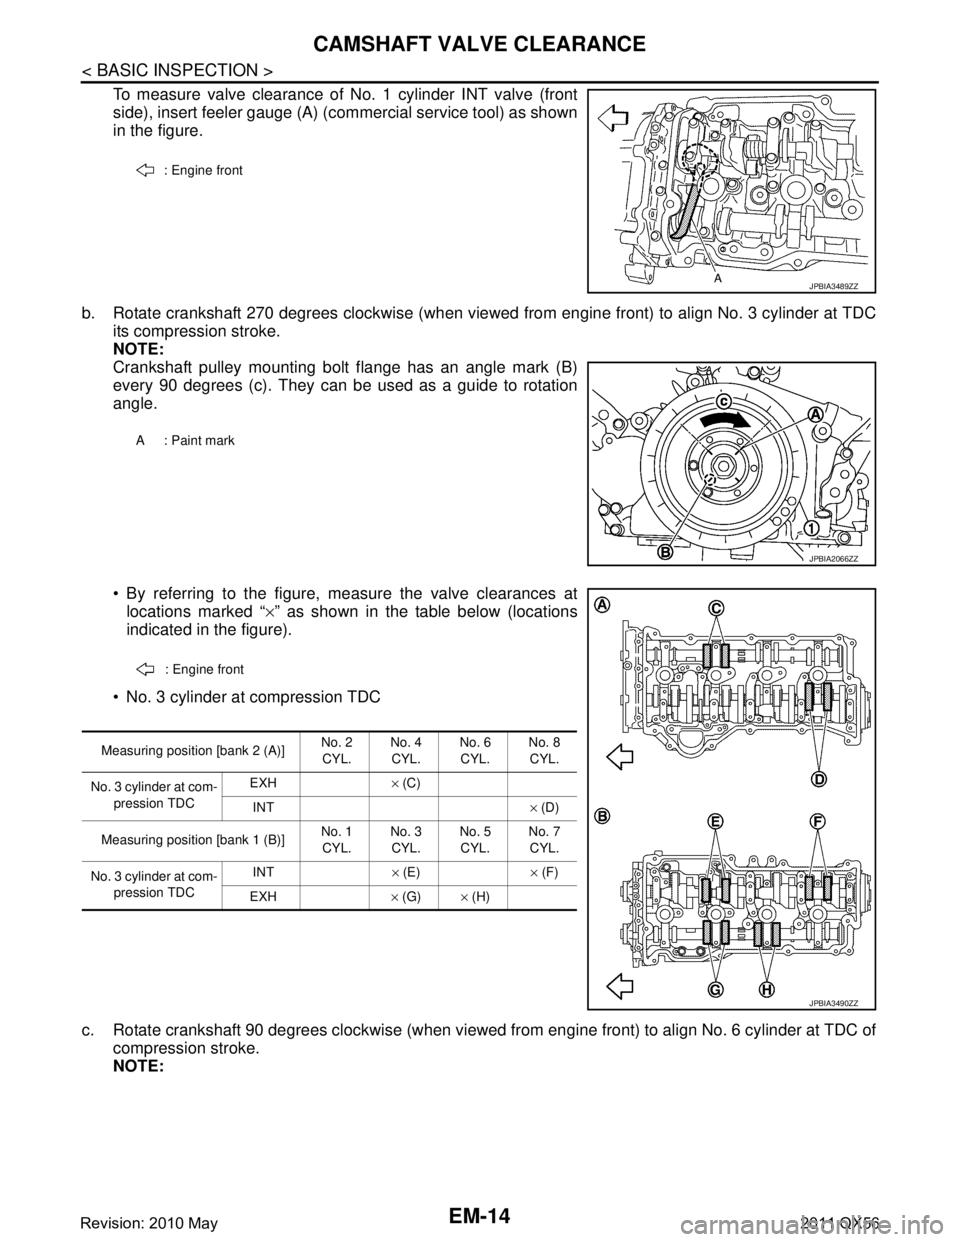
To measure valve clearance of No. 1 cylinder INT valve (front
side), insert feeler gauge (A) (commercial service tool) as shown
in the figure.
b. Rotate crankshaft 270 degrees clockwise (when viewed from engine front) to align No. 3 cylinder at TDC its compression stroke.
NOTE:
Crankshaft pulley mounting bolt flange has an angle mark (B)
every 90 degrees (c). They can be used as a guide to rotation
angle.
By referring to the figure, measure the valve clearances atlocations marked “ ×” as shown in the table below (locations
indicated in the figure).
No. 3 cylinder at compression TDC
c. Rotate crankshaft 90 degrees clockwise (when viewed from engine front) to align No. 6 cylinder at TDC of compression stroke.
NOTE:
: Engine front
JPBIA3489ZZ
A : Paint mark
JPBIA2066ZZ
: Engine front
Measuring position [bank 2 (A)] No. 2
CYL. No. 4
CYL. No. 6
CYL. No. 8
CYL.
No. 3 cylinder at com- pression TDC EXH
× (C)
INT × (D)
Measuring position [bank 1 (B)] No. 1
CYL. No. 3
CYL. No. 5
CYL. No. 7
CYL.
No. 3 cylinder at com- pression TDC INT
× (E) × (F)
EXH × (G) × (H)
JPBIA3490ZZ
Revision: 2010 May2011 QX56
Page 2583 of 5598
DRIVE BELTSEM-21
< PERIODIC MAINTENANCE >
C
DE
F
G H
I
J
K L
M A
EM
NP
O
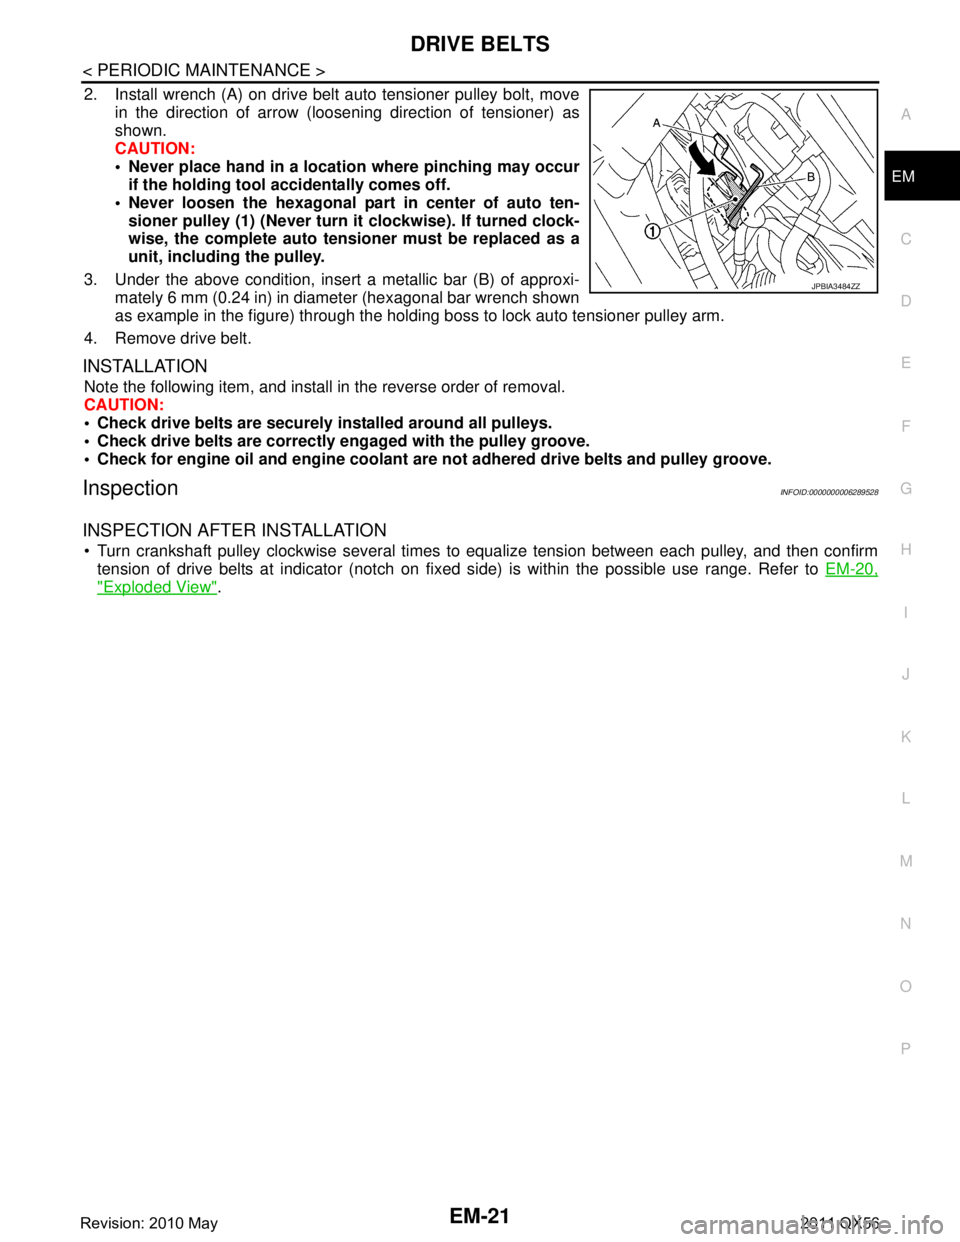
2. Install wrench (A) on drive belt auto tensioner pulley bolt, move
in the direction of arrow (loosening direction of tensioner) as
shown.
CAUTION:
Never place hand in a location where pinching may occurif the holding tool accidentally comes off.
Never loosen the hexagonal part in center of auto ten- sioner pulley (1) (Never turn it clockwise). If turned clock-
wise, the complete auto tensioner must be replaced as a
unit, including the pulley.
3. Under the above condition, insert a metallic bar (B) of approxi- mately 6 mm (0.24 in) in diameter (hexagonal bar wrench shown
as example in the figure) through the holding boss to lock auto tensioner pulley arm.
4. Remove drive belt.
INSTALLATION
Note the following item, and install in the reverse order of removal.
CAUTION:
Check drive belts are securely installed around all pulleys.
Check drive belts are correctly engaged with the pulley groove.
Check for engine oil and engine coolant ar e not adhered drive belts and pulley groove.
InspectionINFOID:0000000006289528
INSPECTION AFTER INSTALLATION
Turn crankshaft pulley clockwise several times to equalize tension between each pulley, and then confirm
tension of drive belts at indicator (notch on fixed side) is within the possible use range. Refer to EM-20,
"Exploded View".
JPBIA3484ZZ
Revision: 2010 May2011 QX56
Page 2588 of 5598
EM-26
< REMOVAL AND INSTALLATION >
DRIVE BELT AUTO TENSIONER AND IDLER PULLEY
DRIVE BELT AUTO TENSI ONER AND IDLER PULLEY
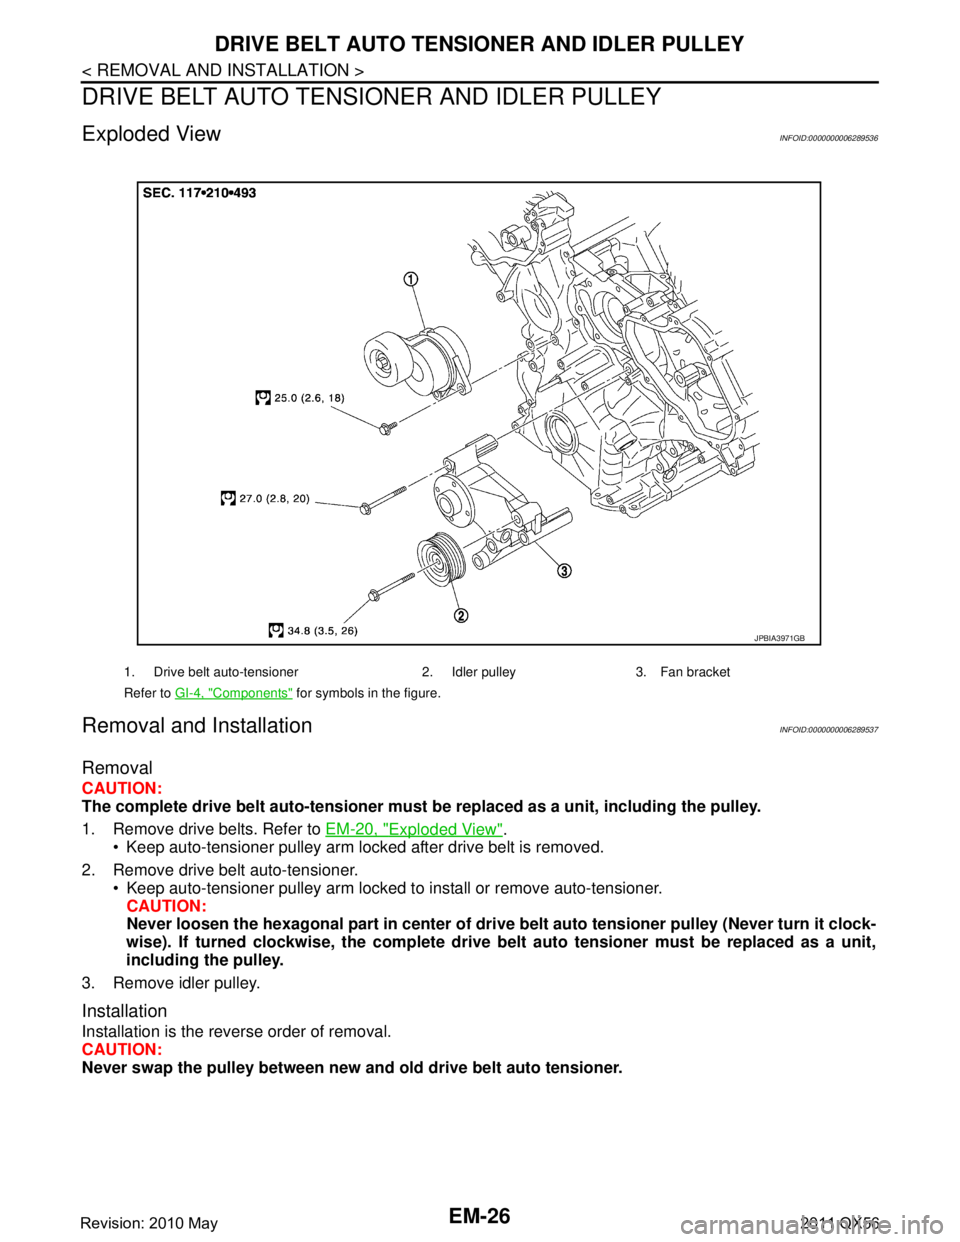
Exploded ViewINFOID:0000000006289536
Removal and InstallationINFOID:0000000006289537
Removal
CAUTION:
The complete drive belt auto-tensioner must be replaced as a unit, including the pulley.
1. Remove drive belts. Refer to EM-20, "
Exploded View".
Keep auto-tensioner pulley arm locked after drive belt is removed.
2. Remove drive belt auto-tensioner. Keep auto-tensioner pulley arm locked to install or remove auto-tensioner.CAUTION:
Never loosen the hexagonal part in center of dri ve belt auto tensioner pulley (Never turn it clock-
wise). If turned clockwise, the complete drive belt auto tensioner must be replaced as a unit,
including the pulley.
3. Remove idler pulley.
Installation
Installation is the reverse order of removal.
CAUTION:
Never swap the pulley between new an d old drive belt auto tensioner.
1. Drive belt auto-tensioner 2. Idler pulley 3. Fan bracket
Refer to GI-4, "
Components" for symbols in the figure.
JPBIA3971GB
Revision: 2010 May2011 QX56
Page 2612 of 5598
EM-50
< REMOVAL AND INSTALLATION >
FUEL INJECTOR AND FUEL TUBE
c. Press down body portion (A) of injector remover [SST:KV10119600 (—)] until it contacts cylinder head.
d. Tighten injector remover [SST: KV10119600 (—)] clockwise and remove injector from cylinder head.
e. Cut Teflon seal (1) while pinching it. Be careful not to damage injector.
f. Remove insulator from mounting ho le of fuel injector of cylinder
head.
INSTALLATION
1. Install seal ring to fuel injector as per the following: CAUTION:
Handle seal ring with bare hands. Never wear gloves.
Never apply engine oil to seal ring.
Never clean seal ring with solvent.
JPBIA3747ZZ
JPBIA3748ZZ
JSBIA0346ZZ
Revision: 2010 May2011 QX56
Page 2613 of 5598
![INFINITI QX56 2011 Factory Service Manual
FUEL INJECTOR AND FUEL TUBEEM-51
< REMOVAL AND INSTALLATION >
C
DE
F
G H
I
J
K L
M A
EM
NP
O
a. Install an injector seal drift set [SST: KV101197S0 (—)] (A) to
fuel injector (1).
b. Set seal ring INFINITI QX56 2011 Factory Service Manual
FUEL INJECTOR AND FUEL TUBEEM-51
< REMOVAL AND INSTALLATION >
C
DE
F
G H
I
J
K L
M A
EM
NP
O
a. Install an injector seal drift set [SST: KV101197S0 (—)] (A) to
fuel injector (1).
b. Set seal ring](/manual-img/42/57033/w960_57033-2612.png)
FUEL INJECTOR AND FUEL TUBEEM-51
< REMOVAL AND INSTALLATION >
C
DE
F
G H
I
J
K L
M A
EM
NP
O
a. Install an injector seal drift set [SST: KV101197S0 (—)] (A) to
fuel injector (1).
b. Set seal ring (1) to injector seal drift set [SST: KV101197S0 (—)]
(A).
c. Straightly insert seal ring (1), which is set in step 2, to fuel injec- tor as shown in the figure and install.
CAUTION:
Be careful that seal ring do es not exceed the groove portion
of fuel injector.
d. Insert injector seal drift set [SST: KV101197S0 (—)] (A) to injec- tor and rotate clockwise and counterclockwise by 90 ° while
pressing seal ring to fit it.
NOTE:
Compress seal ring, because this operation is for rectifying
stretch of seal ring caused by installation and for preventing
sticking when inserting injector into cylinder head.
2. Install O-ring and backup ring to fuel injector. When handing new O-ring and backup ring, paying attention to the following caution items:
CAUTION:
Handle O-ring with bare hands. Never wear gloves.
Lubricate O-ring with new engine oil.
Never clean O-ring with solvent.
Check that O-ring and its mating pa rt are free of foreign material.
When installing O-ring, be careful not to scratch it with tool or fingernails. Also be careful not to
twist or stretch O-ring. If O-ring was stretched wh ile it was being attached, never insert it quickly
into fuel tube.
Insert new O-ring straight into fu el rail. Never decenter or twist it.
JSBIA0347ZZ
JSBIA0348ZZ
JSBIA0350ZZ
JSBIA0351ZZ
Revision: 2010 May2011 QX56
Page 2634 of 5598
EM-72
< REMOVAL AND INSTALLATION >
TIMING CHAIN
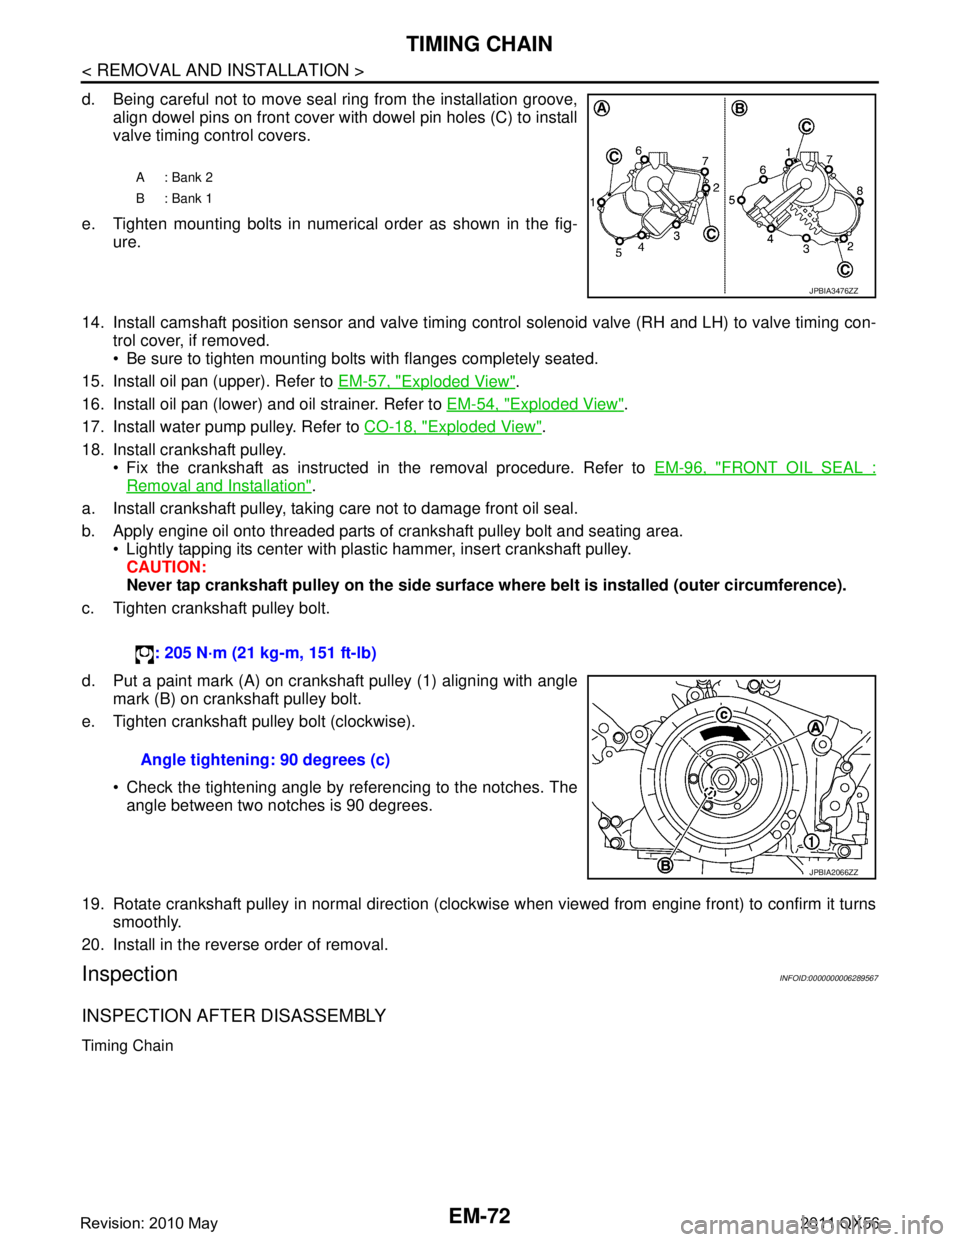
d. Being careful not to move seal ring from the installation groove,align dowel pins on front cover with dowel pin holes (C) to install
valve timing control covers.
e. Tighten mounting bolts in numerical order as shown in the fig- ure.
14. Install camshaft position sensor and valve timing c ontrol solenoid valve (RH and LH) to valve timing con-
trol cover, if removed.
Be sure to tighten mounting bolts with flanges completely seated.
15. Install oil pan (upper). Refer to EM-57, "
Exploded View".
16. Install oil pan (lower) and oil strainer. Refer to EM-54, "
Exploded View".
17. Install water pump pulley. Refer to CO-18, "
Exploded View".
18. Install crankshaft pulley. Fix the crankshaft as instructed in the removal procedure. Refer to EM-96, "
FRONT OIL SEAL :
Removal and Installation".
a. Install crankshaft pulley, taking care not to damage front oil seal.
b. Apply engine oil onto threaded parts of crankshaft pulley bolt and seating area. Lightly tapping its center with plastic hammer, insert crankshaft pulley.
CAUTION:
Never tap crankshaft pulley on the side surface wh ere belt is installed (outer circumference).
c. Tighten crankshaft pulley bolt.
d. Put a paint mark (A) on crankshaft pulley (1) aligning with angle mark (B) on crankshaft pulley bolt.
e. Tighten crankshaft pulley bolt (clockwise).
Check the tightening angle by referencing to the notches. Theangle between two notches is 90 degrees.
19. Rotate crankshaft pulley in normal direction (clockwise when viewed from engine front) to confirm it turns smoothly.
20. Install in the reverse order of removal.
InspectionINFOID:0000000006289567
INSPECTION AFTER DISASSEMBLY
Timing Chain
A: Bank 2
B: Bank 1
JPBIA3476ZZ
: 205 N·m (21 kg-m, 151 ft-lb)
Angle tightening: 90 degrees (c)
JPBIA2066ZZ
Revision: 2010 May2011 QX56
Page 2650 of 5598
EM-88
< REMOVAL AND INSTALLATION >
CYLINDER HEAD
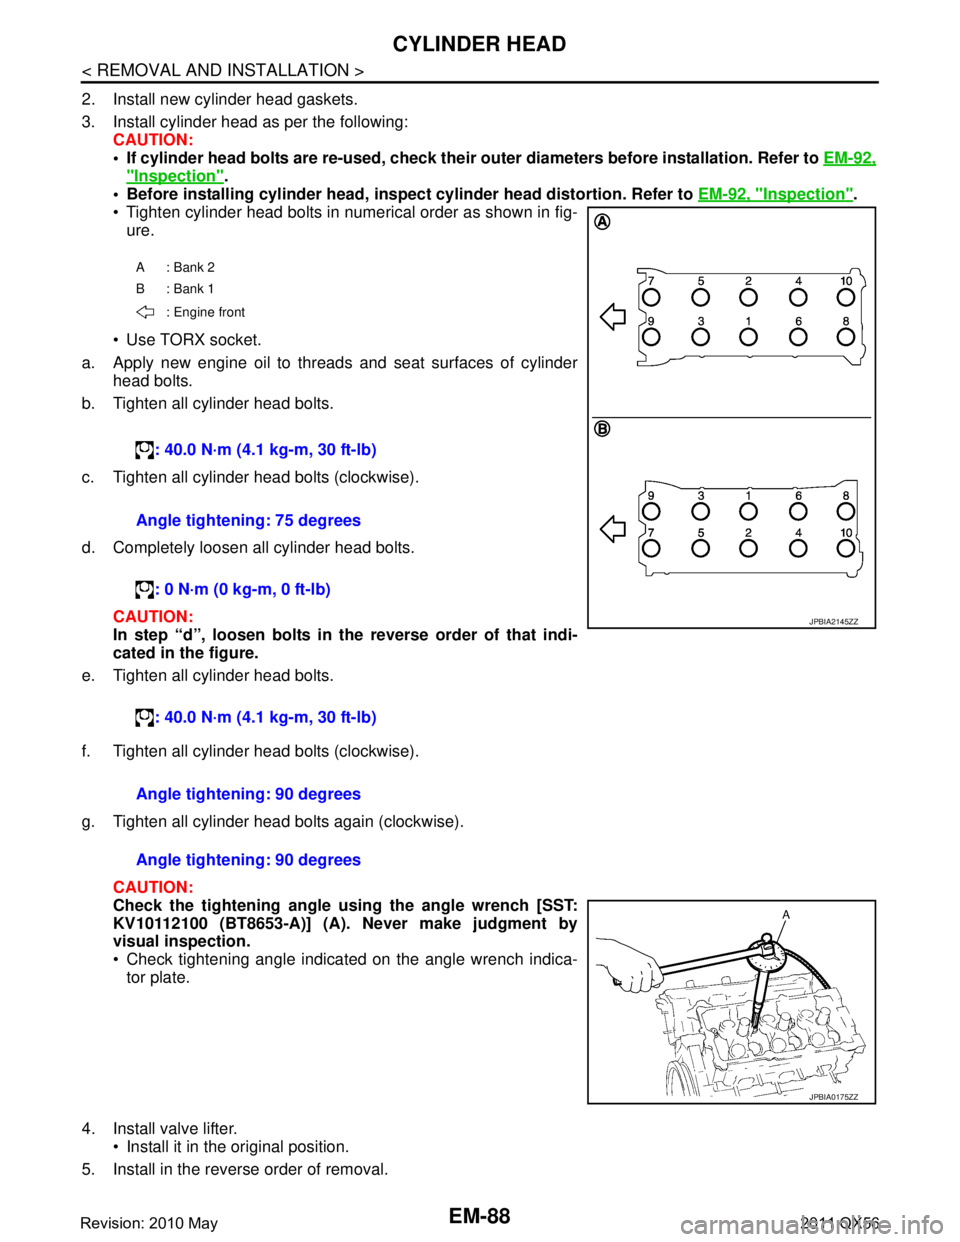
2. Install new cylinder head gaskets.
3. Install cylinder head as per the following: CAUTION:
If cylinder head bolts are re-used, check their ou ter diameters before installation. Refer to EM-92,
"Inspection".
Before installing cylinder head, inspect cylinder head distortion. Refer to EM-92, "
Inspection".
Tighten cylinder head bolts in numerical order as shown in fig- ure.
Use TORX socket.
a. Apply new engine oil to threads and seat surfaces of cylinder head bolts.
b. Tighten all cylinder head bolts.
c. Tighten all cylinder head bolts (clockwise).
d. Completely loosen all cylinder head bolts.
CAUTION:
In step “d”, loosen bolts in the reverse order of that indi-
cated in the figure.
e. Tighten all cylinder head bolts.
f. Tighten all cylinder head bolts (clockwise).
g. Tighten all cylinder head bolts again (clockwise).
CAUTION:
Check the tightening angle us ing the angle wrench [SST:
KV10112100 (BT8653-A)] (A). Never make judgment by
visual inspection.
Check tightening angle indicated on the angle wrench indica- tor plate.
4. Install valve lifter. Install it in the original position.
5. Install in the reverse order of removal.
A: Bank 2
B: Bank 1
: Engine front
: 40.0 N·m (4.1 kg-m, 30 ft-lb)
Angle tightening: 75 degrees : 0 N·m (0 kg-m, 0 ft-lb)
: 40.0 N·m (4.1 kg-m, 30 ft-lb)
JPBIA2145ZZ
Angle tightening: 90 degrees
Angle tightening: 90 degrees
JPBIA0175ZZ
Revision: 2010 May2011 QX56
Page 2674 of 5598
![INFINITI QX56 2011 Factory Service Manual
EM-112
< UNIT DISASSEMBLY AND ASSEMBLY >
CYLINDER BLOCK
e. Tighten main bearing cap bolts (M12) in order of No. 1 - 10(clockwise).
CAUTION:
Use the angle wrench [SST: KV10112100 (BT8653-A)] (A) to
ch INFINITI QX56 2011 Factory Service Manual
EM-112
< UNIT DISASSEMBLY AND ASSEMBLY >
CYLINDER BLOCK
e. Tighten main bearing cap bolts (M12) in order of No. 1 - 10(clockwise).
CAUTION:
Use the angle wrench [SST: KV10112100 (BT8653-A)] (A) to
ch](/manual-img/42/57033/w960_57033-2673.png)
EM-112
< UNIT DISASSEMBLY AND ASSEMBLY >
CYLINDER BLOCK
e. Tighten main bearing cap bolts (M12) in order of No. 1 - 10(clockwise).
CAUTION:
Use the angle wrench [SST: KV10112100 (BT8653-A)] (A) to
check tightening angl e. Never make judgment by visual
inspection.
f. Tighten main bearing cap sub bolts (M9) in order of No. 11 - 20. (clockwise)
g. Tighten side bolts (M10) in order of No. 21 - 30. After installing bolts, check that crankshaft can be rotated smoothly by hand.
Check the crankshaft end play. Refer to EM-137, "
CylinderBlock".
8. Install rear oil seal retainer. Apply a continuous bead of liquid gasket with tube presser
(commercial service tool) to rear oil seal retainer as shown in
the figure.
Use Genuine RTV silicone seal ant or equivalent. Refer to
GI-22, "
Recommended Chemical Products and Sealants".
9. Install rear oil seal on rear oil seal retainer.
Apply new engine oil to both oil seal lip (A) and dust seal lip(B).
Install it so that each seal lip is oriented as shown in the figure. CAUTION:
Be careful not to scratch or make burrs on circumference
of oil seal.
Press in rear oil seal (1) to the position as shown in the figure.
Using a suitable drift [outer diameter: 101 mm (3.98 in)].
Check the garter spring is in position and seal lips are not inverted.
10. Install piston to connecting rod as per the following: Angle tightening: 40 degrees
Angle tightening: 30 degrees
JPBIA2149ZZ
: 49.0 N·m (5.0 kg-m, 36 ft-lb)
A : Protrusion
b : 4.0 - 5.6 mm (0.157 - 0.220 in)
c:
φ3.4 - 4.4 mm (0.134 - 0.173 in)
JPBIA2102ZZ
: Engine inside
: Engine outside
JPBIA0054ZZ
B : Rear oil seal retainer rear end face
a : 0 - 0.5 mm (0 - 0.020 in)
JPBIA0152ZZ
Revision: 2010 May2011 QX56