2011 INFINITI QX56 power steering
[x] Cancel search: power steeringPage 4097 of 5598

PWC-12
< SYSTEM DESCRIPTION >
DIAGNOSIS SYSTEM (BCM)
RETAIND PWR
RETAIND PWR : CONSULT-III Function (BCM - RETAINED PWR)INFOID:0000000006217270
Data monitor
CONSULT screen item Indication/Unit Description
Vehicle Speed km/h Vehicle speed of the moment a particular DTC is detected
Odo/Trip Meter km Total mileage (Odometer value) of the moment a particular DTC is detected
Vehicle Condition SLEEP>LOCK
Power position status of
the moment a particular
DTC is detected While turning BCM status from low power consumption mode to
normal mode (Power supply position is “LOCK”)
SLEEP>OFF While turning BCM status from low power consumption mode to
normal mode (Power supply position is “OFF”.)
LOCK>ACC While turning power supply position from “LOCK” to “ACC”
ACC>ON While turning power supply position from “ACC” to “IGN”
RUN>ACC While turning power supp
ly position from “RUN” to “ACC” (Vehicle
is stopping and selector lever is except P position.)
CRANK>RUN While turning power su
pply position from “CRANKING” to “RUN”
(From cranking up the engine to run it)
RUN>URGENT While turning power supply positi
on from “RUN“ to “ACC” (Emer-
gency stop operation)
ACC>OFF While turning power supply position from “ACC” to “OFF”
OFF>LOCK While turning power supply position from “OFF” to “LOCK”
OFF>ACC While turning power supply position from “OFF” to “ACC”
ON>CRANK While turning power supply position from “IGN” to “CRANKING”
OFF>SLEEP While turning BCM status from normal mode (Power supply posi-
tion is “OFF”.) to low power consumption mode
LOCK>SLEEP While turning BCM status from normal mode (Power supply posi-
tion is “LOCK”.) to low power consumption mode
LOCK Power supply position is “LOCK”
(Ignition switch OFF with steer-
ing is locked.)
OFF Power supply position is “OFF” (Ignition switch OFF with steering
is unlocked.)
ACC Power supply position is “ACC” (Ignition switch ACC)
ON Power supply position is “IGN” (Ignition switch ON with engine
stopped)
ENGINE RUN Power supply position is “RUN” (Ignition switch ON with engine
running)
CRANKING Power supply position is “CRANKING” (At engine cranking)
IGN Counter 0 - 39 The number of times that ignition switch is turned ON after DTC is detected
The number is 0 when a malfunction is detected now.
The number increases like 1
→ 2 → 3...38 → 39 after returning to the normal condition
whenever ignition switch OFF → ON.
The number is fixed to 39 until the self-diagnosis results are erased if it is over 39.
Monitor Item Description
DOOR SW-DR Indicates [ON/OFF] condition of driver side door switch.
DOOR SW-AS Indicates [ON/OFF] condition of passenger side door switch.
Revision: 2010 May2011 QX56
Page 4205 of 5598
REAR WHEEL HUB AND HOUSINGRAX-9
< REMOVAL AND INSTALLATION >
CEF
G H
I
J
K L
M A
B
RAX
N
O P
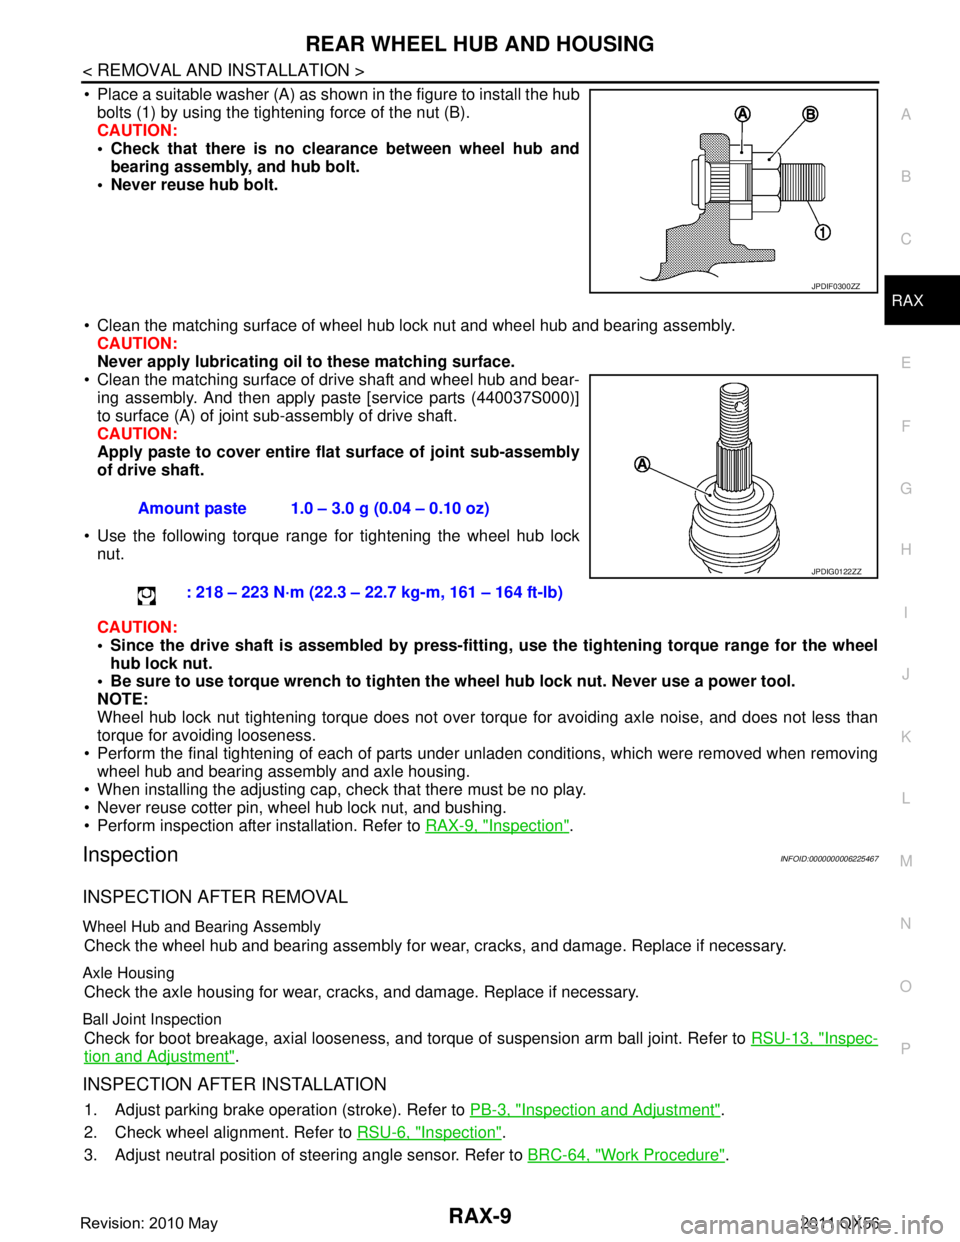
Place a suitable washer (A) as shown in the figure to install the hub bolts (1) by using the tightening force of the nut (B).
CAUTION:
Check that there is no cl earance between wheel hub and
bearing assembly, and hub bolt.
Never reuse hub bolt.
Clean the matching surface of wheel hub lock nut and wheel hub and bearing assembly. CAUTION:
Never apply lubricating oi l to these matching surface.
Clean the matching surface of drive shaft and wheel hub and bear-
ing assembly. And then apply paste [service parts (440037S000)]
to surface (A) of joint sub-assembly of drive shaft.
CAUTION:
Apply paste to cover entire fl at surface of joint sub-assembly
of drive shaft.
Use the following torque range for tightening the wheel hub lock nut.
CAUTION:
Since the drive shaft is assembled by press-fitting , use the tightening torque range for the wheel
hub lock nut.
Be sure to use torque wrench to tighten th e wheel hub lock nut. Never use a power tool.
NOTE:
Wheel hub lock nut tightening torque does not over tor que for avoiding axle noise, and does not less than
torque for avoiding looseness.
Perform the final tightening of each of parts under unladen conditions, which were removed when removing wheel hub and bearing assembly and axle housing.
When installing the adjusting cap, check that there must be no play.
Never reuse cotter pin, wheel hub lock nut, and bushing.
Perform inspection after installation. Refer to RAX-9, "
Inspection".
InspectionINFOID:0000000006225467
INSPECTION AFTER REMOVAL
Wheel Hub and Bearing Assembly
Check the wheel hub and bearing assembly for wear, cracks, and damage. Replace if necessary.
Axle Housing
Check the axle housing for wear, cracks, and damage. Replace if necessary.
Ball Joint Inspection
Check for boot breakage, axial looseness, and torque of suspension arm ball joint. Refer to RSU-13, "Inspec-
tion and Adjustment".
INSPECTION AFTER INSTALLATION
1. Adjust parking brake operation (stroke). Refer to PB-3, "Inspection and Adjustment".
2. Check wheel alignment. Refer to RSU-6, "
Inspection".
3. Adjust neutral position of steering angle sensor. Refer to BRC-64, "
Work Procedure".
JPDIF0300ZZ
Amount paste 1.0 – 3.0 g (0.04 – 0.10 oz)
: 218 – 223 N·m (22.3 – 22.7 kg-m, 161 – 164 ft-lb)
JPDIG0122ZZ
Revision: 2010 May2011 QX56
Page 4266 of 5598
REAR SHOCK ABSORBERRSU-11
< REMOVAL AND INSTALLATION >
C
DF
G H
I
J
K L
M A
B
RSU
N
O P
Inadvertent piping removal causes fluid to splatter.
2. Remove tires with power tool. Refer to WT-64, "
Removal and Installation".
3. Remove height sensor from rear lower link (right side). Refer to EXL-136, "
Removal and Installation".
4. Remove vehicle height sensor from rear lower link (left side). Refer to SCS-98, "
Removal and Installa-
tion".
5. Remove air tube from shock absorber assembly. Refer to SCS-95, "
Removal and Installation".
6. Remove middle tube assembly from shock absorber assembly. (With HBMC) Refer to SCS-44, "
REAR
TUBE ASSEMBLY : Removal and Installation".
7. Remove shock absorber mounting bolt (lower side).
8. Remove piston rod lock nut.
9. Remove bracket, bushings, and shock absorber. (With HBMC)
10. Remove washers, bushings, and shock absorber. (Without HBMC)
11. Perform inspection after removal. Refer to RSU-11, "
Inspection and Adjustment".
INSTALLATION
Note the following, and install in the reverse order of removal.
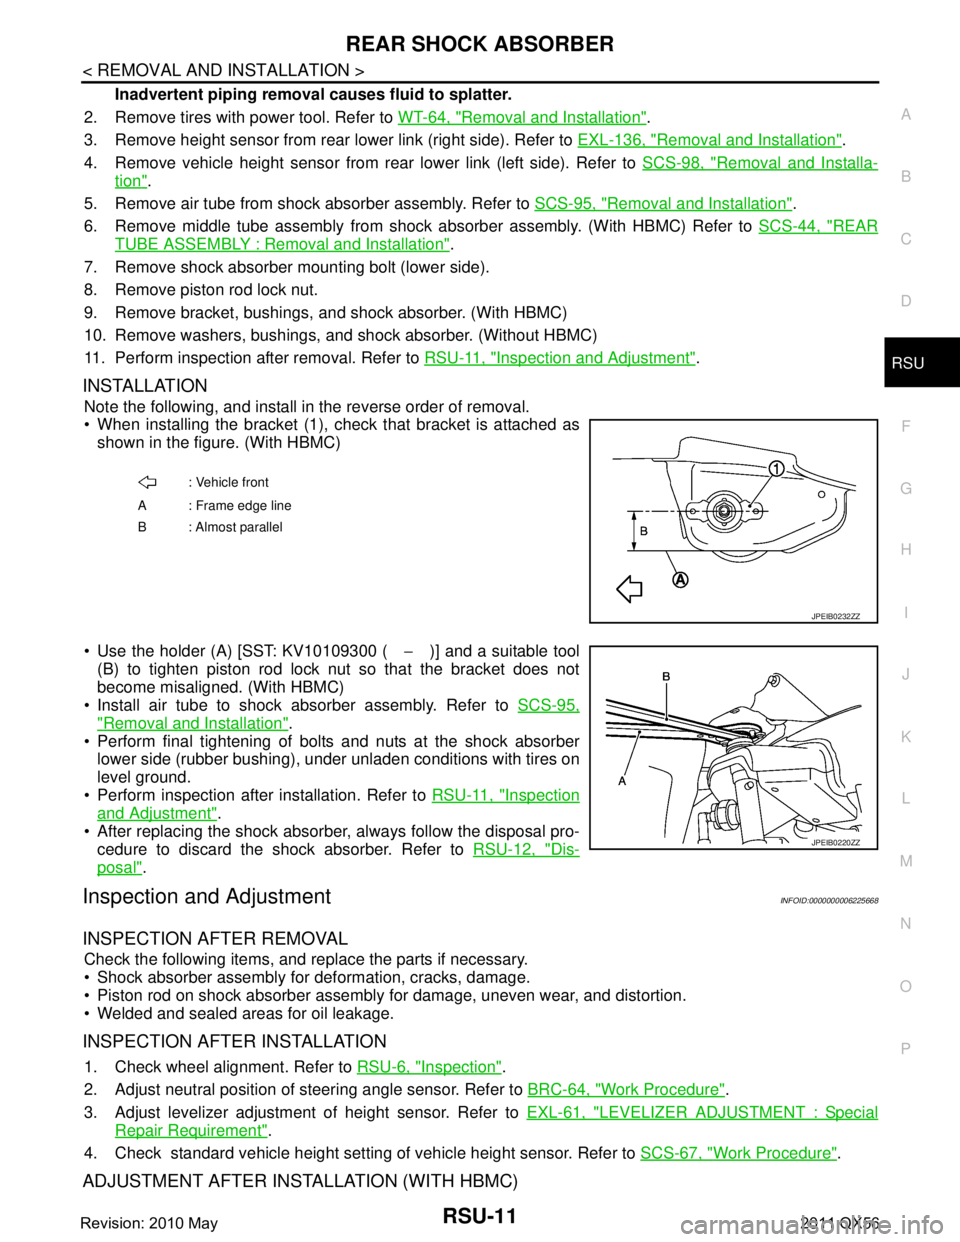
When installing the bracket (1), check that bracket is attached as
shown in the figure. (With HBMC)
Use the holder (A) [SST: KV10109300 ( −)] and a suitable tool
(B) to tighten piston rod lock nut so that the bracket does not
become misaligned. (With HBMC)
Install air tube to shock absorber assembly. Refer to SCS-95,
"Removal and Installation".
Perform final tightening of bolts and nuts at the shock absorber
lower side (rubber bushing), under unladen conditions with tires on
level ground.
Perform inspection after installation. Refer to RSU-11, "
Inspection
and Adjustment".
After replacing the shock absorber, always follow the disposal pro- cedure to discard the shock absorber. Refer to RSU-12, "
Dis-
posal".
Inspection and AdjustmentINFOID:0000000006225668
INSPECTION AFTER REMOVAL
Check the following items, and replace the parts if necessary.
Shock absorber assembly for deformation, cracks, damage.
Piston rod on shock absorber assembly for damage, uneven wear, and distortion.
Welded and sealed areas for oil leakage.
INSPECTION AFTER INSTALLATION
1. Check wheel alignment. Refer to RSU-6, "Inspection".
2. Adjust neutral position of steering angle sensor. Refer to BRC-64, "
Work Procedure".
3. Adjust levelizer adjustment of height sensor. Refer to EXL-61, "
LEVELIZER ADJUSTMENT : Special
Repair Requirement".
4. Check standard vehicle height setting of vehicle height sensor. Refer to SCS-67, "
Work Procedure".
ADJUSTMENT AFTER INSTALLATION (WITH HBMC)
: Vehicle front
A : Frame edge line
B: Almost parallel
JPEIB0232ZZ
JPEIB0220ZZ
Revision: 2010 May2011 QX56
Page 4277 of 5598
SB-2
< PRECAUTION >
PRECAUTIONS
PRECAUTION
PRECAUTIONS
Precaution for Supplemental Restraint System (SRS) "AIR BAG" and "SEAT BELT
PRE-TENSIONER"
INFOID:0000000006369606
The Supplemental Restraint System such as “A IR BAG” and “SEAT BELT PRE-TENSIONER”, used along
with a front seat belt, helps to reduce the risk or severi ty of injury to the driver and front passenger for certain
types of collision. This system includes seat belt switch inputs and dual stage front air bag modules. The SRS
system uses the seat belt switches to determine the front air bag deployment, and may only deploy one front
air bag, depending on the severity of a collision and w hether the front occupants are belted or unbelted.
Information necessary to service the system safely is included in the “SRS AIR BAG” and “SEAT BELT” of this
Service Manual.
WARNING:
• To avoid rendering the SRS inopera tive, which could increase the risk of personal injury or death in
the event of a collision that would result in air bag inflation, all maintenance must be performed by
an authorized NISS AN/INFINITI dealer.
Improper maintenance, including in correct removal and installation of the SRS, can lead to personal
injury caused by unintent ional activation of the system. For re moval of Spiral Cable and Air Bag
Module, see the “SRS AIR BAG”.
Do not use electrical test equipmen t on any circuit related to the SRS unless instructed to in this
Service Manual. SRS wiring harnesses can be identi fied by yellow and/or orange harnesses or har-
ness connectors.
PRECAUTIONS WHEN USING POWER TOOLS (AIR OR ELECTRIC) AND HAMMERS
WARNING:
When working near the Air Bag Diagnosis Sensor Unit or other Air Bag System sensors with the ignition ON or engine running, DO NOT use air or electric power tools or strike near the sensor(s)
with a hammer. Heavy vibration could activate the sensor(s) and deploy the air bag(s), possibly
causing serious injury.
When using air or electric power tools or hammers , always switch the ignition OFF, disconnect the
battery, and wait at least 3 minu tes before performing any service.
Precaution Necessary for Steering W heel Rotation after Battery Disconnect
INFOID:0000000006369607
NOTE:
Before removing and installing any control units, first tu rn the push-button ignition switch to the LOCK posi-
tion, then disconnect bot h battery cables.
After finishing work, confirm that all control unit connectors are connected properly, then re-connect both
battery cables.
Always use CONSULT-III to perform self-diagnosis as a part of each function inspection after finishing work.
If a DTC is detected, perform trouble diagnos is according to self-diagnosis results.
For vehicle with steering lock unit, if the battery is disconnected or discharged, the steering wheel will lock and
cannot be turned.
If turning the steering wheel is required with the bat tery disconnected or discharged, follow the operation pro-
cedure below before starting the repair operation.
OPERATION PROCEDURE
1. Connect both battery cables. NOTE:
Supply power using jumper cables if battery is discharged.
2. Turn the push-button ignition switch to ACC position. (At this time, the steering lock will be released.)
3. Disconnect both battery cables. The steering lock wi ll remain released with both battery cables discon-
nected and the steering wheel can be turned.
4. Perform the necessary repair operation.
Revision: 2010 May2011 QX56
Page 4303 of 5598

SBC-6
< SYSTEM DESCRIPTION >
COMPONENT PARTS
Component Description
INFOID:0000000006237876
A. View with instrument driver lower cov- er removed B. Combination switch C. View with center pillar lower garnish
removed (driver side)
D. View with center pillar lower garnish re- moved (passenger side)
Component Function
ABS actuator and electric unit (control unit) ABS operation signal is rece
ived from ABS actuator and el ectric unit (control unit)
via CAN communication.
ADAS control unit Intelligent brake assistance operation signal is received from ADAS control unit
via CAN communication.
Air bag diagnosis sensor unit Detects a collision and supplies power supply for deployment to air bag module
and pre-tensioner seat belt.
Performs the deploy judgement of passenger air bag based on the information from Occupant Detection System control unit
BCM Ignition ON signal, sleep/wake up signal, and door switch signal are received
from BCM via CAN communication.
Brake pedal stroke sensor It changes voltage according to brake pedal depressed amount and sends the
signal to pre-crash seat belt control unit.
There are 2 signals (brake pedal stroke sensor 1 and 2) sent from the brake
pedal stroke sensor. Pre-crash seat belt control unit judges the stroke amount
and the speed of the brake pedal according to the voltage of the signal sent by
each side.
Combination meter Transmits vehicle speed signal to pre-crash seat belt control unit (driver side).
Turns the seat belt warning lamp ON when the seat belt is unfastened.
Occupant detection system control unit Judges the passenger seat condition based on the information from occupant de-
tection unit.
Pre-crush seat belt control unit (driver side) Total control of pre-crash seat belt system is operated according to transmit sig-
nal.
Driver seat belt retractor integrates pre-crash seat belt control unit (driver side), driver seat belt motor, and tension reducer.
Seat belt motor operates each operation of pull, return, and hold.
Pre-crush seat belt control unit (passenger side) Control of passenger pre-crash seat belt is operated according to transmit sig-
nal.
Passenger seat belt retractor integrates pre-crash seat belt control unit (driver seat), driver seat belt motor, and tension reducer.
Seat belt motor operates each operation of pull, return, and hold.
Seat belt buckle switch (driver side) Fastening or not fastening of seat belt is judged. This judgment is used for con-
trol of driver pre-crash seat belt system.
Seat belt warning lamp on combination meter turns ON when seat belt is not fastened while ignition switch is ON.
The seat belt buckle switch is installed in the seat belt buckle.
Seat belt buckle switch (passenger side) Fastening or not fastening of seat belt is judged. This judgment is used to con-
trol passenger pre-crash seat belt system.
The seat belt buckle switch is installed in the seat belt buckle.
Steering angle sensor Steering angle sensor signal, steering angle speed signal, steering angle sensor
neutral position adjustment completion signal, and steering angle sensor mal-
function signal are received via CAN communication.
Revision: 2010 May2011 QX56
Page 4313 of 5598
SBC-16
< ECU DIAGNOSIS INFORMATION >
PRE-CRASH SEAT BELT CONTROL UNIT (DRIVER SIDE)
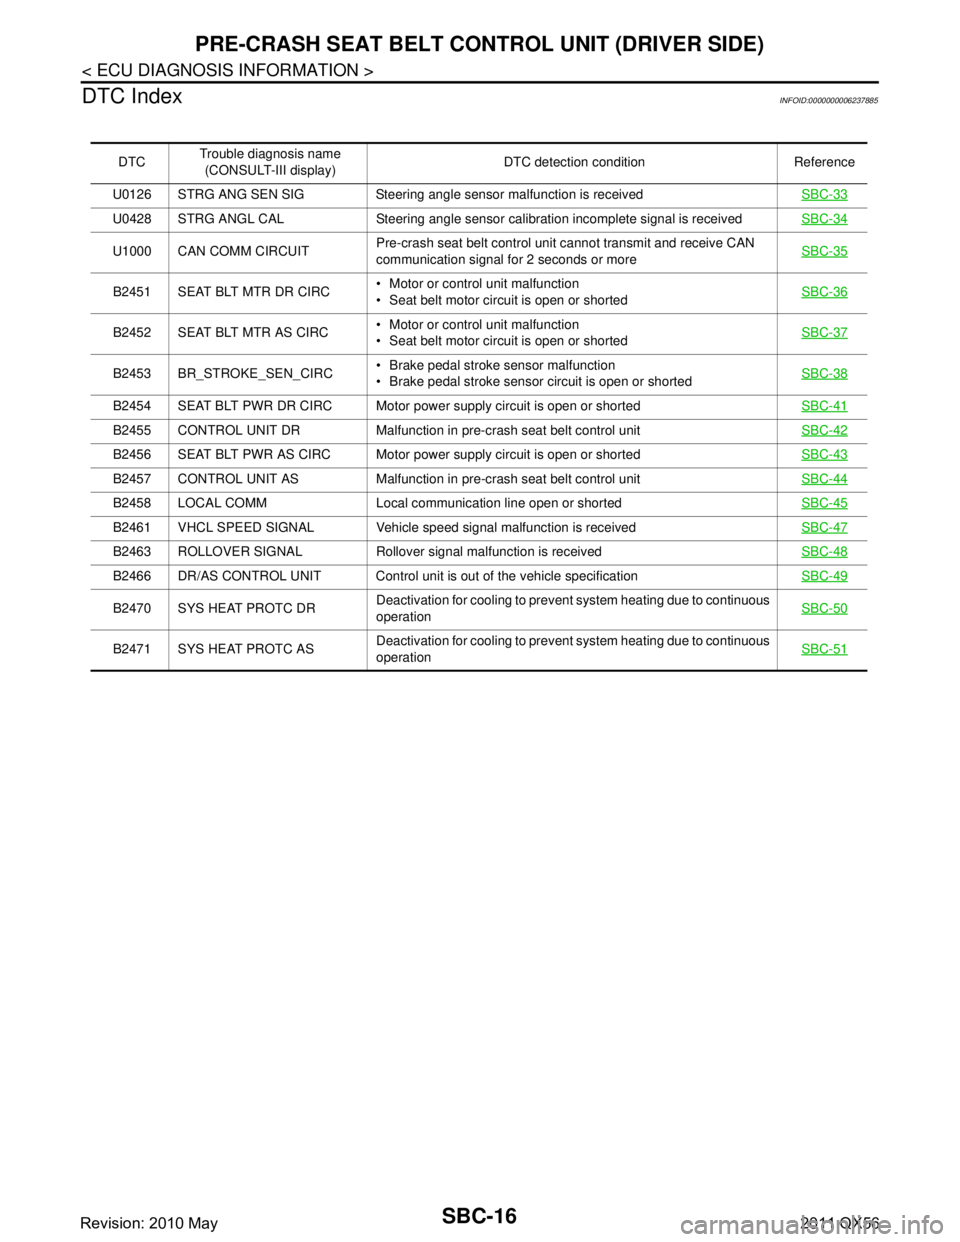
DTC Index
INFOID:0000000006237885
DTC Trouble diagnosis name
(CONSULT-III display) DTC detection condition Reference
U0126 STRG ANG SEN SIG Steering angle sensor malfunction is received SBC-33
U0428 STRG ANGL CAL Steering angle sensor calibration incomplete signal is receivedSBC-34
U1000 CAN COMM CIRCUITPre-crash seat belt control unit cannot transmit and receive CAN
communication signal for 2 seconds or more SBC-35
B2451 SEAT BLT MTR DR CIRC Motor or control unit malfunction
Seat belt motor circuit is open or shorted
SBC-36
B2452 SEAT BLT MTR AS CIRC Motor or control unit malfunction
Seat belt motor circuit is open or shorted SBC-37
B2453 BR_STROKE_SEN_CIRC
Brake pedal stroke sensor malfunction
Brake pedal stroke sensor circuit is open or shorted SBC-38
B2454 SEAT BLT PWR DR CIRC Motor power su
pply circuit is open or shortedSBC-41
B2455 CONTROL UNIT DR Malfunction in pre-crash seat belt control unit SBC-42
B2456 SEAT BLT PWR AS CIRC Motor power supply circuit is open or shortedSBC-43
B2457 CONTROL UNIT AS Malfunction in pre-crash seat belt control unit SBC-44
B2458 LOCAL COMM Local communication line open or shortedSBC-45
B2461 VHCL SPEED SIGNAL Vehicle speed signal malfunction is received SBC-47
B2463 ROLLOVER SIGNAL Rollover signal malfunction is received SBC-48
B2466 DR/AS CONTROL UNIT Control unit is out of the vehicle specificationSBC-49
B2470 SYS HEAT PROTC DRDeactivation for cooling to prevent system heating due to continuous
operation SBC-50
B2471 SYS HEAT PROTC ASDeactivation for cooling to prevent system heating due to continuous
operation
SBC-51
Revision: 2010 May2011 QX56
Page 4314 of 5598
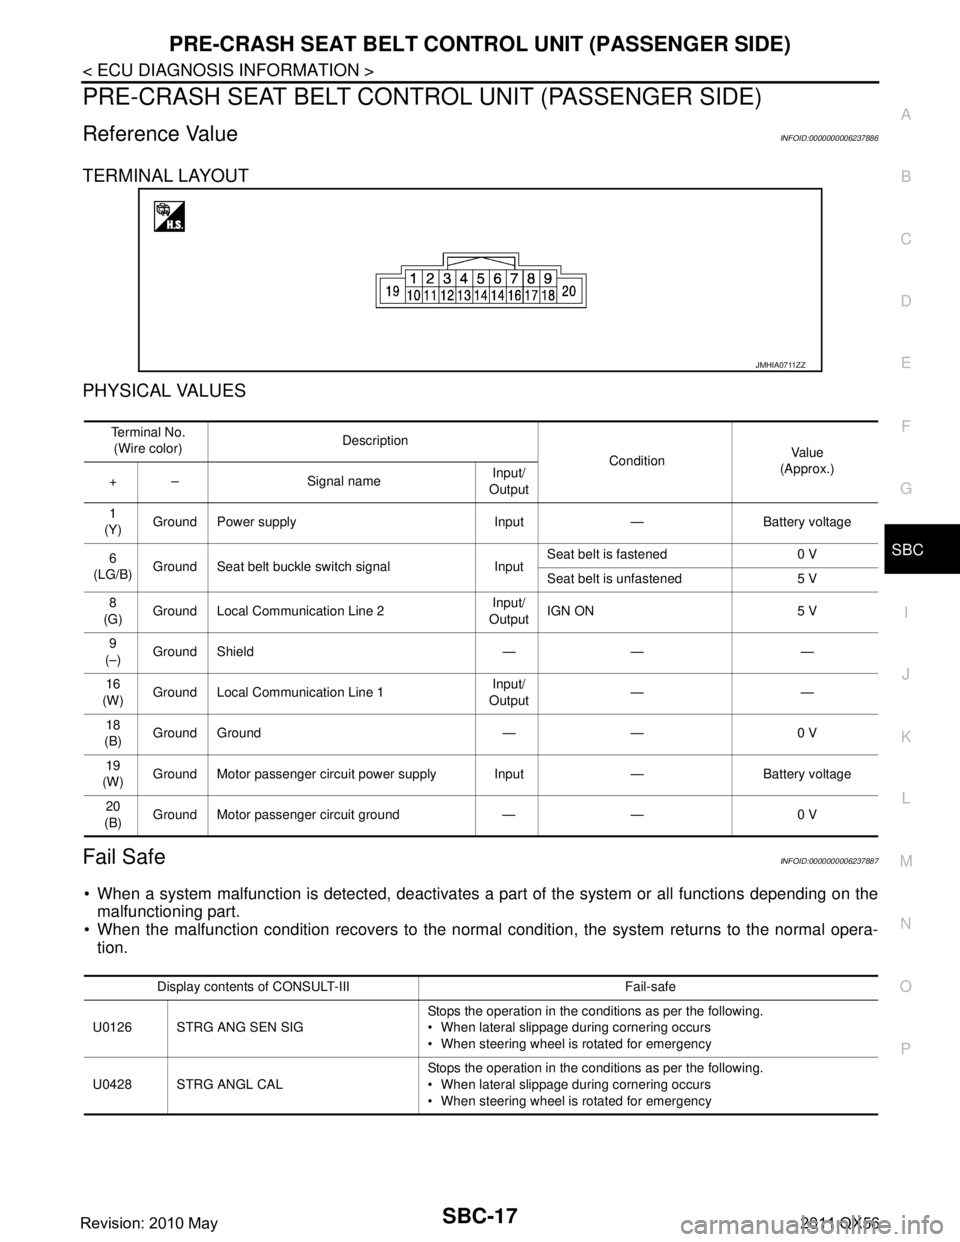
PRE-CRASH SEAT BELT CONTROL UNIT (PASSENGER SIDE)
SBC-17
< ECU DIAGNOSIS INFORMATION >
C
D E
F
G
I
J
K L
M A
B
SBC
N
O P
PRE-CRASH SEAT BELT CONTROL UNIT (PASSENGER SIDE)
Reference ValueINFOID:0000000006237886
TERMINAL LAYOUT
PHYSICAL VALUES
Fail SafeINFOID:0000000006237887
When a system malfunction is detected, deactivates a part of the system or all functions depending on the
malfunctioning part.
When the malfunction condition recovers to the norma l condition, the system returns to the normal opera-
tion.
JMHIA0711ZZ
Te r m i n a l N o .
(Wire color) Description
ConditionVa l u e
(Approx.)
+ – Signal name Input/
Output
1
(Y) Ground Power supply Input — Battery voltage
6
(LG/B) Ground Seat belt buckle switch signal Input Seat belt is fastened 0 V
Seat belt is unfastened 5 V
8
(G) Ground Local Communication Line 2 Input/
Output IGN ON 5 V
9
(–) Ground Shield — — —
16
(W) Ground Local Communication Line 1
Input/
Output ——
18
(B) Ground Ground — — 0 V
19
(W) Ground Motor passenger circuit power supply Input — Battery voltage
20
(B) Ground Motor passenger circuit ground — — 0 V
Display contents of CONSULT-III Fail-safe
U0126 STRG ANG SEN SIG Stops the operation in the conditions as per the following.
When lateral slippage during cornering occurs
When steering wheel is rotated for emergency
U0428 STRG ANGL CAL Stops the operation in the conditions as per the following.
When lateral slippage during cornering occurs
When steering wheel is rotated for emergency
Revision: 2010 May2011 QX56
Page 4364 of 5598
![INFINITI QX56 2011 Factory Service Manual
SCS-4
< PRECAUTION >[HBMC]
PRECAUTIONS
PRECAUTION
PRECAUTIONS
Precaution for Supplemental Restraint S
ystem (SRS) "AIR BAG" and "SEAT BELT
PRE-TENSIONER"
INFOID:0000000006256134
The Supplemental Res INFINITI QX56 2011 Factory Service Manual
SCS-4
< PRECAUTION >[HBMC]
PRECAUTIONS
PRECAUTION
PRECAUTIONS
Precaution for Supplemental Restraint S
ystem (SRS) "AIR BAG" and "SEAT BELT
PRE-TENSIONER"
INFOID:0000000006256134
The Supplemental Res](/manual-img/42/57033/w960_57033-4363.png)
SCS-4
< PRECAUTION >[HBMC]
PRECAUTIONS
PRECAUTION
PRECAUTIONS
Precaution for Supplemental Restraint S
ystem (SRS) "AIR BAG" and "SEAT BELT
PRE-TENSIONER"
INFOID:0000000006256134
The Supplemental Restraint System such as “A IR BAG” and “SEAT BELT PRE-TENSIONER”, used along
with a front seat belt, helps to reduce the risk or severi ty of injury to the driver and front passenger for certain
types of collision. This system includes seat belt switch inputs and dual stage front air bag modules. The SRS
system uses the seat belt switches to determine the front air bag deployment, and may only deploy one front
air bag, depending on the severity of a collision and w hether the front occupants are belted or unbelted.
Information necessary to service the system safely is included in the “SRS AIR BAG” and “SEAT BELT” of this
Service Manual.
WARNING:
• To avoid rendering the SRS inopera tive, which could increase the risk of personal injury or death in
the event of a collision that would result in air bag inflation, all maintenance must be performed by
an authorized NISS AN/INFINITI dealer.
Improper maintenance, including in correct removal and installation of the SRS, can lead to personal
injury caused by unintent ional activation of the system. For re moval of Spiral Cable and Air Bag
Module, see the “SRS AIR BAG”.
Do not use electrical test equipmen t on any circuit related to the SRS unless instructed to in this
Service Manual. SRS wiring harnesses can be identi fied by yellow and/or orange harnesses or har-
ness connectors.
PRECAUTIONS WHEN USING POWER TOOLS (AIR OR ELECTRIC) AND HAMMERS
WARNING:
When working near the Air Bag Diagnosis Sensor Unit or other Air Bag System sensors with the ignition ON or engine running, DO NOT use air or electric power tools or strike near the sensor(s)
with a hammer. Heavy vibration could activate the sensor(s) and deploy the air bag(s), possibly
causing serious injury.
When using air or electric power tools or hammers , always switch the ignition OFF, disconnect the
battery, and wait at least 3 minu tes before performing any service.
Precaution Necessary for Steering W heel Rotation after Battery Disconnect
INFOID:0000000006256136
NOTE:
Before removing and installing any control units, first tu rn the push-button ignition switch to the LOCK posi-
tion, then disconnect bot h battery cables.
After finishing work, confirm that all control unit connectors are connected properly, then re-connect both
battery cables.
Always use CONSULT-III to perform self-diagnosis as a part of each function inspection after finishing work.
If a DTC is detected, perform trouble diagnos is according to self-diagnosis results.
For vehicle with steering lock unit, if the battery is disconnected or discharged, the steering wheel will lock and
cannot be turned.
If turning the steering wheel is required with the bat tery disconnected or discharged, follow the operation pro-
cedure below before starting the repair operation.
OPERATION PROCEDURE
1. Connect both battery cables. NOTE:
Supply power using jumper cables if battery is discharged.
2. Turn the push-button ignition switch to ACC position. (At this time, the steering lock will be released.)
3. Disconnect both battery cables. The steering lock wi ll remain released with both battery cables discon-
nected and the steering wheel can be turned.
4. Perform the necessary repair operation.
Revision: 2010 May2011 QX56