2011 INFINITI QX56 Back door
[x] Cancel search: Back doorPage 3012 of 5598
GI-48
< BASIC INSPECTION >
CONSULT-III/GST CHECKING SYSTEM
CONSULT-III/GST CHECKING SYSTEM
DescriptionINFOID:0000000006280856
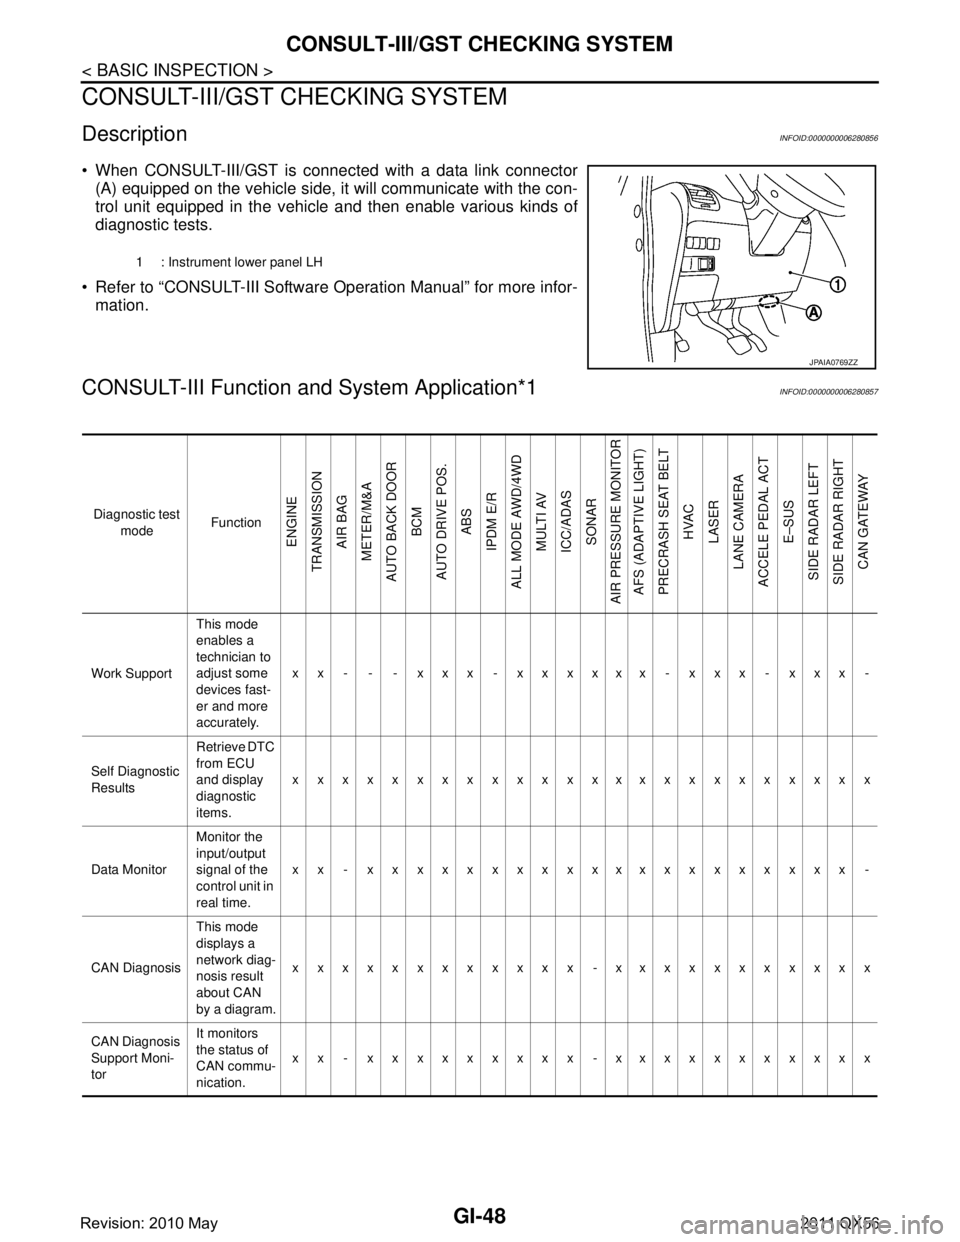
When CONSULT-III/GST is connected with a data link connector
(A) equipped on the vehicle side, it will communicate with the con-
trol unit equipped in the vehicle and then enable various kinds of
diagnostic tests.
Refer to “CONSULT-III Software Operation Manual” for more infor- mation.
CONSULT-III Function a nd System Application*1INFOID:0000000006280857
1 : Instrument lower panel LH
JPAIA0769ZZ
Diagnostic test
mode Function
ENGINE
TRANSMISSION AIR BAG
METER/M&A
AUTO BACK DOOR BCM
AUTO DRIVE POS. ABS
IPDM E/R
ALL MODE AWD/4WD MULTI AV
ICC/ADAS SONAR
AIR PRESSURE MONITOR AFS (ADAPTIVE LIGHT)
PRECRASH SEAT BELT HVAC
LASER
LANE CAMERA
ACCELE PEDAL ACT
E–SUS
SIDE RADAR LEFT
SIDE RADAR RIGHT CAN GATEWAY
Work Support This mode
enables a
technician to
adjust some
devices fast-
er and more
accurately.xx - - - xxx - xxxxxx - xxx - xxx -
Self Diagnostic
Results Retrieve DTC
from ECU
and display
diagnostic
items.
xxxxxxxxxxxxxxxxxxxxxxxx
Data Monitor Monitor the
input/output
signal of the
control unit in
real time.xx - xxxxxxxxxxxxxxxxxxxx -
CAN Diagnosis This mode
displays a
network diag-
nosis result
about CAN
by a diagram.xxxxxxxxxxxx -xxxxxxxxxxx
CAN Diagnosis
Support Moni-
tor It monitors
the status of
CAN commu-
nication.
xx - xxxxxxxxx -xxxxxxxxxxx
Revision: 2010 May2011 QX56
Page 3013 of 5598

CONSULT-III/GST CHECKING SYSTEMGI-49
< BASIC INSPECTION >
C
DE
F
G H
I
J
K L
M B
GI
N
O P
x: Applicable
*1: If GST application is equipped , functions in accordance with SAE J1 979 and ISO 15031-5 can be used.
Active Test
Send the
drive signal
from CON-
SULT-III to
the actuator.
The opera-
tion check
can be per-
formed.x - - - - xxxx - - xxxx - x - - xxxx -
DTC & SRT
confirmation The status of
system moni-
toring tests
and the self-
diagnosis
status/result
can be con-
firmed.
xx----------------------
ECU Identifica-
tion Display the
ECU identifi-
cation num-
ber (part
number etc.)
of the select-
ed system.
xxx - xxxxxxxxxxxxxxxxxxxx
Function Test This mode
can show re-
sults of self-
diagnosis of
ECU with ei-
ther “OK” or
“NG”. For en-
gine, more
practical
tests regard-
ing sensors/
switches and/
or actuators
are available.xxx----x----------------
Configuration Function to
READ/
WRITE vehi-
cle configura-
tion.-----x----x------------x
Special
Function Other results
or histories,
etc. that are
recorded in
ECU are dis-
played.
-xxx--------------------
Diagnostic test
mode Function
ENGINE
TRANSMISSION AIR BAG
METER/M&A
AUTO BACK DOOR
BCM
AUTO DRIVE POS. ABS
IPDM E/R
ALL MODE AWD/4WD
MULTI AV
ICC/ADAS SONAR
AIR PRESSURE MONITOR AFS (ADAPTIVE LIGHT)
PRECRASH SEAT BELT HVAC
LASER
LANE CAMERA
ACCELE PEDAL ACT E–SUS
SIDE RADAR LEFT
SIDE RADAR RIGHT CAN GATEWAY
Revision: 2010 May2011 QX56
Page 3029 of 5598
INSPECTION AND ADJUSTMENTGI-65
< BASIC INSPECTION >
C
DE
F
G H
I
J
K L
M B
GI
N
O PINSPECTION AND ADJUSTMENT
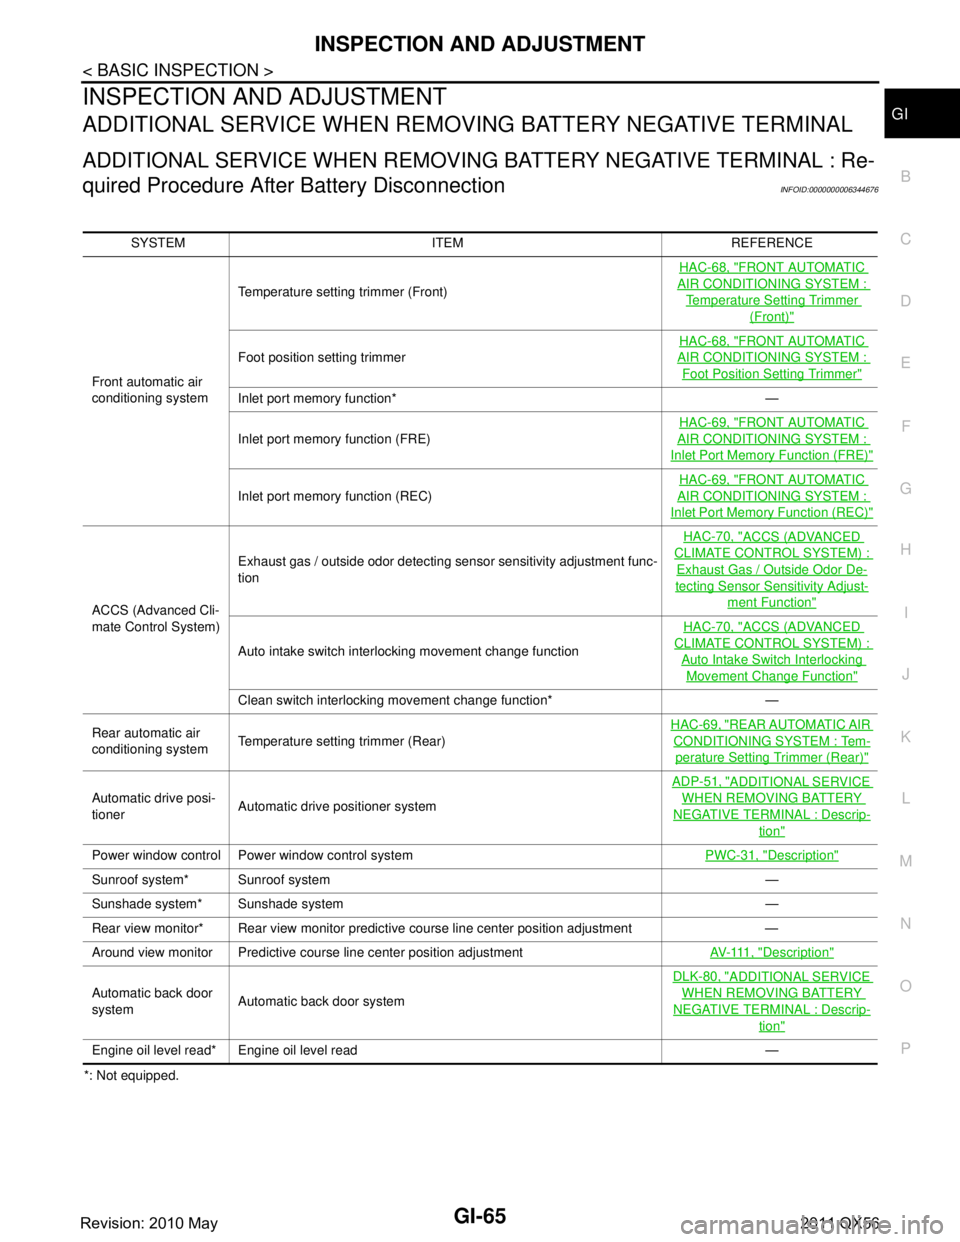
ADDITIONAL SERVICE WHEN REMOVING BATTERY NEGATIVE TERMINAL
ADDITIONAL SERVICE WHEN REMOVING BATTERY NEGATIVE TERMINAL : Re-
quired Procedure After Battery Disconnection
INFOID:0000000006344676
*: Not equipped. SYSTEM ITEM REFERENCE
Front automatic air
conditioning system Temperature setting trimmer (Front)
HAC-68, "
FRONT AUTOMATIC
AIR CONDITIONING SYSTEM :
Temperature Setting Trimmer
(Front)"
Foot position setting trimmer
HAC-68, "
FRONT AUTOMATIC
AIR CONDITIONING SYSTEM :
Foot Position Setting Trimmer"
Inlet port memory function* —
Inlet port memory function (FRE)
HAC-69, "
FRONT AUTOMATIC
AIR CONDITIONING SYSTEM :
Inlet Port Memory
Function (FRE)"
Inlet port memory function (REC) HAC-69, "
FRONT AUTOMATIC
AIR CONDITIONING SYSTEM :
Inlet Port Memory Function (REC)"
ACCS (Advanced Cli-
mate Control System)Exhaust gas / outside odor detecting sensor sensitivity adjustment func-
tion
HAC-70, "
ACCS (ADVANCED
CLIMATE CONTROL SYSTEM) :
Exhaust Gas / Outside Odor De-
tecting Sensor Sensitivity Adjust-
ment Function"
Auto intake switch interlocking movement change function
HAC-70, "
ACCS (ADVANCED
CLIMATE CONTROL SYSTEM) :
Auto Intake Switch Interlocking
Movement Change Function"
Clean switch interlocking movement change function* —
Rear automatic air
conditioning system Temperature setting trimmer (Rear) HAC-69, "
REAR AUTOMATIC AIR
CONDITIONING SYSTEM : Tem-
perature Setting
Trimmer (Rear)"
Automatic drive posi-
tioner Automatic drive positioner system ADP-51, "
ADDITIONAL SERVICE
WHEN REMOVING BATTERY
NEGATIVE TERMINAL : Descrip-
tion"
Power window control Power window control system
PWC-31, "Description"
Sunroof system* Sunroof system —
Sunshade system* Sunshade system —
Rear view monitor* Rear view monitor predictive course line center position adjustment —
Around view monitor Predictive course line center position adjustment AV- 111 , "
Description"
Automatic back door
systemAutomatic back door system DLK-80, "
ADDITIONAL SERVICE
WHEN REMOVING BATTERY
NEGATIVE TERMINAL : Descrip-
tion"
Engine oil level read* Engine oil level read —
Revision: 2010 May2011 QX56
Page 3030 of 5598
GW-1
BODY EXTERIOR, DOORS, ROOF & VEHICLE SECURITY
C
D
E
F
G H
I
J
L
M
SECTION GW
A
B
GW
N
O P
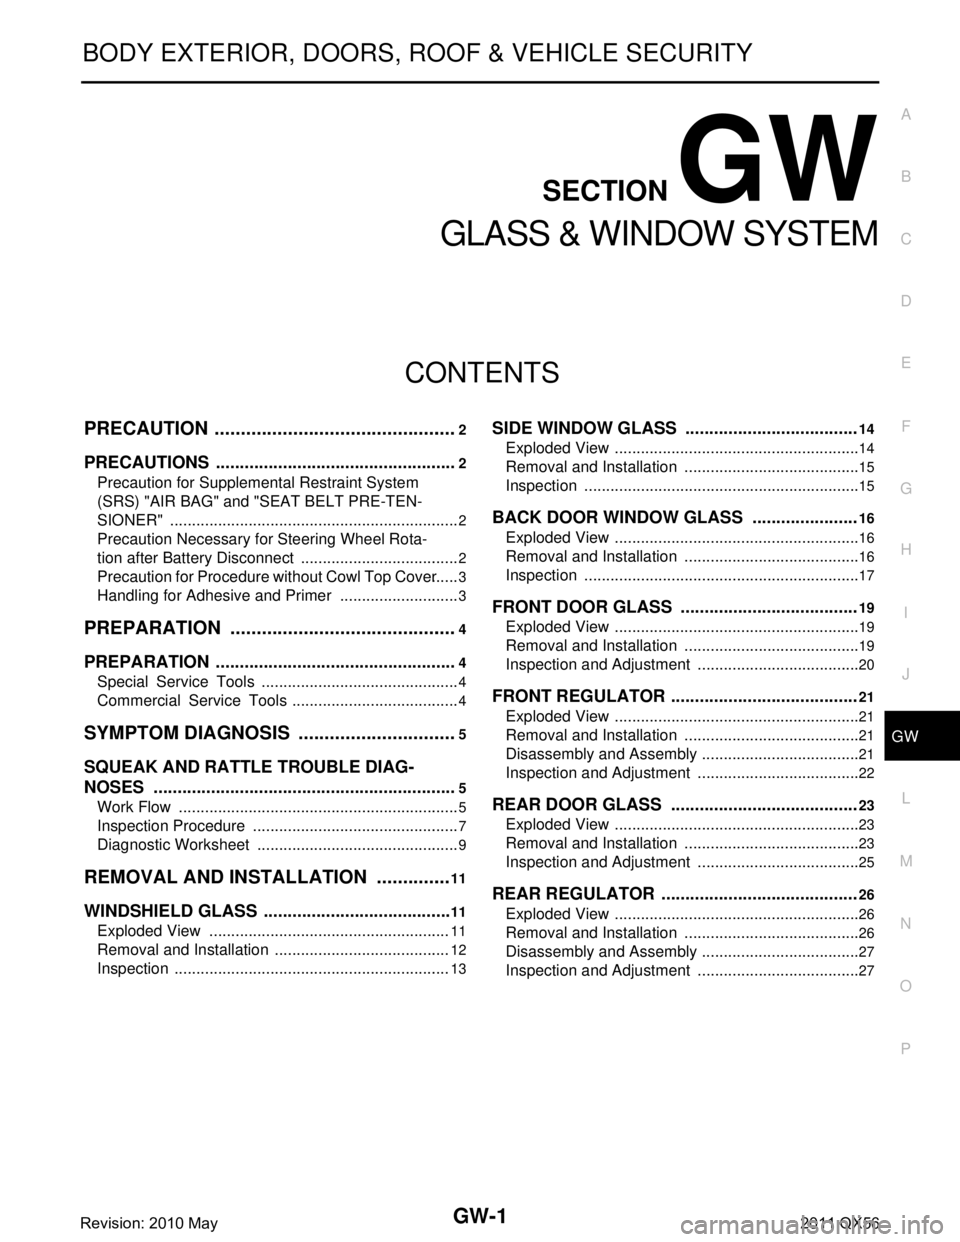
CONTENTS
GLASS & WINDOW SYSTEM
PRECAUTION ................ ...............................2
PRECAUTIONS .............................................. .....2
Precaution for Supplemental Restraint System
(SRS) "AIR BAG" and "SEAT BELT PRE-TEN-
SIONER" ............................................................. ......
2
Precaution Necessary for Steering Wheel Rota-
tion after Battery Disconnect .....................................
2
Precaution for Procedure without Cowl Top Cover ......3
Handling for Adhesive and Primer ............................3
PREPARATION ............................................4
PREPARATION .............................................. .....4
Special Service Tools ........................................ ......4
Commercial Service Tools .......................................4
SYMPTOM DIAGNOSIS ...............................5
SQUEAK AND RATTLE TROUBLE DIAG-
NOSES ........................ ........................................
5
Work Flow ........................................................... ......5
Inspection Procedure ................................................7
Diagnostic Worksheet ...............................................9
REMOVAL AND INSTALLATION ...............11
WINDSHIELD GLASS .................................... ....11
Exploded View .................................................... ....11
Removal and Installation .........................................12
Inspection ................................................................13
SIDE WINDOW GLASS ....................................14
Exploded View ..................................................... ....14
Removal and Installation .........................................15
Inspection ................................................................15
BACK DOOR WINDOW GLASS ......................16
Exploded View ..................................................... ....16
Removal and Installation .........................................16
Inspection ................................................................17
FRONT DOOR GLASS .....................................19
Exploded View .........................................................19
Removal and Installation .........................................19
Inspection and Adjustment ......................................20
FRONT REGULATOR .......................................21
Exploded View .........................................................21
Removal and Installation .........................................21
Disassembly and Assembly .....................................21
Inspection and Adjustment ......................................22
REAR DOOR GLASS .......................................23
Exploded View .........................................................23
Removal and Installation .........................................23
Inspection and Adjustment ......................................25
REAR REGULATOR .........................................26
Exploded View .........................................................26
Removal and Installation .........................................26
Disassembly and Assembly .....................................27
Inspection and Adjustment ......................................27
Revision: 2010 May2011 QX56
Page 3044 of 5598
SIDE WINDOW GLASSGW-15
< REMOVAL AND INSTALLATION >
C
DE
F
G H
I
J
L
M A
B
GW
N
O P
Removal and InstallationINFOID:0000000006220817
CAUTION:
Replace the side window glass assembly with a new part after removal as it cannot be reused.
REMOVAL
1. Remove third seat cushion and third seatback assembly. Refer to SE-138, "Removal and Installation".
2. Remove luggage side lower finisher. Refer to INT-36, "
LUGGAGE SIDE LOWER FINISHER : Removal
and Installation".
3. Remove rear pillar finisher. Refer to INT-37, "
REAR PILLAR FINISHER : Removal and Installation".
4. Remove back pillar garnish. Refer to INT-37, "
BACK PILLAR GARNISH : Removal and Installation".
5. Remove luggage side upper finisher. Refer to INT-38, "
LUGGAGE SIDE UPPER FINISHER : Removal
and Installation".
6. Disconnect the harness connector from side window glass.
7. Apply protective tape around the side window to protect the painted surface from damage.
8. Remove the side window glass using piano wire. WARNING:
Always wear safety glasses and heavy gloves to prevent injury.
CAUTION:
Be careful not to scratch the glass when removing.
Never set or stand the glass on its edge. Small chips may develop into cracks.
INSTALLATION
Use a genuine Nissan Urethane Adhesive Kit (if available) or an equivalent and follow the instructions pro- vided with it.
Open a door window while the urethane adhesive is curing. This prevents the glass from being forced out by
passenger room air pressure when all door windows are closed.
Inform the customer that the v ehicle should remain stationary until the urethane adhesive has completely
cured (approximately 24 hours). Curing time varies with temperature and humidity.
WARNING:
Keep heat and open flames away as primers and adhesive are flammable.
The materials contained in the ki t are harmful if swallowed, and may irritate skin and eyes. Never let
them come in contact with the skin and eyes.
Use in an open, well ventilated location. Never breathe the vapors. They may be harmful if inhaled.
Move immediately to an area with fresh air if affected by vapor inhalation.
Driving the vehicle before the urethane adhesive has completely cured may affect the performance
of the side window in case of an accident.
CAUTION:
Never use an adhesive which is past its usable term. Shelf life of this product is limited to six months
after the date of manufacture. Carefully adhere to the expiration or manufacture date printed on the
box.
Keep primers and adhesive in a cool, dry place. Id eally, they should be stored in a refrigerator.
Never leave primers or adhesive cartridge un attended with their caps open or off.
The vehicle should not be driven for at least 24 hours or until the urethane adhesive has completely
cured. Curing time varies depe nding on temperature and humidity . The curing time increases under
lower temperature and lower humidity.
InspectionINFOID:0000000006220818
REPAIRING WATER LEAKAGE FOR SIDE WINDOW GLASS
Leakage can be repaired without removing glass.
Determine the extent of leakage if water is leaki ng between the urethane adhesive material and body or glass.
This can be done by applying water to the side window glass area while pushing glass outward.
Apply primer (if necessary) and then urethane adhes ive to the leakage point to stop the leakage.
: Clip
: Do not reuse
Unit : mm (in)
Revision: 2010 May2011 QX56
Page 3045 of 5598
GW-16
< REMOVAL AND INSTALLATION >
BACK DOOR WINDOW GLASS
BACK DOOR WINDOW GLASS
Exploded ViewINFOID:0000000006220819
Removal and InstallationINFOID:0000000006220820
REMOVAL
1. Remove rear spoiler. Refer to EXT-41, "Removal and Installation".
2. Remove the connectors and grounds for the back door window defogger.
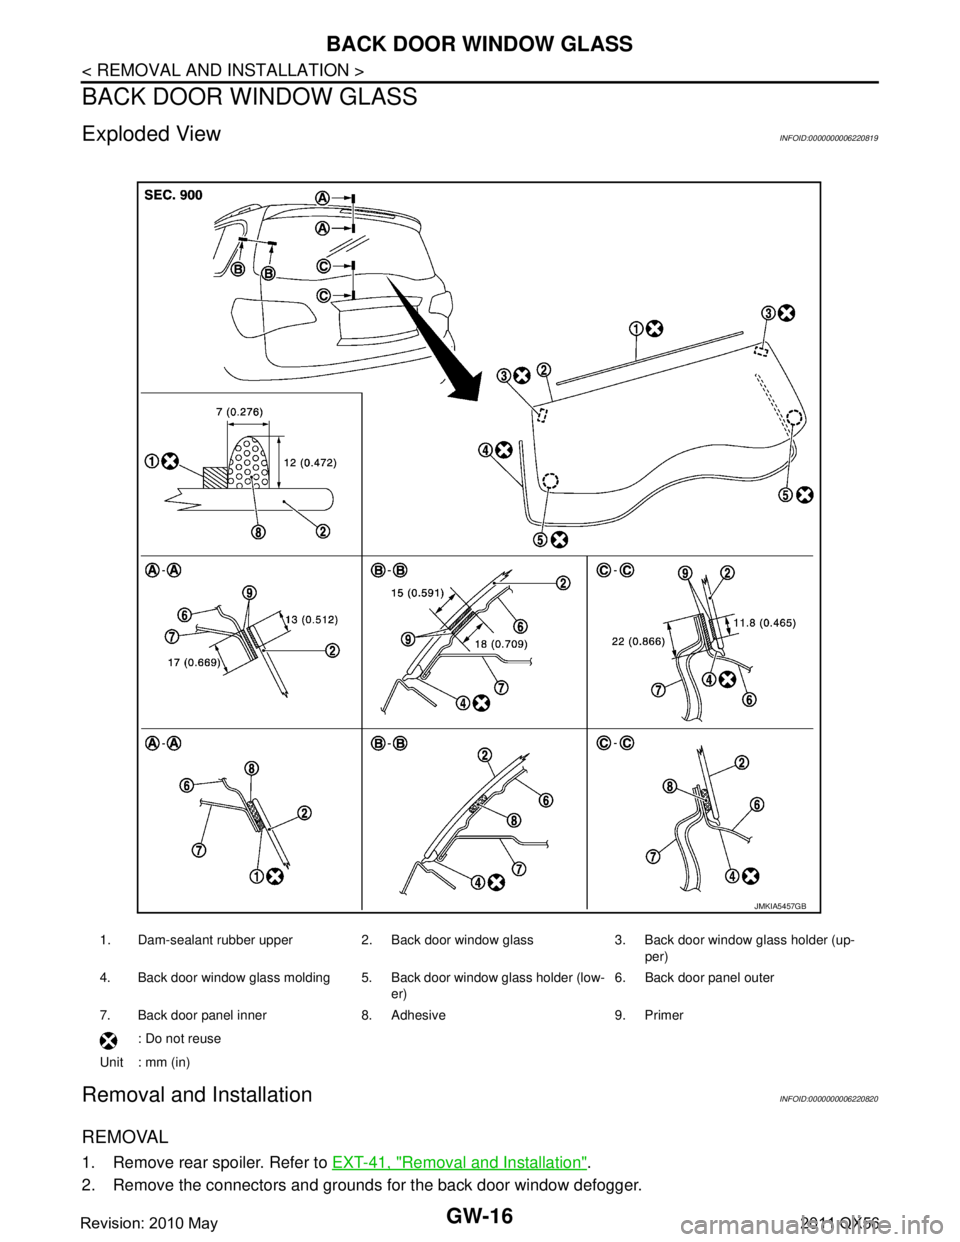
1. Dam-sealant rubber upper 2. Back door window glass 3. Back door window glass holder (up- per)
4. Back door window glass molding 5. Back door window glass holder (low- er)6. Back door panel outer
7. Back door panel inner 8. Adhesive 9. Primer : Do not reuse
Unit : mm (in)
JMKIA5457GB
Revision: 2010 May2011 QX56
Page 3046 of 5598
BACK DOOR WINDOW GLASSGW-17
< REMOVAL AND INSTALLATION >
C
DE
F
G H
I
J
L
M A
B
GW
N
O P
3. Remove rear wiper arm. Refer to WW-74, "Removal and Installation".
4. Remove rear wiper motor. Refer to WW-76, "
Removal and Installation".
5. Remove back door window glass molding using a pliers. Refer to GW-16, "
Exploded View".
6. Apply protective tape around the back door window gl ass to protect the painted surface from damage.
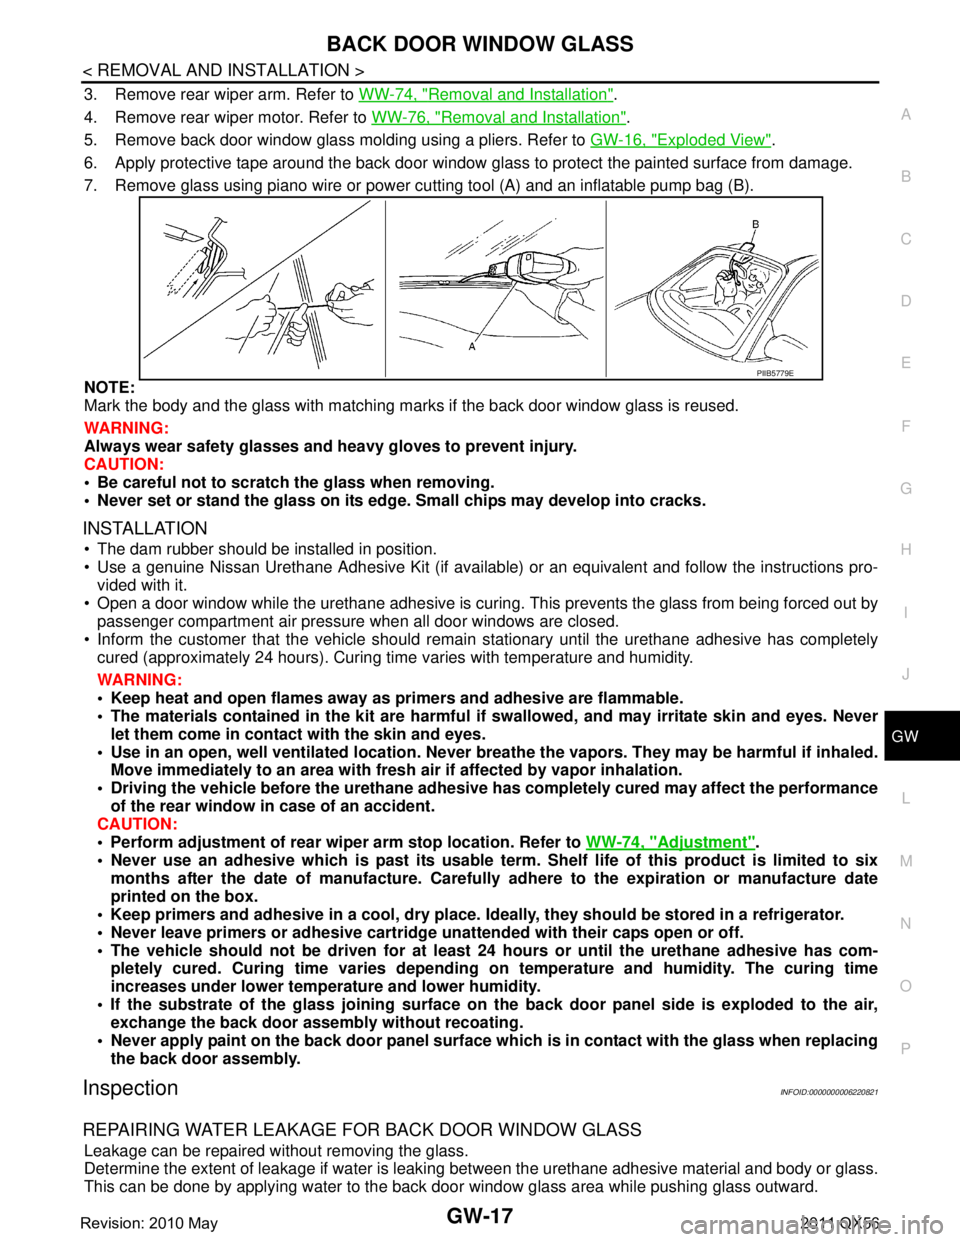
7. Remove glass using piano wire or power cutting tool (A) and an inflatable pump bag (B).
NOTE:
Mark the body and the glass with matching ma rks if the back door window glass is reused.
WARNING:
Always wear safety glasses and heavy gloves to prevent injury.
CAUTION:
Be careful not to scratch the glass when removing.
Never set or stand the glass on its edge . Small chips may develop into cracks.
INSTALLATION
The dam rubber should be installed in position.
Use a genuine Nissan Urethane Adhesive Kit (if available) or an equivalent and follow the instructions pro-
vided with it.
Open a door window while the urethane adhesive is curing. This prevents the glass from being forced out by
passenger compartment air pressure when all door windows are closed.
Inform the customer that the v ehicle should remain stationary until the urethane adhesive has completely
cured (approximately 24 hours). Curing time varies with temperature and humidity.
WARNING:
Keep heat and open flames away as primers and adhesive are flammable.
The materials contained in the kit are harmful if swallowed, and may irritate skin and eyes. Never
let them come in contact with the skin and eyes.
Use in an open, well ventilated location. Never br eathe the vapors. They may be harmful if inhaled.
Move immediately to an area with fresh air if affected by vapor inhalation.
Driving the vehicle before the urethane adhesive has completely cured may affect the performance
of the rear window in case of an accident.
CAUTION:
Perform adjustment of rear wipe r arm stop location. Refer to WW-74, "
Adjustment".
Never use an adhesive which is past its usable term. Shelf life of this product is limited to six
months after the date of manufacture. Carefull y adhere to the expiration or manufacture date
printed on the box.
Keep primers and adhesive in a cool, dry place. Id eally, they should be stored in a refrigerator.
Never leave primers or adhesive cartridge unattended with their caps open or off.
The vehicle should not be driven for at least 24 hours or until the urethane adhesive has com-
pletely cured. Curing time varies depending on temperature and humidity. The curing time
increases under lower temperature and lower humidity.
If the substrate of the glass joining surface on th e back door panel side is exploded to the air,
exchange the back door assembly without recoating.
Never apply paint on the back door panel surface wh ich is in contact with the glass when replacing
the back door assembly.
InspectionINFOID:0000000006220821
REPAIRING WATER LEAKAGE FOR BACK DOOR WINDOW GLASS
Leakage can be repaired without removing the glass.
Determine the extent of leakage if water is leaki ng between the urethane adhesive material and body or glass.
This can be done by applying water to the back door window glass area while pushing glass outward.
PIIB5779E
Revision: 2010 May2011 QX56
Page 3047 of 5598

GW-18
< REMOVAL AND INSTALLATION >
BACK DOOR WINDOW GLASS
Apply primer (if necessary) and then urethane adhesive to the leakage point to stop the leakage.
Revision: 2010 May2011 QX56