2011 INFINITI QX56 tire type
[x] Cancel search: tire typePage 3577 of 5598
![INFINITI QX56 2011 Factory Service Manual
LAN
TPMS BRANCH LINE CIRCUITLAN-157
< DTC/CIRCUIT DIAGNOSIS > [CAN SYSTEM (TYPE 2)]
C
D
E
F
G H
I
J
K L
B A
O P
N
TPMS BRANCH
LINE CIRCUIT
Diagnosis ProcedureINFOID:0000000006256300
1.CHECK CONNECTO INFINITI QX56 2011 Factory Service Manual
LAN
TPMS BRANCH LINE CIRCUITLAN-157
< DTC/CIRCUIT DIAGNOSIS > [CAN SYSTEM (TYPE 2)]
C
D
E
F
G H
I
J
K L
B A
O P
N
TPMS BRANCH
LINE CIRCUIT
Diagnosis ProcedureINFOID:0000000006256300
1.CHECK CONNECTO](/manual-img/42/57033/w960_57033-3576.png)
LAN
TPMS BRANCH LINE CIRCUITLAN-157
< DTC/CIRCUIT DIAGNOSIS > [CAN SYSTEM (TYPE 2)]
C
D
E
F
G H
I
J
K L
B A
O P
N
TPMS BRANCH
LINE CIRCUIT
Diagnosis ProcedureINFOID:0000000006256300
1.CHECK CONNECTOR
1. Turn the ignition switch OFF.
2. Disconnect the battery cabl e from the negative terminal.
3. Check the terminals and connectors of the low ti re pressure warning control unit for damage, bend and
loose connection (unit side and connector side).
Is the inspection result normal?
YES >> GO TO 2.
NO >> Repair the terminal and connector.
2.CHECK HARNESS FOR OPEN CIRCUIT
1. Disconnect the connector of low tire pressure warning control unit.
2. Check the resistance between the low tire pressure warning control unit harness connector terminals.
Is the measurement value within the specification?
YES >> GO TO 3.
NO >> Repair the low tire pressure warning control unit branch line.
3.CHECK POWER SUPPLY AND GROUND CIRCUIT
Check the power supply and the ground circuit of the lo w tire pressure warning control unit. Refer to WT-51,
"Diagnosis Procedure".
Is the inspection result normal?
YES (Present error)>>Replace the low tire pressure warning control unit. Refer to WT-65, "Removal and
Installation".
YES (Past error)>>Error was detected in the low tire pressure warning control unit branch line.
NO >> Repair the power supply and the ground circuit.
Low tire pressure warning control unit harness connector Resistance (Ω)
Connector No. Terminal No.
M96 2 1 Approx. 54 – 66
Revision: 2010 May2011 QX56
Page 3609 of 5598
![INFINITI QX56 2011 Factory Service Manual
LAN
TPMS BRANCH LINE CIRCUITLAN-189
< DTC/CIRCUIT DIAGNOSIS > [CAN SYSTEM (TYPE 3)]
C
D
E
F
G H
I
J
K L
B A
O P
N
TPMS BRANCH
LINE CIRCUIT
Diagnosis ProcedureINFOID:0000000006256347
1.CHECK CONNECTO INFINITI QX56 2011 Factory Service Manual
LAN
TPMS BRANCH LINE CIRCUITLAN-189
< DTC/CIRCUIT DIAGNOSIS > [CAN SYSTEM (TYPE 3)]
C
D
E
F
G H
I
J
K L
B A
O P
N
TPMS BRANCH
LINE CIRCUIT
Diagnosis ProcedureINFOID:0000000006256347
1.CHECK CONNECTO](/manual-img/42/57033/w960_57033-3608.png)
LAN
TPMS BRANCH LINE CIRCUITLAN-189
< DTC/CIRCUIT DIAGNOSIS > [CAN SYSTEM (TYPE 3)]
C
D
E
F
G H
I
J
K L
B A
O P
N
TPMS BRANCH
LINE CIRCUIT
Diagnosis ProcedureINFOID:0000000006256347
1.CHECK CONNECTOR
1. Turn the ignition switch OFF.
2. Disconnect the battery cabl e from the negative terminal.
3. Check the terminals and connectors of the low ti re pressure warning control unit for damage, bend and
loose connection (unit side and connector side).
Is the inspection result normal?
YES >> GO TO 2.
NO >> Repair the terminal and connector.
2.CHECK HARNESS FOR OPEN CIRCUIT
1. Disconnect the connector of low tire pressure warning control unit.
2. Check the resistance between the low tire pressure warning control unit harness connector terminals.
Is the measurement value within the specification?
YES >> GO TO 3.
NO >> Repair the low tire pressure warning control unit branch line.
3.CHECK POWER SUPPLY AND GROUND CIRCUIT
Check the power supply and the ground circuit of the lo w tire pressure warning control unit. Refer to WT-51,
"Diagnosis Procedure".
Is the inspection result normal?
YES (Present error)>>Replace the low tire pressure warning control unit. Refer to WT-65, "Removal and
Installation".
YES (Past error)>>Error was detected in the low tire pressure warning control unit branch line.
NO >> Repair the power supply and the ground circuit.
Low tire pressure warning control unit harness connector Resistance (Ω)
Connector No. Terminal No.
M96 2 1 Approx. 54 – 66
Revision: 2010 May2011 QX56
Page 3636 of 5598
![INFINITI QX56 2011 Factory Service Manual
LAN-216
< DTC/CIRCUIT DIAGNOSIS >[CAN SYSTEM (TYPE 4)]
TPMS BRANCH LINE CIRCUIT
TPMS BRANCH LINE CIRCUIT
Diagnosis ProcedureINFOID:0000000006256387
1.CHECK CONNECTOR
1. Turn the ignition switch OFF.
INFINITI QX56 2011 Factory Service Manual
LAN-216
< DTC/CIRCUIT DIAGNOSIS >[CAN SYSTEM (TYPE 4)]
TPMS BRANCH LINE CIRCUIT
TPMS BRANCH LINE CIRCUIT
Diagnosis ProcedureINFOID:0000000006256387
1.CHECK CONNECTOR
1. Turn the ignition switch OFF.](/manual-img/42/57033/w960_57033-3635.png)
LAN-216
< DTC/CIRCUIT DIAGNOSIS >[CAN SYSTEM (TYPE 4)]
TPMS BRANCH LINE CIRCUIT
TPMS BRANCH LINE CIRCUIT
Diagnosis ProcedureINFOID:0000000006256387
1.CHECK CONNECTOR
1. Turn the ignition switch OFF.
2. Disconnect the battery cable from the negative terminal.
3. Check the terminals and connectors of the low tire pressure warning control unit for damage, bend and loose connection (unit side and connector side).
Is the inspection result normal?
YES >> GO TO 2.
NO >> Repair the terminal and connector.
2.CHECK HARNESS FOR OPEN CIRCUIT
1. Disconnect the connector of low tire pressure warning control unit.
2. Check the resistance between the low tire pressu re warning control unit harness connector terminals.
Is the measurement value within the specification?
YES >> GO TO 3.
NO >> Repair the low tire pressure warning control unit branch line.
3.CHECK POWER SUPPLY AND GROUND CIRCUIT
Check the power supply and the ground circuit of the lo w tire pressure warning control unit. Refer to WT-51,
"Diagnosis Procedure".
Is the inspection result normal?
YES (Present error)>>Replace the low tire pressure warning control unit. Refer to WT-65, "Removal and
Installation".
YES (Past error)>>Error was detected in the low tire pressure warning control unit branch line.
NO >> Repair the power supply and the ground circuit.
Low tire pressure warning control unit harness connector Resistance (Ω)
Connector No. Terminal No.
M96 2 1 Approx. 54 – 66
Revision: 2010 May2011 QX56
Page 3677 of 5598
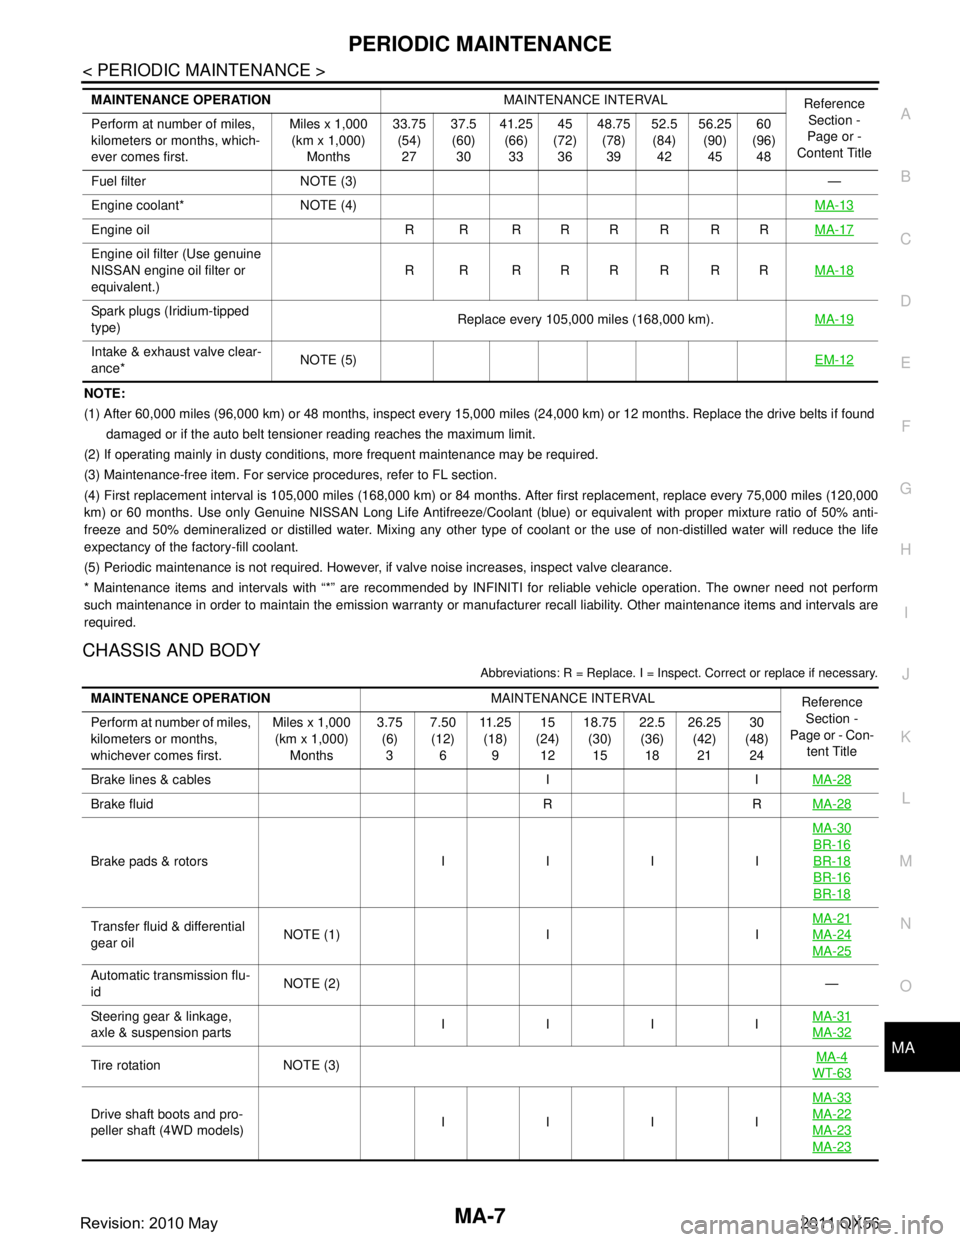
PERIODIC MAINTENANCEMA-7
< PERIODIC MAINTENANCE >
C
DE
F
G H
I
J
K L
M B
MA
N
O A
NOTE:
(1) After 60,000 miles (96,000 km) or 48 months, inspect every 15,000 miles (24,000 km) or 12 months. Replace the drive belts i
f found
damaged or if the auto belt tensioner reading reaches the maximum limit.
(2) If operating mainly in dusty conditions, more frequent maintenance may be required.
(3) Maintenance-free item. For service procedures, refer to FL section.
(4) First replacement interval is 105,000 miles (168,000 km) or 84 months. After first replacement, replace every 75,000 miles (120,000
km) or 60 months. Use only Genu ine NISSAN Long Life Antifreeze/Coo lant (blue) or equivalent with proper mixture ratio of 50% anti-
freeze and 50% demineralized or distilled water. Mixing any other type of coolant or the use of non-distilled water will reduce the life
expectancy of the factory-fill coolant.
(5) Periodic maintenance is not required. However, if valve noise increases, inspect valve clearance.
* Maintenance items and intervals with “*” are recommended by INFINITI for reliable vehicle operation. The owner need not perfo rm
such maintenance in order to maintain the emission warranty or manufacturer recall liability. Other maintenance items and inter vals are
required.
CHASSIS AND BODY
Abbreviations: R = Replace. I = Inspec t. Correct or replace if necessary.
Fuel filter NOTE (3) —
Engine coolant* NOTE (4) MA-13
Engine oil R R R R R R R RMA-17
Engine oil filter (Use genuine
NISSAN engine oil filter or
equivalent.)R R RRRRRR
MA-18
Spark plugs (Iridium-tipped
type)Replace every 105,000 miles (168,000 km).
MA-19
Intake & exhaust valve clear-
ance*NOTE (5)
EM-12
MAINTENANCE OPERATIONMAINTENANCE INTERVAL
Reference
Section -
Page or -
Content Title
Perform at number of miles,
kilometers or months, which-
ever comes first. Miles x 1,000
(km x 1,000)
Months 33.75
(54)
27 37.5
(60)
30 41.25
(66)
33 45
(72)
36 48.75
(78)
39 52.5
(84)
42 56.25
(90)
45 60
(96)
48
MAINTENANCE OPERATION MAINTENANCE INTERVAL
Reference
Section -
Page or - Con- tent Title
Perform at number of miles,
kilometers or months,
whichever comes first. Miles x 1,000
(km x 1,000)
Months 3.75
(6)
3 7.50
(12)
6 11 . 2 5
(18)
9 15
(24)
12 18.75
(30)
15 22.5
(36)
18 26.25
(42)
21 30
(48)
24
Brake lines & cables I I MA-28
Brake fluid R RMA-28
Brake pads & rotors I I I IMA-30
BR-16
BR-18
BR-16
BR-18
Transfer fluid & differential
gear oil
NOTE (1) I I MA-21MA-24
MA-25
Automatic transmission flu-
id
NOTE (2)
—
Steering gear & linkage,
axle & suspension parts IIII
MA-31
MA-32
Tire rotation NOTE (3) MA-4WT-63
Drive shaft boots and pro-
peller shaft (4WD models) IIII MA-33MA-22
MA-23
MA-23
Revision: 2010 May2011 QX56
Page 3679 of 5598
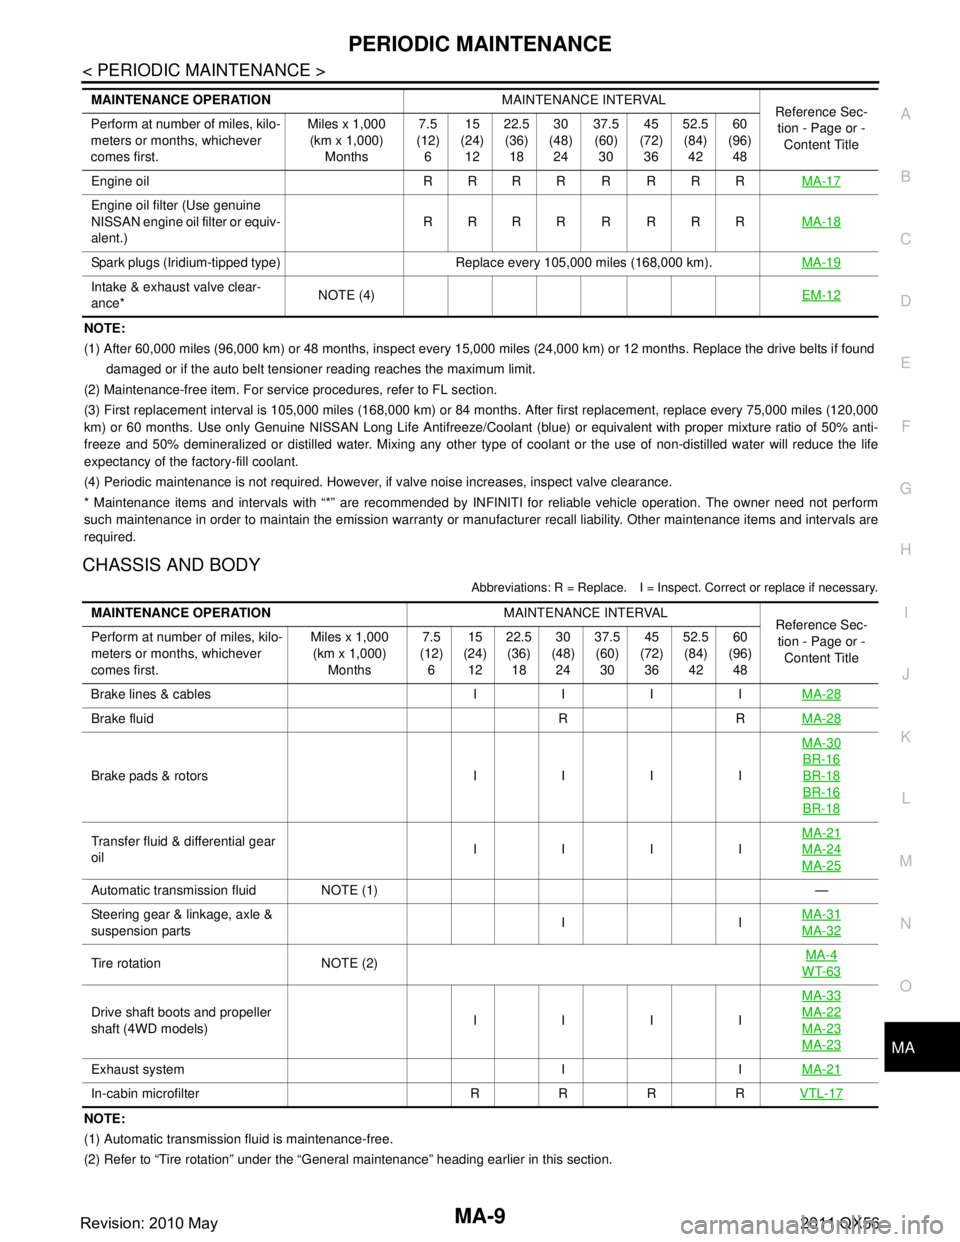
PERIODIC MAINTENANCEMA-9
< PERIODIC MAINTENANCE >
C
DE
F
G H
I
J
K L
M B
MA
N
O A
NOTE:
(1) After 60,000 miles (96,000 km) or 48 months, inspect every 15,000 miles (24,000 km) or 12 months. Replace the drive belts i
f found
damaged or if the auto belt tensioner reading reaches the maximum limit.
(2) Maintenance-free item. For service procedures, refer to FL section.
(3) First replacement interval is 105,000 miles (168,000 km) or 84 months. After first replacement, replace every 75,000 miles (120,000
km) or 60 months. Use only Genu ine NISSAN Long Life Antifreeze/Coo lant (blue) or equivalent with proper mixture ratio of 50% anti-
freeze and 50% demineralized or distilled water. Mixing any other type of coolant or the use of non-distilled water will reduce the life
expectancy of the factory-fill coolant.
(4) Periodic maintenance is not required. However, if valve noise increases, inspect valve clearance.
* Maintenance items and intervals with “*” are recommended by INFINITI for reliable vehicle operation. The owner need not perfo rm
such maintenance in order to maintain the emission warranty or manufacturer recall liability. Other maintenance items and inter vals are
required.
CHASSIS AND BODY
Abbreviations: R = Replace. I = Inspec t. Correct or replace if necessary.
NOTE:
(1) Automatic transmission fluid is maintenance-free.
(2) Refer to “Tire rotation” under the “General maintenance” heading earlier in this section.
Engine oil R R R R R R R R
MA-17
Engine oil filter (Use genuine
NISSAN engine oil filter or equiv-
alent.)RRRR R RRR
MA-18
Spark plugs (Iridium-tipped type) Replace every 105,000 miles (168,000 km). MA-19
Intake & exhaust valve clear-
ance*NOTE (4)
EM-12
MAINTENANCE OPERATIONMAINTENANCE INTERVAL
Reference Sec-
tion - Page or -
Content Title
Perform at number of miles, kilo-
meters or months, whichever
comes first. Miles x 1,000
(km x 1,000)
Months 7.5
(12)
6 15
(24)
12 22.5
(36)
18 30
(48)
24 37.5
(60)
30 45
(72)
36 52.5
(84)
42 60
(96)
48
MAINTENANCE OPERATION MAINTENANCE INTERVAL
Reference Sec-
tion - Page or - Content Title
Perform at number of miles, kilo-
meters or months, whichever
comes first. Miles x 1,000
(km x 1,000) Months 7.5
(12) 6 15
(24) 12 22.5
(36) 18 30
(48) 24 37.5
(60) 30 45
(72) 36 52.5
(84) 42 60
(96) 48
Brake lines & cables I I I I MA-28
Brake fluid R RMA-28
Brake pads & rotors I I I IMA-30
BR-16
BR-18
BR-16
BR-18
Transfer fluid & differential gear
oil
IIIIMA-21MA-24
MA-25
Automatic transmission fluid NOTE (1)
—
Steering gear & linkage, axle &
suspension parts II
MA-31
MA-32
Tire rotation NOTE (2) MA-4WT-63
Drive shaft boots and propeller
shaft (4WD models) IIIIMA-33MA-22
MA-23
MA-23
Exhaust system I I
MA-21
In-cabin microfilter R R R RVTL-17
Revision: 2010 May2011 QX56
Page 3696 of 5598
MA-26
< PERIODIC MAINTENANCE >
CHASSIS MAINTENANCE
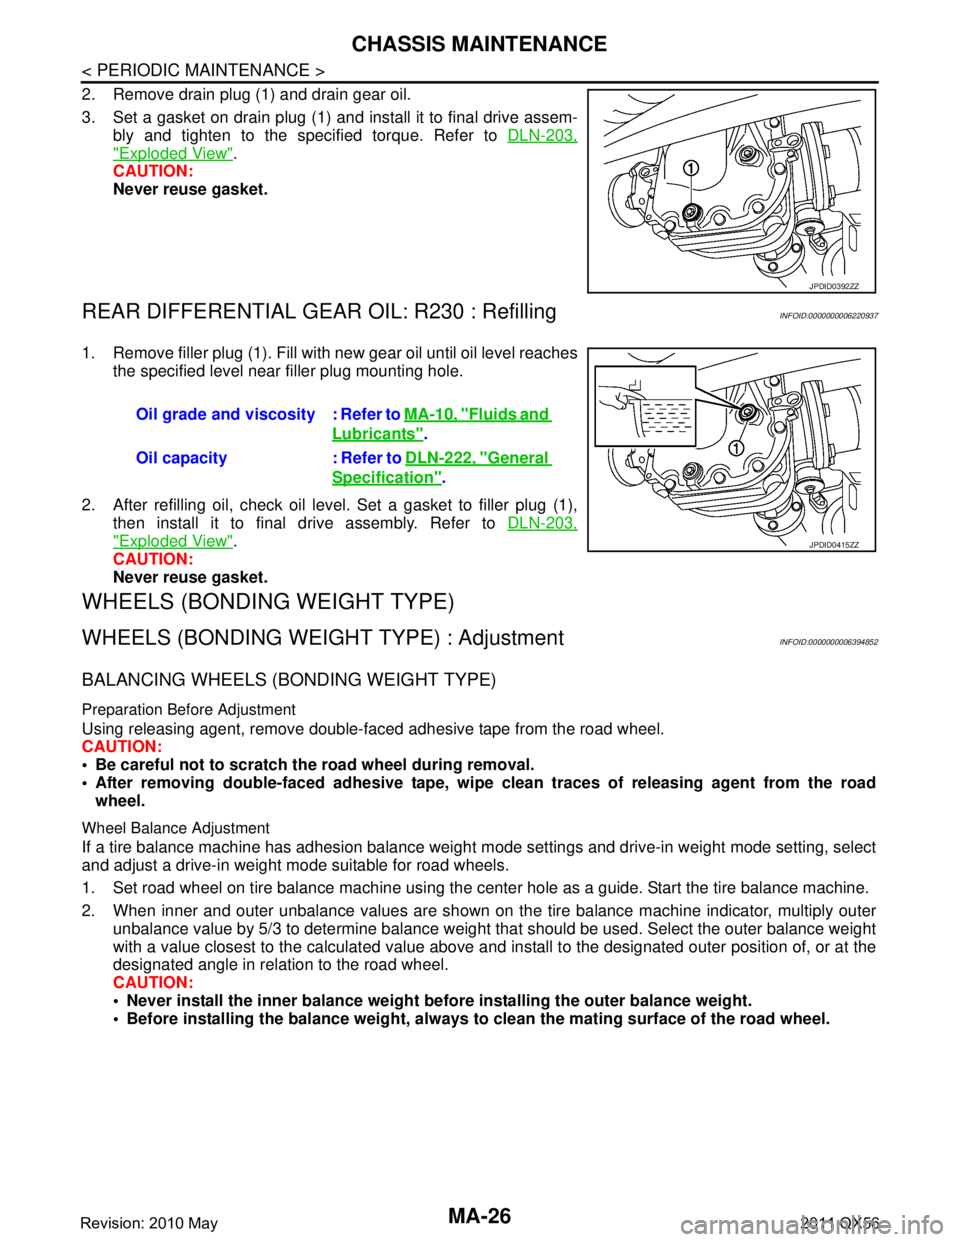
2. Remove drain plug (1) and drain gear oil.
3. Set a gasket on drain plug (1) and install it to final drive assem-bly and tighten to the specified torque. Refer to DLN-203,
"Exploded View".
CAUTION:
Never reuse gasket.
REAR DIFFERENTIAL GEAR OIL: R230 : RefillingINFOID:0000000006220937
1. Remove filler plug (1). Fill with new gear oil until oil level reaches
the specified level near filler plug mounting hole.
2. After refilling oil, check oil level. Set a gasket to filler plug (1), then install it to final drive assembly. Refer to DLN-203,
"Exploded View".
CAUTION:
Never reuse gasket.
WHEELS (BONDING WEIGHT TYPE)
WHEELS (BONDING WEIG HT TYPE) : AdjustmentINFOID:0000000006394852
BALANCING WHEELS (BONDING WEIGHT TYPE)
Preparation Before Adjustment
Using releasing agent, remove double-faced adhesive tape from the road wheel.
CAUTION:
Be careful not to scratch th e road wheel during removal.
After removing double-faced adhesive tape, wi pe clean traces of releasing agent from the road
wheel.
Wheel Balance Adjustment
If a tire balance machine has adhesion balance weight m ode settings and drive-in weight mode setting, select
and adjust a drive-in weight mode suitable for road wheels.
1. Set road wheel on tire balance machine using the center hole as a guide. Start the tire balance machine.
2. When inner and outer unbalance values are shown on the tire balance machine indicator, multiply outer unbalance value by 5/3 to determine balance weight t hat should be used. Select the outer balance weight
with a value closest to the calculated value above and in stall to the designated outer position of, or at the
designated angle in relation to the road wheel.
CAUTION:
Never install the inner balance weight be fore installing the outer balance weight.
Before installing the balance weight, always to clean the mating surface of the road wheel.
JPDID0392ZZ
Oil grade and viscosity : Refer to MA-10, "Fluids and
Lubricants".
Oil capacity : Refer to DLN-222, "
General
Specification".
JPDID0415ZZ
Revision: 2010 May2011 QX56
Page 4261 of 5598
RSU-6
< PERIODIC MAINTENANCE >
WHEEL ALIGNMENT
WHEEL ALIGNMENT
InspectionINFOID:0000000006225661
DESCRIPTION
Measure wheel alignment under unladen conditions.
NOTE:
“Unladen conditions” means that fuel, engine coolant, and lubricant are full. Spare tire, jack, hand tools and
mats are in designated positions.
PRELIMINARY CHECK
Check the following:
Tires for improper air pressure and wear
Road wheels for runout. Refer to WT-64, "
Inspection".
Wheel bearing axial end play. Refer to RAX-5, "
Inspection".
Ball joint axial end play of suspension arm and front lower link. Refer to RSU-20, "
Ball Joint".
Shock absorber operation
Each mounting point of axle and suspension for looseness and deformation
Each of front lower link, rear lower link, rear suspension member, suspension arm and shock absorber for
cracks, deformation, and other damage
Vehicle height (posture)
GENERAL INFORMATION AND RECOMMENDATIONS
A four-wheel thrust alignment should be performed.
- This type of alignment is recomm ended for any NISSAN/INFINITI vehicle.
- The four-wheel “thrust” process helps ensure that t he vehicle is properly aligned and the steering wheel is
centered.
- The alignment rack itself should be capable of accepting any NISSAN/INFINITI vehicle.
- The rack should be checked to ensure that it is level.
Make sure the machine is properly calibrated.
- Your alignment equipment should be regularly calib rated in order to give correct information.
- Check with the manufacturer of your specific equi pment for their recommended Service/Calibration Sched-
ule.
ALIGNMENT PROCESS
IMPORTANT:
Use only the alignment specifications listed in this Service Manual.
When displaying the alignment settings, many alignment machines use “indicators”: (Green/red, plus or
minus, Go/No Go). Never use these indicators.
- The alignment specifications programmed into your machine that operate these indicators may not be cor-
rect.
- This may result in an ERROR.
Some newer alignment machines are equipped with an optional “Rolling Compensation” method to “com- pensate” the sensors (alignment targets or head units). Never use this “Rolling Compensation” method.
- Use the “Jacking Compensation Method”. After installi ng the alignment targets or head units, raise the vehi-
cle and rotate the wheels 1/2 turn both ways.
- See Instructions in the alignment machine you're using for more information on this.
AdjustmentINFOID:0000000006225662
CAMBER
Revision: 2010 May2011 QX56
Page 4280 of 5598
FRONT SEAT BELTSB-5
< REMOVAL AND INSTALLATION >
C
DE
F
G
I
J
K L
M A
B
SB
N
O P
SEAT BELT RETRACTOR ON-VEHICLE CHECK
Emergency Locking Retractors (ELR) and Automatic Locking Retractors (ALR)
NOTE:
All seat belt retractors are Emergency Locking Retr actors (ELR) type. In an emergency (sudden stop) the
retractor will lock and prevent the webbing from extendi ng any further. All 3-point type seat belt retractors
except the driver seat belt also have an Automati c Locking Retractors (ALR) mode. The ALR mode (also
called child restraint mode) is used when installing child seats. The ALR mode is activated when the seat belt
is fully extended. When the webbing is then retracted part ially, the ALR mode automatically locks the seat belt
in a specific position so the webbi ng cannot be extended any further. To c ancel the ALR mode, allow the seat
belt to fully wind back into the retractor.
Check the seat belt retractors with the following test(s ) to determine if a retractor assembly is operating prop-
erly.
ELR Function Stationary Check
Grasp the shoulder webbing and pull forward quickly. The retractor should lock and prevent the belt from
extending further.
ALR Function Stationary Check
1. Pull out the entire length of seat bel t from retractor until a click is heard.
2. Retract the webbing partially. A clicking noise should be heard as the webbing retracts indicating that the
retractor is in the Automatic Locking Retractors (ALR) mode.
3. Grasp the seat belt and try to pull out the retractor. The webbing must lock and not extend any further. If it
does not operate normally, replace the retractor assembly.
4. Allow the entire length of the webbing to retract to cancel the automatic locking mode.
ELR Function Moving Check
WARNING:
Perform the following test in a safe, open area clear of other vehicles and obstructions (for example, a
large, empty parking lot). Road surface must be p aved and dry. Never perform the following test on
wet or gravel roads or on public streets and highways. This could result in an accident and serious
personal injury. The driver and passenger must be prepared to brace themselves in the event that the
retractor does not lock.
1. Fasten driver seat belt. Buckle a passenger into the seat for the belt that is to be tested.
2. Proceed to the designated safe area.
3. Drive the vehicle at approximately 16 km/h ( 10 MPH). Notify any passengers of a pending sudden stop
and the driver and passenger must be prepared to brac e themselves in the event that the retractor does
not lock. Apply brakes firmly and make a very hard stop.
During stopping, seat belts should lock and not be extended. If the seat belt retractor assembly does not lock,
perform the retractor off-vehicle check.
SEAT BELT RETRACTOR OFF-VEHICLE CHECK
1. Remove the front seat belt retractor. Refer to SB-6, "SEAT BELT RETRACTOR : Removal and Installa-
tion".
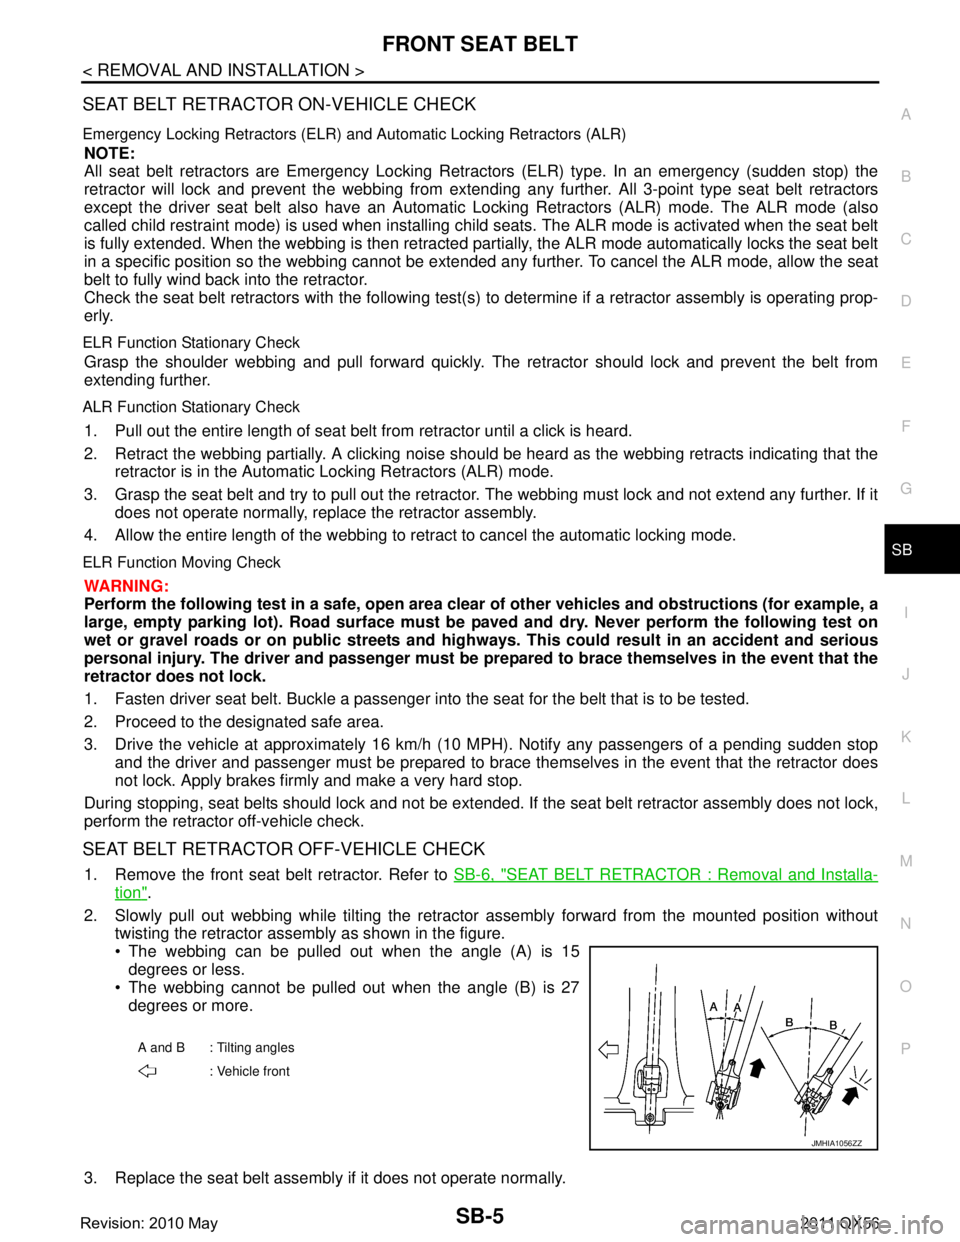
2. Slowly pull out webbing while tilting the retracto r assembly forward from the mounted position without
twisting the retractor assembly as shown in the figure.
The webbing can be pulled out when the angle (A) is 15
degrees or less.
The webbing cannot be pulled out when the angle (B) is 27
degrees or more.
3. Replace the seat belt assembly if it does not operate normally.
A and B : Tilting angles : Vehicle front
JMHIA1056ZZ
Revision: 2010 May2011 QX56