Page 3050 of 5598
FRONT REGULATORGW-21
< REMOVAL AND INSTALLATION >
C
DE
F
G H
I
J
L
M A
B
GW
N
O P
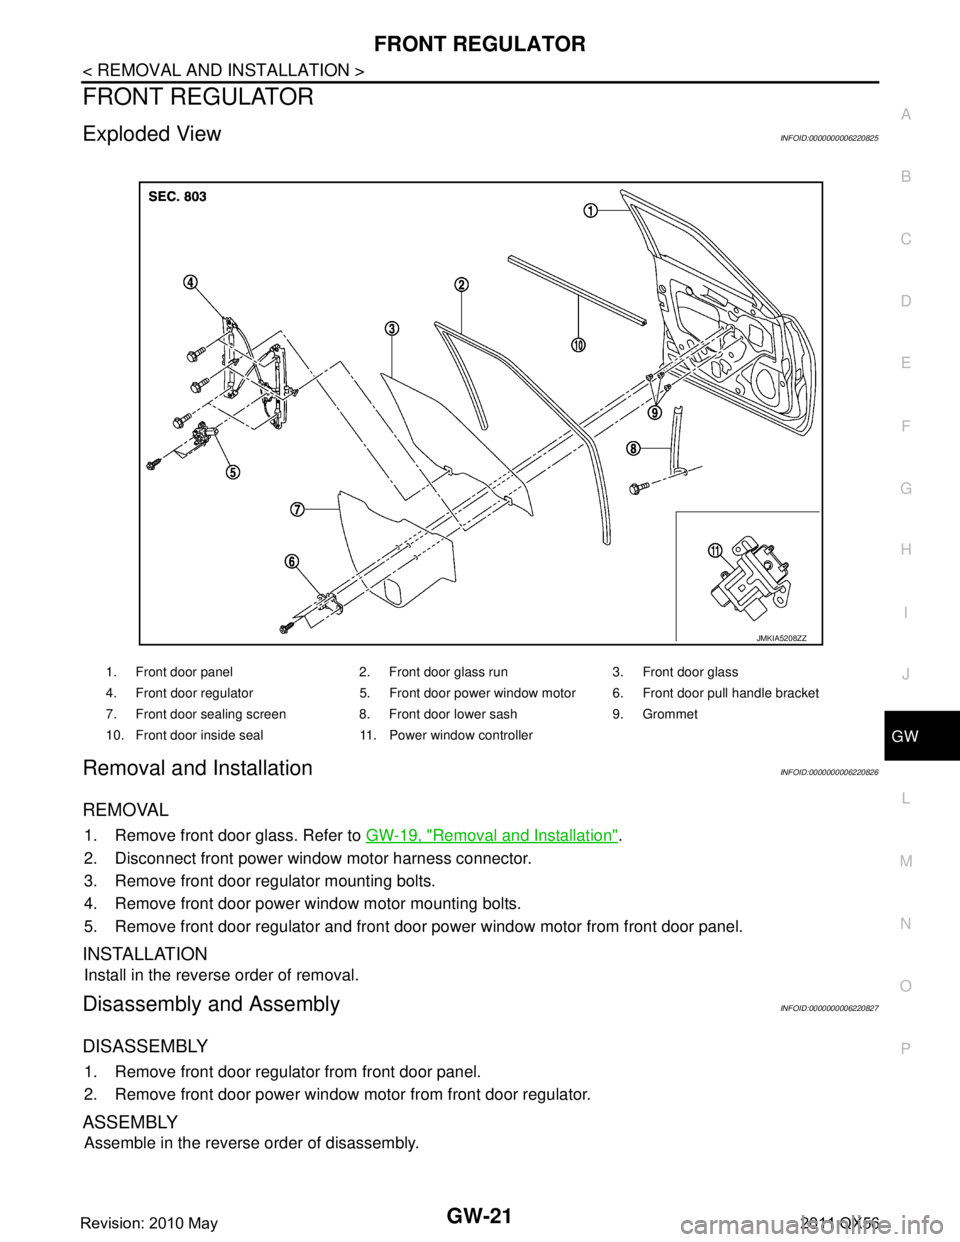
FRONT REGULATOR
Exploded ViewINFOID:0000000006220825
Removal and InstallationINFOID:0000000006220826
REMOVAL
1. Remove front door glass. Refer to GW-19, "Removal and Installation".
2. Disconnect front power window motor harness connector.
3. Remove front door regulator mounting bolts.
4. Remove front door power window motor mounting bolts.
5. Remove front door regulator and front door power window motor from front door panel.
INSTALLATION
Install in the reverse order of removal.
Disassembly and AssemblyINFOID:0000000006220827
DISASSEMBLY
1. Remove front door regulator from front door panel.
2. Remove front door power window motor from front door regulator.
ASSEMBLY
Assemble in the reverse order of disassembly.
1. Front door panel 2. Front door glass run 3. Front door glass
4. Front door regulator 5. Front door power window motor 6. Front door pull handle bracket
7. Front door sealing screen 8. Front door lower sash 9. Grommet
10. Front door inside seal 11. Power window controller
JMKIA5208ZZ
Revision: 2010 May2011 QX56
Page 3052 of 5598
REAR DOOR GLASSGW-23
< REMOVAL AND INSTALLATION >
C
DE
F
G H
I
J
L
M A
B
GW
N
O P
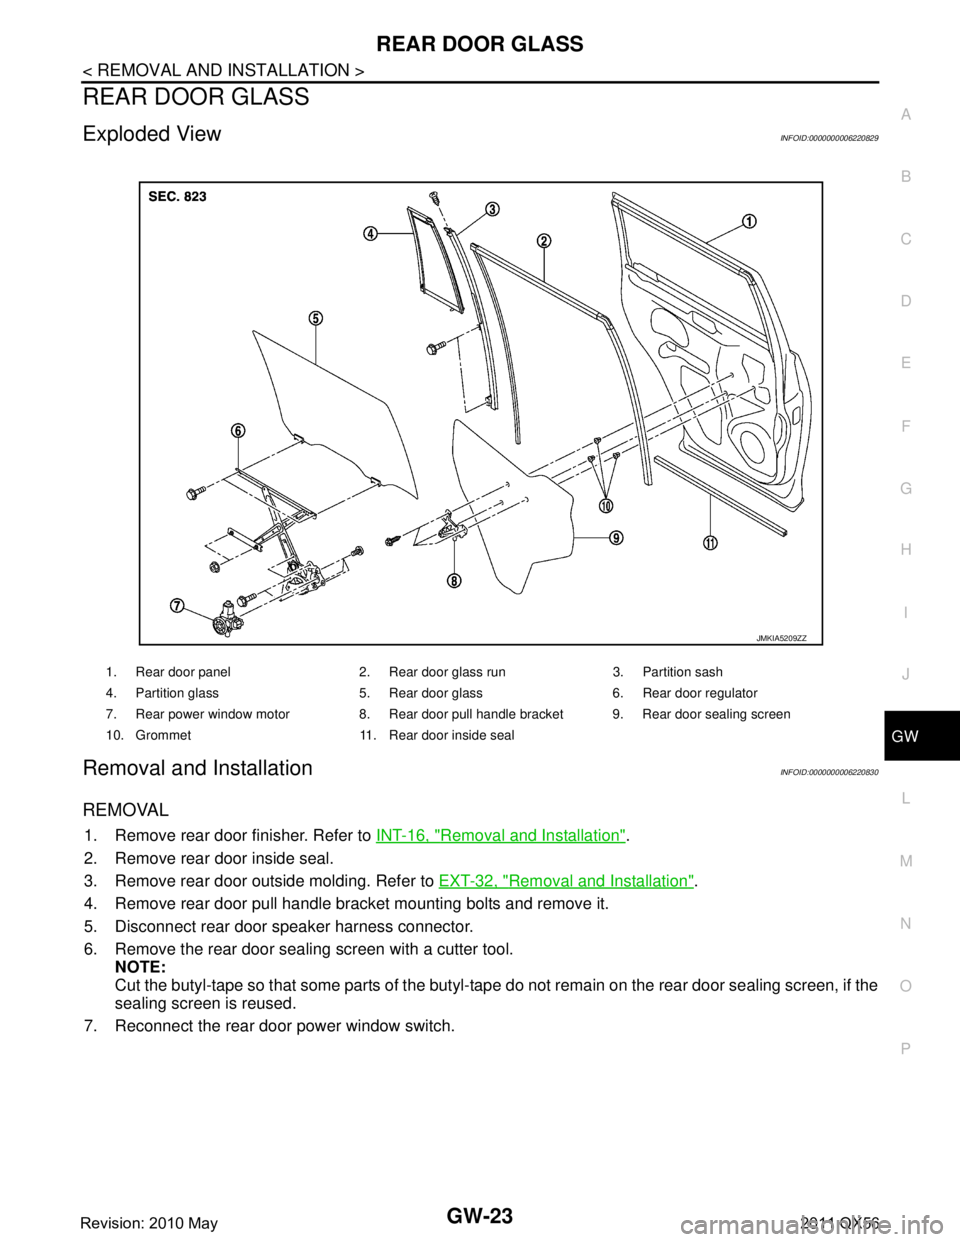
REAR DOOR GLASS
Exploded ViewINFOID:0000000006220829
Removal and InstallationINFOID:0000000006220830
REMOVAL
1. Remove rear door finisher. Refer to INT-16, "Removal and Installation".
2. Remove rear door inside seal.
3. Remove rear door outside molding. Refer to EXT-32, "
Removal and Installation".
4. Remove rear door pull handle bracket mounting bolts and remove it.
5. Disconnect rear door speaker harness connector.
6. Remove the rear door sealing screen with a cutter tool. NOTE:
Cut the butyl-tape so that some parts of the butyl-tape do not remain on the rear door sealing screen, if the
sealing screen is reused.
7. Reconnect the rear door power window switch.
1. Rear door panel 2. Rear door glass run 3. Partition sash
4. Partition glass 5. Rear door glass 6. Rear door regulator
7. Rear power window motor 8. Rear door pull handle bracket 9. Rear door sealing screen
10. Grommet 11. Rear door inside seal
JMKIA5209ZZ
Revision: 2010 May2011 QX56
Page 3053 of 5598
GW-24
< REMOVAL AND INSTALLATION >
REAR DOOR GLASS
8. Operate the power window switch to raise or lower the door win-dow until the glass mounting bolts can be seen.
9. Remove the rear door glass mounting bolts.
10. Raise rear door glass up and hold it with a suction lifter (A).
11. Disconnect rear door power window motor harness connector.
12. Remove rear door regulator mounting nuts.
13. Remove rear door power window motors mounting bolts.
14. Remove rear door regulator from rear door panel.
15. Securely place rear door glass down inside rear door panel.
16. Remove rear door glass run.
17. Remove rear door sash mounting bolts and screw, and then pull it up to remove.
CAUTION:
Be careful not to scratch or damage rear door glass with
rear door sash.
18. Remove rear door glass from rear door panel as shown by the figure.
: Bolt
JMKIA1789ZZ
PIIB3511J
JMKIA5272ZZ
JMKIA5273ZZ
Revision: 2010 May2011 QX56
Page 3055 of 5598
GW-26
< REMOVAL AND INSTALLATION >
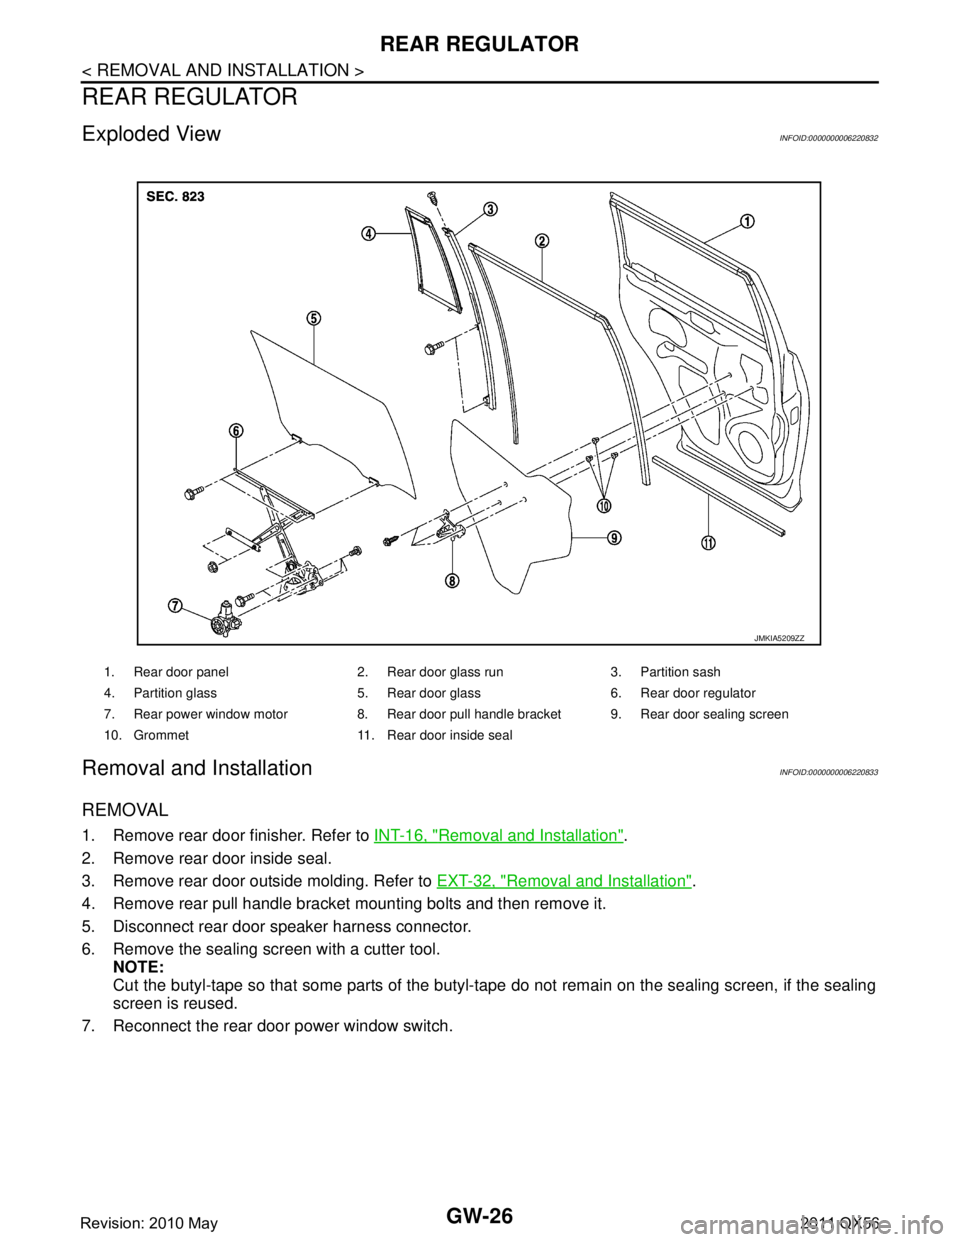
REAR REGULATOR
REAR REGULATOR
Exploded ViewINFOID:0000000006220832
Removal and InstallationINFOID:0000000006220833
REMOVAL
1. Remove rear door finisher. Refer to INT-16, "Removal and Installation".
2. Remove rear door inside seal.
3. Remove rear door outside molding. Refer to EXT-32, "
Removal and Installation".
4. Remove rear pull handle bracket mounting bolts and then remove it.
5. Disconnect rear door speaker harness connector.
6. Remove the sealing screen with a cutter tool. NOTE:
Cut the butyl-tape so that some parts of the butyl-t ape do not remain on the sealing screen, if the sealing
screen is reused.
7. Reconnect the rear door power window switch.
1. Rear door panel 2. Rear door glass run 3. Partition sash
4. Partition glass 5. Rear door glass 6. Rear door regulator
7. Rear power window motor 8. Rear door pull handle bracket 9. Rear door sealing screen
10. Grommet 11. Rear door inside seal
JMKIA5209ZZ
Revision: 2010 May2011 QX56
Page 3056 of 5598
REAR REGULATORGW-27
< REMOVAL AND INSTALLATION >
C
DE
F
G H
I
J
L
M A
B
GW
N
O P
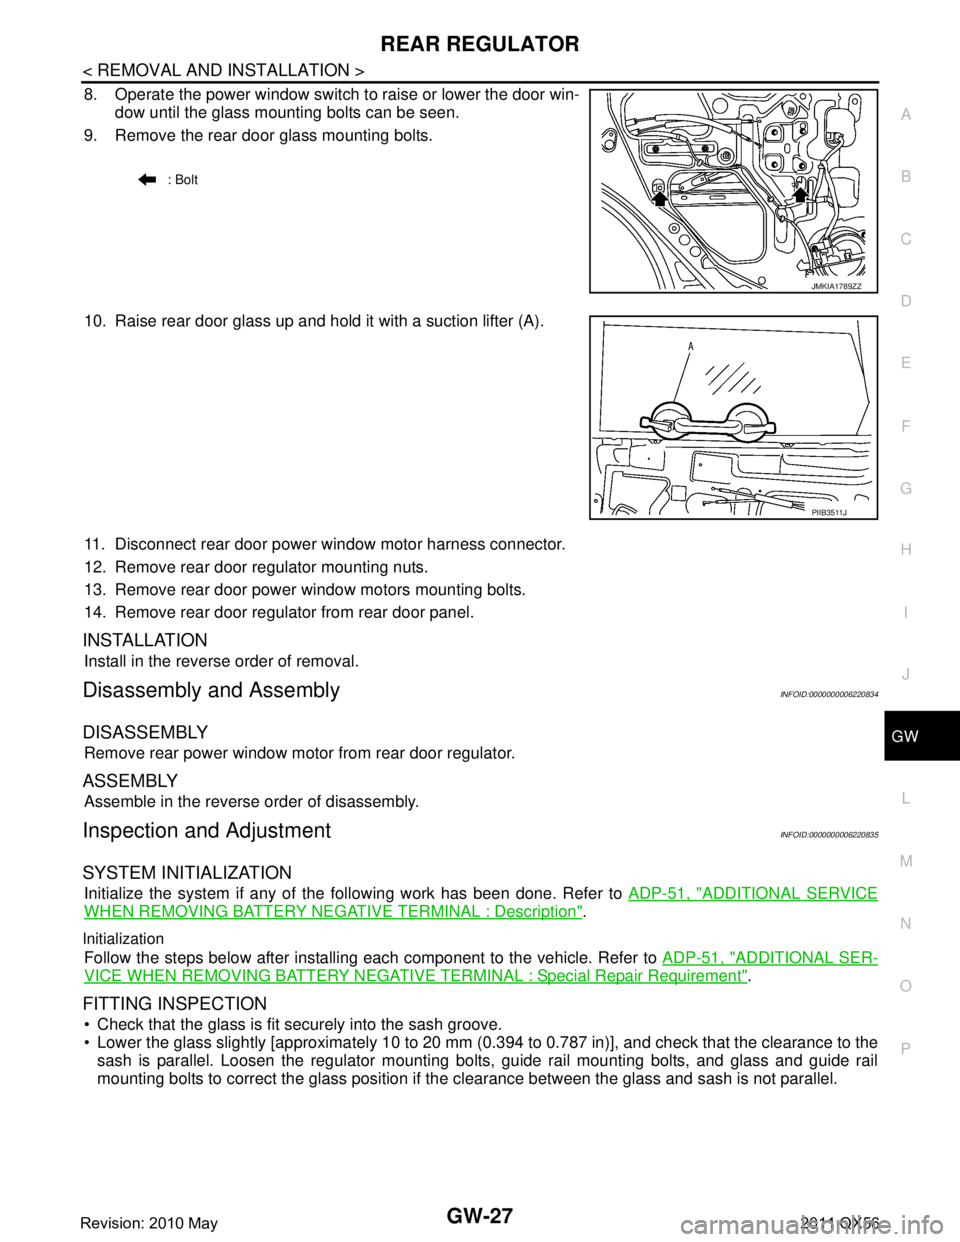
8. Operate the power window switch to raise or lower the door win- dow until the glass mounting bolts can be seen.
9. Remove the rear door glass mounting bolts.
10. Raise rear door glass up and hold it with a suction lifter (A).
11. Disconnect rear door power window motor harness connector.
12. Remove rear door regulator mounting nuts.
13. Remove rear door power window motors mounting bolts.
14. Remove rear door regulator from rear door panel.
INSTALLATION
Install in the reverse order of removal.
Disassembly and AssemblyINFOID:0000000006220834
DISASSEMBLY
Remove rear power window motor from rear door regulator.
ASSEMBLY
Assemble in the reverse order of disassembly.
Inspection and AdjustmentINFOID:0000000006220835
SYSTEM INITIALIZATION
Initialize the system if any of t he following work has been done. Refer to ADP-51, "ADDITIONAL SERVICE
WHEN REMOVING BATTERY NEGATIVE TERMINAL : Description".
Initialization
Follow the steps below after installing each component to the vehicle. Refer to ADP-51, "ADDITIONAL SER-
VICE WHEN REMOVING BATTERY NEGATIVE TERMINAL : Special Repair Requirement".
FITTING INSPECTION
Check that the glass is fit securely into the sash groove.
Lower the glass slightly [approximately 10 to 20 mm (0.394 to 0.787 in)], and check that the clearance to the
sash is parallel. Loosen the regulator mounting bolts, guide rail mounting bolts, and glass and guide rail
mounting bolts to correct the glass position if the clearance between the glass and sash is not parallel.
: Bolt
JMKIA1789ZZ
PIIB3511J
Revision: 2010 May2011 QX56
Page 3279 of 5598
INL-12
< SYSTEM DESCRIPTION >
DIAGNOSIS SYSTEM (BCM)
DIAGNOSIS SYSTEM (BCM)
COMMON ITEM
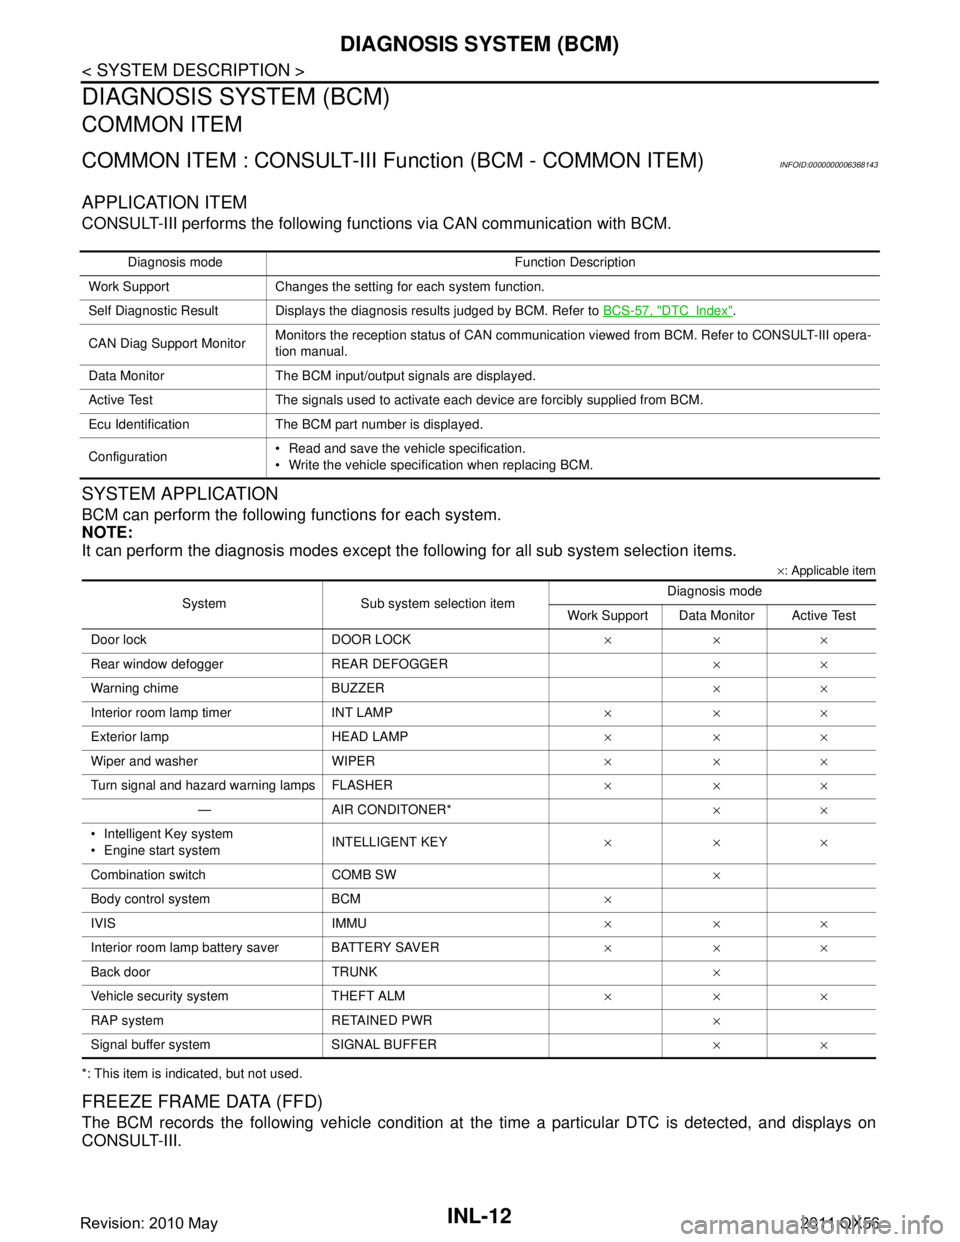
COMMON ITEM : CONSULT-III Function (BCM - COMMON ITEM)INFOID:0000000006368143
APPLICATION ITEM
CONSULT-III performs the following functions via CAN communication with BCM.
SYSTEM APPLICATION
BCM can perform the following functions for each system.
NOTE:
It can perform the diagnosis modes except the following for all sub system selection items.
×: Applicable item
*: This item is indicated, but not used.
FREEZE FRAME DATA (FFD)
The BCM records the following vehicle condition at the time a particular DTC is detected, and displays on
CONSULT-III.
Diagnosis mode Function Description
Work Support Changes the setting for each system function.
Self Diagnostic Result Displays the diagnosis results judged by BCM. Refer to BCS-57, "
DTCIndex".
CAN Diag Support Monitor Monitors the reception status of CAN communication viewed from BCM. Refer to CONSULT-III opera-
tion manual.
Data Monitor The BCM input/output signals are displayed.
Active Test The signals used to activate ea ch device are forcibly supplied from BCM.
Ecu Identification The BCM part number is displayed.
Configuration Read and save the vehicle specification.
Write the vehicle specification when replacing BCM.
System Sub system selection item Diagnosis mode
Work Support Data Monitor Active Test
Door lock DOOR LOCK ×××
Rear window defogger REAR DEFOGGER ××
Warning chime BUZZER ××
Interior room lamp timer INT LAMP ×××
Exterior lamp HEAD LAMP ×××
Wiper and washer WIPER ×××
Turn signal and hazard warning lamps FLASHER ×××
— AIR CONDITONER* ××
Intelligent Key system
Engine start system INTELLIGENT KEY
×××
Combination switch COMB SW ×
Body control system BCM ×
IVIS IMMU ×××
Interior room lamp battery saver BATTERY SAVER ×××
Back door TRUNK ×
Vehicle security system THEFT ALM ×××
RAP system RETAINED PWR ×
Signal buffer system SIGNAL BUFFER ××
Revision: 2010 May2011 QX56
Page 3362 of 5598
FRONT DOOR FINISHERINT-13
< REMOVAL AND INSTALLATION >
C
DE
F
G H
I
K L
M A
B
INT
N
O P
REMOVAL AND INSTALLATION
FRONT DOOR FINISHER
Exploded ViewINFOID:0000000006220241
1. Front door panel 2. Front inside door seal 3. Front door finisher
4. Bumper rubber 5. Door finisher cap 6. Inside handle escutcheon
7. Front door grip cap 8. Step lamp 9. Power window switch finisher
10. Power window switch 11. Door mirror corner cover 12. BSW/BSI indicator
13. Seat memory switch 14. Front door inside handle : Clip
: Pawl
: Metal clip
JMJIA4235ZZ
Revision: 2010 May2011 QX56
Page 3363 of 5598
INT-14
< REMOVAL AND INSTALLATION >
FRONT DOOR FINISHER
Removal and Installation
INFOID:0000000006220242
CAUTION:
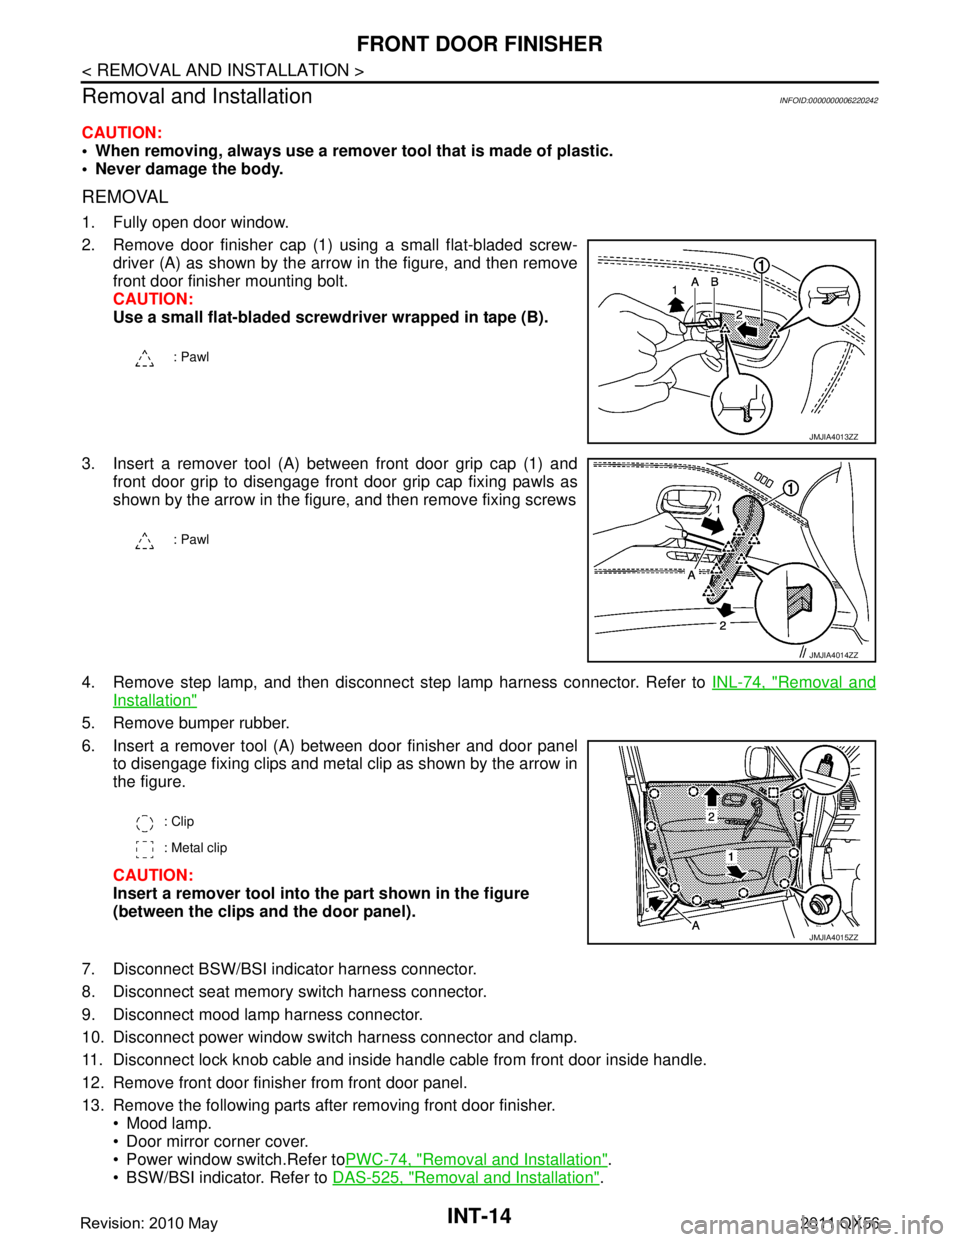
When removing, always use a remover tool that is made of plastic.
Never damage the body.
REMOVAL
1. Fully open door window.
2. Remove door finisher cap (1) using a small flat-bladed screw- driver (A) as shown by the ar row in the figure, and then remove
front door finisher mounting bolt.
CAUTION:
Use a small flat-bladed screwdriver wrapped in tape (B).
3. Insert a remover tool (A) between front door grip cap (1) and front door grip to disengage front door grip cap fixing pawls as
shown by the arrow in the figure, and then remove fixing screws
4. Remove step lamp, and then disconnect step lamp harness connector. Refer to INL-74, "
Removal and
Installation"
5. Remove bumper rubber.
6. Insert a remover tool (A) between door finisher and door panel
to disengage fixing clips and metal clip as shown by the arrow in
the figure.
CAUTION:
Insert a remover tool into th e part shown in the figure
(between the clips an d the door panel).
7. Disconnect BSW/BSI indicator harness connector.
8. Disconnect seat memory switch harness connector.
9. Disconnect mood lamp harness connector.
10. Disconnect power window switch harness connector and clamp.
11. Disconnect lock knob cable and inside handle cable from front door inside handle.
12. Remove front door finisher from front door panel.
13. Remove the following parts after removing front door finisher. Mood lamp.
Door mirror corner cover.
Power window switch.Refer to PWC-74, "
Removal and Installation".
BSW/BSI indicator. Refer to DAS-525, "
Removal and Installation".
: Pawl
JMJIA4013ZZ
: Pawl
JMJIA4014ZZ
: Clip
: Metal clip
JMJIA4015ZZ
Revision: 2010 May2011 QX56