2011 INFINITI QX56 air condition
[x] Cancel search: air conditionPage 5247 of 5598
![INFINITI QX56 2011 Factory Service Manual
SHIFT LOCK SYSTEMTM-159
< DTC/CIRCUIT DIAGNOSIS > [7AT: RE7R01B]
C
EF
G H
I
J
K L
M A
B
TM
N
O P
Is the inspection result normal?
YES >> Check intermittent incident. Refer to GI-40, "Intermittent In INFINITI QX56 2011 Factory Service Manual
SHIFT LOCK SYSTEMTM-159
< DTC/CIRCUIT DIAGNOSIS > [7AT: RE7R01B]
C
EF
G H
I
J
K L
M A
B
TM
N
O P
Is the inspection result normal?
YES >> Check intermittent incident. Refer to GI-40, "Intermittent In](/manual-img/42/57033/w960_57033-5246.png)
SHIFT LOCK SYSTEMTM-159
< DTC/CIRCUIT DIAGNOSIS > [7AT: RE7R01B]
C
EF
G H
I
J
K L
M A
B
TM
N
O P
Is the inspection result normal?
YES >> Check intermittent incident. Refer to GI-40, "Intermittent Incident".
NO >> Repair or replace damaged parts.
10.CHECK INSTALLATION POSITION OF STOP LAMP SWITCH
Adjust stop lamp switch position. Refer to BR-7, "
Inspection and Adjustment".
>> GO TO 11.
11 .CHECK STOP LAMP SWITCH (PART 2)
Check stop lamp switch. Refer to TM-159, "
Component Inspection (Stop Lamp Switch)".
Is the inspection result normal?
YES >> GO TO 5.
NO >> Replace stop lamp switch. Refer to BR-20, "
Exploded View".
Component Inspection (Stop Lamp Switch)INFOID:0000000006226884
1.CHECK STOP LAMP SWITCH
Check continuity between stop lamp switch connector terminals.
Is the inspection result normal?
YES >> INSPECTION END
NO >> Replace stop lamp switch. Refer to BR-20, "
Exploded View".
Component Inspection (Park Position Switch)INFOID:0000000006226885
1.CHECK PARK POSITION SWITCH
Check continuity between A/T shif t selector connector terminals.
Is the inspection result normal?
YES >> INSPECTION END
NO >> Replace A/T shift selector assembly. Refer to TM-176, "
Exploded View".
Component Inspection (Shift Lock Solenoid)INFOID:0000000006226886
1.CHECK SHIFT LOCK SOLENOID
Apply voltage to A/T shift selector connector terminals and check that shift lock solenoid is activated.
CAUTION:
Connect the fuse between the termina ls when applying the voltage.
Stop lamp switch connector
Condition Continuity
Te r m i n a l
34 Depressed brake pedal Existed
Released brake pedal Not existed
A/T shift selector connector
Condition Continuity
Te r m i n a l
11 1 2 Selector lever in
“P” position. Existed
Other than the above. Not existed
A/T shift selector connector Condition Status
Te r m i n a l
+ (fuse) –
11 1 2 Selector lever in
“P” position.
Apply 12 V direct current between terminals 11 and 12. Shift lock solenoid operates
Revision: 2010 May2011 QX56
Page 5250 of 5598
![INFINITI QX56 2011 Factory Service Manual
TM-162
< DTC/CIRCUIT DIAGNOSIS >[7AT: RE7R01B]
SELECTOR LEVER POSITION INDICATOR
Is the inspection result normal?
YES >> GO TO 5.
NO >> Repair or replace damaged parts.
5.CHECK SELECTOR LEVER POSITIO INFINITI QX56 2011 Factory Service Manual
TM-162
< DTC/CIRCUIT DIAGNOSIS >[7AT: RE7R01B]
SELECTOR LEVER POSITION INDICATOR
Is the inspection result normal?
YES >> GO TO 5.
NO >> Repair or replace damaged parts.
5.CHECK SELECTOR LEVER POSITIO](/manual-img/42/57033/w960_57033-5249.png)
TM-162
< DTC/CIRCUIT DIAGNOSIS >[7AT: RE7R01B]
SELECTOR LEVER POSITION INDICATOR
Is the inspection result normal?
YES >> GO TO 5.
NO >> Repair or replace damaged parts.
5.CHECK SELECTOR LEVER POSITION INDICATOR
Check selector lever position indicator. Refer to TM-163, "
Component Inspection (Selector Lever Position Indi-
cator)".
Is the inspection result normal?
YES >> Check intermittent incident. Refer to GI-40, "Intermittent Incident".
NO >> Replace damaged parts.
6.CHECK HARNESS BETWEEN A/T SHIFT SELECTOR AND BCM (PART 1)
1. Turn ignition switch OFF.
2. Disconnect BCM connector.
3. Check continuity between A/T shift selector v ehicle side harness connector terminal and BCM vehicle
side harness connector terminal.
Is the inspection result normal?
YES >> GO TO 7.
NO >> Repair or replace damaged parts.
7.CHECK HARNESS BETWEEN A/T SHIFT SELECTOR AND BCM (PART 2)
Check continuity between A/T shift selector vehicle side harness connector terminal and ground.
Is the inspection result normal?
YES >> GO TO 8.
NO >> Repair or replace damaged parts.
8.CHECK BCM INPUT/OUTPUT SIGNAL
Check BCM input/output signal. Refer to BCS-33, "
Reference Value".
Is the inspection result normal?
A/T shift selector connector Shift position switch connector Condition Continuity
Connector Terminal Connector Terminal
M57 4
M281 10
Selector lever in “M”
position. Existed
1, 2, 3, 4, 5, 8, 9, 12 Not existed 12 Selector lever in “D”
position. Existed
1, 2, 3, 4, 5, 8, 9, 10 Not existed
13 1, 2
Selector lever in “P”
position. Existed
3, 4, 5, 8, 9, 10, 12 Not existed 1, 3 Selector lever in “R”
position. Existed
2, 4, 5, 8, 9, 10, 12 Not existed 1, 4 Selector lever in “D”
position. Existed
2, 3, 5, 8, 9, 10, 12 Not existed 1, 5 Selector lever in “N”
position. Existed
2, 3, 4, 8, 9, 10, 12 Not existed
A/T shift selector vehicle side harness connector BCM vehicle side harness connector Continuity
Connector Terminal Connector Terminal
M57 13 M71 104 Existed
A/T shift selector vehicle side harness connector GroundContinuity
Connector Terminal
M57 13 Not existed
Revision: 2010 May2011 QX56
Page 5251 of 5598
![INFINITI QX56 2011 Factory Service Manual
SELECTOR LEVER POSITION INDICATORTM-163
< DTC/CIRCUIT DIAGNOSIS > [7AT: RE7R01B]
C
EF
G H
I
J
K L
M A
B
TM
N
O P
YES >> Check intermittent incident. Refer to GI-40, "Intermittent Incident".
NO >> Re INFINITI QX56 2011 Factory Service Manual
SELECTOR LEVER POSITION INDICATORTM-163
< DTC/CIRCUIT DIAGNOSIS > [7AT: RE7R01B]
C
EF
G H
I
J
K L
M A
B
TM
N
O P
YES >> Check intermittent incident. Refer to GI-40, "Intermittent Incident".
NO >> Re](/manual-img/42/57033/w960_57033-5250.png)
SELECTOR LEVER POSITION INDICATORTM-163
< DTC/CIRCUIT DIAGNOSIS > [7AT: RE7R01B]
C
EF
G H
I
J
K L
M A
B
TM
N
O P
YES >> Check intermittent incident. Refer to GI-40, "Intermittent Incident".
NO >> Repair or replace damaged parts.
9.CHECK POWER SOURCE (PART 2)
1. Turn ignition switch OFF.
2. Disconnect A/T shift selector connector.
3. Turn ignition switch ON.
4. Check voltage between A/T shift selector vehicle side harness connector terminals.
Is the inspection result normal?
YES >> GO TO 10.
NO >> Check illumination circuit. Refer to INL-34, "
Wiring Diagram".
10.CHECK SHIFT POSITION SWITCH (PART 2)
1. Disconnect shift position switch connector.
2. Check continuity between A/T shift selector connec tor terminals and shift position switch connector termi-
nals.
Is the inspection result normal?
YES >> GO TO 5.
NO >> Repair or replace damaged parts.
Component Inspection (Selecto r Lever Position Indicator)INFOID:0000000006226889
1.CHECK SELECTOR LEVER POSITION INDICATOR
Check that selector lever position indicator lamps turn on.
CAUTION:
Connect the fuse between the termina ls when applying the voltage.
A/T shift selector vehicle side harness connector
Condition Voltage (Approx.)
Connector Te r m i n a l
+ −
M57 9 10 Lighting switch 1ST Battery voltage
A/T shift selector connector Shift position switch connector Continuity
Connector Terminal Connector Terminal
M57 9
M281 9Existed
1, 2, 3, 4, 5, 8, 10, 12 Not existed
10 8Existed
1, 2, 3, 4, 5, 9, 10, 12 Not existed
Shift position switch harness connector Condition Status
Te r m i n a l
+ (fuse) −
110 Apply 12 V direct current between
terminals 1 and 10.
“M” mode indicato
r lamp turns on.
2
12Apply 12 V direct current between
terminals 2 and 12.
“P” position indicator lamp turns on.
3 Apply 12 V direct current between
terminals 3 and 12. “R” position indica
tor lamp turns on.
4 Apply 12 V direct current between
terminals 4 and 12.
“D” position indica
tor lamp turns on.
5 Apply 12 V direct current between
terminals 5 and 12. “N” position indica
tor lamp turns on.
98 Apply 12 V direct current between
terminals 9 and 8. Illumination lamp turns on.
Revision: 2010 May2011 QX56
Page 5387 of 5598

VTL-1
VENTILATION, HEATER & AIR CONDITIONER
C
DE
F
G H
J
K L
M
SECTION VTL
A
B
VTL
N
O P
CONTENTS
VENTILATION SYSTEM
PRECAUTION ................ ...............................3
PRECAUTIONS .............................................. .....3
Precaution for Supplemental Restraint System
(SRS) "AIR BAG" and "SEAT BELT PRE-TEN-
SIONER" ............................................................. ......
3
Precaution Necessary for Steering Wheel Rota-
tion after Battery Disconnect .....................................
3
PREPARATION ............................................5
PREPARATION .............................................. .....5
Commercial Service Tool .................................... ......5
SYSTEM DESCRIPTION ..............................6
VENTILATION SYSTEM ................................ .....6
VENTILATION SYSTEM (FRONT AIR CONDI-
TIONING) ............................................................... ......
6
VENTILATION SYSTEM (FRONT AIR CONDI-
TIONING) : System Description ................................
6
VENTILATION SYSTEM (REAR AIR CONDITION-
ING) ........................................................................ ......
7
VENTILATION SYSTEM (REAR AIR CONDI-
TIONING) : System Description ................................
7
REMOVAL AND INSTALLATION ................8
DUCT AND GRILLE ....................................... .....8
Exploded View .................................................... ......8
CENTER VENTILATOR GRILLE .......................... ....10
CENTER VENTILATOR GRILLE : Removal and
Installation ...............................................................
10
SIDE VENTILATOR GRILLE ................................. ....10
SIDE VENTILATOR GRILLE : Removal and In-
stallation ..................................................................
10
FRONT DEFROSTER GRILLE .............................. ....10
FRONT DEFROSTER GRILLE : Removal and In-
stallation ..................................................................
10
UPPER VENTILATOR GRILLE .................................10
UPPER VENTILATOR GRILLE : Removal and In-
stallation .............................................................. ....
10
SIDE VENTILATOR DUCT .................................... ....10
SIDE VENTILATOR DUCT : Removal and Instal-
lation ........................................................................
10
UPPER VENTILATOR DUCT ....................................10
UPPER VENTILATOR DUCT : Removal and In-
stallation .............................................................. ....
10
FRONT DEFROSTER NOZZLE .................................11
FRONT DEFROSTER NOZZLE : Removal and In-
stallation .............................................................. ....
11
SIDE DEFROSTER NOZZLE .....................................11
SIDE DEFROSTER NOZZLE : Removal and In-
stallation .............................................................. ....
11
FLOOR DUCT 1 ..................................................... ....11
FLOOR DUCT 1 : Removal and Installation ............11
FLOOR DUCT 2 ..................................................... ....11
FLOOR DUCT 2 : Removal and Installation ............11
FLOOR DUCT 3 ..................................................... ....11
FLOOR DUCT 3 : Removal and Installation ............11
REAR FLOOR GRILLE .......................................... ....12
REAR FLOOR GRILLE : Removal and Installation
....
12
FOOT DUCT ........................................................... ....12
FOOT DUCT : Removal and Installation .................12
FOOT GRILLE ....................................................... ....12
FOOT GRILLE : Removal and Installation ..............12
REAR VENTILATOR DUCT LOWER .................... ....12
Revision: 2010 May2011 QX56
Page 5392 of 5598

VTL-6
< SYSTEM DESCRIPTION >
VENTILATION SYSTEM
SYSTEM DESCRIPTION
VENTILATION SYSTEM
VENTILATION SYSTEM (FRONT AIR CONDITIONING)
VENTILATION SYSTEM (FRONT AIR CO NDITIONING) : System Description
INFOID:0000000006276284
OUTLINE
Ventilation system is controlled by A/C control. For details of air conditioner system, refer to HAC-14, "FRONT
AUTOMATIC AIR CONDITIONING SYSTEM : System Description".
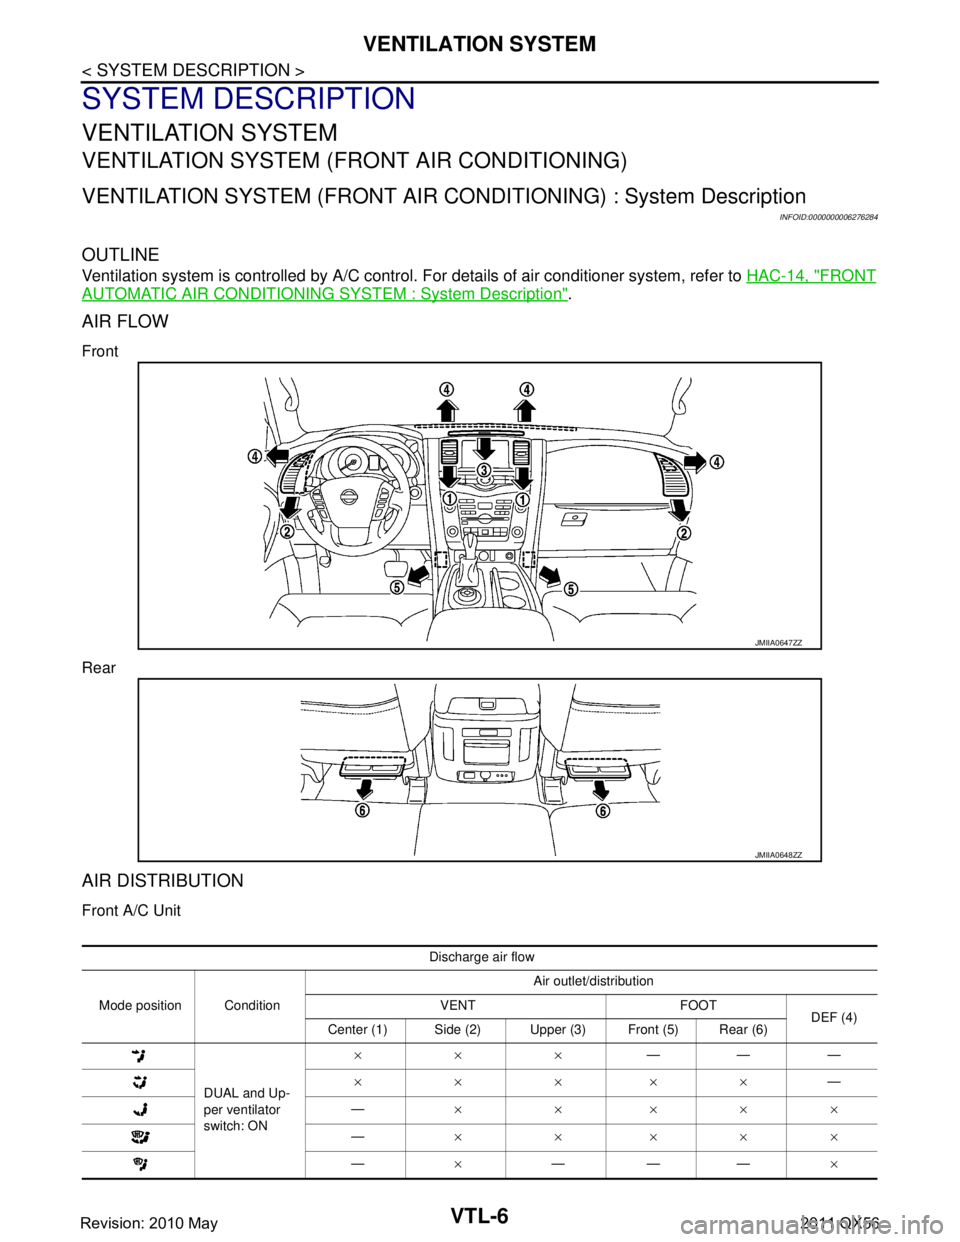
AIR FLOW
Front
Rear
AIR DISTRIBUTION
Front A/C Unit
JMIIA0647ZZ
JMIIA0648ZZ
Discharge air flow
Mode position Condition Air outlet/distribution
VENT FOOT DEF (4)
Center (1) Side (2) Upper (3) Front (5) Rear (6)
DUAL and Up-
per ventilator
switch: ON ×××
———
××××× —
— ×××××
— ×××××
— ×——— ×
Revision: 2010 May2011 QX56
Page 5393 of 5598

VENTILATION SYSTEMVTL-7
< SYSTEM DESCRIPTION >
C
DE
F
G H
J
K L
M A
B
VTL
N
O P
VENTILATION SYSTEM (R EAR AIR CONDITIONING)
VENTILATION SYSTEM (REAR AIR CONDI TIONING) : System Description
INFOID:0000000006276285
OUTLINE
Rear cooling system is controlled by rear blower switch. Refer to HAC-23, "REAR AUTOMATIC AIR CONDI-
TIONING SYSTEM : System Description".
AIR FLOW
AIR DISTRIBUTION
Rear A/C Unit
JMIIA0649ZZ
Discharge air flow
Mode position Air outlet/distribution
VENT (1) FOOT (2)
× —
××
— ×
Revision: 2010 May2011 QX56
Page 5403 of 5598

IN-CABIN MICROFILTERVTL-17
< REMOVAL AND INSTALLATION >
C
DE
F
G H
J
K L
M A
B
VTL
N
O P
IN-CABIN MICROFILTER
Exploded ViewINFOID:0000000006276313
Refer to VTL-14, "Exploded View".
Removal and InstallationINFOID:0000000006276314
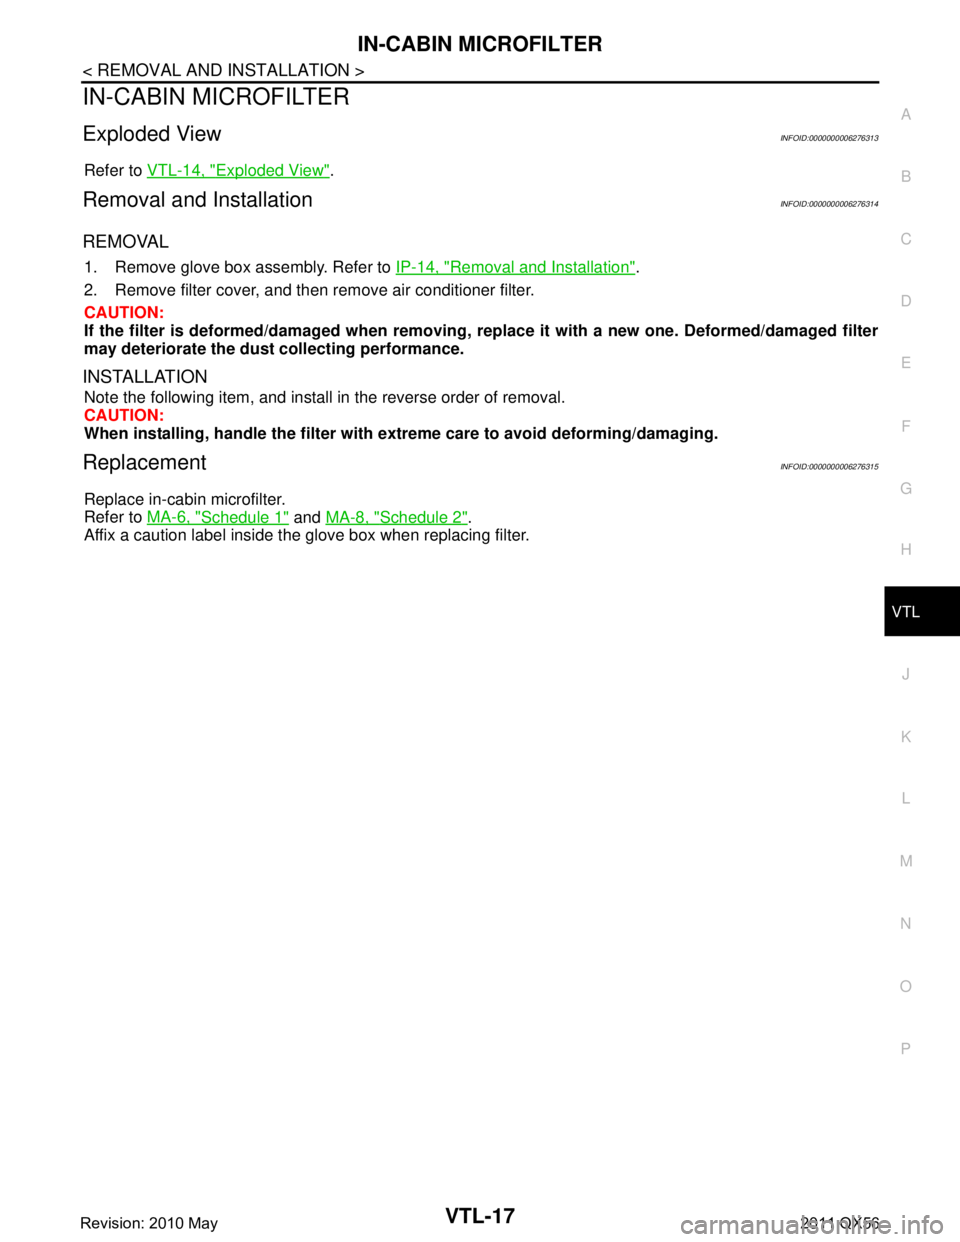
REMOVAL
1. Remove glove box assembly. Refer to IP-14, "Removal and Installation".
2. Remove filter cover, and then remove air conditioner filter.
CAUTION:
If the filter is deformed/damaged when removing , replace it with a new one. Deformed/damaged filter
may deteriorate the dust collecting performance.
INSTALLATION
Note the following item, and install in the reverse order of removal.
CAUTION:
When installing, handle the filter with ext reme care to avoid deforming/damaging.
ReplacementINFOID:0000000006276315
Replace in-cabin microfilter.
Refer to MA-6, "
Schedule 1" and MA-8, "Schedule 2".
Affix a caution label inside the glove box when replacing filter.
Revision: 2010 May2011 QX56
Page 5423 of 5598

WCS
DIAGNOSIS SYSTEM (BCM)WCS-19
< SYSTEM DESCRIPTION >
C
DE
F
G H
I
J
K L
M B A
O P
DIAGNOSIS SYSTEM (BCM)
COMMON ITEM
COMMON ITEM : CONSULT-III Fu nction (BCM - COMMON ITEM)INFOID:0000000006419721
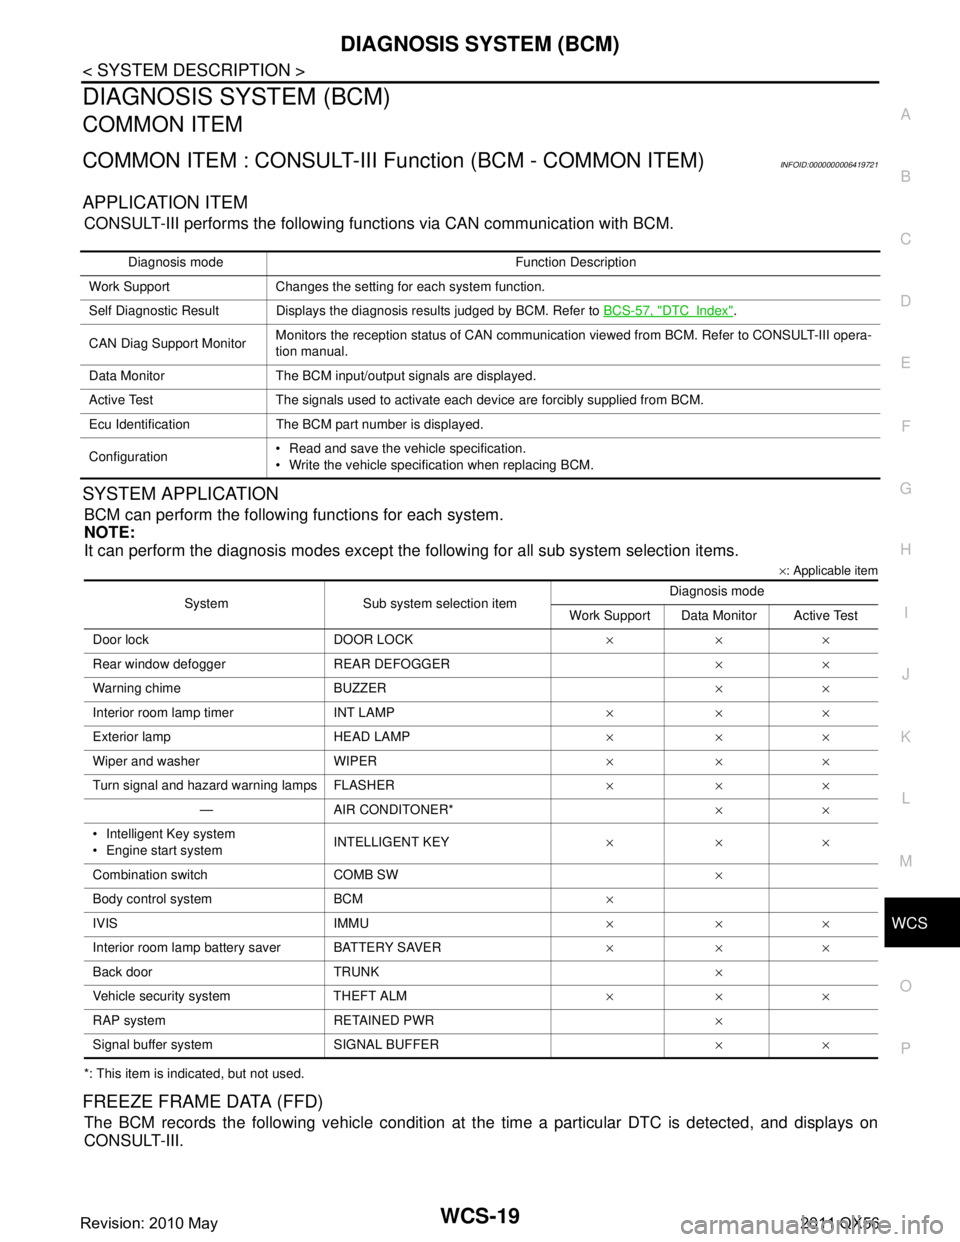
APPLICATION ITEM
CONSULT-III performs the following functions via CAN communication with BCM.
SYSTEM APPLICATION
BCM can perform the following functions for each system.
NOTE:
It can perform the diagnosis modes except the following for all sub system selection items.
×: Applicable item
*: This item is indicated, but not used.
FREEZE FRAME DATA (FFD)
The BCM records the following vehicle condition at the time a particular DTC is detected, and displays on
CONSULT-III.
Diagnosis mode Function Description
Work Support Changes the setting for each system function.
Self Diagnostic Result Displays the diagnosis results judged by BCM. Refer to BCS-57, "
DTCIndex".
CAN Diag Support Monitor Monitors the reception status of CAN communication viewed from BCM. Refer to CONSULT-III opera-
tion manual.
Data Monitor The BCM input/output signals are displayed.
Active Test The signals used to activate each device are forcibly supplied from BCM.
Ecu Identification The BCM part number is displayed.
Configuration Read and save the vehicle specification.
Write the vehicle specification when replacing BCM.
System Sub system selection item Diagnosis mode
Work Support Data Monitor Active Test
Door lock DOOR LOCK ×××
Rear window defo gger REAR DEFOGGER ××
Warning chime BUZZER ××
Interior room lamp timer INT LAMP ×××
Exterior lamp HEAD LAMP ×××
Wiper and washer WIPER ×××
Turn signal and hazard warning lamps FLASHER ×××
— AIR CONDITONER* ××
Intelligent Key system
Engine start system INTELLIGENT KEY
×××
Combination switch COMB SW ×
Body control system BCM ×
IVIS IMMU ×××
Interior room lamp battery saver BATTERY SAVER ×××
Back door TRUNK ×
Vehicle security system THEFT ALM ×××
RAP system RETAINED PWR ×
Signal buffer system SIGNAL BUFFER ××
Revision: 2010 May2011 QX56