2011 INFINITI QX56 oil level
[x] Cancel search: oil levelPage 4264 of 5598
REAR LOWER LINK & COIL SPRINGRSU-9
< REMOVAL AND INSTALLATION >
C
DF
G H
I
J
K L
M A
B
RSU
N
O P
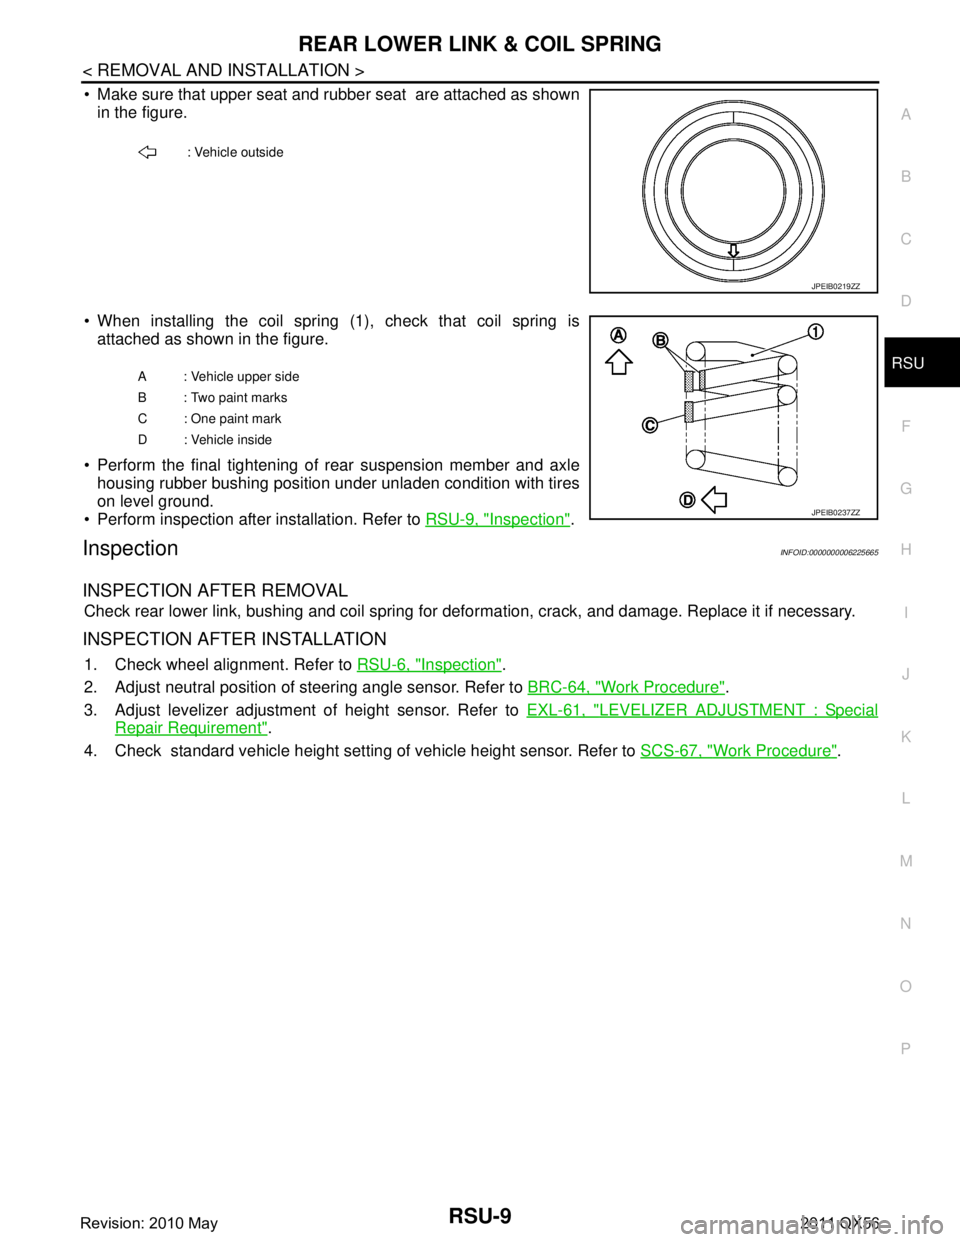
Make sure that upper seat and rubber seat are attached as shown in the figure.
When installing the coil spring (1), check that coil spring is attached as shown in the figure.
Perform the final tightening of rear suspension member and axle housing rubber bushing position under unladen condition with tires
on level ground.
Perform inspection after installation. Refer to RSU-9, "
Inspection".
InspectionINFOID:0000000006225665
INSPECTION AFTER REMOVAL
Check rear lower link, bushing and coil spring for defor mation, crack, and damage. Replace it if necessary.
INSPECTION AFTER INSTALLATION
1. Check wheel alignment. Refer to RSU-6, "Inspection".
2. Adjust neutral position of steering angle sensor. Refer to BRC-64, "
Work Procedure".
3. Adjust levelizer adjustment of height sensor. Refer to EXL-61, "
LEVELIZER ADJUSTMENT : Special
Repair Requirement".
4. Check standard vehicle height setting of vehicle height sensor. Refer to SCS-67, "
Work Procedure".
: Vehicle outside
JPEIB0219ZZ
A : Vehicle upper side
B : Two paint marks
C : One paint mark
D : Vehicle inside
JPEIB0237ZZ
Revision: 2010 May2011 QX56
Page 4266 of 5598
REAR SHOCK ABSORBERRSU-11
< REMOVAL AND INSTALLATION >
C
DF
G H
I
J
K L
M A
B
RSU
N
O P
Inadvertent piping removal causes fluid to splatter.
2. Remove tires with power tool. Refer to WT-64, "
Removal and Installation".
3. Remove height sensor from rear lower link (right side). Refer to EXL-136, "
Removal and Installation".
4. Remove vehicle height sensor from rear lower link (left side). Refer to SCS-98, "
Removal and Installa-
tion".
5. Remove air tube from shock absorber assembly. Refer to SCS-95, "
Removal and Installation".
6. Remove middle tube assembly from shock absorber assembly. (With HBMC) Refer to SCS-44, "
REAR
TUBE ASSEMBLY : Removal and Installation".
7. Remove shock absorber mounting bolt (lower side).
8. Remove piston rod lock nut.
9. Remove bracket, bushings, and shock absorber. (With HBMC)
10. Remove washers, bushings, and shock absorber. (Without HBMC)
11. Perform inspection after removal. Refer to RSU-11, "
Inspection and Adjustment".
INSTALLATION
Note the following, and install in the reverse order of removal.
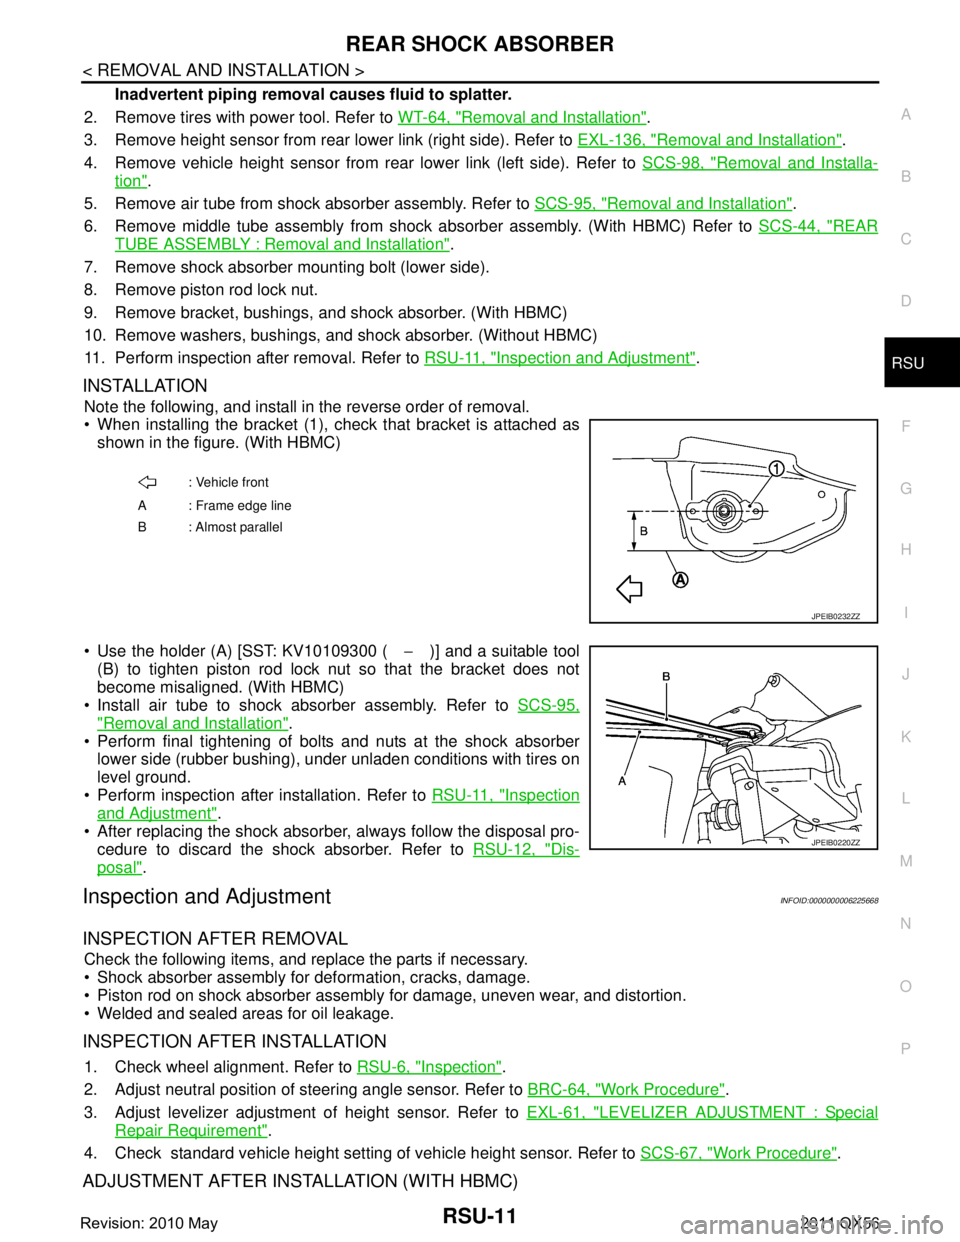
When installing the bracket (1), check that bracket is attached as
shown in the figure. (With HBMC)
Use the holder (A) [SST: KV10109300 ( −)] and a suitable tool
(B) to tighten piston rod lock nut so that the bracket does not
become misaligned. (With HBMC)
Install air tube to shock absorber assembly. Refer to SCS-95,
"Removal and Installation".
Perform final tightening of bolts and nuts at the shock absorber
lower side (rubber bushing), under unladen conditions with tires on
level ground.
Perform inspection after installation. Refer to RSU-11, "
Inspection
and Adjustment".
After replacing the shock absorber, always follow the disposal pro- cedure to discard the shock absorber. Refer to RSU-12, "
Dis-
posal".
Inspection and AdjustmentINFOID:0000000006225668
INSPECTION AFTER REMOVAL
Check the following items, and replace the parts if necessary.
Shock absorber assembly for deformation, cracks, damage.
Piston rod on shock absorber assembly for damage, uneven wear, and distortion.
Welded and sealed areas for oil leakage.
INSPECTION AFTER INSTALLATION
1. Check wheel alignment. Refer to RSU-6, "Inspection".
2. Adjust neutral position of steering angle sensor. Refer to BRC-64, "
Work Procedure".
3. Adjust levelizer adjustment of height sensor. Refer to EXL-61, "
LEVELIZER ADJUSTMENT : Special
Repair Requirement".
4. Check standard vehicle height setting of vehicle height sensor. Refer to SCS-67, "
Work Procedure".
ADJUSTMENT AFTER INSTALLATION (WITH HBMC)
: Vehicle front
A : Frame edge line
B: Almost parallel
JPEIB0232ZZ
JPEIB0220ZZ
Revision: 2010 May2011 QX56
Page 4371 of 5598
![INFINITI QX56 2011 Factory Service Manual
STRUCTURE AND OPERATIONSCS-11
< SYSTEM DESCRIPTION > [HBMC]
C
D
F
G H
I
J
K L
M A
B
SCS
N
O P
When system pressure decreases, influent oil is dist ributed to both pipes by gas spring reaction force o INFINITI QX56 2011 Factory Service Manual
STRUCTURE AND OPERATIONSCS-11
< SYSTEM DESCRIPTION > [HBMC]
C
D
F
G H
I
J
K L
M A
B
SCS
N
O P
When system pressure decreases, influent oil is dist ributed to both pipes by gas spring reaction force o](/manual-img/42/57033/w960_57033-4370.png)
STRUCTURE AND OPERATIONSCS-11
< SYSTEM DESCRIPTION > [HBMC]
C
D
F
G H
I
J
K L
M A
B
SCS
N
O P
When system pressure decreases, influent oil is dist ributed to both pipes by gas spring reaction force of
nitrogen gas via PPMU pipe A and PPMU pipe B to control sudden decrease in system pressure.
AccumulatorINFOID:0000000006256004
Influent oil from both front and rear shock absorbers on the outer ring flows simultaneously into the oil cham-
ber during cornering, and gas spring reaction force of ni trogen gas increases pressure, according to the influ-
ent oil level. As for inner ring side, the gas spring conv eys oil from the oil chamber to both front and rear shock
absorbers and decreases pressure, according to the oil level.
PPMU PipeINFOID:0000000006256005
PPMU and right and left tubes are connected. When oil in creases according to increase of system pressure,
increased amount of oil is sent to PPMU. When system pressure decreases, oil discharged from PPMU is sent
to right and left tubes.
1. Oil chamber 2. Bellows 3. Gas chamber
JSEIA0175ZZ
1. Oil chamber 2. Gas chamber 3. Bellows
JSEIA0176ZZ
Revision: 2010 May2011 QX56
Page 4373 of 5598
![INFINITI QX56 2011 Factory Service Manual
SYSTEMSCS-13
< SYSTEM DESCRIPTION > [HBMC]
C
D
F
G H
I
J
K L
M A
B
SCS
N
O P
During rough road driving (Front wheel LH: compressing, front wheel RH: extending, rear wheel LH: extending, rear
wheel RH INFINITI QX56 2011 Factory Service Manual
SYSTEMSCS-13
< SYSTEM DESCRIPTION > [HBMC]
C
D
F
G H
I
J
K L
M A
B
SCS
N
O P
During rough road driving (Front wheel LH: compressing, front wheel RH: extending, rear wheel LH: extending, rear
wheel RH](/manual-img/42/57033/w960_57033-4372.png)
SYSTEMSCS-13
< SYSTEM DESCRIPTION > [HBMC]
C
D
F
G H
I
J
K L
M A
B
SCS
N
O P
During rough road driving (Front wheel LH: compressing, front wheel RH: extending, rear wheel LH: extending, rear
wheel RH: compressing)
Discharged oil from each shock absorber moves along piping
path, but oil does not overflow from piping path,
since oil moves in between each shock absorber. Oil does not flow in accumulator and system pressure does
not increase.
Since the oil from the contracted shock absorber flow s into the shock absorber upper chamber, stabilizer-like
action is not generated. This improves the adhes ion level and the running performance on rough roads.
JSEIA0177GB
Revision: 2010 May2011 QX56
Page 5001 of 5598
ST-14
< BASIC INSPECTION >
STEERING WHEEL
STEERING WHEEL
InspectionINFOID:0000000006225584
NEUTRAL POSITION STEERING WHEEL
1. Check that steering gear assembly, steering column assembly and steering wheel are installed in the cor-
rect position.
2. Perform neutral position inspection after wheel alignment. Refer to FSU-7, "
Inspection".
3. Set vehicle to the straight-ahead position and c onfirm steering wheel is in the neutral position.
4. Loosen outer socket lock nut and turn inner socket to left and right equally to make fine adjustments if steering wheel is not in the neutral position.
STEERING WHEEL TURNING FORCE
1. Park vehicle on a level and dry surface, set parking brake.
2. Tires need to be inflated the specified pressure. Refer to WT-69, "
Tire Air Pressure".
3. Start the engine.
4. Bring power steering fluid up to adequate operating temperature.
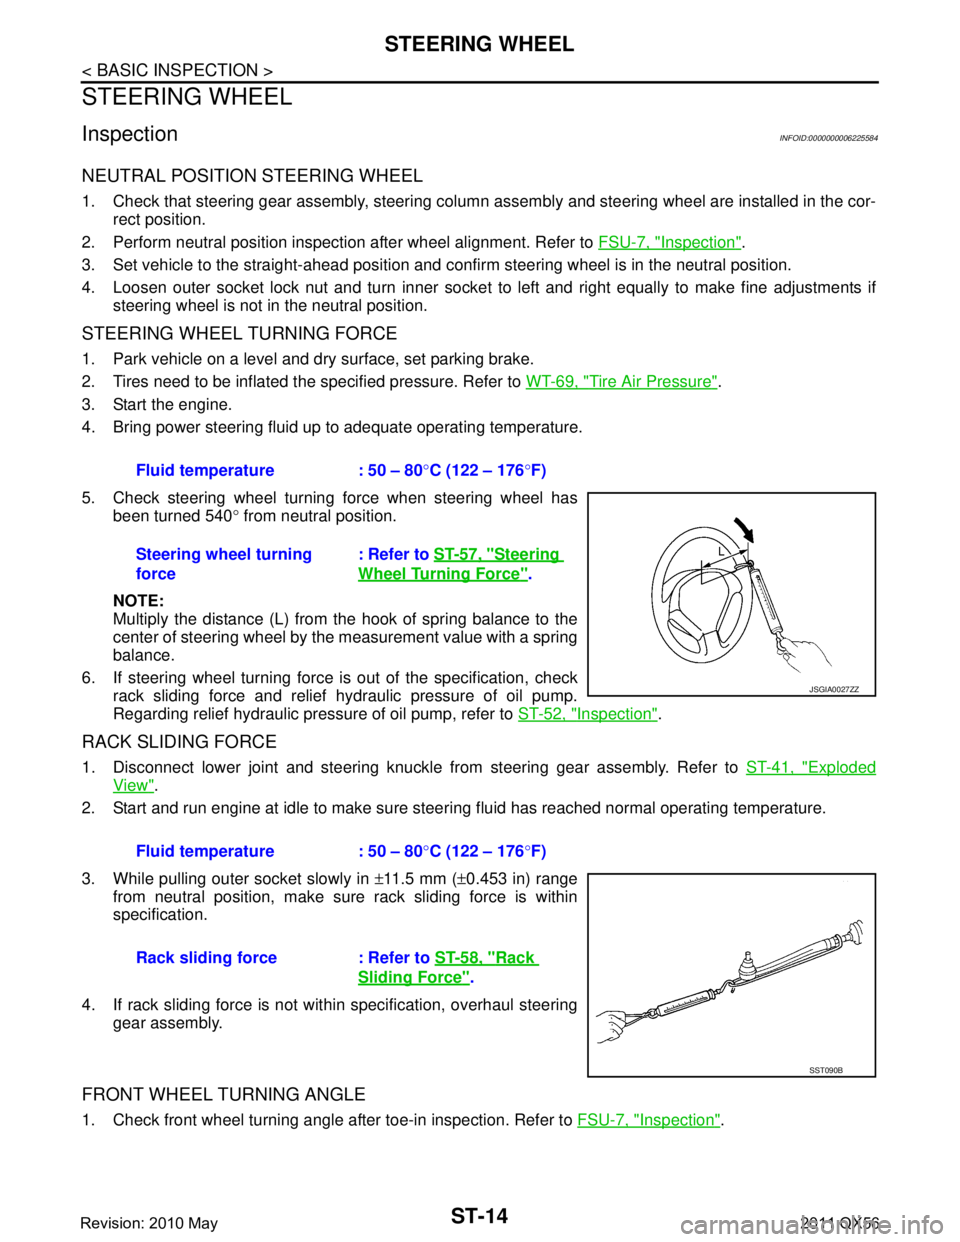
5. Check steering wheel turning force when steering wheel has been turned 540 ° from neutral position.
NOTE:
Multiply the distance (L) from the hook of spring balance to the
center of steering wheel by the measurement value with a spring
balance.
6. If steering wheel turning force is out of the specification, check
rack sliding force and relief hydraulic pressure of oil pump.
Regarding relief hydraulic pressure of oil pump, refer to ST-52, "
Inspection".
RACK SLIDING FORCE
1. Disconnect lower joint and steering knuckle from steering gear assembly. Refer to ST-41, "Exploded
View".
2. Start and run engine at idle to make sure steer ing fluid has reached normal operating temperature.
3. While pulling outer socket slowly in ±11.5 mm ( ±0.453 in) range
from neutral position, make sure rack sliding force is within
specification.
4. If rack sliding force is not within specification, overhaul steering gear assembly.
FRONT WHEEL TURNING ANGLE
1. Check front wheel turning angle after toe-in inspection. Refer to FSU-7, "Inspection".
Fluid temperature : 50 – 80
°C (122 – 176 °F)
Steering wheel turning
force : Refer to
ST-57, "
Steering
Wheel Turning Force".
JSGIA0027ZZ
Fluid temperature : 50 – 80 °C (122 – 176 °F)
Rack sliding force : Refer to ST-58, "
Rack
Sliding Force".
SST090B
Revision: 2010 May2011 QX56
Page 5017 of 5598
ST-30
< PERIODIC MAINTENANCE >
POWER STEERING FLUID
PERIODIC MAINTENANCE
POWER STEERING FLUID
InspectionINFOID:0000000006225597
FLUID LEVEL
1. Check fluid level with engine stopped.
2. Ensure that fluid level is between MIN and MAX.
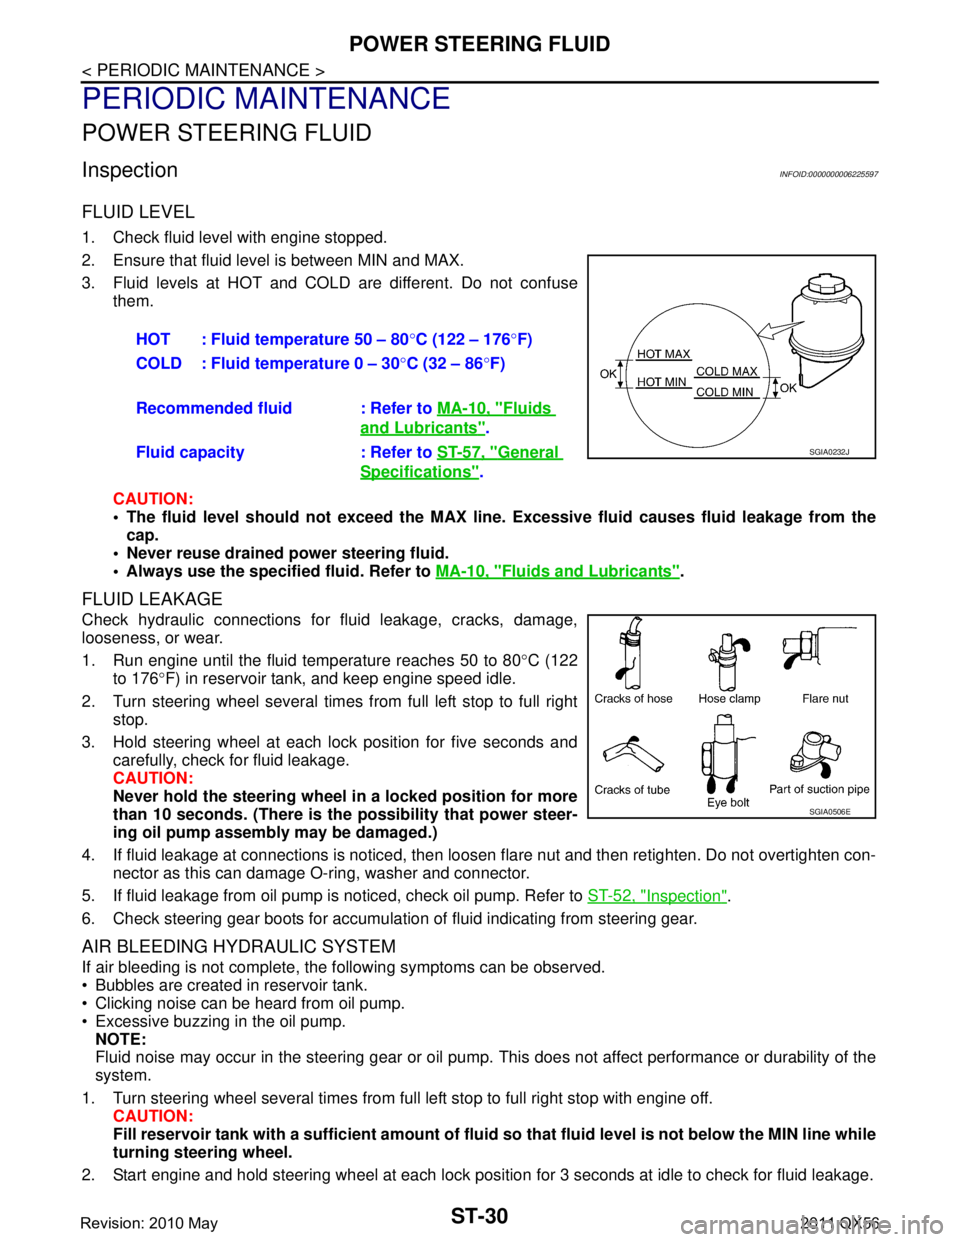
3. Fluid levels at HOT and COLD are different. Do not confuse
them.
CAUTION:
The fluid level should not exceed the MAX line. Excessive flui d causes fluid leakage from the
cap.
Never reuse drained power steering fluid.
Always use the specified fluid. Refer to MA-10, "
Fluids and Lubricants".
FLUID LEAKAGE
Check hydraulic connections for fluid leakage, cracks, damage,
looseness, or wear.
1. Run engine until the fluid temperature reaches 50 to 80 °C (122
to 176 °F) in reservoir tank, and keep engine speed idle.
2. Turn steering wheel several times from full left stop to full right stop.
3. Hold steering wheel at each lock position for five seconds and carefully, check for fluid leakage.
CAUTION:
Never hold the steering wheel in a locked position for more
than 10 seconds. (There is the possibility that power steer-
ing oil pump assembly may be damaged.)
4. If fluid leakage at connections is noticed, then loos en flare nut and then retighten. Do not overtighten con-
nector as this can damage O-ring, washer and connector.
5. If fluid leakage from oil pump is noticed, check oil pump. Refer to ST-52, "
Inspection".
6. Check steering gear boots for accumulation of fluid indicating from steering gear.
AIR BLEEDING HYDRAULIC SYSTEM
If air bleeding is not complete, the following symptoms can be observed.
Bubbles are created in reservoir tank.
Clicking noise can be heard from oil pump.
Excessive buzzing in the oil pump. NOTE:
Fluid noise may occur in the steering gear or oil pump. This does not affect performance or durability of the
system.
1. Turn steering wheel several times from full left stop to full right stop with engine off. CAUTION:
Fill reservoir tank with a sufficien t amount of fluid so that fluid level is not below the MIN line while
turning steering wheel.
2. Start engine and hold steering wheel at each lock position for 3 seconds at idle to check for fluid leakage.
HOT : Fluid temperature 50 – 80
°C (122 – 176 °F)
COLD : Fluid temperature 0 – 30 °C (32 – 86 °F)
Recommended fluid : Refer to MA-10, "
Fluids
and Lubricants".
Fluid capacity : Refer to ST-57, "
General
Specifications".
SGIA0232J
SGIA0506E
Revision: 2010 May2011 QX56
Page 5018 of 5598

POWER STEERING FLUIDST-31
< PERIODIC MAINTENANCE >
C
DE
F
H I
J
K L
M A
B
ST
N
O P
3. Repeat step 2 above several times at approximately 3 seconds intervals. CAUTION:
Never hold the steering wheel in a locked positio n for more than 10 seconds. (There is the possi-
bility that oil pump may be damaged.)
4. Check fluid for bubbles and while contamination.
5. Stop engine if bubbles and white contamination do not drain out. Perform step 2 and 3 above after waiting
until bubbles and white contamination drain out.
6. Stop the engine, and then check fluid level.
Revision: 2010 May2011 QX56
Page 5037 of 5598
ST-50
< REMOVAL AND INSTALLATION >
POWER STEERING OIL PUMP
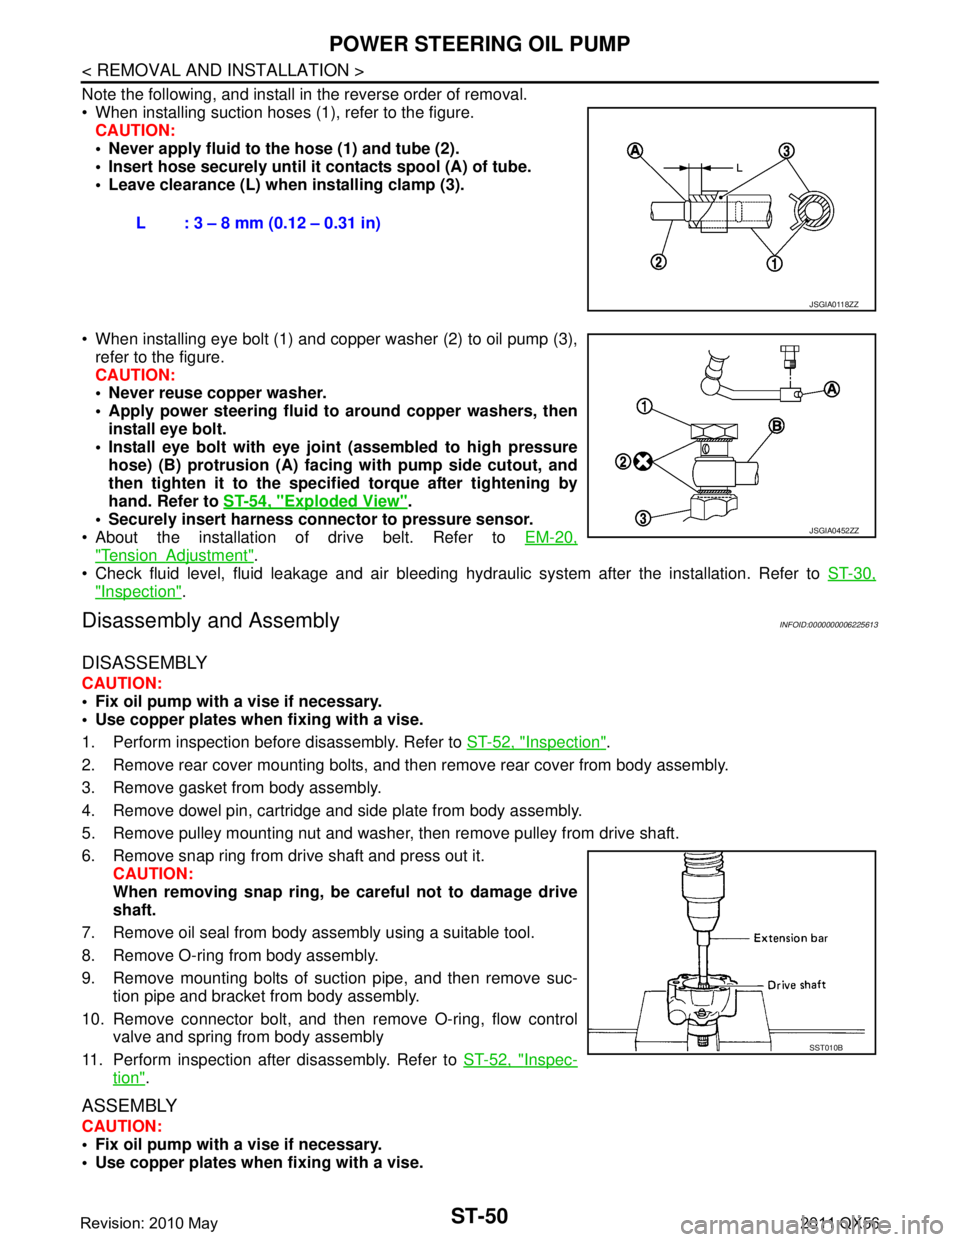
Note the following, and install in the reverse order of removal.
When installing suction hoses (1), refer to the figure.CAUTION:
Never apply fluid to the hose (1) and tube (2).
Insert hose securely until it contacts spool (A) of tube.
Leave clearance (L) when installing clamp (3).
When installing eye bolt (1) and copper washer (2) to oil pump (3), refer to the figure.
CAUTION:
Never reuse copper washer.
Apply power steering fluid to around copper washers, then
install eye bolt.
Install eye bolt with eye join t (assembled to high pressure
hose) (B) protrusion (A) facing with pump side cutout, and
then tighten it to the specifi ed torque after tightening by
hand. Refer to ST-54, "
Exploded View".
Securely insert harness connector to pressure sensor.
About the installation of drive belt. Refer to EM-20,
"TensionAdjustment".
Check fluid level, fluid leakage and air bleeding hydr aulic system after the installation. Refer to ST-30,
"Inspection".
Disassembly and AssemblyINFOID:0000000006225613
DISASSEMBLY
CAUTION:
Fix oil pump with a vise if necessary.
Use copper plates when fixing with a vise.
1. Perform inspection before disassembly. Refer to ST-52, "
Inspection".
2. Remove rear cover mounting bolts, and then remove rear cover from body assembly.
3. Remove gasket from body assembly.
4. Remove dowel pin, cartridge and side plate from body assembly.
5. Remove pulley mounting nut and washer, then remove pulley from drive shaft.
6. Remove snap ring from drive shaft and press out it. CAUTION:
When removing snap ring, be careful not to damage drive
shaft.
7. Remove oil seal from body assembly using a suitable tool.
8. Remove O-ring from body assembly.
9. Remove mounting bolts of suction pipe, and then remove suc- tion pipe and bracket from body assembly.
10. Remove connector bolt, and then remove O-ring, flow control
valve and spring from body assembly
11. Perform inspection after disassembly. Refer to ST-52, "
Inspec-
tion".
ASSEMBLY
CAUTION:
Fix oil pump with a vise if necessary.
Use copper plates when fixing with a vise.L : 3 – 8 mm (0.12 – 0.31 in)
JSGIA0118ZZ
JSGIA0452ZZ
SST010B
Revision: 2010 May2011 QX56