Page 2550 of 5598
![INFINITI QX56 2011 Factory Service Manual
EC-526
< SYMPTOM DIAGNOSIS >[VK56VD]
ENGINE CONTROL SYSTEM SYMPTOMS
1 - 6: The numbers refer to the order of inspection.
(continued on next page)
SYSTEM — ENGINE MECHANICAL & OTHER
Manifold absolut INFINITI QX56 2011 Factory Service Manual
EC-526
< SYMPTOM DIAGNOSIS >[VK56VD]
ENGINE CONTROL SYSTEM SYMPTOMS
1 - 6: The numbers refer to the order of inspection.
(continued on next page)
SYSTEM — ENGINE MECHANICAL & OTHER
Manifold absolut](/manual-img/42/57033/w960_57033-2549.png)
EC-526
< SYMPTOM DIAGNOSIS >[VK56VD]
ENGINE CONTROL SYSTEM SYMPTOMS
1 - 6: The numbers refer to the order of inspection.
(continued on next page)
SYSTEM — ENGINE MECHANICAL & OTHER
Manifold absolute pressure sensor circuit 3
EC-210
Battery current sensor 4 5 5 3EC-412EC-420
EC-424
Heated oxygen sensor 2 6 6 6 6 5EC-243EC-249
EC-257
SYMPTOM
Reference
page
HARD/NO START/RESTART (EXCP. HA)
ENGINE STALL
HESITATION/SURGING/FLAT SPOT
SPARK KNOCK/DETONATION
LACK OF POWER/POOR ACCELERATION
HIGH IDLE/LOW IDLE
ROUGH IDLE/HUNTING
IDLING VIBRATION
SLOW/NO RETURN TO IDLE
OVERHEATS/WATER TEMPERATURE HIGH
EXCESSIVE FUEL CONSUMPTION
EXCESSIVE OIL CONSUMPTION
BATTERY DEAD (UNDER CHARGE)
Warranty symptom code AA AB AC AD AE AF AG AH AJ AK AL AM HA
Fuel Fuel tank 5
5 FL-4
Fuel piping 555 55 5
FL-4
Vapor lock —
Valve deposit 5 555 55 5 —
Poor fuel (Heavy weight gasoline,
Low octane) —
Revision: 2010 May2011 QX56
Page 2551 of 5598
![INFINITI QX56 2011 Factory Service Manual
ENGINE CONTROL SYSTEM SYMPTOMSEC-527
< SYMPTOM DIAGNOSIS > [VK56VD]
C
D
E
F
G H
I
J
K L
M A
EC
NP
O
Air Air duct
55555 5 EM-28
Air cleaner
EM-27
Air leakage from air duct
(Mass air flow sensor — el INFINITI QX56 2011 Factory Service Manual
ENGINE CONTROL SYSTEM SYMPTOMSEC-527
< SYMPTOM DIAGNOSIS > [VK56VD]
C
D
E
F
G H
I
J
K L
M A
EC
NP
O
Air Air duct
55555 5 EM-28
Air cleaner
EM-27
Air leakage from air duct
(Mass air flow sensor — el](/manual-img/42/57033/w960_57033-2550.png)
ENGINE CONTROL SYSTEM SYMPTOMSEC-527
< SYMPTOM DIAGNOSIS > [VK56VD]
C
D
E
F
G H
I
J
K L
M A
EC
NP
O
Air Air duct
55555 5 EM-28
Air cleaner
EM-27
Air leakage from air duct
(Mass air flow sensor — electric
throttle control actuator)
5555 EM-28
Electric throttle control actuator
EC-460
Air leakage from intake manifold/
Collector/GasketEM-30
Cranking Battery
111111
11
PG-161
Generator circuit
CHG-13
Starter circuit 3STR-11
Signal plate 6EM-106
PNP signal 4EC-383
Engine Cylinder head
55555 55 5 EM-92
Cylinder head gasket 4 3
Cylinder block
66666 66 6 4
EM-115
Piston
Piston ring
Connecting rod
Bearing
Crankshaft
Va l v e
mecha-
nism Timing chain
55555 55 5 EM-72
Camshaft
EM-77
Intake valve timing controlEM-61
Intake valve
3EM-92
Exhaust valve
Exhaust Exhaust manifold/Tube/Muffler/ Gasket 55555 55 5 EM-42
EX-6Three way catalystSYMPTOM
Reference
page
HARD/NO START/RESTART (EXCP. HA)
ENGINE STALL
HESITATION/SURGING/FLAT SPOT
SPARK KNOCK/DETONATION
LACK OF POWER/POOR ACCELERATION
HIGH IDLE/LOW IDLE
ROUGH IDLE/HUNTING
IDLING VIBRATION
SLOW/NO RETURN TO IDLE
OVERHEATS/WATER TEMPERATURE HIGH
EXCESSIVE FUEL CONSUMPTION
EXCESSIVE OIL CONSUMPTION
BATTERY DEAD (UNDER CHARGE)
Warranty symptom code AA AB AC AD AE AF AG AH AJ AK AL AM HA
Revision: 2010 May2011 QX56
Page 2562 of 5598
![INFINITI QX56 2011 Factory Service Manual
EC-538
< SERVICE DATA AND SPECIFICATIONS (SDS) [VK56VD]
SERVICE DATA AND SPECIFICATIONS (SDS)
SERVICE DATA AND SPECIFICATIONS (SDS)
SERVICE DATA AND SPECIFICATIONS (SDS)
Idle SpeedINFOID:000000000621 INFINITI QX56 2011 Factory Service Manual
EC-538
< SERVICE DATA AND SPECIFICATIONS (SDS) [VK56VD]
SERVICE DATA AND SPECIFICATIONS (SDS)
SERVICE DATA AND SPECIFICATIONS (SDS)
SERVICE DATA AND SPECIFICATIONS (SDS)
Idle SpeedINFOID:000000000621](/manual-img/42/57033/w960_57033-2561.png)
EC-538
< SERVICE DATA AND SPECIFICATIONS (SDS) [VK56VD]
SERVICE DATA AND SPECIFICATIONS (SDS)
SERVICE DATA AND SPECIFICATIONS (SDS)
SERVICE DATA AND SPECIFICATIONS (SDS)
Idle SpeedINFOID:0000000006218038
*: Under the following conditions
A/C switch: OFF
Electric load: OFF (Lights, heater fan & rear window defogger)
Steering wheel: Kept in straight-ahead position
Ignition TimingINFOID:0000000006218039
*: Under the following conditions
A/C switch: OFF
Electric load: OFF (Lights, heater fan & rear window defogger)
Steering wheel: Kept in straight-ahead position
Calculated Load ValueINFOID:0000000006218040
Mass Air Flow SensorINFOID:0000000006218041
*: Engine is warmed up to normal operating temperature and running under no load.Condition Specification
No load* (in P or N position) 600 ± 50 rpm
Condition Specification
No load* (in P or N position) 12 ± 2 °BTDC
Condition Specification (U sing CONSULT-III or GST)
At idle 5 – 35%
At 2,500 rpm 5 – 35%
Supply voltageBattery voltage (11 – 14 V)
Output voltage at idle 0.9 – 1.1 V*
Mass air flow (Using CONSULT-III or GST) 1.0 – 5.0 g/s at idle*
7.0 – 20.0 g/s at 2,500 rpm*
Revision: 2010 May2011 QX56
Page 2565 of 5598

PRECAUTIONSEM-3
< PRECAUTION >
C
DE
F
G H
I
J
K L
M A
EM
NP
O
PRECAUTION
PRECAUTIONS
Precaution for Procedur
e without Cowl Top CoverINFOID:0000000006289506
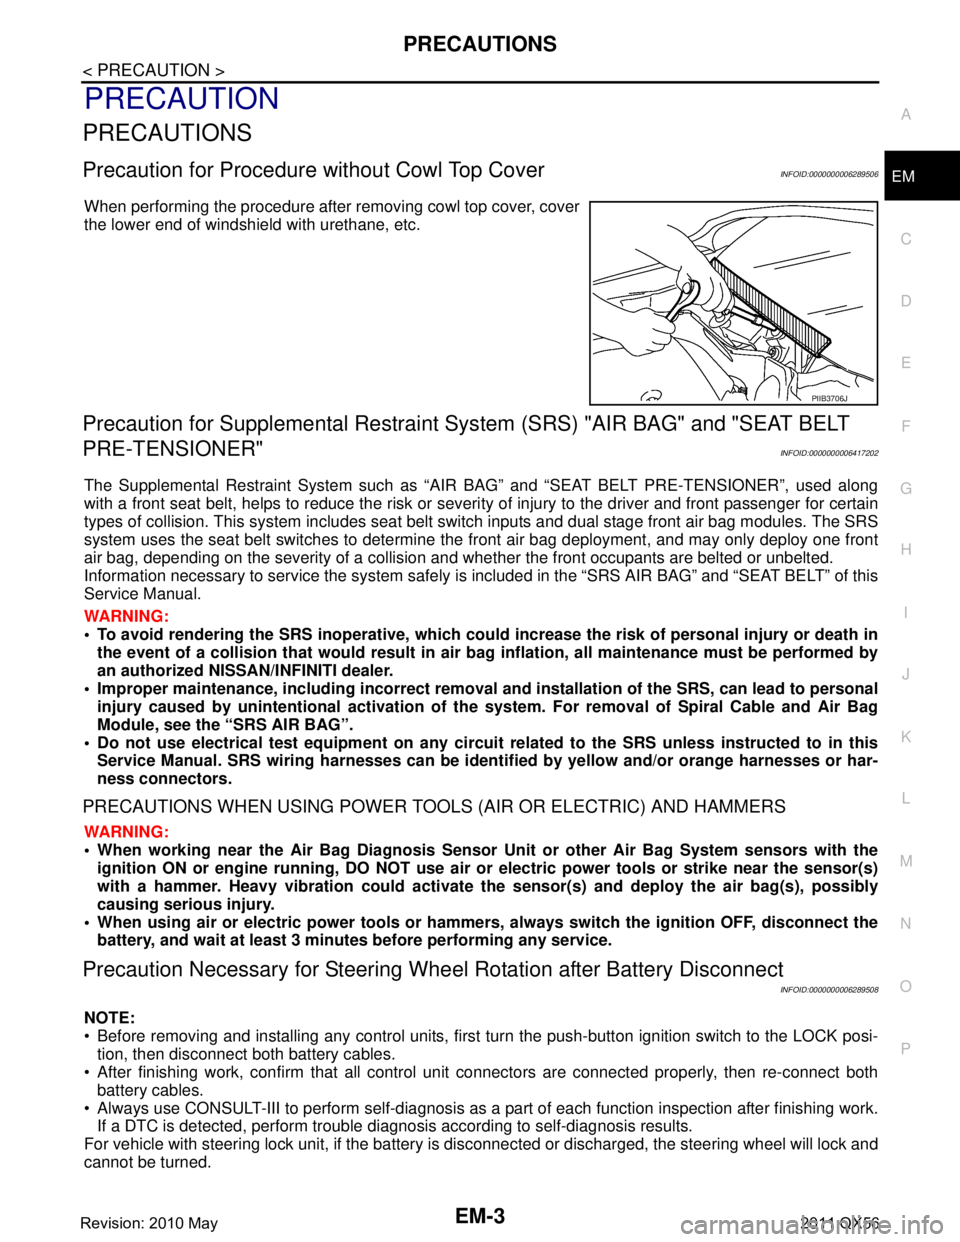
When performing the procedure after removing cowl top cover, cover
the lower end of windshield with urethane, etc.
Precaution for Supplemental Restraint System (SRS) "AIR BAG" and "SEAT BELT
PRE-TENSIONER"
INFOID:0000000006417202
The Supplemental Restraint System such as “A IR BAG” and “SEAT BELT PRE-TENSIONER”, used along
with a front seat belt, helps to reduce the risk or severi ty of injury to the driver and front passenger for certain
types of collision. This system includes seat belt switch inputs and dual stage front air bag modules. The SRS
system uses the seat belt switches to determine the front air bag deployment, and may only deploy one front
air bag, depending on the severity of a collision and whether the front occupants are belted or unbelted.
Information necessary to service the system safely is included in the “SRS AIR BAG” and “SEAT BELT” of this
Service Manual.
WARNING:
• To avoid rendering the SRS inoper ative, which could increase the risk of personal injury or death in
the event of a collision that would result in air ba g inflation, all maintenance must be performed by
an authorized NISSAN/INFINITI dealer.
Improper maintenance, including in correct removal and installation of the SRS, can lead to personal
injury caused by unintentional act ivation of the system. For removal of Spiral Cable and Air Bag
Module, see the “SRS AIR BAG”.
Do not use electrical test equipm ent on any circuit related to the SRS unless instructed to in this
Service Manual. SRS wiring harnesses can be identi fied by yellow and/or orange harnesses or har-
ness connectors.
PRECAUTIONS WHEN USING POWER TOOLS (AIR OR ELECTRIC) AND HAMMERS
WARNING:
When working near the Air Bag Diagnosis Sensor Unit or other Air Bag System sensors with the
ignition ON or engine running, DO NOT use air or electric power tools or strike near the sensor(s)
with a hammer. Heavy vibration could activate the sensor(s) and deploy the air bag(s), possibly
causing serious injury.
When using air or electric power tools or hammers , always switch the ignition OFF, disconnect the
battery, and wait at least 3 minutes before performing any service.
Precaution Necessary for Steering Wh eel Rotation after Battery Disconnect
INFOID:0000000006289508
NOTE:
Before removing and installing any control units, first tu rn the push-button ignition switch to the LOCK posi-
tion, then disconnect both battery cables.
After finishing work, confirm that all control unit connectors are connected properly, then re-connect both
battery cables.
Always use CONSULT-III to perform self-diagnosis as a part of each function inspection after finishing work.
If a DTC is detected, perform trouble diagnos is according to self-diagnosis results.
For vehicle with steering lock unit, if the battery is disconnected or discharged, the steering wheel will lock and
cannot be turned.
PIIB3706J
Revision: 2010 May2011 QX56
Page 2570 of 5598
EM-8
< PREPARATION >
PREPARATION
KV10114400
(J-38365)
Heated oxygen sensor wrenchLoosening or tightening heated oxygen sen-
sor 2
a: 22 mm (0.87 in)
KV10117100
(J-44626)
Heated oxygen sensor wrench Loosening or tightening air fuel ratio sensor 1
a: 22 mm (0.87 in)
KV10120100
(J-47245)
Ring gear stopper Removing and installing crankshaft pulley
—
(J-45488)
Quick connector release Removing fuel tube quick connectors in en-
gine room
(Available in SEC. 164 of PARTS CATA-
LOG:Part No. 16441 6N210)
KV10119300
(—)
Adapter and torque wrench assembly Tightening rocker cover mounting bolts.
(specified torque)
KV10119600
(—)
Injector remover Removing fuel injector
Tool number
(Kent-Moore No.)
Tool name
Description
JPBIA0397ZZ
NT379
LBIA0451E
PBIC0198E
JPBIA2623ZZ
JPBIA3746ZZ
Revision: 2010 May2011 QX56
Page 2572 of 5598

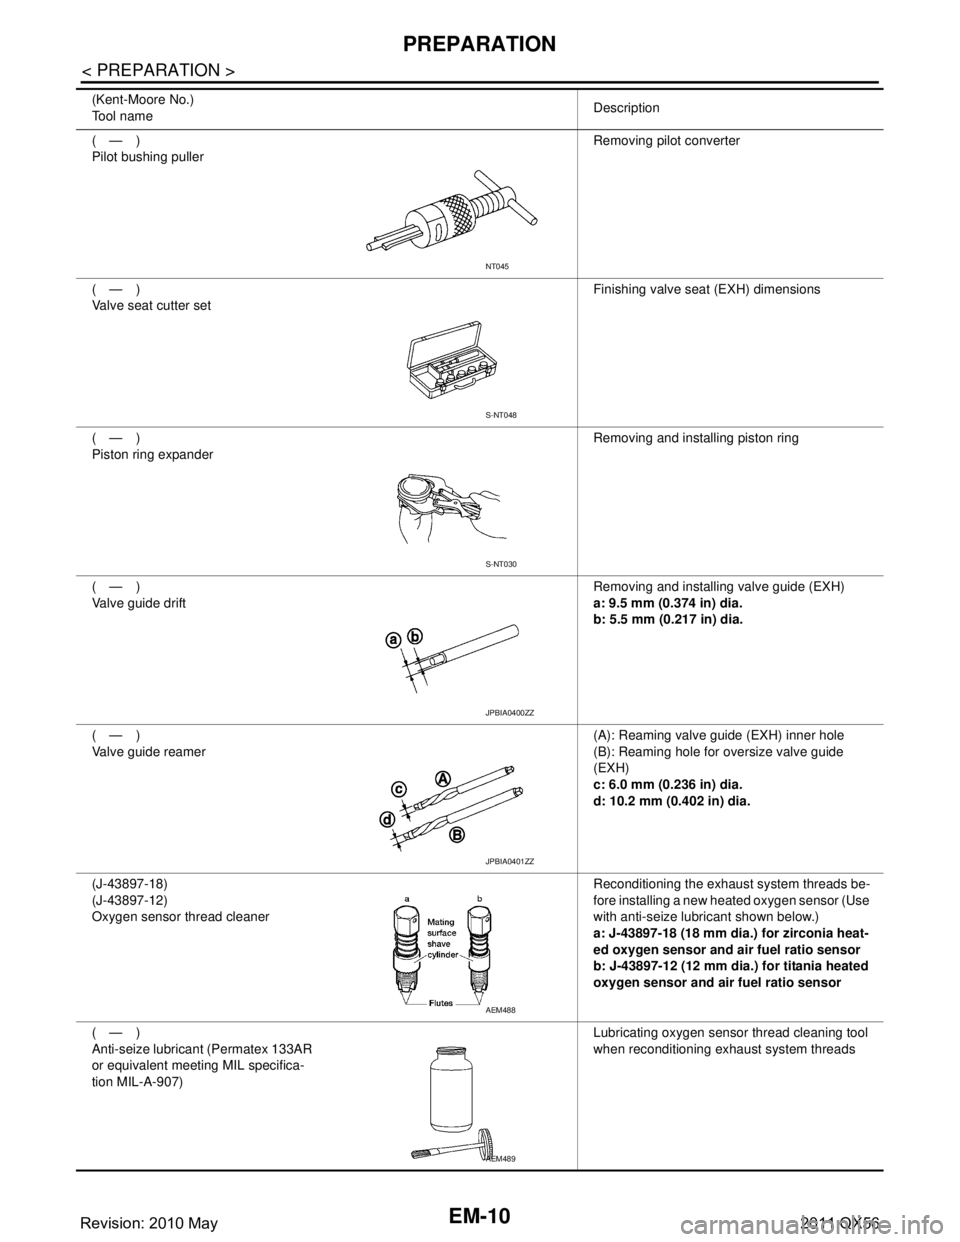
EM-10
< PREPARATION >
PREPARATION
(—)
Pilot bushing pullerRemoving pilot converter
(—)
Valve seat cutter set Finishing valve seat (EXH) dimensions
(—)
Piston ring expander Removing and installing piston ring
(—)
Valve guide drift Removing and installing valve guide (EXH)
a: 9.5 mm (0.374 in) dia.
b: 5.5 mm (0.217 in) dia.
(—)
Valve guide reamer (A): Reaming valve guide (EXH) inner hole
(B): Reaming hole for oversize valve guide
(EXH)
c: 6.0 mm (0.236 in) dia.
d: 10.2 mm (0.402 in) dia.
(J-43897-18)
(J-43897-12)
Oxygen sensor thread cleaner Reconditioning the exhaust system threads be-
fore installing a new heated oxygen sensor (Use
with anti-seize lubricant shown below.)
a: J-43897-18 (18 mm dia.) for zirconia heat-
ed oxygen sensor and air fuel ratio sensor
b: J-43897-12 (12 mm dia.) for titania heated
oxygen sensor and air fuel ratio sensor
(—)
Anti-seize lubricant (Permatex 133AR
or equivalent meeting MIL specifica-
tion MIL-A-907) Lubricating oxygen sensor thread cleaning tool
when reconditioning exhaust system threads
(Kent-Moore No.)
Tool name
Description
NT045
S-NT048
S-NT030
JPBIA0400ZZ
JPBIA0401ZZ
AEM488
AEM489
Revision: 2010 May2011 QX56
Page 2584 of 5598
EM-22
< PERIODIC MAINTENANCE >
AIR CLEANER FILTER
AIR CLEANER FILTER
Exploded ViewINFOID:0000000006289529
Removal and InstallationINFOID:0000000006289530
REMOVAL
NOTE:
The viscous paper type filter does not need cleaning between replacement intervals.
Replace the air filter as necessary for periodic maintenance. Refer to MA-6, "
Introduction of Periodic Mainte-
nance".
1. Unhook clips, and lift air cleaner case (upper).
2. Remove air cleaner filter from air cleaner case.
INSTALLATION
Install is the reverse order of removal.
1. Resonator 2. Adapter 3. Air cleaner case (lower)
4. Air cleaner filter 5. Air cleaner case (upper) 6. Mass air flow sensor
7. Air duct 8. Clamp
Vehicle front
Refer to GI-4, "
Components" for symbols in the figure.
JPBIA3260GB
Revision: 2010 May2011 QX56
Page 2589 of 5598

AIR CLEANER AND AIR DUCTEM-27
< REMOVAL AND INSTALLATION >
C
DE
F
G H
I
J
K L
M A
EM
NP
O
AIR CLEANER AND AIR DUCT
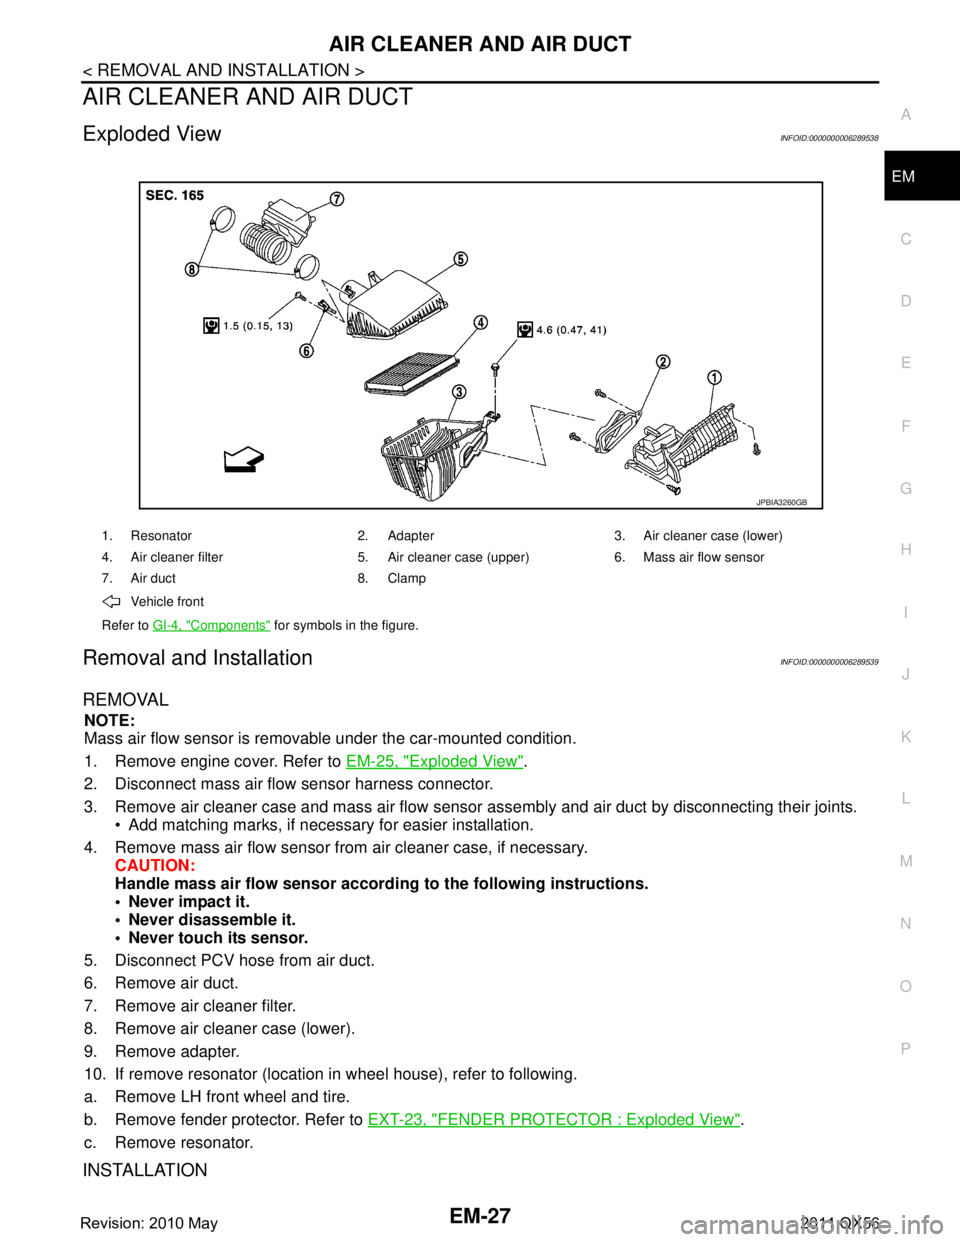
Exploded ViewINFOID:0000000006289538
Removal and InstallationINFOID:0000000006289539
REMOVAL
NOTE:
Mass air flow sensor is removable under the car-mounted condition.
1. Remove engine cover. Refer to
EM-25, "
Exploded View".
2. Disconnect mass air flow sensor harness connector.
3. Remove air cleaner case and mass air flow sensor assembly and air duct by disconnecting their joints.
Add matching marks, if necessary for easier installation.
4. Remove mass air flow sensor from air cleaner case, if necessary. CAUTION:
Handle mass air flow sensor accordi ng to the following instructions.
Never impact it.
Never disassemble it.
Never touch its sensor.
5. Disconnect PCV hose from air duct.
6. Remove air duct.
7. Remove air cleaner filter.
8. Remove air cleaner case (lower).
9. Remove adapter.
10. If remove resonator (location in wheel house), refer to following.
a. Remove LH front wheel and tire.
b. Remove fender protector. Refer to EXT-23, "
FENDER PROTECTOR : Exploded View".
c. Remove resonator.
INSTALLATION
1. Resonator 2. Adapter 3. Air cleaner case (lower)
4. Air cleaner filter 5. Air cleaner case (upper) 6. Mass air flow sensor
7. Air duct 8. Clamp
Vehicle front
Refer to GI-4, "
Components" for symbols in the figure.
JPBIA3260GB
Revision: 2010 May2011 QX56