Page 89 of 152

88Navigation System
System Setup
NOTE:
The maximum size of the “Avoid area” is 1/4 of the navigation display screen regardless of the map scale setting.
The selected area will be displayed as a shaded box with a yellow border. Push in on the joystick to set the end point of the avoided area. To “redraw” the area, touch Cancel and repeat the area selection process. If your selected area contains a freeway, the system will prompt you with a pop-up box saying “Do you want to avoid freeways?”
Answering “No” allows you to enter a route through an avoided area on a freeway and skip the “Avoid area caution box.” See Pop-Ups and Disclaimers on page 62. Say or select Done to return to the Edit area screen. When you return, the “Vicinity” field is automatically filled in by the system. Re-edit the area “Name” if desired. Select Done on the Edit avoid area screen to finish editing. Your new avoided area will now appear on the “Avoid area” list screen and be viewable on the map screen.
NOTE:
You can select areas to avoid, however you cannot select roads or areas that you want the system to use for routing. If you are drawing a box around a road as an area to avoid, then ensure the following: When you draw the box, make sure that the road or portion of a road that you encircled includes an intersection. For instance, in the example below, highway 213 will be avoided, but Van Ness will not be avoided because it lacks an intersectio n in the enclosed box.
Page 90 of 152
 along you")
Navigation System89
System Setup
Edit Waypoint Search Area
When driving en route to your destination, you can select a temporary destination waypoint (marked with a small flag on the map) along your route for gas, a restaurant, or other POI. When you resume your trip from the waypoint, the system continues the trip to your original destination. To use this feature, see Waypoints on page 63.
This Setup item allows you to select the distance from your highlighted route line (on either side of your route) that the system will search for a waypoint. From the Routing & Guidance screen, select Edit for “Edit Waypoint Search Area,” and then choose the desired search distance for either “On Freeways” or “On Surface Street.”
The diagram below shows how the system handles the search for “Places Along the Rout e” or “Places Around the Destination” (see Waypoints on page 63).
For “Places Along the Route,” the system looks in front of you within a corridor width specified by your values for “On Freeways” or “On Surface Street.”The system checks the upcoming area, based on your input.
For “Places Around the Destination,” the system searches outwards in a spiral from the destination. In this case, specific search values are not needed; the matches are displayed in order of distance from destination.
NOTE:
These settings do not affect the search range used for the voice commands like “Find nearest gas station” that are also available when viewing the map screen.
Page 91 of 152

90Navigation System
System Setup
Guidance Mode
Allows you to select the guidance display mode: Single Screen or Split Screen .
To get to Guidance Mode from the Setup screen, select in sequence, “More,” “Routing & Guidance,” and “Guidance Mode.”
The factory default is Single Screen.
NOTE:
The Guidance Mode can also be selected on the Icon Selection screen. See Showing Icons on the Map on page 58.
Vehicle
From the Setup screen (second), say or select Vehicle and the following screen appears:
Off-road Tracking
With this On, the system will provide white off-road tracking dots (“breadcrumbs”) on the map screen whenever you drive into an area where the map does not show any roads.See Map Screen Legend on page 18.
After you have traveled approximately 1/2 mile away from a mapped road, the system will display a series of white dots on the map screen to show the path you have traveled. This is provided so you can follow the dots to backtrack to the mapped road you originally left. Tracking continues until you reach a mapped road. See Off-road Tracking on page 60.
Tracking is shown only in the 1/20, 1/8, 1/4, and 1/2 mile scales, or the 80, 200, 400, and 800 meter scales. Use the ZOOM buttons to change the scales if necessary.
NOTE:
To clear existing dots , turn this feature off and exit Setup. To re-enable this feature, return to Setup and turn it on again.
Page 92 of 152

Navigation System91
System Setup
Correct Vehicle Position
The system relies on satellites for positioning information. Buildings, tunnels, and other objects can block or reflect these signals, requiring the system to use “dead reckoning” to determine your location and direction.This can sometimes lead to small errors in positioning, such as showing you on an adjacent street.
NOTE:
Using this function to adjust vehicle position is not recommended. When the system acquires a GPS signal, it will automatically place the vehicle in the correct location.
If you choose to do this, follow these steps:
1. Stop the vehicle.
2. Select Adjust, and the system will display a map adjustment screen.
3. Use the ZOOM buttons and the joystick to move the location arrowhead to the correct location. Touch the arrow buttons on the bottom of the screen to rotate the direction arrows so the vehicle position is pointin g in the correct direction.
NOTE:
If you continually have to do this, there are either problems in the database or GPS reception problems. See Accessories Precautions on page 5.
4. When you have finished, press the joystick or select Done to return to the previous screen.
5. As you drive, the current road will be displayed at the bottom of the screen.
Page 93 of 152
92Navigation System
System Setup
System Information
From the Setup screen (second), say or select System Information and the following screen appears:
This information is for dealer use only. For ordering updates, use the version number stamped on the label (as Ver. X. XX) of the navigation DVD. See Obtaining a Navigation Update DVD on page 103.
When finished, say or select Return to return to the previous screen.
Basic Settings
From the Setup screen (second), say or select Basic Settings and the following screen appears:
Keyboard Layout
Allows you to select the displayed keypad screen: Alphabet or QWERTY .
Units (mile or km)
Allows you to select the units for the entire system ( mile or km).
Voice Recognition Feedback
Allows you to turn voice control system prompts On or Off. When Off, you will not hear the voice control system confirmations or prompts.
Page 94 of 152
, say or
select Clock Settings and the
following screen appears:
Clock Adjustment
When you select Clock Adjustment ,
t")
Navigation System
System Setup
Clock Settings
From the Setup screen (second), say or
select Clock Settings and the
following screen appears:
Clock Adjustment
When you select Clock Adjustment ,
the following screen appears: This screen allows you to set or adjust
the following:
• Auto Daylight Saving Time
(Default = On)
• Auto Time Zone by GPS (Default = On)
• DST (Daylight Saving Time) Selection
(change DST schedule)
• Time Adjustment (adjust your clock)
• Reset button (resets this screen’s
settings to factory defaults)
Auto Daylight Saving Time
Sets automatic daylight saving time On
or Off . If set to On , the clock will
automatically “spring ahead” or “fall
back” by one hour when a daylight
saving time change occurs. If you reside
in a state or area wh ere daylight saving
time is not used, then you may want to
turn this feature off. NOTE:
If you set Auto Daylight Saving Time to
On
, the daylight saving time function is
activated even in an area that does not
use daylight saving time.
The federal government mandated that
starting in 2007, daylight saving time
begins in March and ends in November
instead of the old schedule from April to
October. The schedule is subject to
review and possible cancellation in
2010-2011.
The schedules for the time changes are
stored in the software and can be
selected in the DST schedule
selection screen. Therefore, your clock
will change based on the daylight saving
time schedule.
NOTE:
The automatic clock setting feature
relies on a satellite signal. It will not
work in Hawaii and Alaska.
93
Page 95 of 152

Navigation System
System Setup
Auto Time Zone by GPS
Sets automatic time zone selection by
GPS to On or Off . If you are driving
across the country and passing through
time zones, then this feature will
automatically set the time to the time
zone you are traveling through.
However, if you live and work in two
different time zones, you may want to
turn this feature off.
NOTE:
When driving near a time zone
boundary, the displayed time zone may
fluctuate between the two zone times.
Daylight Saving Time (DST)
Selection (Change DST Schedule)
This option lets you select the schedule
(April-October or March-
November ) when daylight saving time
will automatically occur in your
navigation system. The system default is
the March-November schedule as
mandated by the U.S. government. During 2010-2011, it is possible that
this new change will
be canceled by the
government and returned back to the
previous “April-October” schedule. If
so, simply change th e schedule in this
setting to the “Apr il-October” schedule.
Time Adjustment
Adjusts the current time in hours and
minutes. You can reset the adjustment
by selecting Reset. Selecting Done
returns you to the previous screen.
NOTE:
Selecting Reset also clears any
changes you made to “Auto Daylight
Saving Time,” “Auto Time Zone by
GPS,” or “DST Selection” settings.
Depending on your location, you may
need to adjust these settings.
Clock Type
Allows you to choose the design of the
clock screen. For more information, see
Clock Type on page 75.
94
Page 96 of 152
Navigation System95
System Setup
Color
From the Setup screen (second), say or select Color and the following screen appears:
Map Color
Allows you to choose the map color from one of four colors for the Day and Night modes.
Say or select Return to return to the previous screen.
NOTE:
Choose White (factory default is Beige) as the Day color to obtain the best daytime display contrast. Choose Black (factory default) as the Night color to obtain the best nighttime display contrast.
Menu Color
Allows you to choose the menu color from one of five colors for the Base and Window.
Say or select Return to return to the previous screen.
NOTE:
Choose Black (factory default) as the Base color to obtain the best display contrast. Choose White (factory default) as the Window color to obtain the best display contrast.
 1
1 2
2 3
3 4
4 5
5 6
6 7
7 8
8 9
9 10
10 11
11 12
12 13
13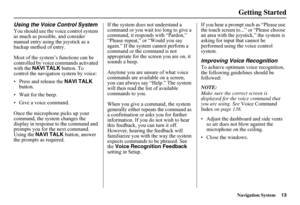 14
14 15
15 16
16 17
17 18
18 19
19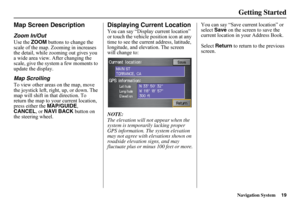 20
20 21
21 22
22 23
23 24
24 25
25 26
26 27
27 28
28 29
29 30
30 31
31 32
32 33
33 34
34 35
35 36
36 37
37 38
38 39
39 40
40 41
41 42
42 43
43 44
44 45
45 46
46 47
47 48
48 49
49 50
50 51
51 52
52 53
53 54
54 55
55 56
56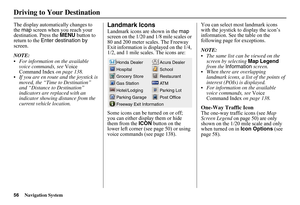 57
57 58
58 59
59 60
60 61
61 62
62 63
63 64
64 65
65 66
66 67
67 68
68 69
69 70
70 71
71 72
72 73
73 74
74 75
75 76
76 77
77 78
78 79
79 80
80 81
81 82
82 83
83 84
84 85
85 86
86 87
87 88
88 89
89 90
90 91
91 92
92 93
93 94
94 95
95 96
96 97
97 98
98 99
99 100
100 101
101 102
102 103
103 104
104 105
105 106
106 107
107 108
108 109
109 110
110 111
111 112
112 113
113 114
114 115
115 116
116 117
117 118
118 119
119 120
120 121
121 122
122 123
123 124
124 125
125 126
126 127
127 128
128 129
129 130
130 131
131 132
132 133
133 134
134 135
135 136
136 137
137 138
138 139
139 140
140 141
141 142
142 143
143 144
144 145
145 146
146 147
147 148
148 149
149 150
150 151
151, say or select System Information and the following screen appears:
This information is for dealer use only. For")
, say or select Color and the following screen appears:
Map Color
Allows you to choose the map color from one of four colors for")