2011 FORD KUGA wheel
[x] Cancel search: wheelPage 1345 of 2057
Action
Possible Sources
Symptom
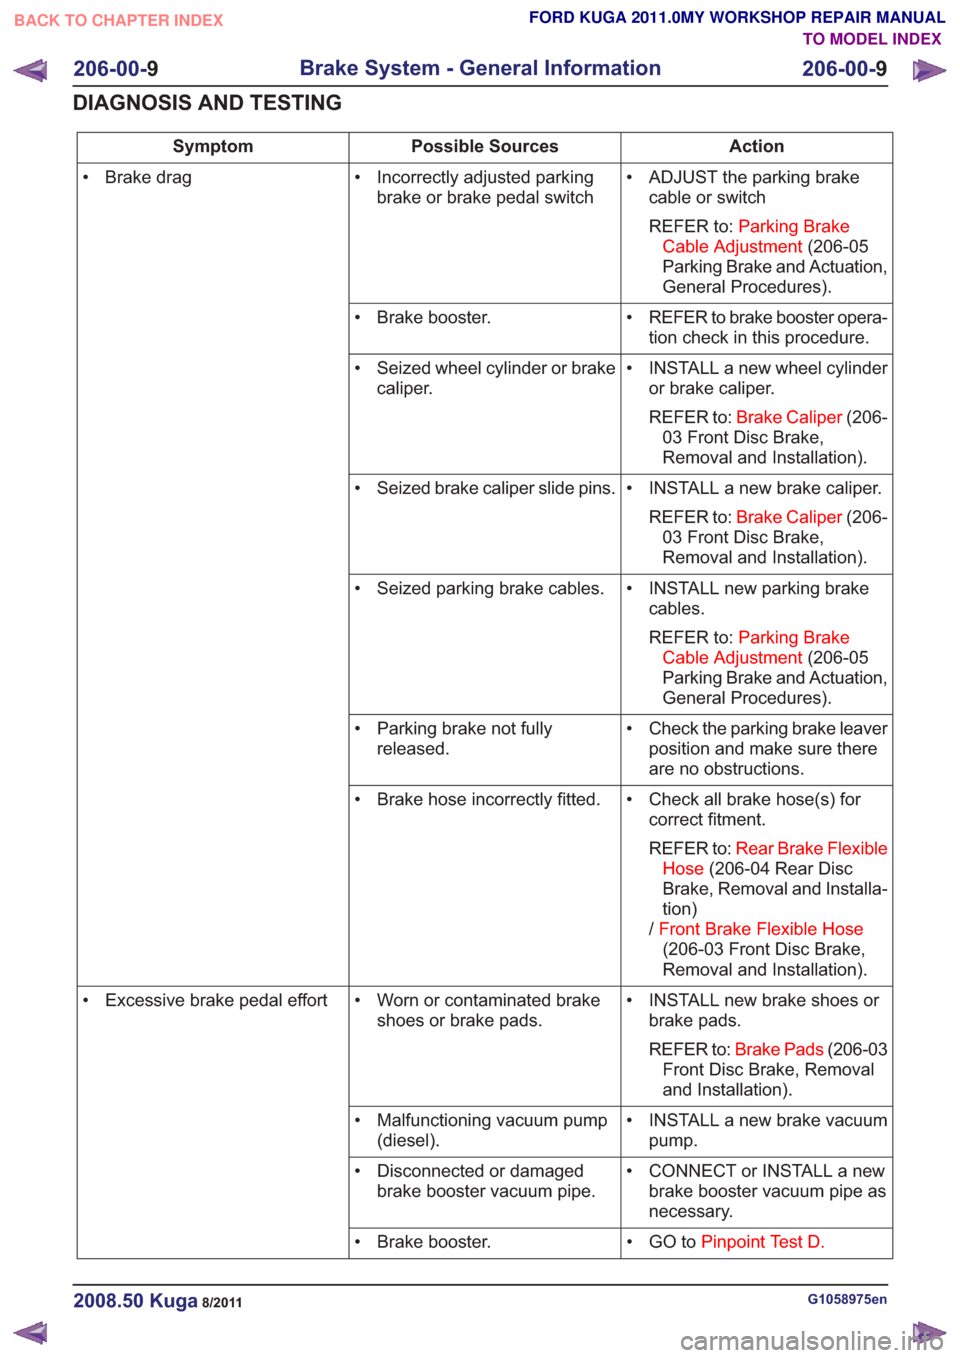
• ADJUST the parking brakecable or switch
REFER to: Parking Brake
Cable Adjustment (206-05
Parking Brake and Actuation,
General Procedures).
• Incorrectly adjusted parking
brake or brake pedal switch
• Brake drag
• REFER to brake booster opera-tion check in this procedure.
• Brake booster.
• INSTALL a new wheel cylinderor brake caliper.
REFER to: Brake Caliper (206-
03 Front Disc Brake,
Removal and Installation).
• Seized wheel cylinder or brake
caliper.
• INSTALL a new brake caliper.REFER to: Brake Caliper (206-
03 Front Disc Brake,
Removal and Installation).
• Seized brake caliper slide pins.
• INSTALL new parking brakecables.
REFER to: Parking Brake
Cable Adjustment (206-05
Parking Brake and Actuation,
General Procedures).
• Seized parking brake cables.
• Check the parking brake leaverposition and make sure there
are no obstructions.
• Parking brake not fully
released.
• Check all brake hose(s) forcorrect fitment.
REFER to: Rear Brake Flexible
Hose (206-04 Rear Disc
Brake, Removal and Installa-
tion)
/ Front Brake Flexible Hose
(206-03 Front Disc Brake,
Removal and Installation).
• Brake hose incorrectly fitted.
• INSTALL new brake shoes orbrake pads.
REFER to: Brake Pads (206-03
Front Disc Brake, Removal
and Installation).
• Worn or contaminated brake
shoes or brake pads.
• Excessive brake pedal effort
• INSTALL a new brake vacuumpump.
• Malfunctioning vacuum pump
(diesel).
• CONNECT or INSTALL a newbrake booster vacuum pipe as
necessary.
• Disconnected or damaged
brake booster vacuum pipe.
• GO toPinpoint Test D.
• Brake booster.
G1058975en2008.50 Kuga8/2011
206-00- 9
Brake System - General Information
206-00- 9
DIAGNOSIS AND TESTING
TO MODEL INDEX
BACK TO CHAPTER INDEX
FORD KUGA 2011.0MY WORKSHOP REPAIR MANUAL
Page 1355 of 2057
too close to the fluid level indicator assembly,
or float assembly damage.
Bypass Condition Test
1. Check the fluid in the brake master cylinderreservoir. Fill the brake master cylinder reservoir
if low or empty.
2. Observe the fluid level in the brake master cylinder reservoir. If after several brake
applications, the fluid level remains the same,
measure the wheel turning torque required to
rotate the wheels with the brakes applied as
follows:
Place the transaxle in the NEUTRAL position.
Raise and support the vehicle. REFER to: (100-02
Jacking and Lifting) Jacking (Description and Operation),
Lifting (Description and Operation).
Apply the brakes with a minimum of 445 N (100
lb) and hold for approximately 15 seconds. With
the brakes still applied, exert a torque on the front
wheels of 10.1 Nm (75 lb ft). If either wheel rotates,
install a new brake master cylinder.
REFER to: Brake Master Cylinder - 2.5L Duratec
(147kW/200PS) - VI5 (206-06 Hydraulic Brake
Actuation, Removal and Installation).
Non-Pressure Leaks
Any empty brake master cylinder reservoir
condition may be caused by two types of
non-pressure external leaks.
Type 1: An external leak may occur at the brake
master cylinder reservoir cap because of incorrect
positioning of the gasket and cap. Reposition the
cap and gasket.
Type 2: An external leak may occur at the brake
master cylinder reservoir mounting seals. Service
such a leak by installing new seals.
G1058975en2008.50 Kuga8/2011
206-00- 19
Brake System - General Information
206-00- 19
DIAGNOSIS AND TESTING
TO MODEL INDEX
BACK TO CHAPTER INDEX
FORD KUGA 2011.0MY WORKSHOP REPAIR MANUAL
Page 1356 of 2057
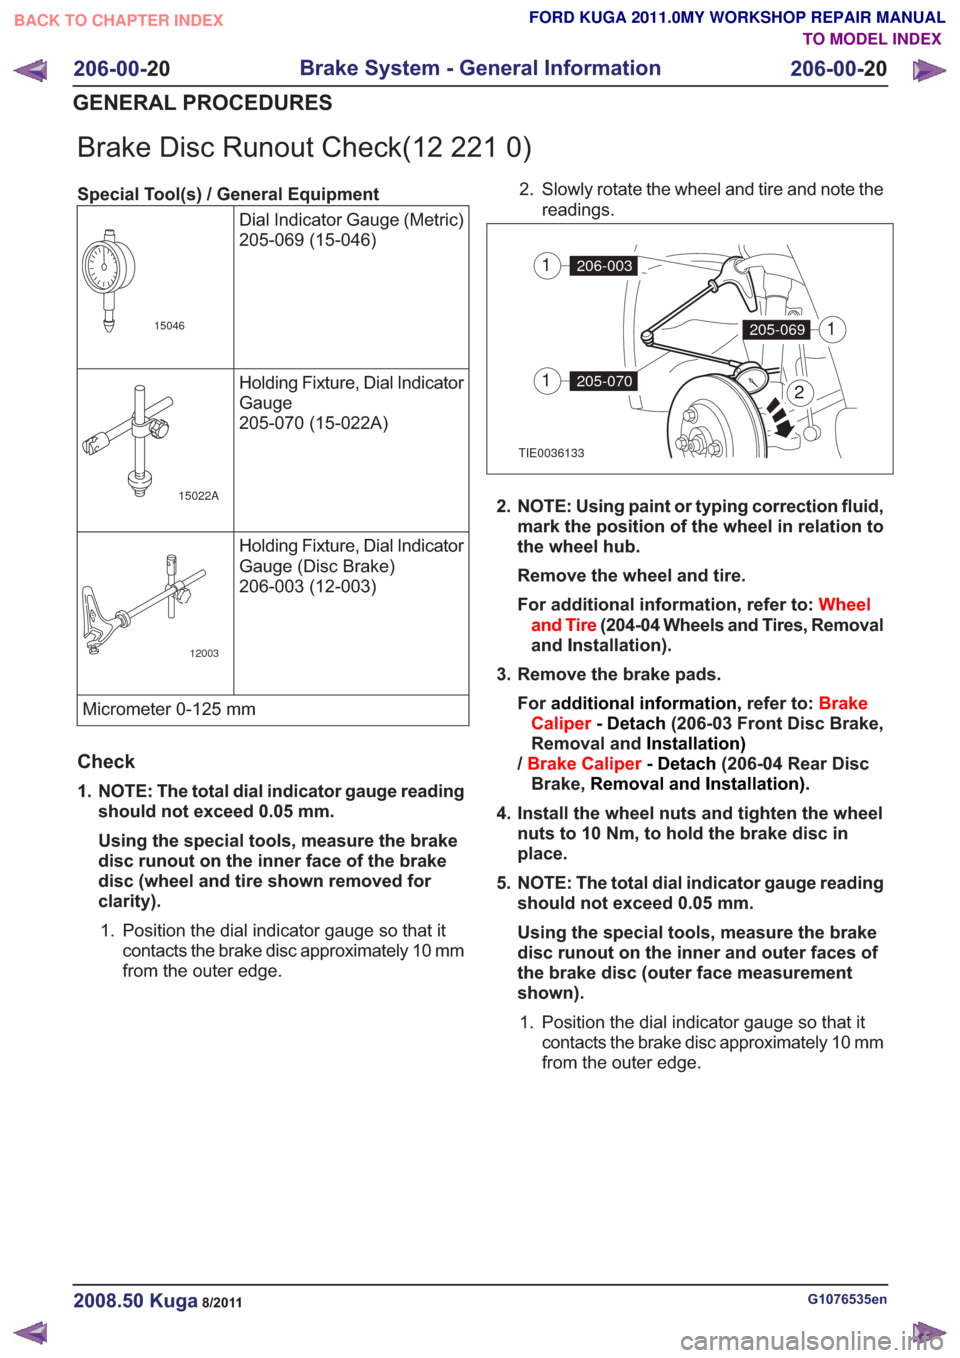
Brake Disc Runout Check(12 221 0)
Special Tool(s) / General EquipmentDial Indicator Gauge (Metric)
205-069 (15-046)
15046
Holding Fixture, Dial Indicator
Gauge
205-070 (15-022A)
15022A
Holding Fixture, Dial Indicator
Gauge (Disc Brake)
206-003 (12-003)
12003
Micrometer 0-125 mm
Check
1. NOTE: The total dial indicator gauge readingshould not exceed 0.05 mm.
Using the special tools, measure the brake
disc runout on the inner face of the brake
disc (wheel and tire shown removed for
clarity).
1. Position the dial indicator gauge so that it contacts the brake disc approximately 10 mm
from the outer edge. 2. Slowly rotate the wheel and tire and note the
readings.
TIE0036133
2
206-0031
205-0701
205-0691
2. NOTE: Using paint or typing correction fluid,mark the position of the wheel in relation to
the wheel hub.
Remove the wheel and tire.
For additional information, refer to: Wheel
and Tire (204-04 Wheels and Tires, Removal
and Installation).
3. Remove the brake pads. For additional information, refer to:Brake
Caliper - Detach (206-03 Front Disc Brake,
Removal and Installation)
/ Brake Caliper -Detach (206-04 Rear Disc
Brake, Removal and Installation).
4. Install the wheel nuts and tighten the wheel nuts to 10 Nm, to hold the brake disc in
place.
5. NOTE: The total dial indicator gauge reading should not exceed 0.05 mm.
Using the special tools, measure the brake
disc runout on the inner and outer faces of
the brake disc (outer face measurement
shown).
1. Position the dial indicator gauge so that it contacts the brake disc approximately 10 mm
from the outer edge.
G1076535en2008.50 Kuga8/2011
206-00- 20
Brake System - General Information
206-00- 20
GENERAL PROCEDURES
TO MODEL INDEX
BACK TO CHAPTER INDEX
FORD KUGA 2011.0MY WORKSHOP REPAIR MANUAL
Page 1357 of 2057
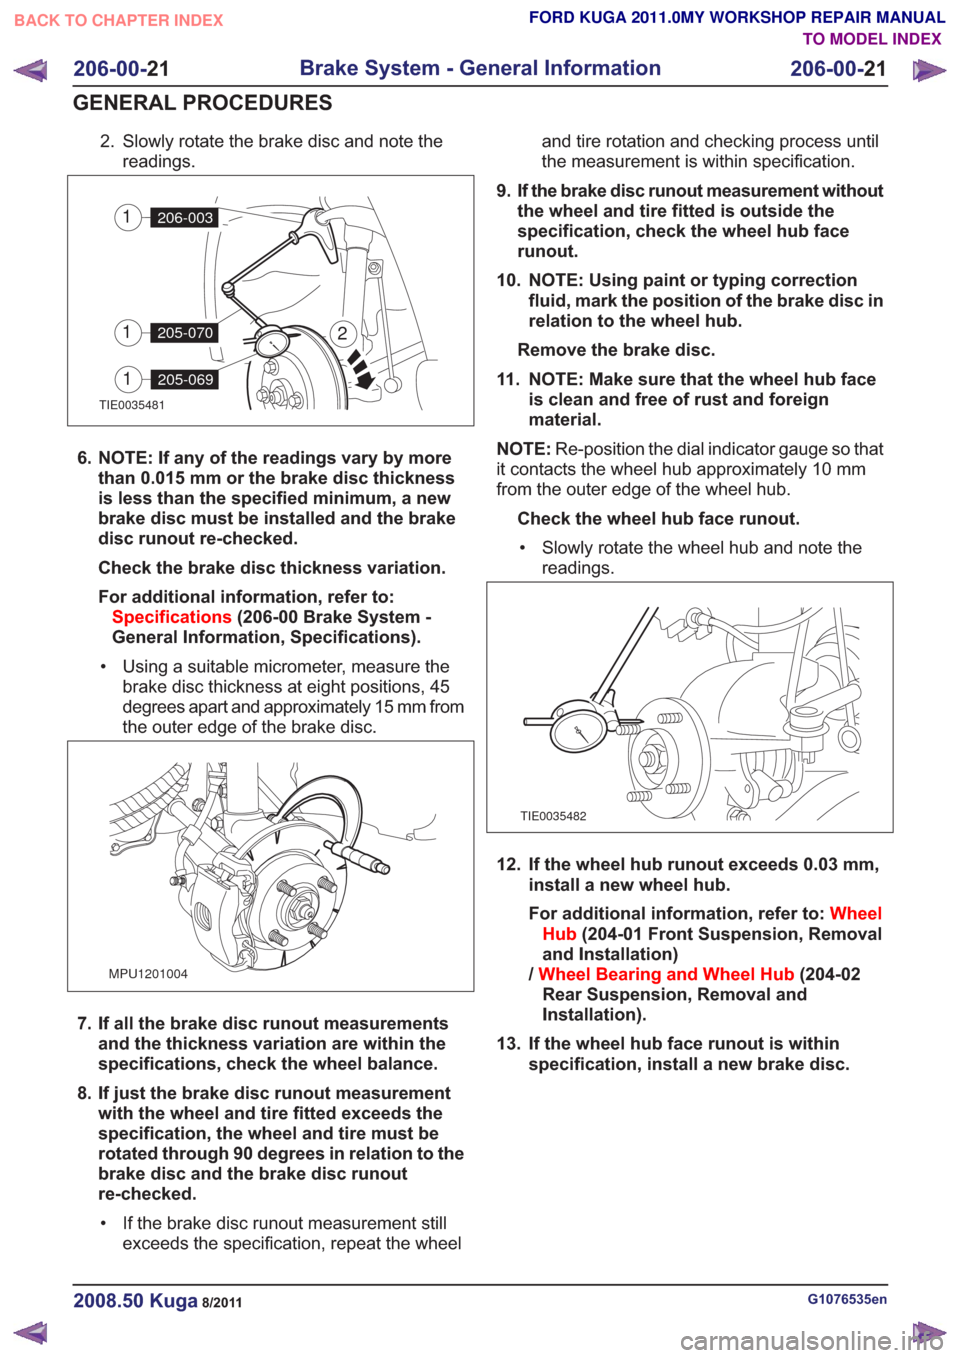
2. Slowly rotate the brake disc and note thereadings.
TIE0035481
2
206-0031
205-0701
205-0691
6. NOTE: If any of the readings vary by morethan 0.015 mm or the brake disc thickness
is less than the specified minimum, a new
brake disc must be installed and the brake
disc runout re-checked.
Check the brake disc thickness variation.
For additional information, refer to:Specifications (206-00 Brake System -
General Information, Specifications).
• Using a suitable micrometer, measure the brake disc thickness at eight positions, 45
degrees apart and approximately 15 mm from
the outer edge of the brake disc.
MPU1201004
7. If all the brake disc runout measurementsand the thickness variation are within the
specifications, check the wheel balance.
8. If just the brake disc runout measurement with the wheel and tire fitted exceeds the
specification, the wheel and tire must be
rotated through 90 degrees in relation to the
brake disc and the brake disc runout
re-checked.
• If the brake disc runout measurement still exceeds the specification, repeat the wheel and tire rotation and checking process until
the measurement is within specification.
9. If the brake disc runout measurement without the wheel and tire fitted is outside the
specification, check the wheel hub face
runout.
10. NOTE: Using paint or typing correction fluid, mark the position of the brake disc in
relation to the wheel hub.
Remove the brake disc.
11. NOTE: Make sure that the wheel hub face is clean and free of rust and foreign
material.
NOTE: Re-position the dial indicator gauge so that
it contacts the wheel hub approximately 10 mm
from the outer edge of the wheel hub.
Check the wheel hub face runout.• Slowly rotate the wheel hub and note the readings.
TIE0035482
12. If the wheel hub runout exceeds 0.03 mm, install a new wheel hub.
For additional information, refer to: Wheel
Hub (204-01 Front Suspension, Removal
and Installation)
/ Wheel Bearing and Wheel Hub (204-02
Rear Suspension, Removal and
Installation).
13. If the wheel hub face runout is within specification, install a new brake disc.
G1076535en2008.50 Kuga8/2011
206-00- 21
Brake System - General Information
206-00- 21
GENERAL PROCEDURES
TO MODEL INDEX
BACK TO CHAPTER INDEX
FORD KUGA 2011.0MY WORKSHOP REPAIR MANUAL
Page 1374 of 2057
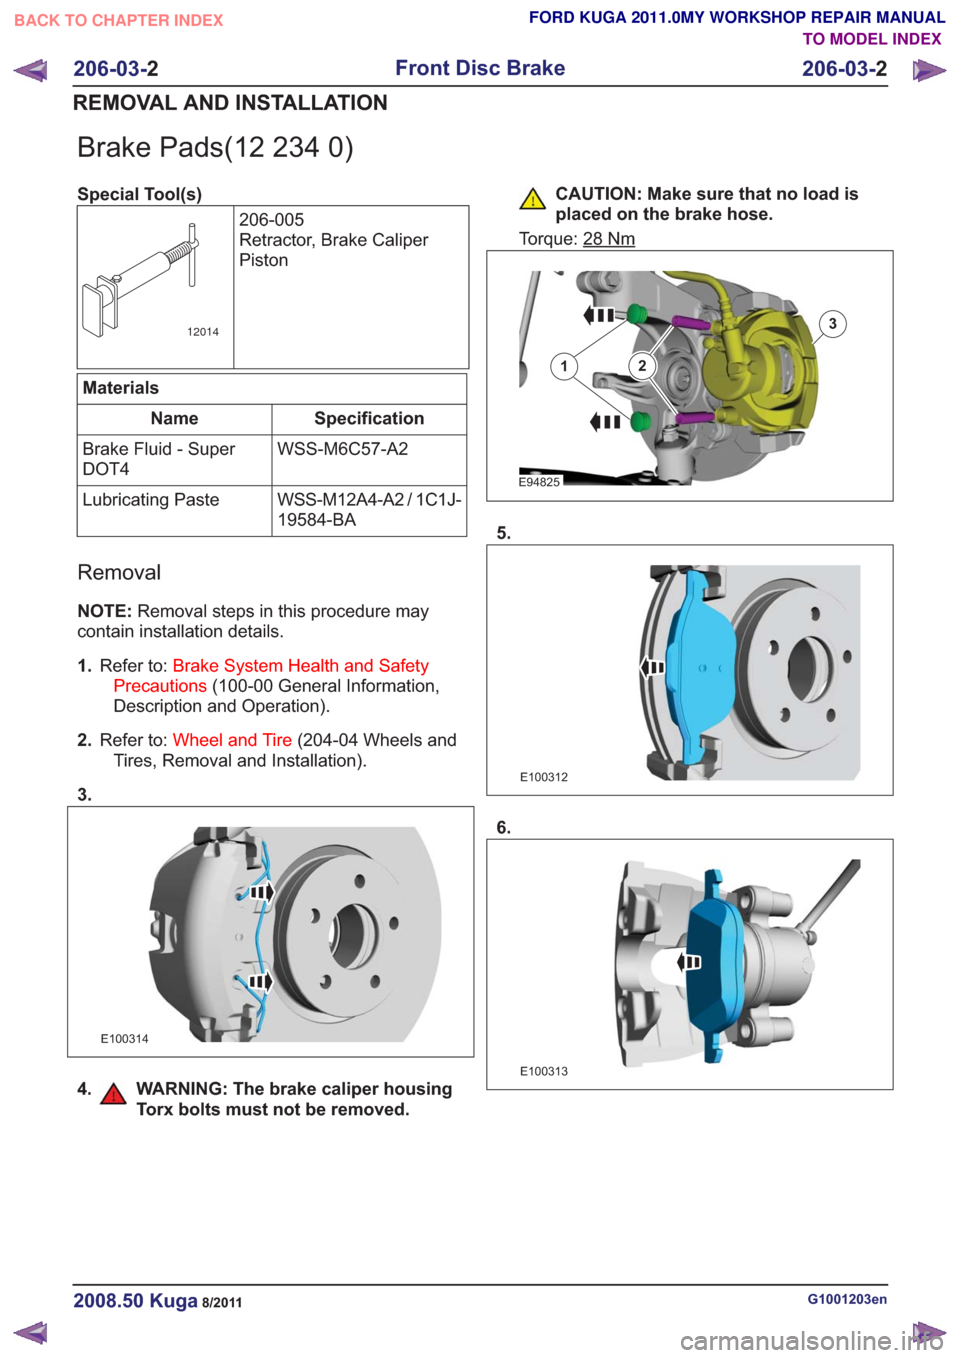
Brake Pads(12 234 0)
Special Tool(s)206-005
Retractor, Brake Caliper
Piston
12014
Materials
Specification
Name
WSS-M6C57-A2
Brake Fluid - Super
DOT4
WSS-M12A4-A2 / 1C1J-
19584-BA
Lubricating Paste
Removal
NOTE:
Removal steps in this procedure may
contain installation details.
1. Refer to: Brake System Health and Safety
Precautions (100-00 General Information,
Description and Operation).
2. Refer to: Wheel and Tire (204-04 Wheels and
Tires, Removal and Installation).
3.
E100314
4. WARNING: The brake caliper housing Torx bolts must not be removed.
CAUTION: Make sure that no load is
placed on the brake hose.
Torque: 28
Nm
E94825
12
3
5.
E100312
6.
E100313
G1001203en2008.50 Kuga8/2011
206-03- 2
Front Disc Brake
206-03- 2
REMOVAL AND INSTALLATION
TO MODEL INDEX
BACK TO CHAPTER INDEX
FORD KUGA 2011.0MY WORKSHOP REPAIR MANUAL
Page 1376 of 2057
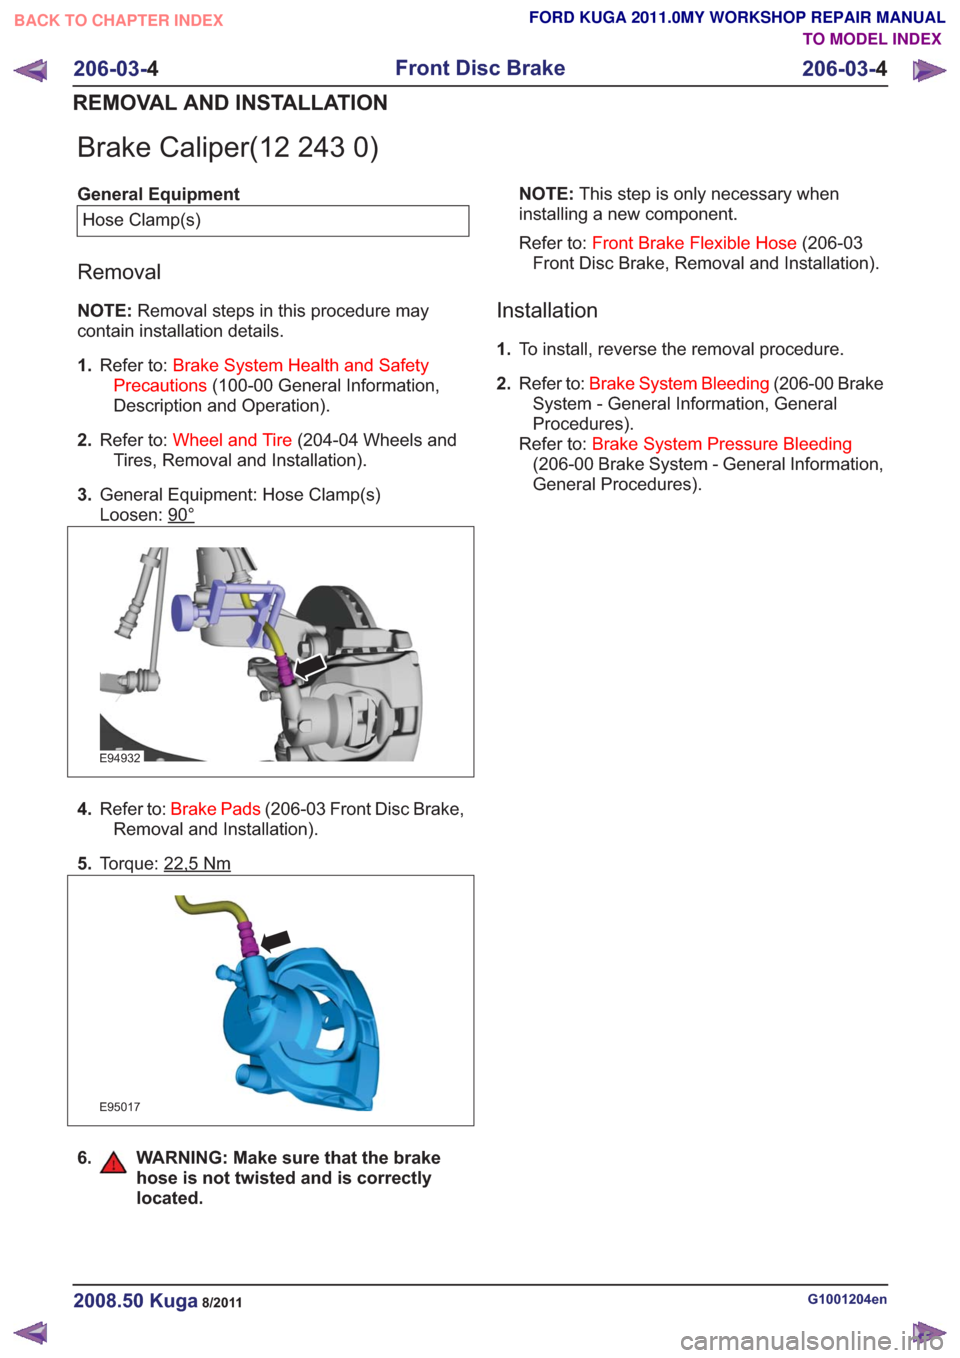
Brake Caliper(12 243 0)
General EquipmentHose Clamp(s)
Removal
NOTE: Removal steps in this procedure may
contain installation details.
1. Refer to: Brake System Health and Safety
Precautions (100-00 General Information,
Description and Operation).
2. Refer to: Wheel and Tire (204-04 Wheels and
Tires, Removal and Installation).
3. General Equipment: Hose Clamp(s)
Loosen: 90°
E94932
4.Refer to: Brake Pads (206-03 Front Disc Brake,
Removal and Installation).
5. Torque: 22,5
Nm
E95017
6. WARNING: Make sure that the brake
hose is not twisted and is correctly
located.
NOTE: This step is only necessary when
installing a new component.
Refer to: Front Brake Flexible Hose (206-03
Front Disc Brake, Removal and Installation).
Installation
1. To install, reverse the removal procedure.
2. Refer to: Brake System Bleeding (206-00 Brake
System - General Information, General
Procedures).
Refer to: Brake System Pressure Bleeding
(206-00 Brake System - General Information,
General Procedures).
G1001204en2008.50 Kuga8/2011
206-03- 4
Front Disc Brake
206-03- 4
REMOVAL AND INSTALLATION
TO MODEL INDEX
BACK TO CHAPTER INDEX
FORD KUGA 2011.0MY WORKSHOP REPAIR MANUAL
Page 1377 of 2057
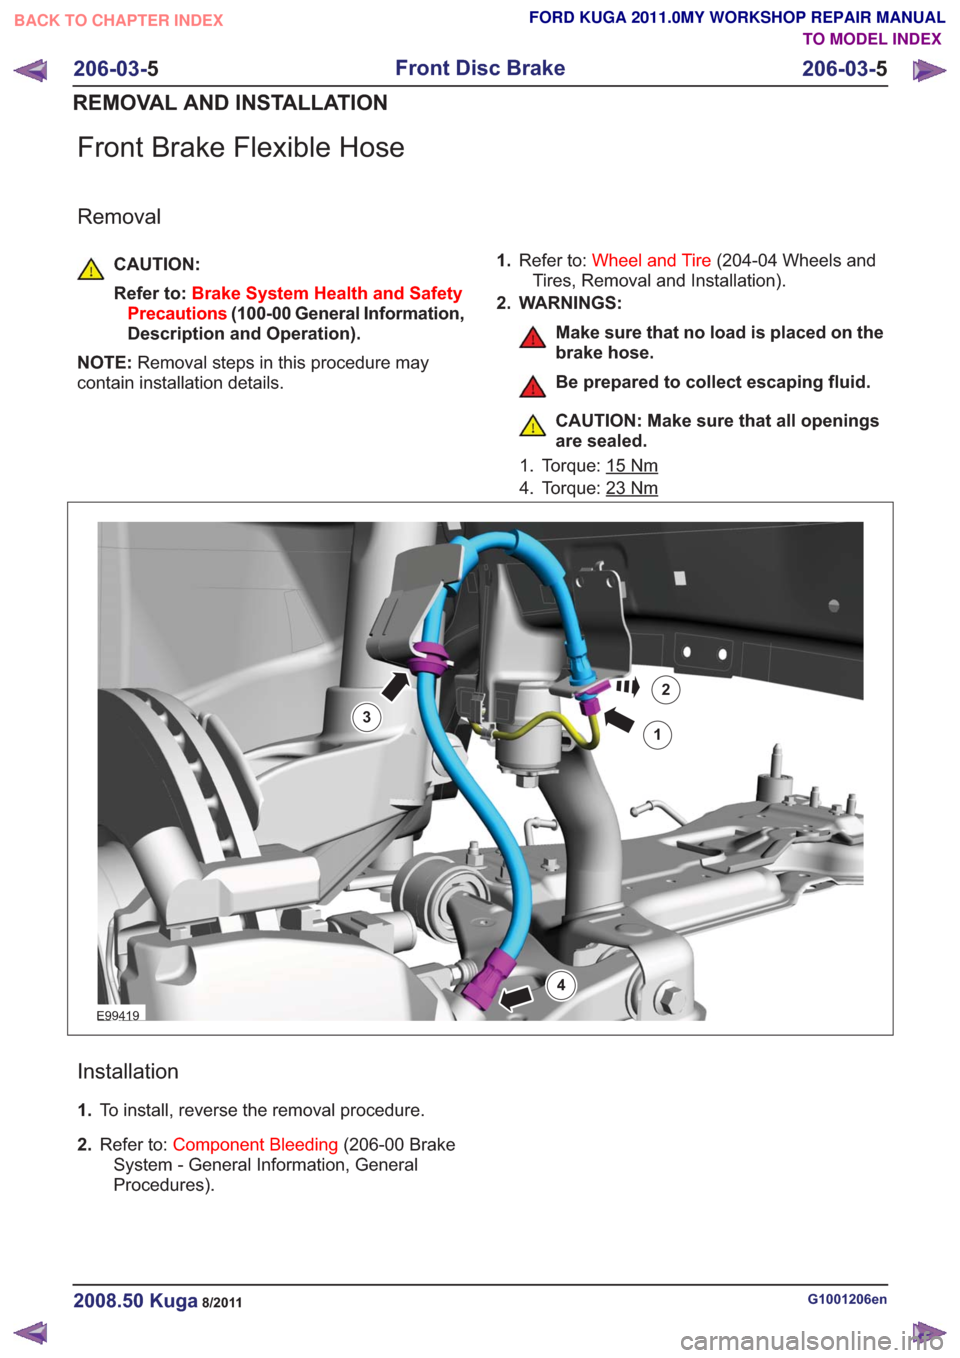
Front Brake Flexible Hose
Removal
CAUTION:
Refer to:Brake System Health and Safety
Precautions (100-00 General Information,
Description and Operation).
NOTE: Removal steps in this procedure may
contain installation details. 1.
Refer to: Wheel and Tire (204-04 Wheels and
Tires, Removal and Installation).
2. WARNINGS:
Make sure that no load is placed on the
brake hose.
Be prepared to collect escaping fluid.
CAUTION: Make sure that all openings
are sealed.
1. Torque: 15
Nm
4. Torque: 23Nm
E99419
1
2
3
4
Installation
1. To install, reverse the removal procedure.
2. Refer to: Component Bleeding (206-00 Brake
System - General Information, General
Procedures).
G1001206en2008.50 Kuga8/2011
206-03- 5
Front Disc Brake
206-03- 5
REMOVAL AND INSTALLATION
TO MODEL INDEX
BACK TO CHAPTER INDEX
FORD KUGA 2011.0MY WORKSHOP REPAIR MANUAL
Page 1379 of 2057
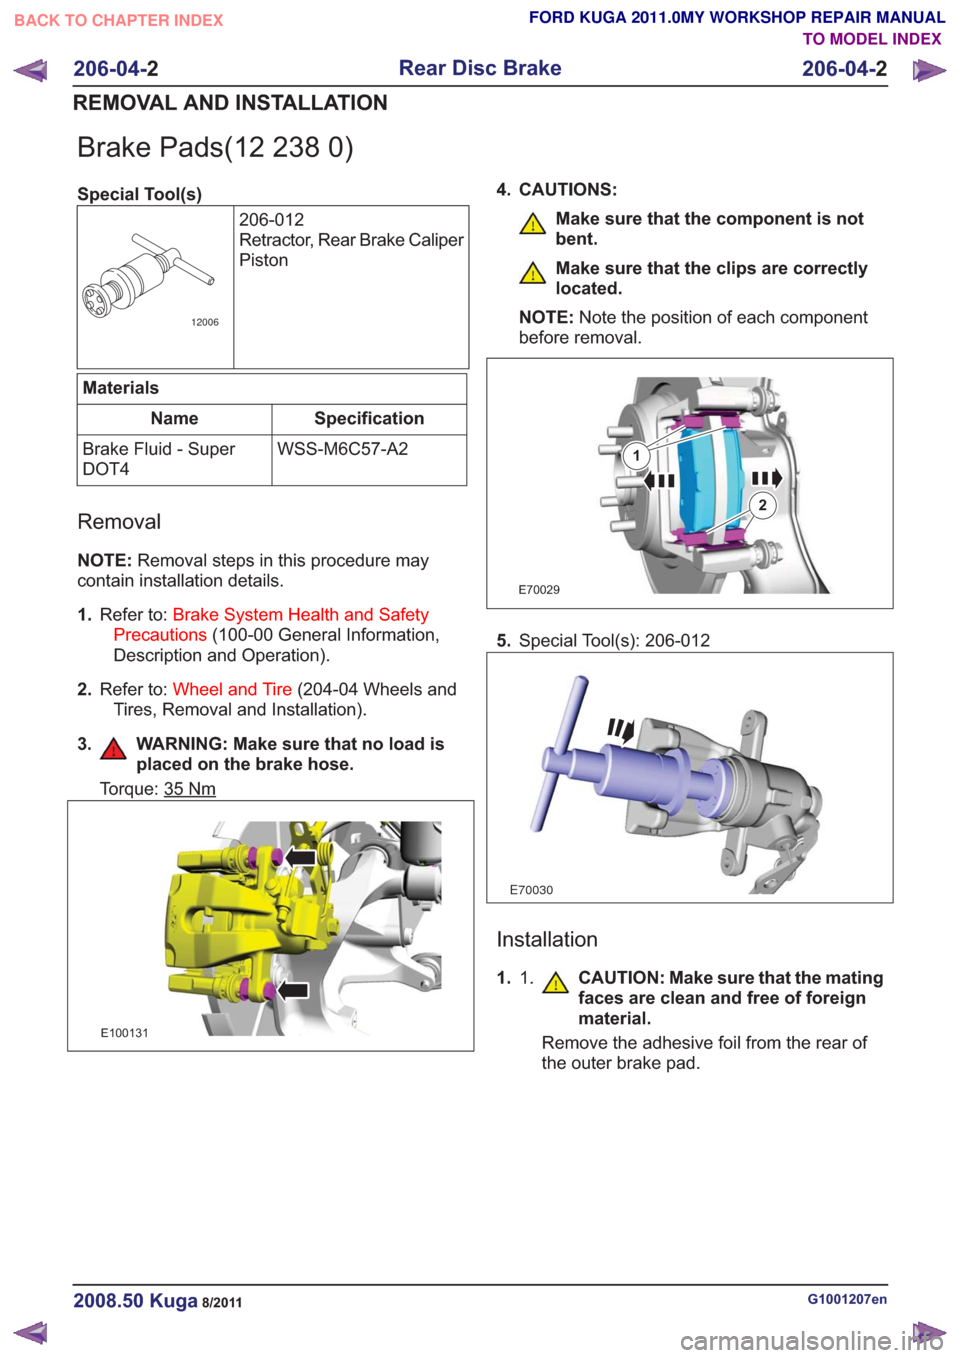
Brake Pads(12 238 0)
Special Tool(s)206-012
Retractor, Rear Brake Caliper
Piston
12006
Materials
Specification
Name
WSS-M6C57-A2
Brake Fluid - Super
DOT4
Removal
NOTE: Removal steps in this procedure may
contain installation details.
1. Refer to: Brake System Health and Safety
Precautions (100-00 General Information,
Description and Operation).
2. Refer to: Wheel and Tire (204-04 Wheels and
Tires, Removal and Installation).
3. WARNING: Make sure that no load is placed on the brake hose.
Torque: 35Nm
E100131
4. CAUTIONS:
Make sure that the component is not
bent.
Make sure that the clips are correctly
located.
NOTE: Note the position of each component
before removal.
E70029
1
2
5. Special Tool(s): 206-012
E70030
Installation
1. 1. CAUTION: Make sure that the mating
faces are clean and free of foreign
material.
Remove the adhesive foil from the rear of
the outer brake pad.
G1001207en2008.50 Kuga8/2011
206-04- 2
Rear Disc Brake
206-04- 2
REMOVAL AND INSTALLATION
TO MODEL INDEX
BACK TO CHAPTER INDEX
FORD KUGA 2011.0MY WORKSHOP REPAIR MANUAL