Page 3 of 449
Seating and Safety Restraints 160
Seating 160
Personal Safety System™ 180
Safety belt system 184
Airbags 197
Child restraints 211
Tires, Wheels and Loading 232
Tire information 235
Tire inflation 237
Tire Pressure Monitoring System (TPMS) 250
Vehicle loading 255
Trailer towing 262
Recreational towing 265
Driving 267
Starting 267
Brakes 274
AdvanceTrac�277
Hill descent control 283
Transmission operation 288
Reverse sensing system 294
Rear-view camera system 296
Roadside Emergencies 325
Getting roadside assistance 325
Hazard flasher control 326
Fuel pump shut-off 327
Fuses and relays 327
Changing tires 336
Temporary mobility kit 344
Wheel lug nut torque 352
Jump starting 354
Wrecker towing 357
Table of Contents
2
2011 Explorer(exp)
Owners Guide, 1st Printing
USA(fus)
Page 129 of 449

Note:If the power liftgate system is turned off in the message center,
the system cannot be activated with the outside release handle or
control button on the liftgate. The system will need to be turned on to
resume operation with the outside release handle or control button on
the liftgate. The power liftgate is still operational through the use of the
transmitter and instrument panel button when the power liftgate is
turned off in the message center.
ROOF RACK SYSTEM (IF EQUIPPED)
Loads should never be placed directly on the roof panel. For proper
function of the roof rack system, loads must be placed directly on
crossbars affixed to the roof rack side rails. Your vehicle may be
equipped with factory-installed crossbars. Ford Genuine Accessory
crossbars, designed specifically for your vehicle, are also recommended
for use with your roof rack system.
The vehicle’s roof panel isNOTdesigned to directly carry a load.The
maximum recommended load is 100 lb (45 kg), evenly distributed
on the crossbars.Ensure that the load is securely fastened. When the
rail system is loaded, check the tightness of the load before driving and
at each fuel stop.
WARNING:When loading the roof rail crossbars, it is
recommended to evenly distribute the load, as well as maintain a
low center of gravity. Loaded vehicles, with higher centers of gravity,
may handle differently than unloaded vehicles. Extra precautions, such
as slower speeds and increased stopping distance, should be taken
when driving a heavily loaded vehicle.
Your vehicle may be equipped with
factory or dealer-installed crossbars
that may be easily adjusted to
accommodate a wide range of roof
mounted accessories.
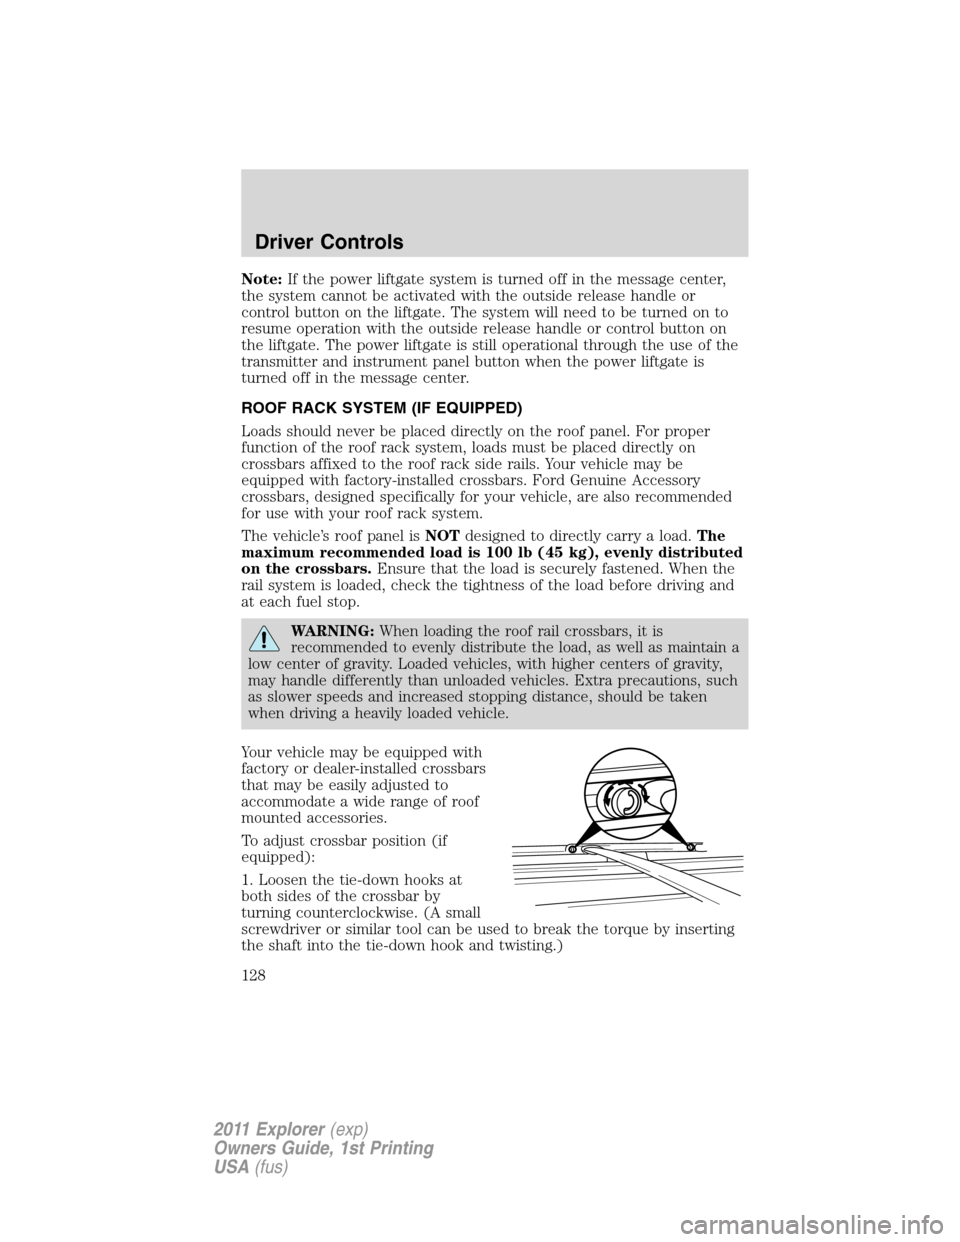
To adjust crossbar position (if
equipped):
1. Loosen the tie-down hooks at
both sides of the crossbar by
turning counterclockwise. (A small
screwdriver or similar tool can be used to break the torque by inserting
the shaft into the tie-down hook and twisting.)
Driver Controls
128
2011 Explorer(exp)
Owners Guide, 1st Printing
USA(fus)
Page 289 of 449

WARNING:Do not drive your vehicle until you verify that the
brakelamps are working.
WARNING:Always set the parking brake fully and make sure
the gearshift is latched in P (Park). Turn the ignition off.
WARNING:If the parking brake is fully released, but the brake
warning lamp remains illuminated, the brakes may not be
working properly. See your authorized dealer.
AUTOMATIC TRANSMISSION OPERATION
Automatic transmission adaptive learning
Your transmission is equipped with an adaptive learning strategy found in
the vehicle computer. This feature is designed to increase durability and
provide consistent shift feel over the life of the vehicle. A new vehicle or
transmission may have firm and/or soft shifts. This operation is
considered normal and will not affect function or durability of the
transmission. Over time, the adaptive learning process will fully update
transmission operation. Additionally, whenever the battery is
disconnected or a new battery installed, the strategy must be relearned.
Understanding the gearshift positions of the 6–speed automatic
transmission
Your vehicle has been designed to improve fuel economy by reducing
fuel usage while coasting or decelerating. When you take your foot off
the accelerator pedal and the vehicle begins to slow down, the torque
converter clutch locks up and aggressively shuts off fuel flow to the
engine while decelerating. This fuel economy benefit may be perceived
as a light to medium braking sensation when removing your foot from
the accelerator pedal.
Driving
288
2011 Explorer(exp)
Owners Guide, 1st Printing
USA(fus)
Page 343 of 449

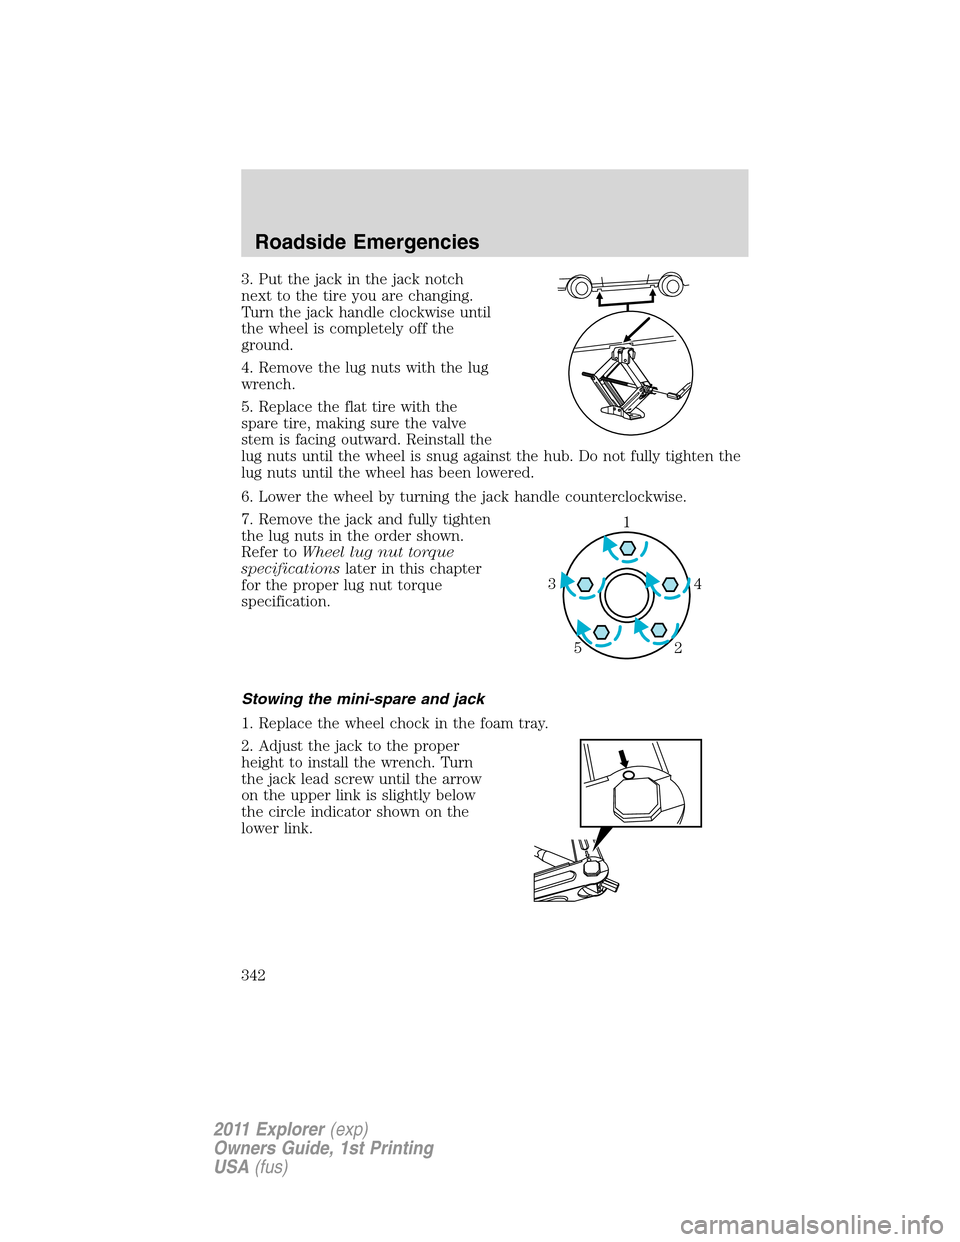
3. Put the jack in the jack notch
next to the tire you are changing.
Turn the jack handle clockwise until
the wheel is completely off the
ground.
4. Remove the lug nuts with the lug
wrench.
5. Replace the flat tire with the
spare tire, making sure the valve
stem is facing outward. Reinstall the
lug nuts until the wheel is snug against the hub. Do not fully tighten the
lug nuts until the wheel has been lowered.
6. Lower the wheel by turning the jack handle counterclockwise.
7. Remove the jack and fully tighten
the lug nuts in the order shown.
Refer toWheel lug nut torque
specificationslater in this chapter
for the proper lug nut torque
specification.
Stowing the mini-spare and jack
1. Replace the wheel chock in the foam tray.
2. Adjust the jack to the proper
height to install the wrench. Turn
the jack lead screw until the arrow
on the upper link is slightly below
the circle indicator shown on the
lower link.
1
4 3
2 5
Roadside Emergencies
342
2011 Explorer(exp)
Owners Guide, 1st Printing
USA(fus)
Page 353 of 449
3. Wrap the clear tube around the
compressor housing.
Note:If you experience any difficulties with the removal or installation
of the sealant canister, consult your Ford Motor Company authorized
dealer for assistance.
Be sure to check the sealant
compound’s “use by” date regularly.
The “use by” date is on the lower
right hand corner of the label
located on the sealant canister
(bottle). The sealant canister should be replaced after four years.
WHEEL LUG NUT TORQUE SPECIFICATIONS
Retighten the lug nuts to the specified torque within 100 miles (160 km)
after any wheel disturbance (rotation, flat tire, wheel removal, etc.).
Lug nut socket
size/Bolt sizeWheel lug nut torque*
ft-lb N•m
Lug nut socket size:
3�4
inch (19 mm) hex
Bolt size:1�2x20100 135
* Torque specifications are for nut and bolt threads free of dirt and
rust. Use only Ford recommended replacement fasteners.
Roadside Emergencies
352
2011 Explorer(exp)
Owners Guide, 1st Printing
USA(fus)