2011 FORD EXPLORER AUX
[x] Cancel search: AUXPage 2 of 449

Introduction 4
Instrument Cluster 14
Warning lights and chimes 14
Gauges 21
Message center 23
Entertainment Systems 51
MyFord™ system 51
Auxiliary input jack (Line in) 60
Climate Controls 63
Manual heating and air conditioning 63
Automatic temperature control 66
Touchscreen features 71
Auxiliary passenger climate control 74
Rear window defroster 75
Lights 77
Headlamps 77
Turn signal control 82
Bulb replacement 84
Driver Controls 92
Windshield wiper/washer control 92
Steering wheel adjustment 94
Power windows 98
Mirrors 100
Speed control 103
Adaptive cruise control 105
Moon roof 114
Locks and Security 130
Keys 130
Locks 138
Anti-theft system 154
Table of Contents
1
2011 Explorer(exp)
Owners Guide, 1st Printing
USA(fus)
Page 61 of 449

CD tips
•Handle discs by their edges only.(Never touch the playing surface).
•Inspect discs before playing.
•Clean only with an approved CD cleaner.
•Wipe discs from the center out.
•Do notexpose discs to direct sunlight or heat sources for extended
periods of time.
•Do notclean using a circular motion.
Note:CD units are designed to play commercially pressed 4.75 in
(12 cm) audio compact discs only. Due to technical incompatibility,
certain recordable and re-recordable compact discs may not function
correctly when used in Ford CD players. Do not use any irregular shaped
CDs or discs with a scratch protection film attached.CDs with
homemade paper (adhesive) labels should not be inserted into
the CD player as the label may peel and cause the CD to become
jammed.It is recommended that homemade CDs be identified with
permanent felt tip marker rather than adhesive labels. Ballpoint pens
may damage CDs. Please contact your authorized dealer for further
information.
Auxiliary input jack (line in)
WARNING:Driving while distracted can result in loss of vehicle
control, accident and injury. Ford strongly recommends that
drivers use extreme caution when using any device or feature that may
take their focus off the road. Your primary responsibility is the safe
operation of the vehicle. We recommend against the use of any
handheld device while driving, encourage the use of voice-operated
systems when possible and that you become aware of applicable state
and local laws that may affect use of electronic devices while driving.
The auxiliary input jack (AIJ) provides a way to connect and play music
from your portable music player over the vehicle speakers. To access:
1. Plug in one end of the cable into the AIJ (located in your center
console).
2. Listen to an FM station or a CD first to adjust the volume to a
comfortable listening level.
Entertainment Systems
60
2011 Explorer(exp)
Owners Guide, 1st Printing
USA(fus)
Page 62 of 449

3. Turn your portable music player on and adjust the volume to 1/2 of
full volume.
4. Press AUX repeatedly untilAuxiliary audio activeorLine in active
appears.
5. Now adjust the volume on your portable music player until it matches
that of the FM station or the CD you were listening to previously.
Troubleshooting tips
•Don’t connect the AIJ to a line level output. These are intended for
connection to a home stereo and are not compatible.
•Don’t set the volume on your portable music player higher than
necessary as this may cause distortion and reduce sound quality.
•If the music sounds distorted at lower listening levels, turn the volume
on the portable music player down and check to see if you need to
replace or recharge the batteries.
•The AIJ doesn’t provide control over your portable music player. You
still need to use the controls on the player for functions such as play,
pause, etc.
•For safety reasons, you should not connect or adjust your portable
music player while the vehicle is moving. The portable music player
should have a long enough extension cable to allow it to be stored in a
secure location, (such as the center console or the glove box) when
the vehicle is in motion.
Phone
PHONE:Press to mute the playing media. Press again to return to the
playing media.
Entertainment Systems
61
2011 Explorer(exp)
Owners Guide, 1st Printing
USA(fus)
Page 74 of 449

11.Driver settings:
•Press the red arrow to increase the temperature and press the blue
arrow to decrease the temperature.
•Press
to control the heated seat (if equipped). Refer toHeated
seatsin theSeat and Safety Restraintschapter.
•Press and hold MyTemp to select a temperature you would like the
vehicle to remember and maintain for you.
Rear controls
To access, press ‘Rear’ in the lower right status bar. When the arrow icon is
down (
), you have access to the rear controls and they will display
along on the bottom of the screen under the Rear Climate heading.
•Pressto turn on/off the Rear Climate controls.
•Press ‘Rear Control’ to allow the rear seat passengers to have control
over of the rear auxiliary climate controls. Press again to control via
the touchscreen.
•Press the blue/red arrow to decrease/increase the temperature.
•Press
+/- to increase/decrease the fan speed.
To close access to the rear controls, press the arrow in the lower right
status bar again.
Climate control voice commands (if equipped)
The following voice commands are available at the main menu level of a
voice session. For example, press
and after the prompt, “Say a
command”, you may say any of the following commands:
•Climate On•Climate Off
•Climate Automatic•Climate My Temperature
•Climate Temperature <15.5–29.5>
degrees•Climate Temperature <60–85>
degrees
There are additional climate control commands but in order to access
them, you have to say “Climate” first, then when the system is ready to
listen, you may say any of the following commands:
•Automatic•Dual Off
•Off•On
•A/C Off•A/C On
•Max A/C On•Max A/C Off
•Defrost On•Defrost Off
Climate Controls
73
2011 Explorer(exp)
Owners Guide, 1st Printing
USA(fus)
Page 75 of 449

•Rear Defrost On•Rear Defrost Off
•Recirc On•Recirc Off
•Panel On•Panel Floor On
•Floor On•Windshield Floor On
•Temperature High•Temperature Low
•Fan Increase•Fan Decrease
•Temperature•Temperature Increase
•Temperature Decrease•Temperature <15.5–29.5>
degrees
•Temperature <60–85> degrees•My Temp
•Help
*Note:If you have said “Temperature”, you can then say any of the
following commands:
•High•Low
•<15.5–29.5> degrees•<60–85> degrees
For more information on your touchscreen system, refer to theMyFord
Touch™ / MyLincoln Touch™ supplement.
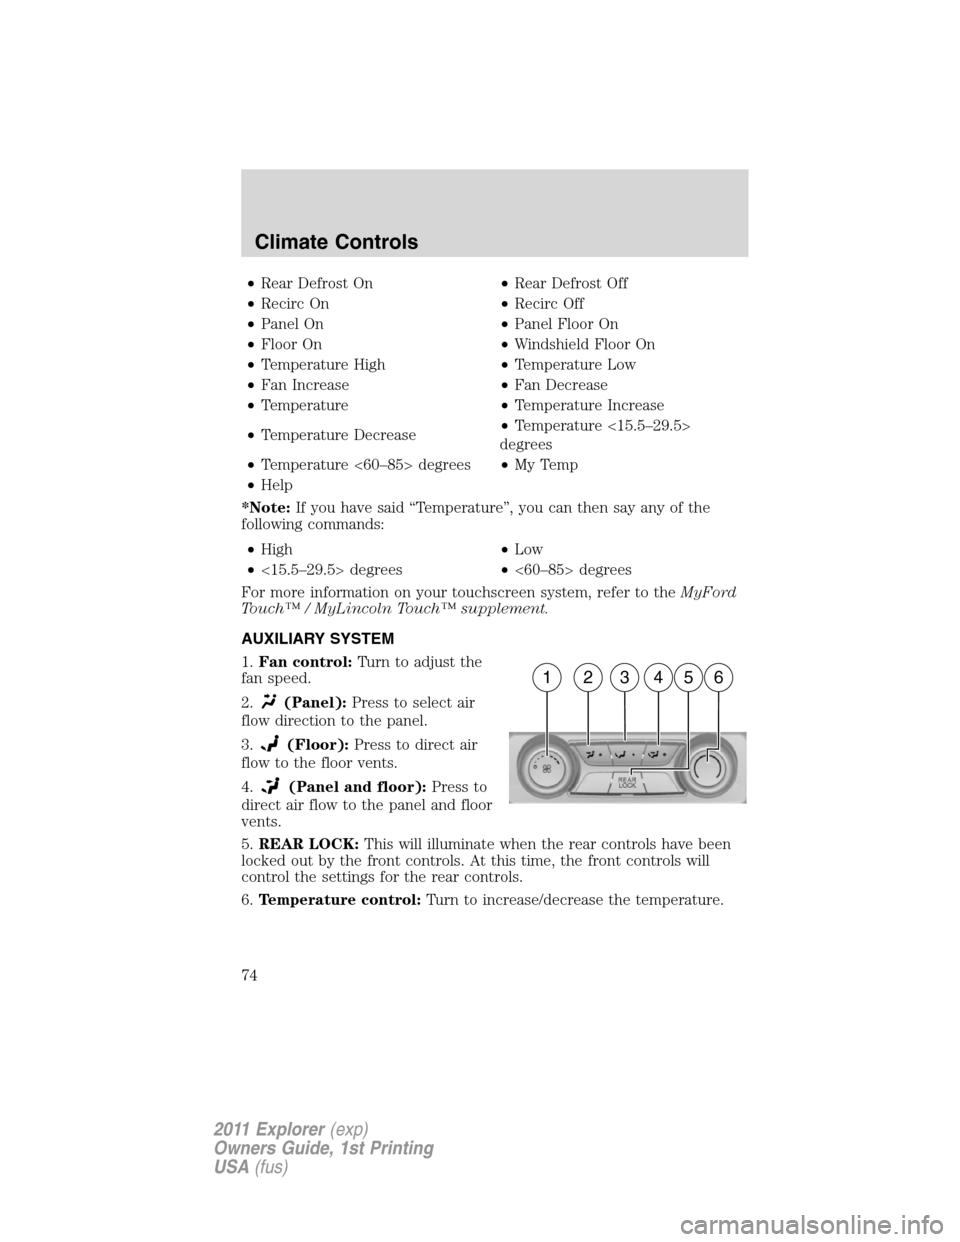
AUXILIARY SYSTEM
1.Fan control:Turn to adjust the
fan speed.
2.
(Panel):Press to select air
flow direction to the panel.
3.
(Floor):Press to direct air
flow to the floor vents.
4.
(Panel and floor):Press to
direct air flow to the panel and floor
vents.
5.REAR LOCK:This will illuminate when the rear controls have been
locked out by the front controls. At this time, the front controls will
control the settings for the rear controls.
6.Temperature control:Turn to increase/decrease the temperature.
162345
Climate Controls
74
2011 Explorer(exp)
Owners Guide, 1st Printing
USA(fus)
Page 96 of 449

OVERHEAD CONSOLE
The appearance of your vehicle’s overhead console will vary according to
your option package.
Storage compartment
The storage compartment may be
used to store a pair of sunglasses.
Press the release area on the rear
edge of the bin door to open the
storage compartment. The door will
open to the full open position.
CENTER CONSOLE
Your vehicle may be equipped with a variety of console features. These
include:
•Cupholders
•Large utility storage compartment
with 12V power point
•12V power point and 110V AC
power point outlet on the rear of
the console
•Auxiliary AV connections, USB
ports and 12V power point
located forward of the shifter
WARNING:Use only soft cups in the cupholder. Hard objects
can injure you in a collision.
Driver Controls
95
2011 Explorer(exp)
Owners Guide, 1st Printing
USA(fus)
Page 97 of 449

Rear center console features (if equipped)
The rear center console incorporates the following features:
•Flip forward armrest to provide a
flat load floor
•Utility compartment
•Cupholders
AUXILIARY POWER POINTS (12V DC)
Power outlets are designed for accessory plugs only. Do not insert
any other object in the power outlet as this will damage the
outlet and blow the fuse. Do not hang any type of accessory or
accessory bracket from the plug. Improper use of the power
outlet can cause damage not covered by your warranty.
Auxiliary power points can be found in the following locations:
•On the front of the center console
•Inside the utility compartment
•On the rear of the console, accessible from the rear seats
•In the cargo area
Do not use the power point for operating the cigarette lighter element (if
equipped).
Note:
Do not plug optional electrical accessories into the cigarette lighter
socket (if equipped). Improper use of the lighter can cause damage not
covered by your warranty, and can result in fire or serious injury.
To prevent the fuse from being blown, do not use the power point(s)
over the vehicle capacity of 12V DC/180W. If the power point or cigar
lighter socket is not working, a fuse may have blown. Refer toFuses and
relaysin theRoadside Emergencieschapter for information on
checking and replacing fuses.
Driver Controls
96
2011 Explorer(exp)
Owners Guide, 1st Printing
USA(fus)
Page 334 of 449

Fuse/Relay
LocationFuse Amp
RatingPower Distribution Box Description
6 — Not used
7 30A** Power liftgate
8 20A** Moon roof
9 20A** Power point #2 (console rear)
10 — 3rd row rear seat release relay
11 — Rear window defroster relay
12 — Trailer tow battery charge relay
13 — Starter motor relay
14 — Not used
15 — Fuel pump relay
16 — Not used
17 40A** 110V AC power point
18 40A** Front blower motor
19 30A** Starter motor
20 20A** Power point #1/cigar lighter
21 20A** Power point #3 (cargo area)
22 30A** 3rd row seat module
23 30A** Driver power seat, Memory module
24 30A** Trailer tow (TT) battery charge
25 — Not used
26 40A** Rear window defroster, Heated mirrors
27 20A** Power point (console)
28 30A** Climate controlled seats
29 — Not used
30 — Not used
31 — Not used
32 — Auxiliary blower motor relay
33 — Not used
34 — Blower motor relay
35 — Not used
36 — Not used
Roadside Emergencies
333
2011 Explorer(exp)
Owners Guide, 1st Printing
USA(fus)