Page 57 of 337

Replacing exterior bulbs
Check the operation of all bulbs frequently.
Replacing headlamp bulbs (aerodynamic)
1. Make sure the headlamp switch is in the off position, then open the
hood.
2. Remove the three screws from
the headlamp assembly and pull the
assembly straight out.
3. Disconnect the electrical
connector by squeezing the release
tab and pushing the connector
forward, then pulling it rearward.
4. Remove the bulb assembly by
turning it counterclockwise and
pulling it straight out.
WARNING:Handle a halogen headlamp bulb carefully and keep
out of children’s reach. Grasp the bulb only by its plastic base
and do not touch the glass. The oil from your hand could cause the
bulb to break the next time the headlamps are operated.
Note:If the bulb is accidentally touched, it should be cleaned with
alcohol before being used.
To install the new bulb, follow the removal procedures in reverse order.
Replacing headlamps (sealed beam)
1. Make sure the headlamp switch is in the off position, then open the
hood.
Lights
57
2011 Econoline(eco)
Owners Guide, 1st Printing
USA(fus)
Page 58 of 337
2. Remove the four screws from the
headlamp assembly and carefully
remove the lamp/bezel.
3. Remove the four screws and the
retaining ring.
4. Disconnect the electrical
connector from the lamp and
remove the lamp.
To install the new lamp, follow the
removal procedures in reverse order.
Replacing front parking lamp/turn signal bulbs
1. Make sure the headlamp control is in the off position.
2. Remove the headlamp assembly. Refer toReplacing headlamp bulbs
in this section.
Aerodynamic
Sealed beam
3. Rotate the bulb socket counterclockwise and remove.
4. Carefully pull the bulb straight out of the socket.
Lights
58
2011 Econoline(eco)
Owners Guide, 1st Printing
USA(fus)
Page 59 of 337
To complete installation, follow the removal procedures in reverse order.
Replacing side marker bulbs
1. Make sure the headlamp control is in the off position.
2. Remove the headlamp assembly. Refer toReplacing headlamp bulbs
in this section.
Aerodynamic
Sealed beam
3. Rotate the bulb socket counterclockwise and remove.
4. Carefully pull the bulb straight out of the socket.
To complete installation, follow the removal procedures in reverse order.
Lights
59
2011 Econoline(eco)
Owners Guide, 1st Printing
USA(fus)
Page 60 of 337
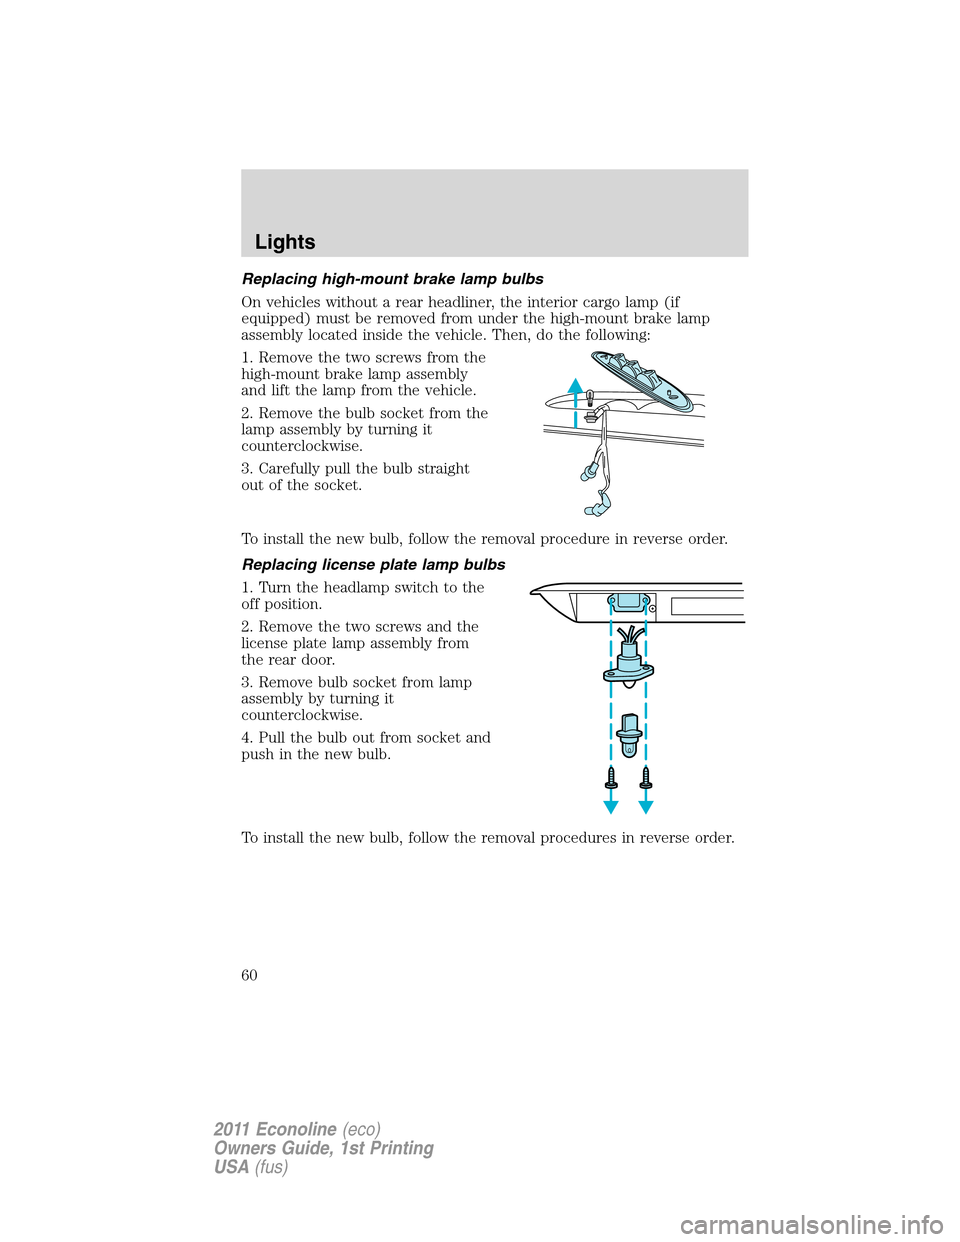
Replacing high-mount brake lamp bulbs
On vehicles without a rear headliner, the interior cargo lamp (if
equipped) must be removed from under the high-mount brake lamp
assembly located inside the vehicle. Then, do the following:
1. Remove the two screws from the
high-mount brake lamp assembly
and lift the lamp from the vehicle.
2. Remove the bulb socket from the
lamp assembly by turning it
counterclockwise.
3. Carefully pull the bulb straight
out of the socket.
To install the new bulb, follow the removal procedure in reverse order.
Replacing license plate lamp bulbs
1. Turn the headlamp switch to the
off position.
2. Remove the two screws and the
license plate lamp assembly from
the rear door.
3. Remove bulb socket from lamp
assembly by turning it
counterclockwise.
4. Pull the bulb out from socket and
push in the new bulb.
To install the new bulb, follow the removal procedures in reverse order.
Lights
60
2011 Econoline(eco)
Owners Guide, 1st Printing
USA(fus)
Page 61 of 337
Replacing stop/turn/tail/side marker/backup lamp bulbs
The stop/turn/tail/side marker/backup lamp bulbs are located in the tail
lamp assembly. Follow the same steps to replace any of the bulbs:
1. Turn the headlamp switch to the
off position, then remove the four
screws and the lamp assembly from
the vehicle.
2. Rotate the bulb socket
counterclockwise and remove it
from lamp assembly.
3. Carefully pull the bulb straight
out of the socket and push in the
new bulb.
To install the lamp, follow the removal procedures in reverse order.
Lights
61
2011 Econoline(eco)
Owners Guide, 1st Printing
USA(fus)
Page 62 of 337

MULTI-FUNCTION LEVER
Windshield wiper:Rotate the end
of the control away from you to
increase the speed of the wipers;
rotate towards you to decrease the
speed of the wipers.
Windshield washer:Press the end
of the stalk:
•briefly: causes a single swipe of
the wipers without washer fluid.
•a quick press and hold: the
wipers will swipe three times with
washer fluid.
•a long press and hold: the wipers
and washer fluid will be activated
for up to ten seconds.
Courtesy wipe feature:One extra wipe will occur a few seconds after
washing the front window to clear any excess washer fluid remaining on
the windshield.
Note:Do not operate the washer when the washer reservoir is empty.
This may cause the washer pump to overheat. Check the washer fluid
level frequently. Do not operate the wipers when the windshield is dry.
This may scratch the glass, damage the wiper blades and cause the wiper
motor to burn out. Before operating the wiper on a dry windshield,
always use the windshield washer. In freezing weather, be sure the wiper
blades are not frozen to the windshield before operating the wipers.
Driver Controls
62
2011 Econoline(eco)
Owners Guide, 1st Printing
USA(fus)
Page 63 of 337

TILT STEERING WHEEL
To adjust the steering wheel:
1. Pull and hold the steering wheel
release control toward you.
2. Move the steering wheel up or
down until you find the desired
location.
3. Release the steering wheel
release control. This will lock the
steering wheel in position.
WARNING:Never adjust the steering wheel when the vehicle is
moving.
ILLUMINATED VISOR MIRROR (IF EQUIPPED)
Lift the mirror cover to turn on the
visor mirror lamp.
AUXILIARY POWER POINT (12V DC)
Power outlets are designed for accessory plugs only. Do not insert
any other object in the power outlet as this will damage the
outlet and blow the fuse. Do not hang any type of accessory or
accessory bracket from the plug. Improper use of the power
outlet can cause damage not covered by your warranty.
Auxiliary power points can be found in the following locations:
•On the instrument panel, equipped with a cover or a cap plug
•Behind the driver’s seat on the upper trim panel (if equipped)
•In the glove box (if equipped)
Do not use the power point for operating the cigarette lighter element (if
equipped).
To prevent the fuse from being blown, do not use the power point(s)
over the vehicle capacity of 12V DC/180W. If the power point is not
Driver Controls
63
2011 Econoline(eco)
Owners Guide, 1st Printing
USA(fus)
Page 64 of 337

working, a fuse may have blown. Refer toFuses and relaysin the
Roadside Emergencieschapter for information on checking and
replacing fuses.
To have full capacity usage of your power point, the engine is required to
be running to avoid unintentional discharge of the battery. To prevent
the battery from being discharged:
•do not use the power point longer than necessary when the engine is
not running,
•do not leave battery chargers, video game adapters, computers and
other devices plugged in overnight or when the vehicle is parked for
extended periods.
Always keep the power point caps closed when not being used.
POWER WINDOWS (IF EQUIPPED)
WARNING:Do not leave children unattended in the vehicle and
do not let children play with the power windows. They may
seriously injure themselves.
WARNING:When closing the power windows, you should verify
they are free of obstructions and ensure that children and/or
pets are not in the proximity of the window openings.
Press and pull the window switches
to open and close windows.
•Press down (to the first detent)
and hold the switch to open.
•Pull up (to the first detent) and
hold the switch to close.
One-touch down
Allows the driver’s window to open fully without holding the control
down. Press the switch completely down to the second detent and
release quickly. The window will open fully. Momentarily press the switch
to any position to stop the window operation.
Accessory delay
With accessory delay, the window switches and radio may be used for up
to 10 minutes after the ignition switch is turned to the off position, or
until any door is opened.
Driver Controls
64
2011 Econoline(eco)
Owners Guide, 1st Printing
USA(fus)