2011 CITROEN BERLINGO FIRST Handbook (in English)
-
 1
1 -
 2
2 -
 3
3 -
 4
4 -
 5
5 -
 6
6 -
 7
7 -
 8
8 -
 9
9 -
 10
10 -
 11
11 -
 12
12 -
 13
13 -
 14
14 -
 15
15 -
 16
16 -
 17
17 -
 18
18 -
 19
19 -
 20
20 -
 21
21 -
 22
22 -
 23
23 -
 24
24 -
 25
25 -
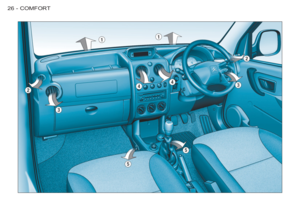
 26
26 -
 27
27 -
 28
28 -
 29
29 -
 30
30 -
 31
31 -
 32
32 -
 33
33 -
 34
34 -
 35
35 -
 36
36 -
 37
37 -
 38
38 -
 39
39 -
 40
40 -
 41
41 -
 42
42 -
 43
43 -
 44
44 -
 45
45 -
 46
46 -
 47
47 -
 48
48 -
 49
49 -
 50
50 -
 51
51 -
 52
52 -
 53
53 -
 54
54 -
 55
55 -
 56
56 -
 57
57 -
 58
58 -
 59
59 -
 60
60 -
 61
61 -
 62
62 -
 63
63 -
 64
64 -
 65
65 -
 66
66 -
 67
67 -
 68
68 -
 69
69 -
 70
70 -
 71
71 -
 72
72 -
 73
73 -
 74
74 -
 75
75 -
 76
76 -
 77
77 -
 78
78 -
 79
79 -
 80
80 -
 81
81 -
 82
82 -
 83
83 -
 84
84 -
 85
85 -
 86
86 -
 87
87 -
 88
88 -
 89
89 -
 90
90 -
 91
91 -
 92
92 -
 93
93 -
 94
94 -
 95
95 -
 96
96 -
 97
97 -
 98
98 -
 99
99 -
 100
100 -
 101
101 -
 102
102 -
 103
103 -
 104
104 -
 105
105 -
 106
106 -
 107
107 -
 108
108 -
 109
109 -
 110
110 -
 111
111 -
 112
112 -
 113
113 -
 114
114 -
 115
115 -
 116
116 -
 117
117 -
 118
118 -
 119
119 -
 120
120 -
 121
121 -
 122
122 -
 123
123 -
 124
124 -
 125
125 -
 126
126 -
 127
127 -
 128
128 -
 129
129 -
 130
130 -
 131
131
 55 VISIBILITY
-
THE EXTERIOR MIRRORS
Passenger side exterior
mirror electric control
From the drivers seat, move the con-
trol 1
in all four directions to adjust.
THE MANUAL INTERIORMIRR")
 LIFE ON BOARD
56 -")
 57 LIFE ON BOARD-
FRONT LAYOUT
4. Courtesy lights
5. Sun visors
Permanently off.
On entering the vehicle:
- they come on when the
vehicle is unlocked or
when a door is open")
 LIFE ON BOARD
58 -
STEERING WHEEL HEIGHT
ADJUSTMENT HEADLAMP ADJUSTMENT
HORN
HAZARD WARNING LIGHT
S
Press the button, the direction indicators
fl ash.
They can operate with the ignition off.")
 59 LIFE ON BOARD-
LASHING RINGS
It is recommended that the
load is immobilised by secur-
ing it fi rmly using the lashing
rings on the fl oor. Use the 6 lashing rings on the lug-
gage compar")
 LIFE ON BOARD
60 -
REAR LAYOUT")
 61 LIFE ON BOARD-
1. Load-space cover
To install it:
- position the front ends of the load
space cover on its support and
press gently to put it in place,
- unfold the load sp")
 DRIVING62 -
HANDBRAKE
Illumination of this warning
light and of the STOP
warn-
ing light, accompanied by
an audible signal (while the
vehicle is moving), indicates that the
handbrake is stil")