2011 CITROEN BERLINGO FIRST Handbook (in English)
-
 1
1 -
 2
2 -
 3
3 -
 4
4 -
 5
5 -
 6
6 -
 7
7 -
 8
8 -
 9
9 -
 10
10 -
 11
11 -
 12
12 -
 13
13 -
 14
14 -
 15
15 -
 16
16 -
 17
17 -
 18
18 -
 19
19 -
 20
20 -
 21
21 -
 22
22 -
 23
23 -
 24
24 -
 25
25 -
 26
26 -
 27
27 -
 28
28 -
 29
29 -
 30
30 -
 31
31 -
 32
32 -
 33
33 -
 34
34 -
 35
35 -
 36
36 -
 37
37 -
 38
38 -
 39
39 -
 40
40 -
 41
41 -
 42
42 -
 43
43 -
 44
44 -
 45
45 -
 46
46 -
 47
47 -
 48
48 -
 49
49 -
 50
50 -
 51
51 -
 52
52 -
 53
53 -
 54
54 -
 55
55 -
 56
56 -
 57
57 -
 58
58 -
 59
59 -
 60
60 -
 61
61 -
 62
62 -
 63
63 -
 64
64 -
 65
65 -
 66
66 -
 67
67 -
 68
68 -
 69
69 -
 70
70 -
 71
71 -
 72
72 -
 73
73 -
 74
74 -
 75
75 -
 76
76 -
 77
77 -
 78
78 -
 79
79 -
 80
80 -
 81
81 -
 82
82 -
 83
83 -
 84
84 -
 85
85 -
 86
86 -
 87
87 -
 88
88 -
 89
89 -
 90
90 -
 91
91 -
 92
92 -
 93
93 -
 94
94 -
 95
95 -
 96
96 -
 97
97 -
 98
98 -
 99
99 -
 100
100 -
 101
101 -
 102
102 -
 103
103 -
 104
104 -
 105
105 -
 106
106 -
 107
107 -
 108
108 -
 109
109 -
 110
110 -
 111
111 -
 112
112 -
 113
113 -
 114
114 -
 115
115 -
 116
116 -
 117
117 -
 118
118 -
 119
119 -
 120
120 -
 121
121 -
 122
122 -
 123
123 -
 124
124 -
 125
125 -
 126
126 -
 127
127 -
 128
128 -
 129
129 -
 130
130 -
 131
131
 23MONITORING and DISPLAY SCREENS
-
Engine oil level indicator
When the ignition is switched on,
the engine oil level is indicated for
approximately 10 seconds, after the
service information.")
 MONITORING and DISPLAY SCREENS
24 -
Briefl y pressing button 1
alternates
between the total and trip distance
displays.
To reset the trip recorder to zero,
when it is displayed press butto")
 25MONITORING and DISPLAY SCREENS
-
DISPLAY A
This displays the following information:
- the time,
- the date,
- the audio system displays,
- a door check (e.g.: left")
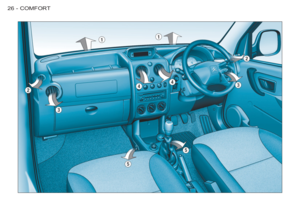
 COMFORT26 -")
 27COMFORT-
VENTILATION
1.
Windscreen de-icing or demisting
vents.
2.
Front window de-icing or demisting
vents.
3.
Side vents.
4.
Centre vents.
5.
Air outlets")
 COMFORT28 -
Intake of exterior air.
HEATING
Turn the control from posi-
tion 1
to position 4
to obtain
an air fl ow suffi cient to en-
sure your comfort.
2. Air fl ow adjustme")
 29COMFORT-
These settings are recommended for
cold climates.
3. Temperature adjustment
To be adjusted to your requirements.
From blue (exterior temperature) to
red (hot).
4. Air d")
 COMFORT30 -
Press the switch to activate
the air conditioning. The indi-
cator lamp comes on.
2. Air fl ow adjustment and air
intake control
Turn the control from position 1
to positi")