2011 CHEVROLET HHR spare wheel
[x] Cancel search: spare wheelPage 278 of 430
Black plate (2,1)Chevrolet HHR Owner Manual - 2011
Section 6 Service and Appearance Care
When It Is Time for New Tires . . . . . . . . . . . . . . . . . 6-62
Buying New Tires . . . . . . . . . . . . . . . . . . . . . . . . . . . . . . 6-62
Different Size Tires and Wheels . . . . . . . . . . . . . . . 6-65
Uniform Tire Quality Grading . . . . . . . . . . . . . . . . . . . 6-65
Wheel Alignment and Tire Balance . . . . . . . . . . . . 6-67
Wheel Replacement . . . . . . . . . . . . . . . . . . . . . . . . . . . 6-67
Tire Chains . . . . . . . . . . . . . . . . . . . . . . . . . . . . . . . . . . . . 6-68
If a Tire Goes Flat . . . . . . . . . . . . . . . . . . . . . . . . . . . . . 6-68
Tire Sealant and Compressor Kit . . . . . . . . . . . . . . 6-70
Tire Sealant and Compressor Kit Storage . . . . . . 6-78
Changing a Flat Tire . . . . . . . . . . . . . . . . . . . . . . . . . . . 6-78
Removing the Spare Tire and Tools . . . . . . . . . . . . 6-80
Removing the Flat Tire and Installing theSpare Tire . . . . . . . . . . . . . . . . . . . . . . . . . . . . . . . . . . . 6-82
Storing a Flat or Spare Tire and Tools . . . . . . . . . 6-87
Compact Spare Tire . . . . . . . . . . . . . . . . . . . . . . . . . . . 6-91
Appearance Care . . . . . . . . . . . . . . . . . . . . . . . . . . . . . . . . . 6-92
Interior Cleaning . . . . . . . . . . . . . . . . . . . . . . . . . . . . . . 6-92
Fabric/Carpet . . . . . . . . . . . . . . . . . . . . . . . . . . . . . . . . . . 6-93
Leather . . . . . . . . . . . . . . . . . . . . . . . . . . . . . . . . . . . . . . . . 6-94
Instrument Panel, Vinyl, and Other Plastic Surfaces . . . . . . . . . . . . . . . . . . . . . . . . . . . . . . . . . . . . . 6-94
Care of Safety Belts . . . . . . . . . . . . . . . . . . . . . . . . . . . 6-95
Weatherstrips . . . . . . . . . . . . . . . . . . . . . . . . . . . . . . . . . . 6-95 Washing Your Vehicle . . . . . . . . . . . . . . . . . . . . . . . . . 6-95
Cleaning Exterior Lamps/Lenses . . . . . . . . . . . . . . 6-95
Finish Care . . . . . . . . . . . . . . . . . . . . . . . . . . . . . . . . . . . . 6-96
Windshield and Wiper Blades . . . . . . . . . . . . . . . . . . 6-96
Aluminum or Chrome-Plated Wheels
and Trim . . . . . . . . . . . . . . . . . . . . . . . . . . . . . . . . . . . . . 6-97
Tires . . . . . . . . . . . . . . . . . . . . . . . . . . . . . . . . . . . . . . . . . . . 6-98
Sheet Metal Damage . . . . . . . . . . . . . . . . . . . . . . . . . . 6-98
Finish Damage . . . . . . . . . . . . . . . . . . . . . . . . . . . . . . . . 6-98
Underbody Maintenance . . . . . . . . . . . . . . . . . . . . . . . 6-98
Chemical Paint Spotting . . . . . . . . . . . . . . . . . . . . . . . 6-98
Vehicle Identification . . . . . . . . . . . . . . . . . . . . . . . . . . . . . 6-99
Vehicle Identification Number (VIN) . . . . . . . . . . . . 6-99
Service Parts Identification Label . . . . . . . . . . . . . . 6-99
Electrical System . . . . . . . . . . . . . . . . . . . . . . . . . . . . . . . . 6-100
Add-On Electrical Equipment . . . . . . . . . . . . . . . . . 6-100
Headlamp Wiring . . . . . . . . . . . . . . . . . . . . . . . . . . . . . 6-100
Windshield Wiper Fuses . . . . . . . . . . . . . . . . . . . . . . 6-100
Power Windows and Other Power Options . . . 6-100
Fuses and Circuit Breakers . . . . . . . . . . . . . . . . . . . 6-101
Floor Console Fuse Block . . . . . . . . . . . . . . . . . . . . 6-101
Engine Compartment Fuse Block . . . . . . . . . . . . . 6-104
Capacities and Specifications . . . . . . . . . . . . . . . . . .6-107
6-2
Page 333 of 430
Black plate (57,1)Chevrolet HHR Owner Manual - 2011
Tire Pressure Monitor Operation
This vehicle may have a Tire Pressure Monitor System
(TPMS). The TPMS is designed to warn the driver when
a low tire pressure condition exists. If your vehicle has
this feature, TPMS sensors are mounted onto each tire
and wheel assembly, excluding the spare tire and wheel
assembly. The TPMS sensors monitor the air pressure
in the vehicle's tires and transmits the tire pressure
readings to a receiver located in the vehicle.
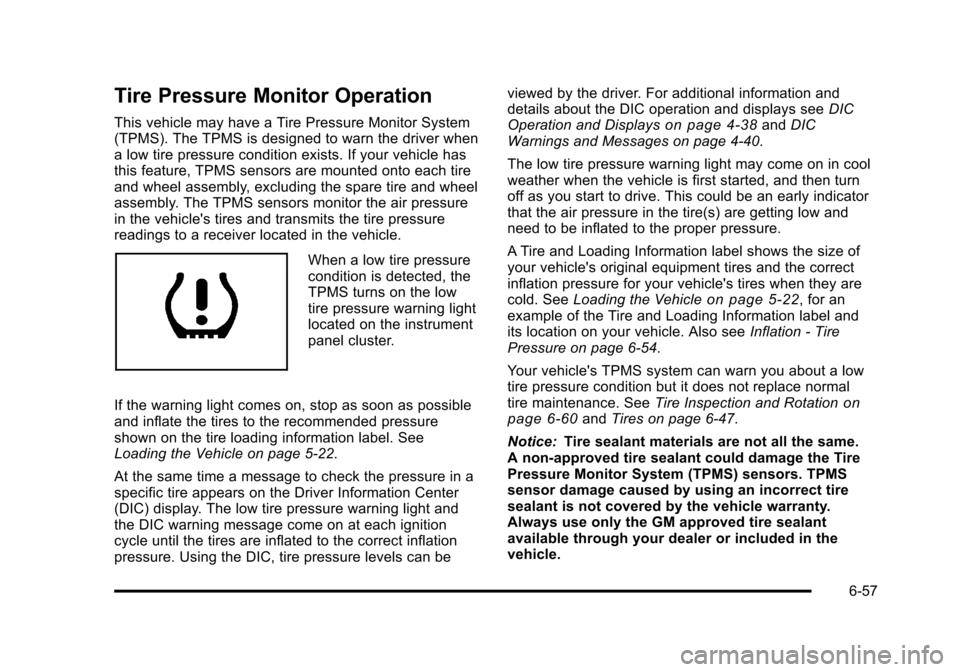
When a low tire pressure
condition is detected, the
TPMS turns on the low
tire pressure warning light
located on the instrument
panel cluster.
If the warning light comes on, stop as soon as possible
and inflate the tires to the recommended pressure
shown on the tire loading information label. See
Loading the Vehicle on page 5‑22.
At the same time a message to check the pressure in a
specific tire appears on the Driver Information Center
(DIC) display. The low tire pressure warning light and
the DIC warning message come on at each ignition
cycle until the tires are inflated to the correct inflation
pressure. Using the DIC, tire pressure levels can be viewed by the driver. For additional information and
details about the DIC operation and displays see
DIC
Operation and Displays
on page 4‑38and DIC
Warnings and Messages on page 4‑40.
The low tire pressure warning light may come on in cool
weather when the vehicle is first started, and then turn
off as you start to drive. This could be an early indicator
that the air pressure in the tire(s) are getting low and
need to be inflated to the proper pressure.
A Tire and Loading Information label shows the size of
your vehicle's original equipment tires and the correct
inflation pressure for your vehicle's tires when they are
cold. See Loading the Vehicle
on page 5‑22, for an
example of the Tire and Loading Information label and
its location on your vehicle. Also see Inflation - Tire
Pressure on page 6‑54.
Your vehicle's TPMS system can warn you about a low
tire pressure condition but it does not replace normal
tire maintenance. See Tire Inspection and Rotation
on
page 6‑60and Tires on page 6‑47.
Notice: Tire sealant materials are not all the same.
A non-approved tire sealant could damage the Tire
Pressure Monitor System (TPMS) sensors. TPMS
sensor damage caused by using an incorrect tire
sealant is not covered by the vehicle warranty.
Always use only the GM approved tire sealant
available through your dealer or included in the
vehicle.
6-57
Page 334 of 430
Black plate (58,1)Chevrolet HHR Owner Manual - 2011
Factory-installed Tire Inflator Kits use a GM approved
liquid tire sealant. Using non-approved tire sealants
could damage the TPMS sensors. SeeTire Sealant and
Compressor Kit
on page 6‑70for information regarding
the inflator kit materials and instructions.
TPMS Malfunction Light and Message
The TPMS will not function properly if one or more of
the TPMS sensors are missing or inoperable. When the
system detects a malfunction, the low tire warning light
flashes for about one minute and then stays on for the
remainder of the ignition cycle. A DIC warning message
is also displayed. The low tire warning light and DIC
warning message come on at each ignition cycle until
the problem is corrected. Some of the conditions that
can cause the malfunction light and DIC message to
come on are:
.One of the road tires has been replaced with the
spare tire. The spare tire does not have a TPMS
sensor. The TPMS malfunction light and DIC
message should go off once you re‐install the road
tire containing the TPMS sensor.
.The TPMS sensor matching process was started
but not completed or not completed successfully
after rotating the vehicle's tires. The DIC message
and TPMS malfunction light should go off once the
TPMS sensor matching process is performed
successfully. See “TPMS Sensor Matching
Process” later in this section.
.One or more TPMS sensors are missing or
damaged. The DIC message and the TPMS
malfunction light should go off when the TPMS
sensors are installed and the sensor matching
process is performed successfully. See your dealer
for service.
.Replacement tires or wheels do not match your
vehicle's original equipment tires or wheels. Tires
and wheels other than those recommended for
your vehicle could prevent the TPMS from
functioning properly. See Buying New Tires
on
page 6‑62.
.Operating electronic devices or being near facilities
using radio wave frequencies similar to the TPMS
could cause the TPMS sensors to malfunction.
If the TPMS is not functioning it cannot detect or signal
a low tire condition. See your dealer for service if the
TPMS malfunction light and DIC message comes on
and stays on.
6-58
Page 337 of 430
Black plate (61,1)Chevrolet HHR Owner Manual - 2011
Any time you notice unusual wear, rotate the tires
as soon as possible and check wheel alignment.
Also check for damaged tires or wheels. See
When It Is Time for New Tires
on page 6‑62and
Wheel Replacement
on page 6‑67.
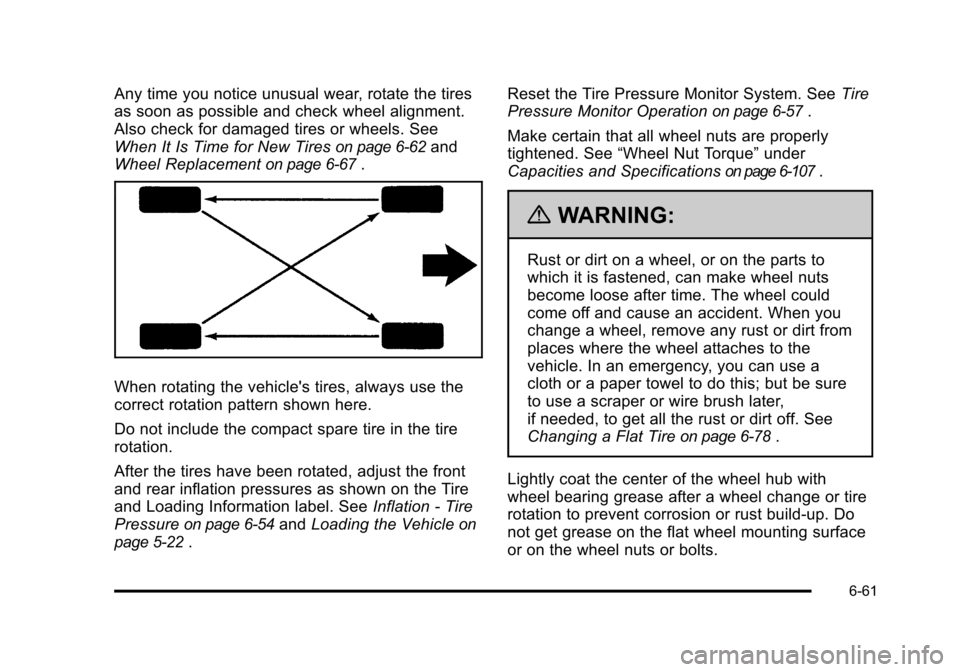
When rotating the vehicle's tires, always use the
correct rotation pattern shown here.
Do not include the compact spare tire in the tire
rotation.
After the tires have been rotated, adjust the front
and rear inflation pressures as shown on the Tire
and Loading Information label. See Inflation - Tire
Pressure
on page 6‑54and Loading the Vehicleon
page 5‑22
. Reset the Tire Pressure Monitor System. See
Tire
Pressure Monitor Operation
on page 6‑57.
Make certain that all wheel nuts are properly
tightened. See “Wheel Nut Torque” under
Capacities and Specifications
on page 6‑107.
{WARNING:
Rust or dirt on a wheel, or on the parts to
which it is fastened, can make wheel nuts
become loose after time. The wheel could
come off and cause an accident. When you
change a wheel, remove any rust or dirt from
places where the wheel attaches to the
vehicle. In an emergency, you can use a
cloth or a paper towel to do this; but be sure
to use a scraper or wire brush later,
if needed, to get all the rust or dirt off. See
Changing a Flat Tire
on page 6‑78.
Lightly coat the center of the wheel hub with
wheel bearing grease after a wheel change or tire
rotation to prevent corrosion or rust build-up. Do
not get grease on the flat wheel mounting surface
or on the wheel nuts or bolts.
6-61
Page 339 of 430
Black plate (63,1)Chevrolet HHR Owner Manual - 2011
GM's exclusive TPC Spec system considers over
a dozen critical specifications that impact the
overall performance of your vehicle, including
brake system performance, ride and handling,
traction control, and tire pressure monitoring
performance. GM's TPC Spec number is molded
onto the tire's sidewall near the tire size. If the
tires have an all‐season tread design, the TPC
Spec number will be followed by an MS for mud
and snow. SeeTire Sidewall Labeling
on
page 6‑48
for additional information.
GM recommends replacing tires in sets of four.
This is because uniform tread depth on all tires
will help keep your vehicle performing most like it
did when the tires were new. Replacing less than
a full set of tires can affect the braking and
handling performance of your vehicle. See Tire
Inspection and Rotation
on page 6‑60for
information on proper tire rotation.
{WARNING:
Tires could explode during improper service. You
or others could be injured or killed if you attempt
to mount or dismount a tire. Only your dealer or
an authorized tire service center should mount
and dismount the tires.
{WARNING:
Mixing tires could cause you to lose control
while driving. If you mix tires of different
sizes, brands, or types (radial and
bias-belted tires), the vehicle may not handle
properly, and you could have a crash. Using
tires of different sizes, brands, or types may
also cause damage to your vehicle. Be sure
to use the correct size, brand, and type of
tires on all wheels. It is all right to drive with
your compact spare temporarily, as it was
developed for use on your vehicle. See
Compact Spare Tire
on page 6‑91.
6-63
Page 341 of 430
Black plate (65,1)Chevrolet HHR Owner Manual - 2011
Different Size Tires and Wheels
If you add wheels or tires that are a different size than
your original equipment wheels and tires, this could
affect the way your vehicle performs, including its
braking, ride and handling characteristics, stability, and
resistance to rollover. Additionally, if your vehicle has
electronic systems such as anti‐lock brakes, rollover
airbags, traction control, and electronic stability control,
the performance of these systems can be affected.
{WARNING:
If you add different sized wheels, your vehicle
may not provide an acceptable level of
performance and safety if tires not recommended
for those wheels are selected. You may increase
the chance that you will crash and suffer serious
injury. Only use GM specific wheel and tire
systems developed for your vehicle, and have
them properly installed by a GM certified
technician.
See Buying New Tires
on page 6‑62andAccessories
and Modificationson page 6‑3for additional
information.
Uniform Tire Quality Grading
Quality grades can be found where applicable on
the tire sidewall between tread shoulder and
maximum section width. For example:
Treadwear 200 Traction AA
Temperature A
The following information relates to the system
developed by the United States National Highway
Traffic Safety Administration (NHTSA), which
grades tires by treadwear, traction, and
temperature performance. This applies only to
vehicles sold in the United States. The grades are
molded on the sidewalls of most passenger car
tires. The Uniform Tire Quality Grading (UTQG)
system does not apply to deep tread, winter-type
snow tires, space-saver, or temporary use spare
tires, tires with nominal rim diameters of
10 to 12 inches (25 to 30 cm), or to some
limited-production tires.
While the tires available on General Motors
passenger cars and light trucks may vary with
respect to these grades, they must also conform
to federal safety requirements and additional
General Motors Tire Performance Criteria (TPC)
standards.
6-65
Page 346 of 430
Black plate (70,1)Chevrolet HHR Owner Manual - 2011
Tire Sealant and Compressor Kit
{WARNING:
Idling a vehicle in an enclosed area with poor
ventilation is dangerous. Engine exhaust may
enter the vehicle. Engine exhaust contains
Carbon Monoxide (CO) which cannot be seen or
smelled. It can cause unconsciousness and even
death. Never run the engine in an enclosed area
that has no fresh air ventilation. For more
information, seeEngine Exhaust on page 3‑34.
{WARNING:
Over-inflating a tire could cause the tire to rupture
and you or others could be injured. Be sure to
read and follow the tire sealant and compressor
kit instructions and inflate the tire to its
recommended pressure. Do not exceed the
recommended pressure.
{WARNING:
Storing the tire sealant and compressor kit or
other equipment in the passenger compartment of
the vehicle could cause injury. In a sudden stop or
collision, loose equipment could strike someone.
Store the tire sealant and compressor kit in its
original location.
If this vehicle has a tire sealant and compressor kit,
there may not be a spare tire, tire changing equipment,
and on some vehicles there may not be a place to store
a tire.
The tire sealant and compressor can be used to
temporarily seal punctures up to 6 mm (¼ in) in the
tread area of the tire. It can also be used to inflate an
under inflated tire.
If the tire has been separated from the wheel, has
damaged sidewalls, or has a large puncture, the tire is
too severely damaged for the tire sealant and
compressor kit to be effective. See Roadside
Assistance Program on page 8‑6.
Read and follow all of the tire sealant and compressor
kit instructions.
6-70
Page 356 of 430
Black plate (80,1)Chevrolet HHR Owner Manual - 2011
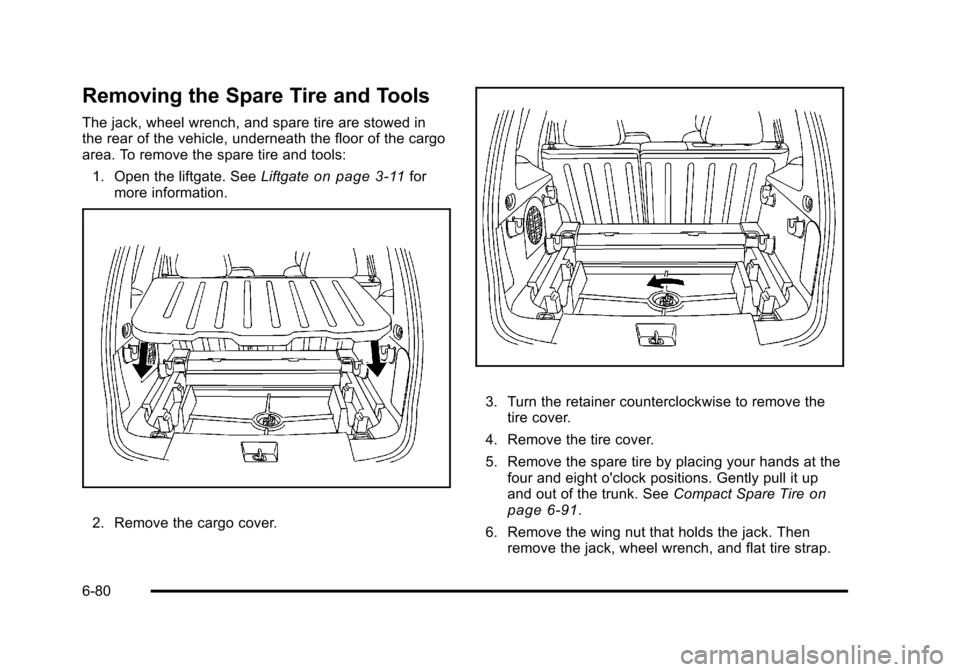
Removing the Spare Tire and Tools
The jack, wheel wrench, and spare tire are stowed in
the rear of the vehicle, underneath the floor of the cargo
area. To remove the spare tire and tools:1. Open the liftgate. See Liftgate
on page 3‑11for
more information.
2. Remove the cargo cover.
3. Turn the retainer counterclockwise to remove the tire cover.
4. Remove the tire cover.
5. Remove the spare tire by placing your hands at the four and eight o'clock positions. Gently pull it up
and out of the trunk. See Compact Spare Tire
on
page 6‑91.
6. Remove the wing nut that holds the jack. Then remove the jack, wheel wrench, and flat tire strap.
6-80