2010 VOLKSWAGEN TRANSPORTER key
[x] Cancel search: keyPage 214 of 486
A wARNING
Always use the luggage net carefully, observ-ing the instructions. Risk of injury.
• Heavy, pointed or sharp items which are not stowed securely can cause injury in the event of sudden braking manoeuvres or acci-dents.
Stowage compartment in the headliner
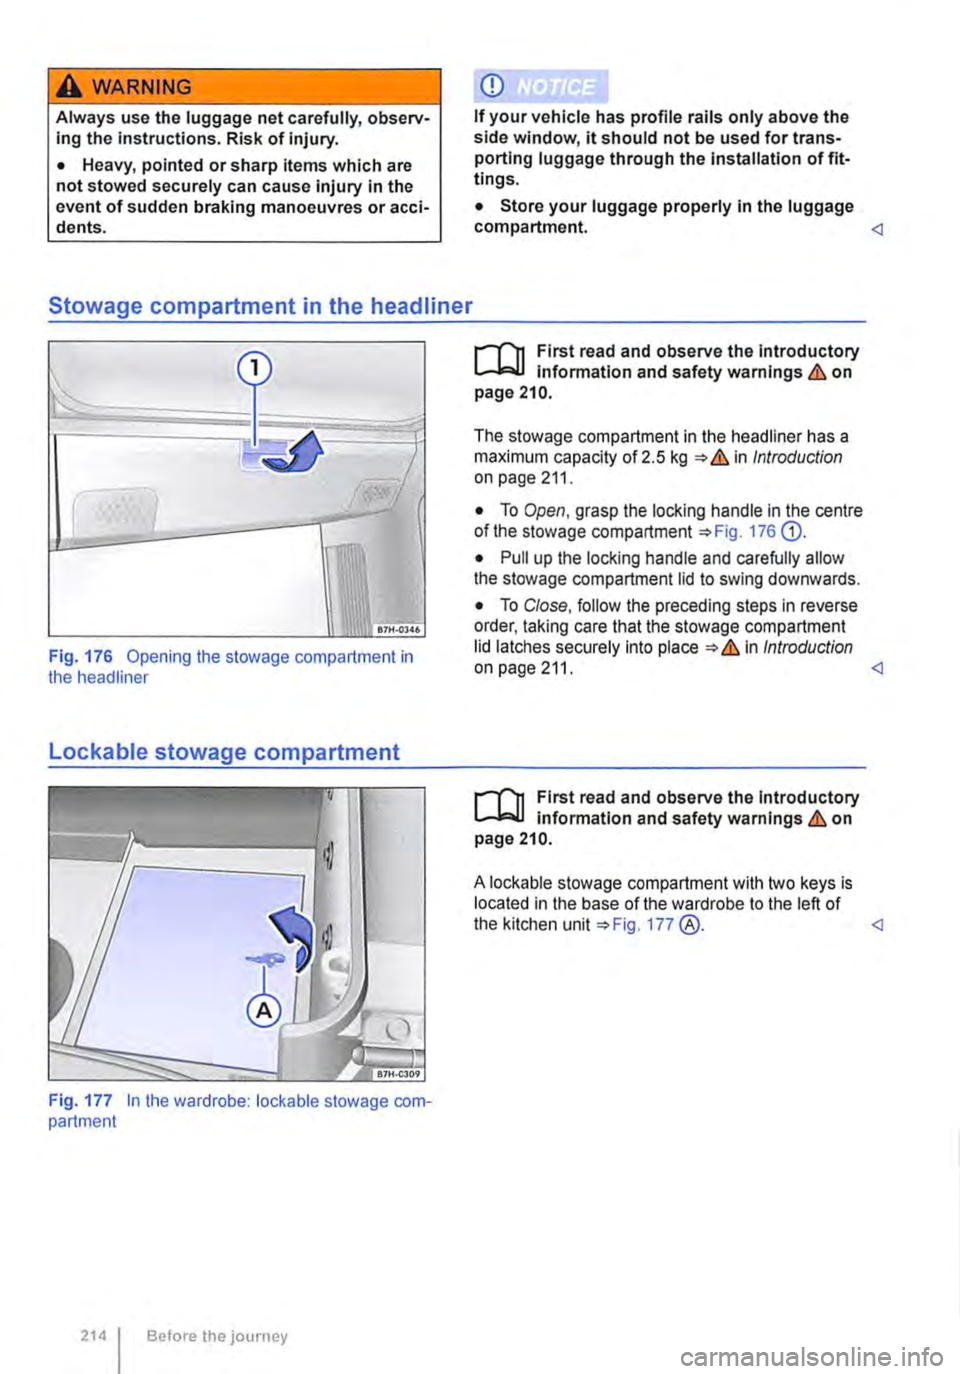
Fig. 176 Opening the stowage compartment in the headliner
Lockable stowage compartment
Fig. 177 In the wardrobe: lockable stowage com-partment
214 Before the journey
CD
If your vehicle has profile rails only above the side window, it should not be used for trans-porting luggage through the Installation of fit-tings.
• Store your luggage properly In the luggage compartment. <1
r-I'n First read and observe the Introductory L-Wl Information and safety warnings & on page 210.
The stowage compartment in the headliner has a maximum capacity of 2.5 kg & in Introduction on page 211.
• To Open, grasp the locking handle in the centre of the stowage compartment 176 G).
• Pull up the locking handle and carefully allow the stowage compartment lid to swing downwards.
• To Close, follow the preceding steps in reverse order, taking care that the stowage compartment lid latches securely into place & in Introduction on page 211.
r-I'n First read and observe the introductory L-Wl information and safety warnings & on page 210.
A lockable stowage compartment with two keys is located in the base of the wardrobe to the left of the kitchen unit 177 @. <1
Page 218 of 486
Manual pop-up roof, California
C::O Introduction
This chapter contains information on the following subjects:
Opening the manual pop-up roof.......... 219
Closing the manual pop-up roof . 220
Roller shutter
Above the front seats there is a roller shutter, which must always be closed while the vehicle is in motion. This prevents the pop-up roof canvas from hanging down through the ceiling access and blocking the driver's view. Keeping the roller shut-ter closed also reduces wind noise while the vehi-cle is in motion.
A WARNING
Incorrect handling of the manual pop-up roof can cause accidents and serious injuries.
• Never drive the vehicle with the pop-up roof open. The pop-up roof must always be completely closed and securely locked while the vehicle is in motion.
• Never drive with people in the pop-up roof.
• Only open or close the pop-up roof while the vehicle Is stationary.
• Only mount a luggage roof rack when the pop-up roof is completely closed and secure-ly locked.
A WARNING
Careless or inattentive use of the manual pop-up roof could cause serious Injuries.
• The pop-up roof should only be opened or closed when you are sure that nobody is in its operating area.
• Never leave children or people requiring assistance alone in the vehicle.
• Always take all vehicle keys with you ev-ery time you leave the vehicle.
218 I Before the journey
CD
Incorrect handling of the manual pop-up roof can cause damage to it or to other parts of the vehicle.
• Make sure there Is adequate space before opening the pop-up roof.
• When closing the pop-up roof, always open the roller shutter and one of the vehicle doors to allow the excess air pressure to escape.
• Only close the pop-up roof when it is dry to prevent the build up of mould or mildew.
• Open the pop-up roof occasionally to air it out when it Is not being used for long periods oftime.
• Clean the pop-up roof bellows with water only. Never use household cleaners or Impreg-nating fabric treatment products.
• Close the pop-up roof during storms with driving rain and wind gusts. Otherwise the bel-lows could leak despite their specially treated fabric.
Page 221 of 486
Electric pop-up roof, California
o:IJ Introduction
This chapter contains information on the following subjects:
Opening the electric pop-up roof . . . . . . . . . . . 222
Closing the electric pop-up roof . . . 223
Preliminary work for closing the electric pop-up roof manually . . . . . . . . . . . . . . . . . . . . . . . . 224
Closing the electric pop-up roof manually . 225 Securing the pop-up roof manually from outside the vehicle . . . . . 225
Roller shutter
Above the front seats there is a roller shutter, which must always be closed while the vehicle is in motion. This prevents the pop-up roof canvas from hanging down through the ceiling access and blocking the driver's view. Keeping the roller shut-ter closed also reduces wind noise while the vehi-cle is in motion.
Additional information:
• Central control panel 204
• Rectifying faults on the camping equipment 254
• Winter conditions 253
• Vehicle tool kit 416
A WARNING
Incorrect handling of the pop-up roof can cause accidents and serious Injuries.
• Never drive the vehicle with the pop-up roof open. The pop-up roof must always be completely closed and securely locked while the vehicle Is In motion.
• Never drive with people In the pop-up roof.
• Only open or close the pop-up roof while the vehicle Is stationary.
• Only mount a luggage roof rack when the pop-up roof is completely closed and secure-ly locked.
A WARNING
Careless or inattentive use of the pop-up roof could cause serious Injuries.
• The pop-up roof should only be opened or closed when you are sure that nobody is in its operating area.
A WARNING (Continued)
• Never leave children or people requiring assistance alone In the vehicle.
• Always take all vehicle keys with you ev-ery time you leave the vehicle.
A WARNING
Driving at high vehicle speeds and with a strong headwind after closing the pop-up roof manually could cause the pop-up roof to lift up or open on Its own and potentially cause serious Injuries.
• If you close the pop-up roof manually, do not drive faster than 60 km/h.
• Drive especially carefully and slowly In the presence of a strong headwind.
• The pop-up roof should be checked by a qualified workshop as soon as possible.
CD
Incorrect handling of the pop-up roof can cause damage to it or to other parts of the vehi-cle.
• Make sure there is adequate space before opening the pop-up roof.
• When closing the pop-up roof, always open the roller shutter and one of the vehicle doors to allow the excess air pressure to escape.
• Only close the pop-up roof when it is dry to prevent the build up of mould or mildew.
• Open the pop-up roof occasionally to air it out when it is not being used for long periods of time.
• Clean the pop-up roof bellows with water only. Never use household cleaners or Impreg-nating fabric treatment products.
• Close the pop-up roof during storms with driving rain and wind gusts. Otherwise the bel-lows could leak despite their specially treated fabric.
m Roof hydraulics: the pop-up height of the W pop-up roof will be checked automatically and altered if necessary at regular intervals after the ignition has been switched off and the ignition key removed: first after 10 hours and then every five hours. .,.
Equipment, California 221
Page 222 of 486
m If the pop-up roof cannot be closed even l!J when the ignition is switched on and the clos-ing function is used, please check all possible cau-ses. If the cause cannot be found or there are oth-er malfunctions, please close the pop-up roof man-
Opening the electric pop-up roof
r--'('n First read and observe the introductory L-.lo:.U information and safety warnings & on page 221.
Opening the pop-up roof
• Switch on the ignition.
• Switch on the central control panel.
• Open the roller shutter and release the reading lamp retaining strap.
• Select the menu option Pop-up roof in the central control panel.
• Select menu option Open (dark background).
• Press and hold the rotary/push knob until the hydraulic motor has switched off automatically and the pop-up roof has opened fully. The symbol for the open pop-up roof will be displayed. The hy-draulic motor has a run-on time of approx. 5 sec-onds to bleed the hydraulic system.
• Switch off the ignition and remove the ignition key.
• Push up the bed panel to increase standing room.
Opening and closing the windows in the canvas
• To Open, unzip and fold down the canvas.
• To Close, fold the canvas back up and zip com-pletely closed.
The insect screen is sewn into the canvas and cannot be opened.
Bed in pop-up roof
• Step carefully onto the seat cushion of the front seats and support yourself on the edge of the bed when climbing up to the pop-up roof bed &.
Fitting the safety net for the pop-up roof bed
Always fit the safety net when children sleep in or otherwise occupy the pop-up roof bed &.
222 I Before the journey
ually 224, and drive carefully and at re-duced speed to the nearest qualified workshop. Volkswagen Commercial Vehicles recommends us-ing a Volkswagen Commercial Vehicles dealership for this purpose.
• Lift the mattress on the roof bed and attach the bottom of the safety net to the now accessible press studs in the bed panel.
• Observe the safety instructions on the sticker on the front side of the bed panel
A WARNING
Always take care when climbing Into and out of the pop-up roof bed, otherwise you could cause serious injury to yourself or others.
• Never step on or support yourself with the front seat armrests or head restraints.
• Never step on or support yourself with the closed roller shutter.
• Never jump off the pop-up roof bed. Al-ways take care while climbing down.
• Help others, especially children, to climb up and down safely.
A WARNING
If the safecy net is not fitted or not properly fitted, children could fall off the pop-up roof bed and seriously Injure themselves.
• Always fit the safety net when children sleep In or otherwise occupy the pop-up roof bed.
m Volkswagen Commercial Vehicles recom-l!J mends that small children not be allowed to sleep in the pop-up roof bed. <
Page 235 of 486
Connecting the gas bottle
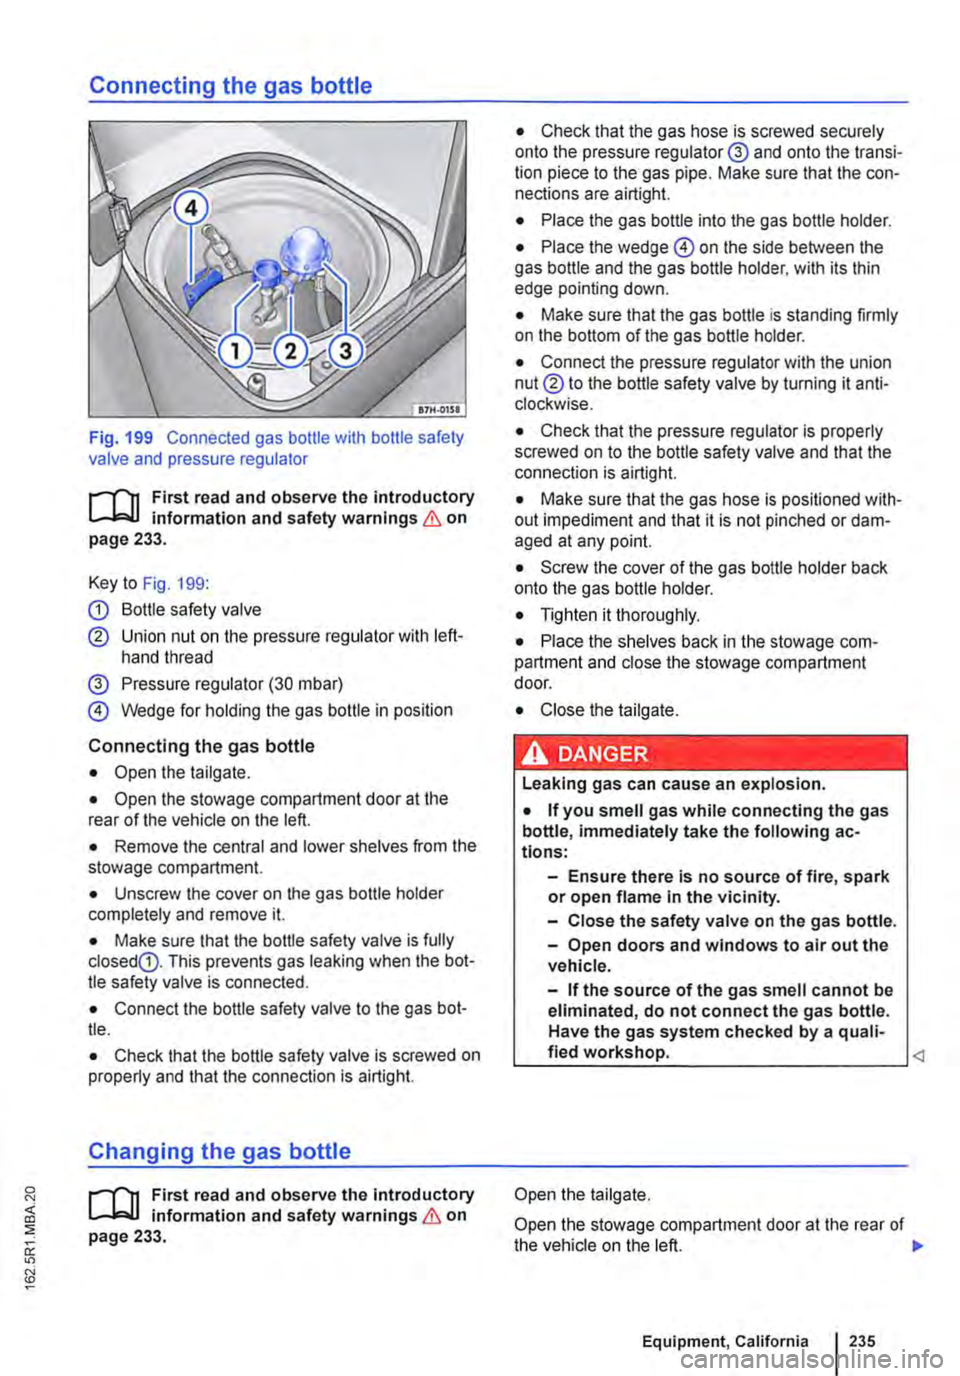
Fig. 199 Connected gas bottle with bottle safety valve and pressure regulator
r-l'n First read and observe the introductory L-J.:.IJ information and safety warnings & on page 233.
Key to Fig. 199:
G) Bottle safety valve
® Union nut on the pressure regulator with left-hand thread
@ Pressure regulator (30 mbar)
@ Wedge for holding the gas bottle in position
Connecting the gas bottle
• Open the tailgate.
• Open the stowage compartment door at the rear of the vehicle on the left.
• Remove the central and lower shelves from the stowage compartment.
• Unscrew the cover on the gas bottle holder completely and remove it.
• Make sure that the bottle safety valve is fully closedG). This prevents gas leaking when the bot-tle safety valve is connected.
• Connect the bottle safety valve to the gas bot-tle.
• Check that the bottle safety valve is screwed on properly and that the connection is airtight.
Changing the gas bottle
r-l'n First read and observe the Introductory L-J.:.IJ information and safety warnings & on page 233.
• Check that the gas hose is screwed securely onto the pressure regulator@ and onto the transi-tion piece to the gas pipe. Make sure that the con-nections are airtight.
• Place the gas bottle into the gas bottle holder.
• Place the wedge @ on the side between the gas bottle and the gas bottle holder. with its thin edge pointing down.
• Make sure that the gas bottle is standing firmly on the bottom of the gas bottle holder.
• Connect the pressure regulator with the union nut® to the bottle safety valve by turning it anti-clockwise.
• Check that the pressure regulator is properly screwed on to the bottle safety valve and that the connection is airtight.
• Make sure that the gas hose is positioned with-out impediment and that it is not pinched or dam-aged at any point.
• Screw the cover of the gas bottle holder back onto the gas bottle holder.
• Tighten it thoroughly.
• Place the shelves back in the stowage com-partment and close the stowage compartment door.
• Close the tailgate.
· &' DANGER .. --' • ,.,_.._.. '·-• I Leaking gas can cause an explosion.
• If you smell gas while connecting the gas bottle, immediately take the following ac-tions:
-Ensure there is no source of fire, spark or open flame in the vicinity.
-Close the safety valve on the gas bottle.
-Open doors and windows to air out the vehicle.
-If the source of the gas smell cannot be eliminated, do not connect the gas bottle. Have the gas system checked by a quali-fied workshop.
Open the stowage compartment door at the rear of the vehicle on the left. 11>
Equipment, California I 235
Page 250 of 486
A WARNING (Continued)
• Never fit fuses that have a higher fuse pro-tection limit. Fuses must always be replaced by a new fuse with the same amp rating (same colour and markings) and size.
• Never repair a fuse.
• Never use a metal strip, paper clip or simi-lar objects to replace a fuse.
CD
• To avoid damage to the electrical system in the vehicle, switch the ignition, the lights and all electrical consumers off and remove the ve-hicle key from the ignition before changing a fuse.
• You can damage another position in the electrical system by using a fuse with a higher amp rating.
• Fuse boxes must be protected from dirt and moisture when opened. Dirt and moisture in the fuse boxes can damage the electrical system.
o::n Introduction
This chapter contains information on the following subjects:
Controls for the living area 250
Controls for the living area
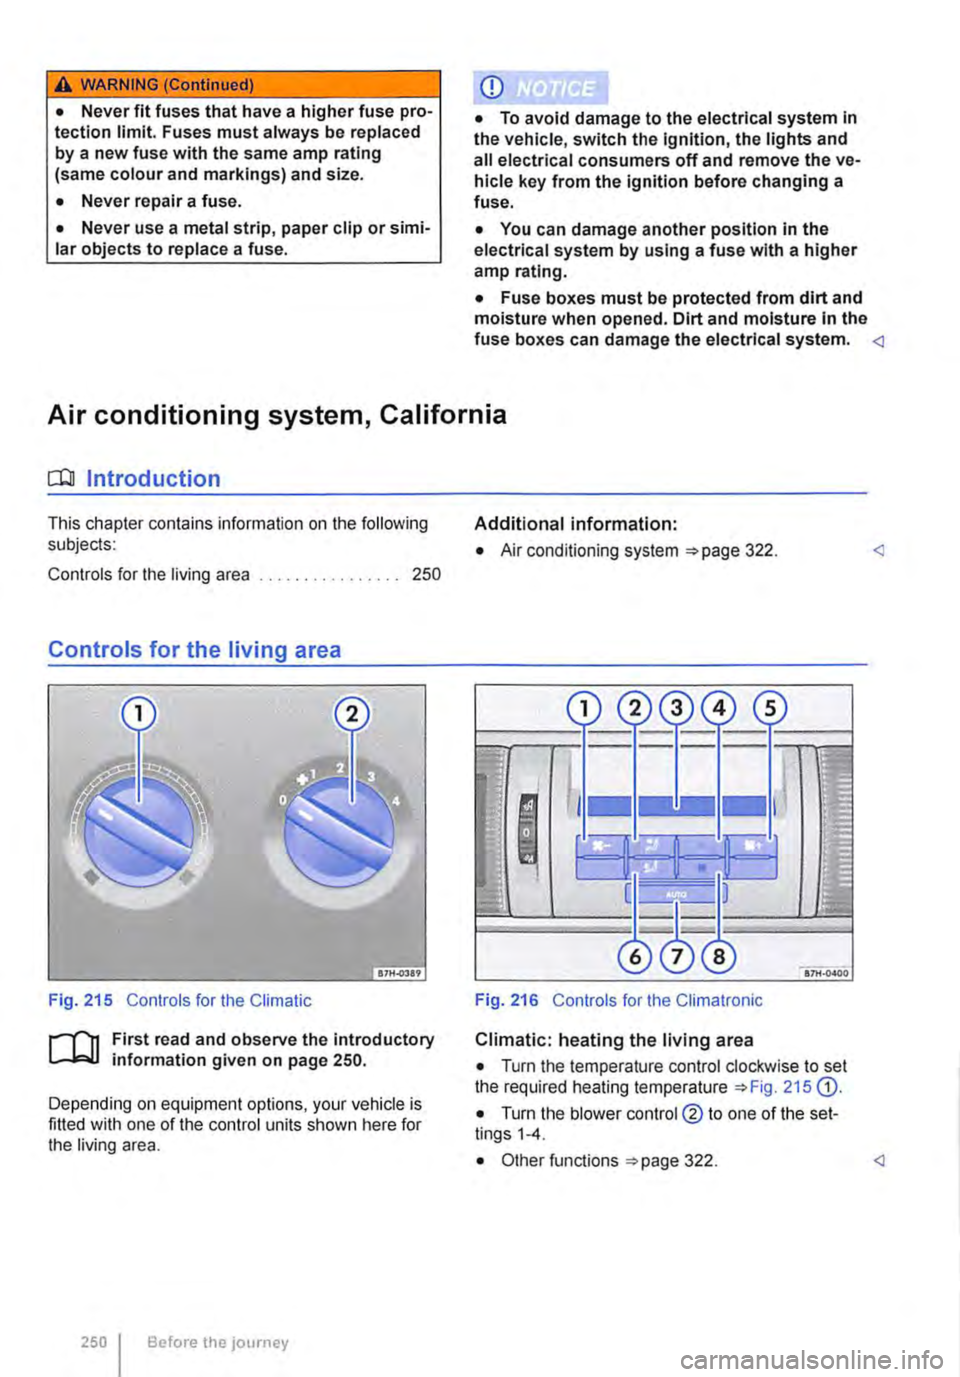
Fig. 215 Controls for the Climatic
ifl1 First read and observe the introductory L-.J.=.IJ information given on page 250.
Depending on equipment options, your vehicle is fitted with one of the control units shown here for the living area.
250 I Before the journey
Additional information:
• Air conditioning system 322.
Fig. 216 Controls for the Climatronic
Climatic: heating the living area
• Turn the temperature control clockwise to set the required heating temperature 215 G).
• Turn the blower control @ to one of the set-tings 1-4.
Page 253 of 486
Checklist (Continued)
-Insurance documents
-Camping and travel guides
./ Inform yourself about the peculiarities of any foreign country you plan to visit, such as driving speed limits and required papers .
./ Check the cooking gas supply and change the bottle if necessary.
Actions to take during thunderstorms
ro First read and observe the introductory information given on page 252.
Checklist
Take the following actions before an impending storm:
./ Close the pop-up roof .
./ Retract the awning completely.
Winter conditions
r-f"'n First read and observe the introductory information given on page 252.
When parked at a camping site
• Engage a gear and place chocks against the wheels to prevent the vehicle rolling away.
• Release the handbrake so that it does not freeze.
• Do not lay power cables on the ground as they could freeze to the ground.
• Keep the ground under the vehicle free of ob-structions so that the exhaust from the supplemen-tary heating system can escape.
Ventilation
High humidity levels in the vehicle can be reduced by using a commercially available fan.
Cleaning cupboards, cooker and sink
r-f"'n First read and observe the Introductory L-la.U Information given on page 252.
Cleaning the cupboards
Clean the surfaces of the kitchen unit and cup-boards with commercially available non-abrasive cleaning agents =>
./ Drain the waste water tank.
./ Check the vehicle toolkit.
./ Take a mains cable and cable reel on board so you can use the 230-volt electrical feed.
./ Disconnect the 230-volt electrical feed.
./ Wait out the storm while remaining inside the vehicle.
Additional information:
• Read and observe the information under the in-dex keyword "Winter conditions".
CD
In very cold weather the fresh and waste water systems should be emptied to prevent them from becoming damaged If the vehicle Is not to be kept heated continuously or Is only to be
Page 257 of 486
While driving
Starting the engine, changing gear and parking
Starting and stopping the engine
o::n Introduction
This chapter contains information on the following subjects:
Ignition lock . . ......•........ 258
Starting the engine . . . . . • . • . . . . . . . . 258
Stopping the engine . . . . . . . . . . . . . . . . . . . . . 259
Electronic immobilizer . . . . . . . . . • . . . . . . . . . . 260
Immobilizer display
When a vehicle key is not valid or there is a fault in the system, this will be displayed in the Instrument cluster. The engine cannot be started.
Push-starting or tow-starting
For technical reasons, your vehicle must not be push-started or tow-started. Use jump leads to start the engine instead.
Additional information and warnings:
• Vehicle key set =>page 36
• Changing gear =>page 260
• Braking, stopping and parking =>page 269
• Steering =>page 281
• Pull-away assist systems =>page 282
• Filling the tank =>page 340
• Fuel =>page 343
• Manual opening and dosing =>page 413
• Jump starting =>page 443
• Tow-starting and towing =>page 446
A WARNING
Switching the engine off while the vehicle Is moving makes it more difficult to stop the ve-hicle. This can lead to loss of control of the vehicle and to accidents and severe Injuries.
• Braking and steering support systems, the alrbag system, the belt tens loners and other items of safety equipment in the vehicle are only active when the engine is running.
A WARNING (Continued)
• The engine should only be switched off when the vehicle Is stationary.
A WARNING
The risk of serious Injury can be reduced with the engine running or when starting the en-glne.
• Never start or run the engine In unventlla-ted or closed spaces. The exhaust fumes contain carbon monoxide, an odourless and colourless toxic gas. Carbon monoxide can cause people to lose consciousness. it can also cause death.
• Never start or run the engine if oil, fuel or any other highly flammable fluids are under or near the vehicle, or are leaking out of the vehicle, e.g. as the result of damage.
• Never leave the vehicle unattended with the engine running, particularly if a gear or driving mode has been selected. The vehicle could move suddenly or something unexpec-ted may happen that may cause damage, fire and serious Injuries.
• Never use a start booster. Start boosters may explode and cause the engine to sud-denly run at high revs.
A WARNING
The components of the exhaust system be-come very hot. This can cause fires and sari-ous Injuries.
• Never park the vehicle where parts of the exhaust system can come Into contact with Inflammable material underneath the vehicle, e.g. undergrowth, leaves, dry grass, split fuel.
• Never apply additional undersea! or anti-corrosion coatings to the exhaust pipes, cat-a lytic converters or heat shields.
Starting the engine, changing gear and parking I 257