2010 VOLKSWAGEN TRANSPORTER key
[x] Cancel search: keyPage 175 of 486
Equipment, Multivan
Darkening the interior of the vehicle, Multivan
n:n Introduction
This chapter contains information on the following subjects:
Components of the opaque shades kit . . . 175
Assembling opaque shades for the windscreen and the rear window . . . . . . . 176
Fitting opaque shades for the windscreen and the rear window . . . . . . . . . . . . . . . . . . . . . . . . . 177
Fitting the opaque shades to the side windows . . . . . . . . . . . . . . . . . . . . . . . . . . . . . 178
Removing and stowing the opaque shades . . 179
Darkening the interior of the vehicle
The opaque shades kit is supplied in a zippered storage bag, which can be securely stowed in a drawer underneath the 3-seat bench.
Additional information and warnings:
• Windows 36
• Seat functions, front 61
Components of the opaque shades kit
CD
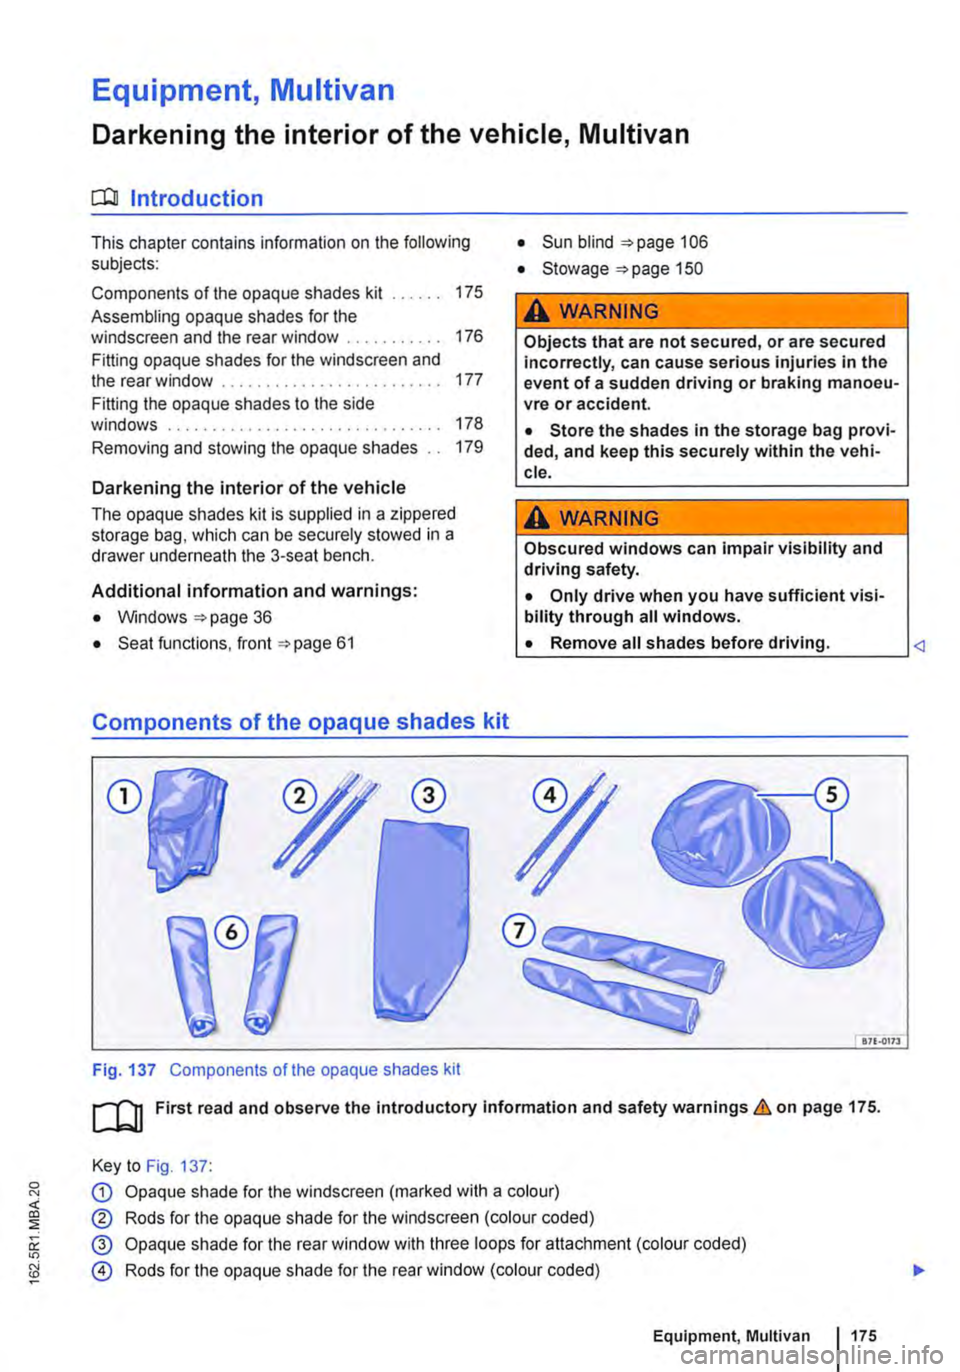
Fig. 137 Components of the opaque shades kit
• Sun blind 106
• Stowage "'page 150
A WARNING
Objects that are not secured, or are secured incorrectly, can cause serious injuries in the event of a sudden driving or braking manoeu-vre or accident.
• Store the shades in the storage bag provi-ded, and keep this securely within the vehi-cle.
A WARNING
Obscured windows can impair visibility and driving safety.
• Only drive when you have sufficient visi-bility through all windows.
L• ___
&71.0173
[QJ First read and observe the introductory information and safety warnings.&. on page 175.
Key to Fig. 137:
G) Opaque shade for the windscreen (marked with a colour)
® Rods for the opaque shade for the windscreen (colour coded)
@ Opaque shade for the rear window with three loops for attachment (colour coded)
@ Rods for the opaque shade for the rear window (colour coded)
Equipment, Multivan 1175
Page 180 of 486
Equipment, Business
Vehicle overview, Business
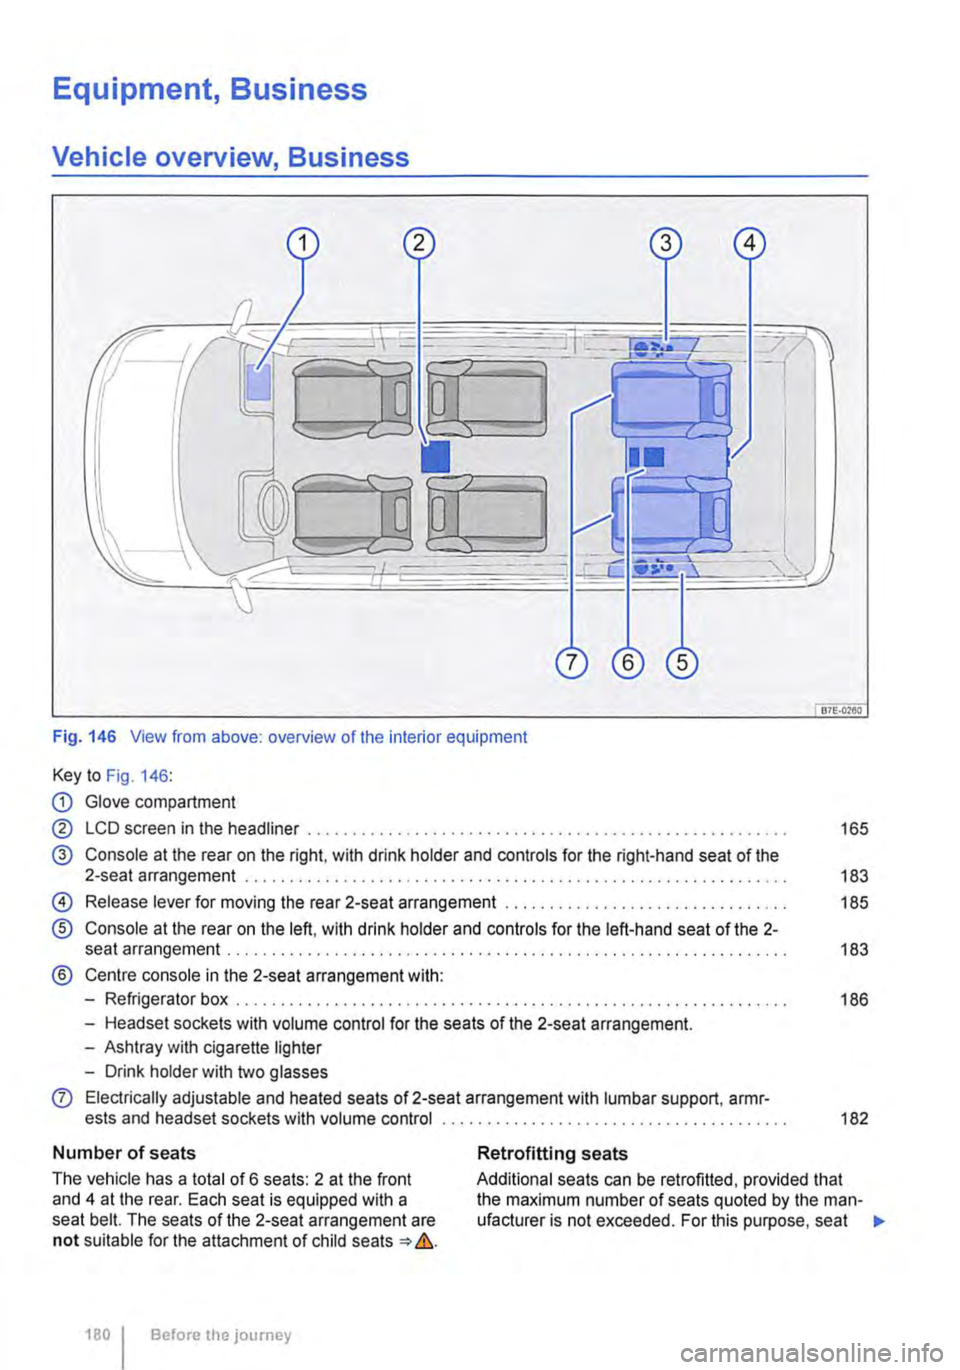
Fig. 146 View from above: overview of the interior equipment
Key to Fig. 146:
CD Glove compartment
@ LCD screen in the headliner . . . . . ............ , . . . . . . . . . . . . . . . . . . . . . . 165
@ Console at the rear on the right, with drink holder and controls for the right-hand seat of the 2-seat arrangement . . . . . . . . . . . . . . . . . . . . . . . . . . . . . . . . . . . . . . . . . . . . . . . . . . . 183
@) Release lever for moving the rear 2-seat arrangement . . . . . . . . . . . . . . . . . 185
® Console at the rear on the left, with drink holder and controls for the left-hand seat of the 2-seat arrangement . . . . . . . . . . . . . . . . . . . . . . .... , .. , , , , , , , , . , , . , . . . . . . . . . . . . 183
® Centre console in the 2-seat arrangement with:
-Refrigerator box . . . . . . . . . . . . . . . . . . . . . . . . . . . . . . . . . . . . . . . . . . . . . . . . . . . . . . . . . . . 186
-Headset sockets with volume control for the seats of the 2-seat arrangement.
-Ashtray with cigarette lighter
-Drink holder with two glasses
0 Electrically adjustable and heated seats of 2-seat arrangement with lumbar support, armr-ests and headset sockets with volume control ............................ , . . . . . . . . . . 182
Number of seats
The vehicle has a total of 6 seats: 2 at the front and 4 at the rear. Each seat is equipped with a seat belt. The seats of the 2-seat arrangement are not suitable for the attachment of child seats => &.
180 I Before the journey
Retrofitting seats
Additional seats can be retrofitted, provided that the maximum number of seats quoted by the man-ufacturer is not exceeded. For this purpose, seat .,.
Page 183 of 486
A WARNING (Continued)
• Never use child seats In the groups 0 or 0+ on single seats that face the rear of the vehicle.
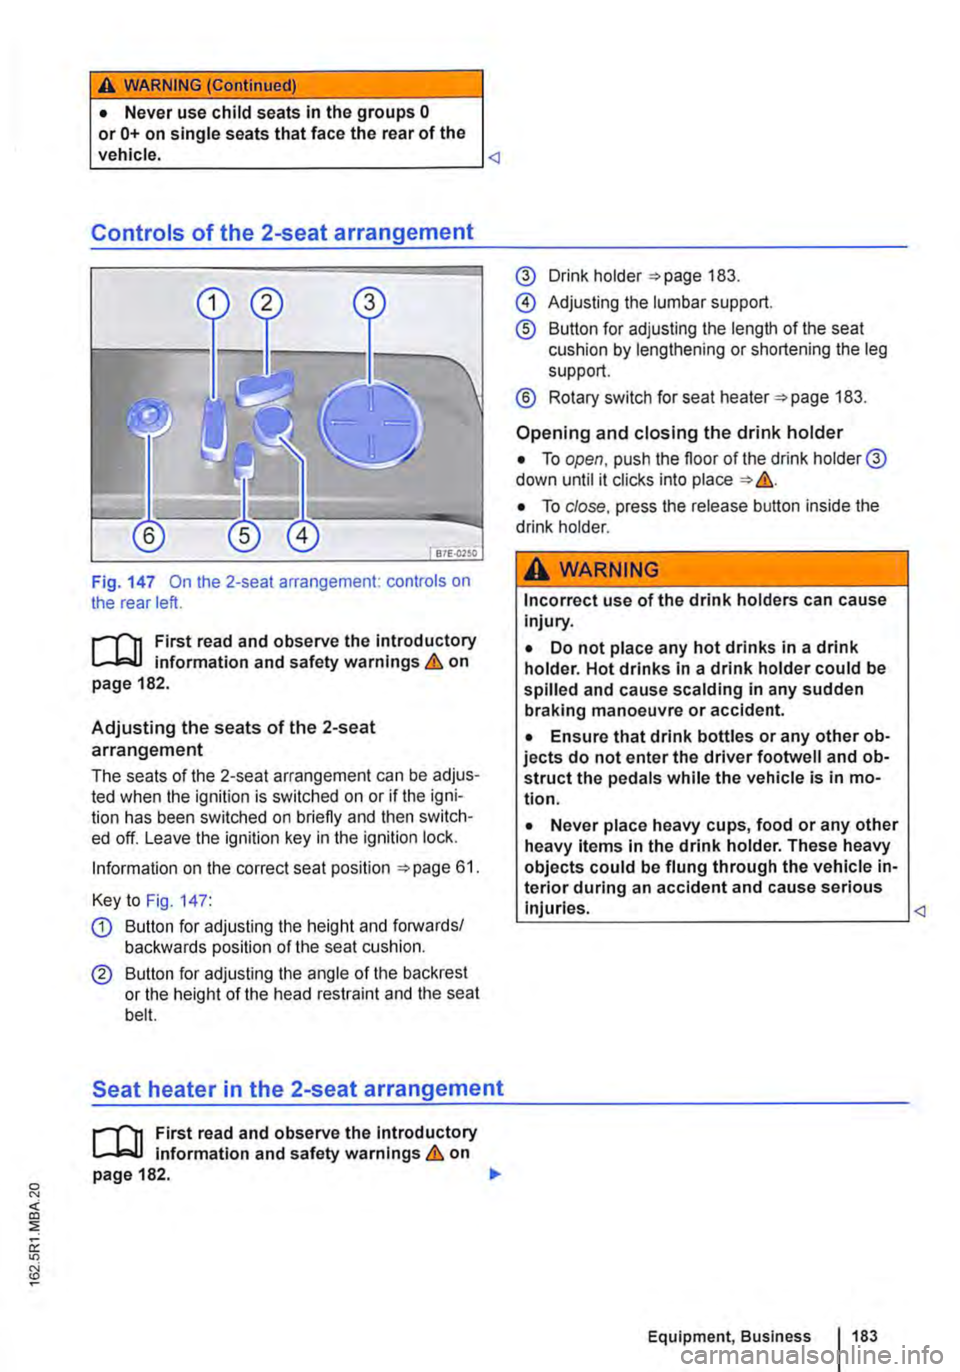
Fig. 147 On the 2-seat arrangement: controls on the rear left.
1"'1'11 First read and observe the Introductory L-J.:.U information and safety warnings & on page 182.
Adjusting the seats of the 2-seat
arrangement
The seats of the 2-seat arrangement can be adjus-ted when the ignition is switched on or if the igni-tion has been switched on briefly and then switch-ed off. Leave the ignition key in the ignition lock.
Information on the correct seat position 61.
Key to Fig. 147:
Q) Button for adjusting the height and forwards/ backwards position of the seat cushion.
® Button for adjusting the angle of the backrest or the height of the head restraint and the seat bell.
Seat heater in the 2-seat arrangement
1"'1'11 First read and observe the Introductory L-J.:.U Information and safety warnings & on page 182. .,..
@ Drink holder 183.
@ Adjusting the lumbar support.
® Button for adjusting the length of the seat cushion by lengthening or shortening the leg support.
® Rotary switch for seat heater 183.
Opening and closing the drink holder
• To open, push the floor of the drink holder@ down until it clicks into place &.
• To close. press the release button inside the drink holder.
A WARNING
Incorrect use of the drink holders can cause Injury.
• Do not place any hot drinks in a drink holder. Hot drinks In a drink holder could be spilled and cause scalding in any sudden braking manoeuvre or accident.
• Ensure that drink bottles or any other ob-jects do not enter the driver footwell and ob-struct the pedals while the vehicle is in mo-tion.
• Never place heavy cups, food or any other heavy items in the drink holder. These heavy objects could be flung through the vehicle in-terior during an accident and cause serious Injuries.
Page 185 of 486
Moving the 2-seat arrangement
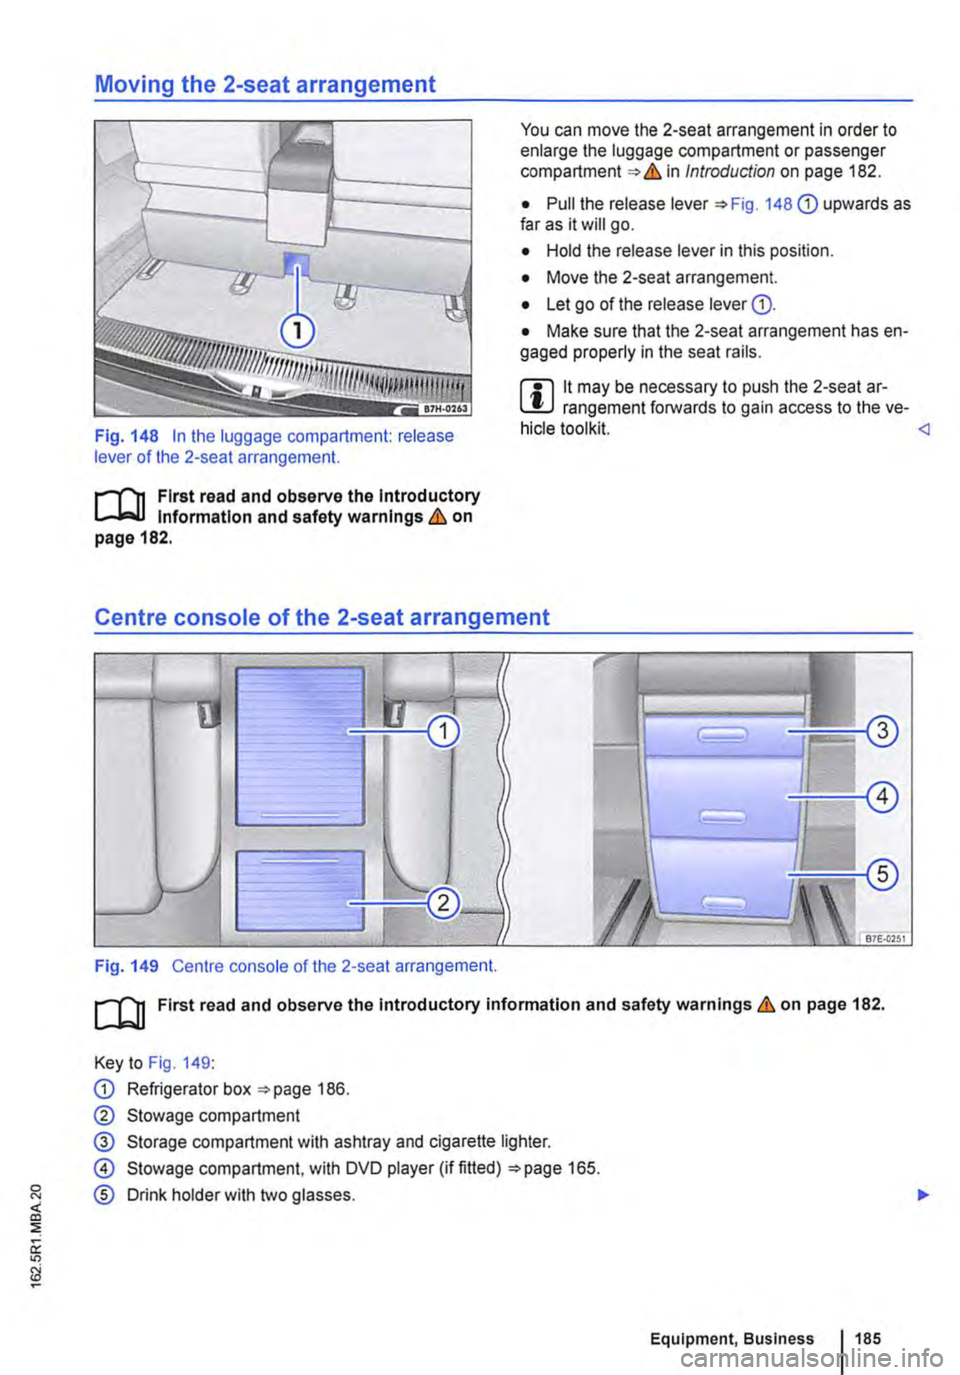
Fig. 148 In the luggage compartment: release lever of the 2-seat arrangement.
r-f"'n First read and observe the Introductory l..-Jo-IJ Information and safety warnings & on page 182.
You can move the 2-seat arrangement in order to enlarge the luggage compartment or passenger compartment & in Introduction on page 182.
• Pull the release lever 148 G) upwards as far as it will go.
• Hold the release lever in this position.
• Move the 2-seat arrangement.
• Let go of the release lever G).
• Make sure that the 2-seat arrangement has en-gaged properly in the seat rails.
m lt may be necessary to push the 2-seat ar-L!:J rangement forwards to gain access to the ve-hicle tool kit.
Fig. 149 Centre console of the 2-seat arrangement.
ro First read and observe the Introductory information and safety warnings & on page 182.
Key to Fig. 149:
G) Refrigerator box 186.
0 Stowage compartment
@ Storage compartment with ashtray and cigarette lighter.
@ Stowage compartment. with DVD player (if fitted) 165.
® Drink holder with two glasses.
::; ir "'
Equipment, Business 1185
Page 190 of 486
Key to Fig. 151:
G) Make the rear-seat telephony system visible to Bluetooth devices.
@ Increase call volume.
@ Press briefly: call volume is lowered. Press and hold down for approx. 10 seconds: the list of all devices is deleted from the rear-seat tel-ephony system.
il""'n First read and observe the introductory L--i=J.I information and safety warnings & on page 187.
Each mobile telephone must be paired with the rear-seat telephony system via Bluetooth once.
The pairing process takes a few minutes.
For pairing, you do not need to place the mobile telephone in the charging base (telephone holder).
Step 1: Preparations on the mobile telephone
• Read the operating manual for the mobile telephone.
• Switch on the mobile telephone.
• Deactivate the keypad lock.
• Switch off the screen saver.
• Deactivate the warning and service tones, e.g. key tones.
• Close all active Bluetooth connections on the mobile telephone.
Step 2: Making the rear-seat telephony system visible for Bluetooth
• With the ignition switched on, press the 151 G) button.
Step 3: Pairing the mobile telephone
• Activate the Bluetooth function on the mobile telephone.
• Start the Bluetooth device search on the mobile telephone. it will display a list of the devices found.
Functional description
il""'n First read and observe the introductory L--i=J.I information and safety warnings & on page 187.
190 I Before the journey
• Select CC9045 ... device.
• Confirm the selection on the mobile telephone to set up a Bluetooth connection.
• A message on the mobile telephone prompts you to enter a password for authorisation.
• Enter the password 1234. If an incorrect pass-word is entered, the pairing process will be abor-ted. Start again from step 2.
• If you would like this Bluetooth connection to be made in future without password entry, select Yes if offered this option by the mobile telephone.
• An acoustic signal will be emitted to confirm that the pairing process has been successful.
m Up to six devices can be stored as known in L!.J the rear-seat telephony system. If an addi-tional device is then paired with the rear-seat tel-ephony system, the authentication for the device that has remained unused for the longest time will be deleted automatically.
m Mobile telephones and other Bluetooth devi-L!.J ces can be set in such a way that they auto-matically connect themselves to the rear-seat tel-ephony system. Volkswagen Commercial Vehicles recommends that automatic pairing be deactiva-ted, especially in case an additional provision for mobile telephone in the vehicle is used at another time.
Page 191 of 486
When the mobile telephone has been paired with the rear-seat telephony system via Bluetooth, the following applies:
• There is a connection between the mobile tele-phone and the microphone at the rear on the right in the passenger compartment headliner.
• Incoming calls are output over the vehicle loud-speaker in the rear right side trim paneL
• The digital voice enhancement (DVE) is switch-ed off during a telephone calL
When a paired mobile telephone is in the charging base (telephone holder), the following applies:
• The mobile telephone is connected to the exter-nal aerial via the charging base.
• If the vehicle key is in the ignition lock. the bat-tery in the mobile telephone will be charged, if nec-essary.
Using the telephone handset
Active telephone calls can also be conducted by means of the telephone handset 152.
• Open the storage compartment in the armrest of the 2-seat arrangement.
• Pick up the handset during an active telephone calL
The microphone and the vehicle loudspeaker in the side trim panel will then be switched off. The telephone call will only be audible via the tele-phone handset ("Private Mode").
If the handset is replaced in its holder, the micro-phone and the vehicle loudspeaker in the side trim panel will be switched on again and the telephone call will not be ended.
• To end the telephone call, press the corre-sponding button on the mobile telephone.
Deleting the list of all devices from the rear-seat telephony system
• Close the existing Bluetooth connection on the mobile telephone.
• Press and hold button 151@ for longer than 10 seconds.
• A signal will sound to confirm that the data has been deleted.
m All other functions must be carried out direct-L!J ly from the mobile telephone.
Page 192 of 486
Equipment, California
Vehicle overview, California
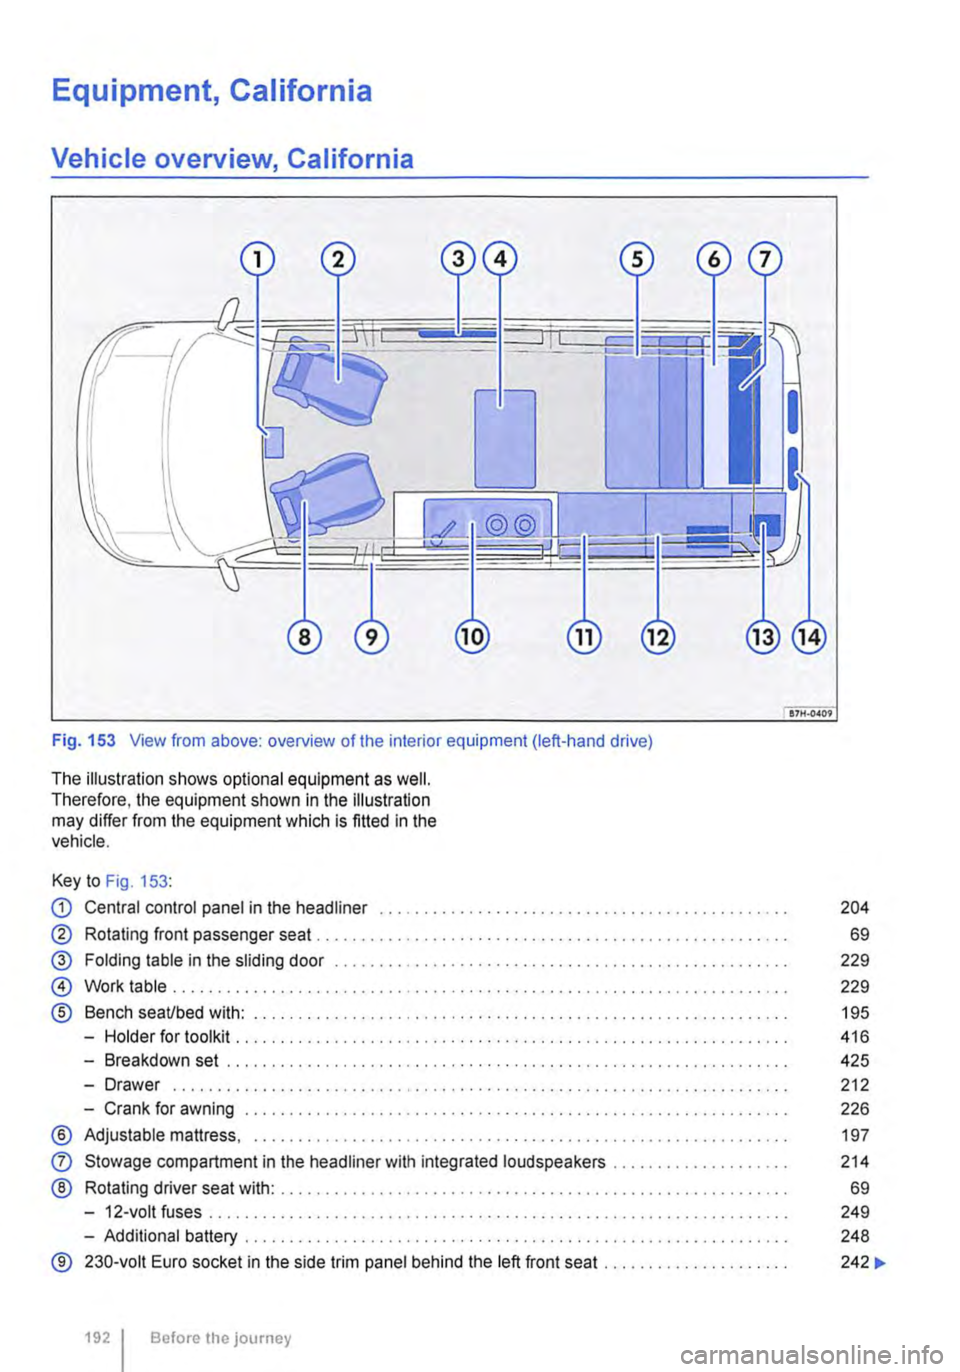
Fig. 153 View from above: overview of the interior equipment (left-hand drive)
The illustration shows optional equipment as well. Therefore, the equipment shown in the illustration may differ from the equipment which is fitted in the vehicle.
Key to Fig. 153:
CD Central control panel in the headliner . . . . . . . . . . . . . . . . . . . . . . . . . • . . . . . . . . . . . . . . . . . . . . 204
® Rotating front passenger seat . . . . . . . . . . . . . . . . . . . . . . . . . . . . . . . . . . . . . . . . . . . . . . . . . . . 69
@ Folding table in the sliding door . . . . . . . . . . . . . . . . . . . . . . . . . . . . . . . . . . . . . . . . . . . . . . 229
@ Work table . . . . . . . . . . . . . . . . . . . . . . . . . . . . . . . . . . . . . . . . . . . . . . . . . . . . . . . . . . . . . . . . . . 229
® Bench seaUbed with: . . . . . . . . . . . . . . . . . . . . . . . . . . . . . . . . . . . . . . . . . . . . . . . . . . . 195
-Holder for toolkit .......... .
-Breakdown set ..................................................... .
-Drawer ................................................................. · · ·
-Crank for awning .............................................•..............
® Adjustable mattress, ............................................•...............
0
®
Stowage compartment in the headliner with integrated loudspeakers ................... .
Rotating driver seat with: ........................................................ .
-12-volt fuses ..
-Additional battery ........... .
® 230-volt Euro socket in the side trim panel behind the left front seat ..
1921 Before the journey
416
425
212
226
197
214
69
249
248
242 ...
Page 193 of 486
@ Kitchen unit with:
-Gas cooker ................................... . 233
242
242
-230-volt grounded safety socket ................. .
-12-volt socket .............................•..................................
-Cupboard with two sliding doors
-Drawer
-Waste water tank with drain lever and opening for cleaning ...... . 237
-First aid kit on the rear panel of the left stowage compartment in the cupboard
@ Refrigerator box ...
@ Wardrobe with:
241
-Cleaning opening for fresh water tank . . . . . . . . . . . . . . . . . . . . . . . . . . . . . . . . . . . . . . . 237
-Second additional battery . . . . . ........ , . . . . . . . . . . . . . . . . . . . . . . . . . . 248
-Lockable stowage compartment . . . . . . . . . . . . . . . . . . . . . . . . . . . . . . . . . . . . . . . . . . . . . . . . 214
@ Stowage area with:
-Residual current circuit breaker ............... , ...... . 247
233
229
-Gas bottle holder .................. .
® Tailgate with room for stowing two camping chairs
Number of seats
The vehicle has a total of 4 seats: 2 at the front and 2 at the rear. Each seat is equipped with a seat belt.
Retrofitting seats
Additional seats can be retrofitted, provided that the maximum number of seats quoted by the man-ufacturer is not exceeded. For this purpose, seat anchor points should be fitted to the vehicle floor by a specialist workshop in accordance with Volks-wagen AG guidelines.
These additional seats must also have seat belt anchor points and suitable seat belts.
The Volkswagen Commercial Vehicles dealership can provide you with more information on retrofit-ting seats.
Furniture Catches
The flaps and doors are fitted with furniture catch-es to prevent them from opening when the vehicle is in motion.
Seat functions, rear, California
ClJ Introduction
This chapter contains information on the following subjects:
Bench seat/bed . . . . . . . . . . . . . . . . . . . . • • . . . 195
Bed (bench seat/bed) . . . . . . . . . . . 196 Mattress, bench seat/bed . . . . . . . . . . . . . . . . . 197
Components of the mattress, 3-seat bench . . 198
To open the doors in the kitchen unit, press and hold the catch. Slide the door open.
Equipment accessible only from the outside of the vehicle
• Opening for filling the fresh water tank on the rear left side of the vehicle (with lockable lid and separate key)
• 230-volt electrical feed on the rear left side of the vehicle (with flap cover)
• Fresh water tank drain opening under the vehi-cle.
• Waste water tank drain opening under the vehi-cle.
• Awning rails on the left and right side of the top of the vehicle on the roof frame.
• Awning adapter on left (if vehicle is fitted with an awning) and on right in the awning rail.
• Awning: attach to aluminium rail on right side over sliding door only.
Mattress for a medium-length bed, 3-seat bench . . . . . . . . . . . . . . . . . . . . . . . . . . . . 199 Mattress for a long bed, 3-seat bench . . . . . . . 201 Stowing the mattress, 3-seat bench . . . . . . . . 203 .,..
Equipment, California 1193