Page 169 of 592
169
2-1. Driving procedures
2
When driving
NOTICE
■
To prevent battery discharge
Do not leave the key in the “ACC” or “ON” position for long periods if the
engine is not running.
■ When starting the engine
●Do not race a cold engine.
● If the engine becomes difficult to start or stalls frequently, have the engine
checked immediately.
Page 170 of 592
170
2-1. Driving procedures
Automatic transmission
Select a shift position appropriate for the driving conditions.
■Shifting the shift lever
While the engine switch is in the “ON” position, depress the
brake pedal and move the shift lever.
■ Shift position uses
*: To improve fuel efficiency and reduce noises, set the shift lever in the
D position for normal driving.
Shift positionFunction
P Parking the vehicle or starting the engine
R Reversing
N Neutral
D Normal driving
*
4 Position for engine braking
3, 2 Position for more powerful engine braking
L Position for maximum engine braking
Page 171 of 592
171
2-1. Driving procedures
2
When driving
■
Downshifting restrictions
The shift lever cannot be downshifted if the following speeds are exceeded.
2WD models mph (km/h)
AWD models mph (km/h)
■ When driving with the cruise control system
Engine braking will not occur when downshifting from D to 4. ( P. 194, 197)
■ If the shift lever cannot be shifted from P
P. 530
DownshiftingMaximum speed
4 3 100 (162)
3 2 64 (104)
2 L 36 (58)
DownshiftingMaximum speed
4 3 95 (154)
3 2 61 (99)
2 L 34 (55)
Page 172 of 592
172
2-1. Driving procedures
Tur n signal lever
■Turn signals can be operated when
The engine switch is in the “ON” position.
■ If the indicators flash faster than usual
Check that a light bulb in the front or rear turn signal lights has not burned
out.
Right turn
Left turn
Move and hold the lever
partway to signal a lane
change.
The right hand signal will flash
until you release the lever.
Move and hold the lever
partway to signal a lane
change.
The left hand signal will flash
until you release the lever.
Page 174 of 592
174
2-2. Instrument cluster and information display
Gauges and meters
Optitron type meters
Non-Optitron type meters
Optitron type meters only The following gauges, meters and dis-
plays illuminate when the engine switch is in the “ON” position.
Tachometer
Displays the engine speed in revolutions per minute.
Speedometer
Displays the vehicle speed.
Page 175 of 592
175
2-2. Instrument cluster and information display
2
When driving
Fuel gauge
Displays the quantity of fuel remaining in the tank.
Engine coolant temperature gauge
Displays the engine coolant temperature.
Dynamic laser cruise control display (if equipped)
P. 197
Odometer/trip meter/instrument p
anel light control and trip meter
reset button
Switches between odometer and trip meter displays. Pressing and
holding the button will reset the trip meter when the trip meter is being
displayed.
To adjust the brightness of the instrument panel light, turn the button.
( P. 176)
Odometer and trip meter
Odometer: Displays the total distance the vehicle has been driven.
Trip meter: Displays the distance the vehicle has been driven since the
meter was last reset. Trip meters “A” and “B” can be used to record and
display different distances independently.
Page 176 of 592
176 2-2. Instrument cluster and information display
Instrument panel light controlThe brightness of the instrument panel lights can be adjusted.
Darker
Brighter
Optitron type meters only:
When the headlight switch is
turned on, the brightness will
be reduced slightly unless the
control button is turned fully
clockwise.
NOTICE
■To prevent damage to the engine and its components
●Do not let the indicator needle of the tachometer enter the red zone, which
indicates the maximum engine speed.
● The engine may be overheating if the engine coolant temperature gauge is
in the red zone (H). In this case, immediately stop the vehicle in a safe
place, and check the engine after it has cooled completely. (
P. 536)
Page 179 of 592

179
2-2. Instrument cluster and information display
2
When driving
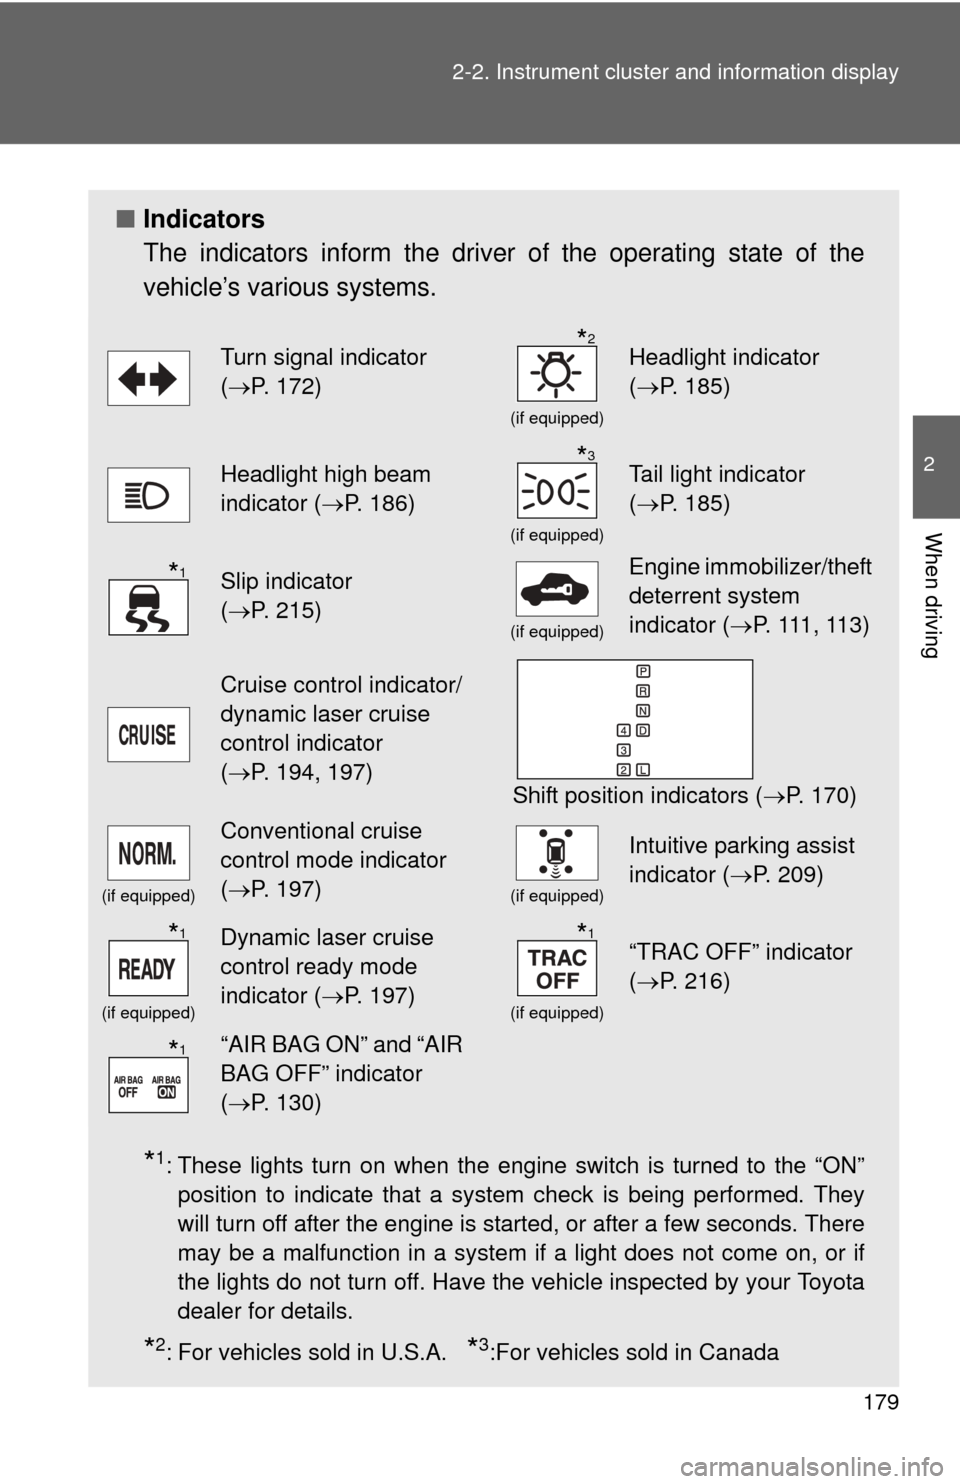
■
Indicators
The indicators inform the driver of the operating state of the
vehicle’s various systems.
*1: These lights turn on when the engine switch is turned to the “ON”
position to indicate that a system check is being performed. They
will turn off after the engine is started, or after a few seconds. There
may be a malfunction in a system if a light does not come on, or if
the lights do not turn off. Have the vehicle inspected by your Toyota
dealer for details.
*2: For vehicles sold in U.S.A. *3:For vehicles sold in Canada
Turn signal indicator
(P. 172)
(if equipped)
Headlight indicator
( P. 185)
Headlight high beam
indicator ( P. 186)
(if equipped)
Tail light indicator
(P. 185)
Slip indicator
(P. 215)
(if equipped)
Engine immobilizer/theft
deterrent system
indicator ( P. 111 , 11 3 )
Cruise control indicator/
dynamic laser cruise
control indicator
(P. 194, 197)
Shift position indicators ( P. 170)
(if equipped)
Conventional cruise
control mode indicator
(P. 197)
(if equipped)
Intuitive parking assist
indicator ( P. 209)
(if equipped)
Dynamic laser cruise
control ready mode
indicator (P. 197)
(if equipped)
“TRAC OFF” indicator
(P. 216)
“AIR BAG ON” and “AIR
BAG OFF” indicator
(P. 130)
*2
*3
*1
*1*1
*1