Page 115 of 315
MY PLACES
11 8
6. To delete the destination, touch
“Yes”. To cancel the deletion, touch
“No”.
Page 122 of 315
TELEPHONE AND INFORMATION
125
3. Touch “Yes” to connect your phone.
4. When this screen is displayed, input
the passcode displayed on the screen
into the phone.
For the operation of the phone, see the
manual that comes with your cellular
phone.
If you want to cancel it, touch “Cancel”.
5. When the connection is completed,
this screen is displayed.
You do not need to enter the phone in case
of using the same one.
When this screen is displayed, follow the
guidance on the screen to try again.
Page 132 of 315
TELEPHONE AND INFORMATION
135
Calling without the voice recognition
After the entry number is displayed, you
can also call by pushing
of the steering
wheel or touching “Dial”.
Cancelling the voice recognition
The voice recognition will be cancelled
when you do the following.
�Keep on pushing the talk switch.
�Push of the steering wheel.
�Touch “Cancel” . (Except for recogniz-
ing the command.)
�Say “Cancel”.
�By POI* call
You can call by touching when it is
displayed on the screen from naviga-
tion system. (See “POI INFORMA TION”
on page 36 for details.)
*: Point of Interest
Page 148 of 315

AUDIO SYSTEM
151
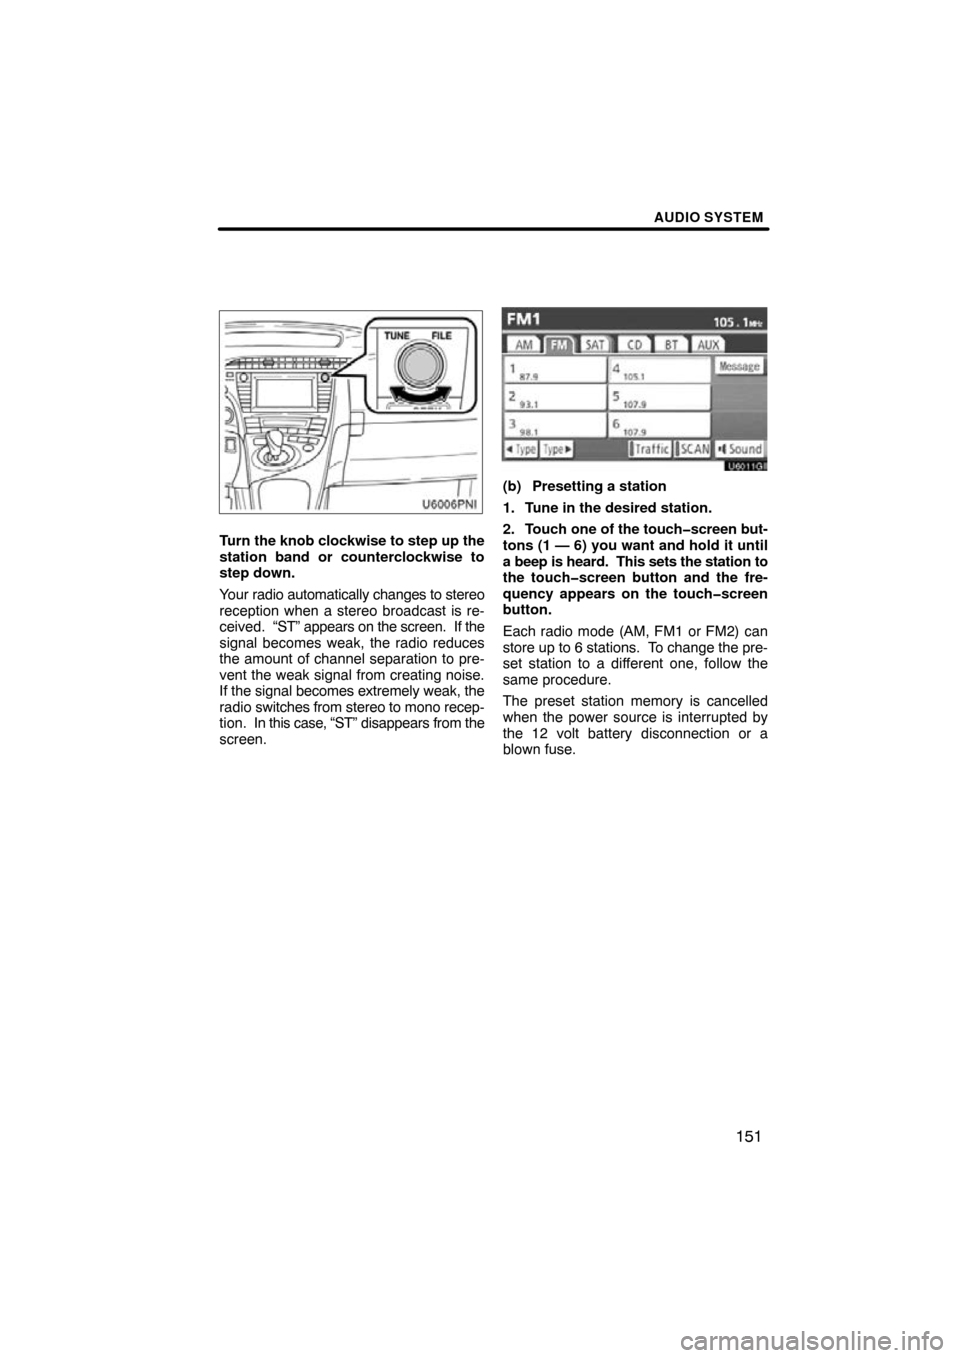
Turn the knob clockwise to step up the
station band or counterclockwise to
step down.
Your radio automatically changes to stereo
reception when a stereo broadcast is re-
ceived. “ST” appears on the screen. If the
signal becomes weak, the radio reduces
the amount of channel separation to pre-
vent the weak signal from creating noise.
If the signal becomes extremely weak, the
radio switches from stereo to mono recep-
tion. In this case, “ST” disappears from the
screen.
U6011GI
(b) Presetting a station
1. Tune in the desired station.
2. Touch one of the touch�screen but-
tons (1 — 6) you want and hold it until
a beep is heard. This sets the station to
the touch�screen button and the fre-
quency appears on the touch�screen
button.
Each radio mode (AM, FM1 or FM2) can
store up to 6 stations. To change the pre-
set station to a different one, follow the
same procedure.
The preset station memory is cancelled
when the power source is interrupted by
the 12 volt battery disconnection or a
blown fuse.
Page 152 of 315

AUDIO SYSTEM
155
To listen to a satellite radio broadcast in
your vehicle, a subscription to the XM�
Satellite Radio service is necessary.
(a) How to subscribe to an XM� Satel-
lite Radio
An XM� Satellite Radio is a tuner designed
exclusively to receive broadcasts provided
under a separate subscription. Availability
is limited to the 48 contiguous U.S. states
and some Canadian provinces.
How to subscribe:
You must enter into a separate service
agreement with the XM� Satellite Radio in
order to receive satellite broadcast pro-
gramming in the vehicle. Additional activa-
tion and service subscription fees apply
that are not included in the purchase price
of the vehicle and optional digital satellite
tuner.
For complete information on subscription
rates and terms, or to subscribe to the XM�
Satellite Radio.
U.S.A.—
Visit on the web at www.xmradio.com
or
call 1 −800− 967−2346.
Canada—
Visit on the web at www .xmradio.ca
or call
1−877−438−9677. The XM
� Satellite Radio is solely responsi-
ble for the quality, availability and content
of the satellite radio services provided,
which are subject to the terms and condi-
tions of the XM � Satellite Radio customer
service agreement.
Customers should have their radio ID
ready; the radio ID can be found by tuning
to “channel 000” on the radio. For details,
see “(b) Displaying the radio ID” below.
All fees and programming are the respon-
sibility of the XM� Satellite Radio and are
subject to change.
Satellite tuner technology notice:
Toyota’s satellite radio tuners are awarded
Type Approval Certificates from XM� Sat-
ellite Radio Inc. as proof of compatibility
with the services offered by the XM � Satel-
lite Radio.
(b) Displaying the radio ID
Each XM � tuner is identified with a unique
radio ID. You will need the radio ID when
activating XM� service or when reporting
a problem.
If you select the “CH 000” using the
“TUNE FILE” knob, the ID code of 8 al-
phanumeric characters appears. If you se-
lect another channel, display of the ID
code is canceled. The channel(000) alter-
nates the display between the radio ID and
the specific radio ID code.
—Radio operation
(XM� Satellite Radio
broadcast)
Page 154 of 315

AUDIO SYSTEM
157
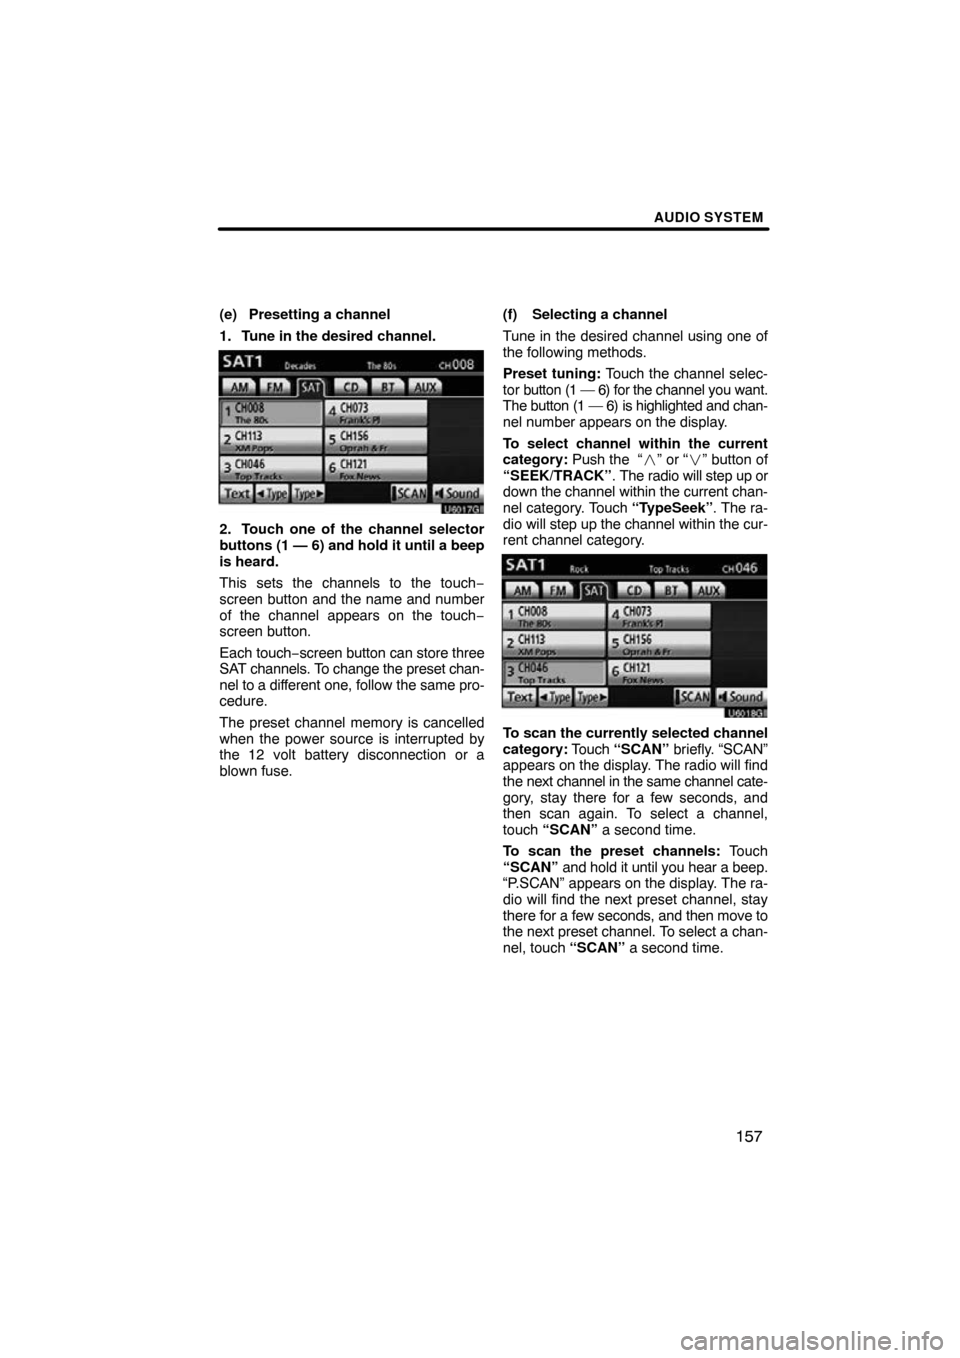
(e) Presetting a channel
1. Tune in the desired channel.
U6017GI
2. Touch one of the channel selector
buttons (1 — 6) and hold it until a beep
is heard.
This sets the channels to the touch −
screen button and the name and number
of the channel appears on the touch −
screen button.
Each touch− screen button can store three
SAT channels. To change the preset chan-
nel to a different one, follow the same pro-
cedure.
The preset channel memory is cancelled
when the power source is interrupted by
the 12 volt battery disconnection or a
blown fuse. (f) Selecting a channel
Tune in the desired channel using one of
the following methods.
Preset tuning:
Touch the channel selec-
tor button (1 — 6) for the channel you want.
The button (1 — 6) is highlighted and chan-
nel number appears on the display.
To select channel within the current
category: Push the “� ” or “�” button of
“SEEK/TRACK” . The radio will step up or
down the channel within the current chan-
nel category. Touch “TypeSeek”. The ra-
dio will step up the channel within the cur-
rent channel category.
U6018GI
To scan the currently selected channel
category: Touch “SCAN” briefly. “SCAN”
appears on the display. The radio will find
the next channel in the same channel cate-
gory, stay there for a few seconds, and
then scan again. To select a channel,
touch “SCAN” a second time.
To scan the preset channels: Touch
“SCAN” and hold it until you hear a beep.
“P.SCAN” appears on the display. The ra-
dio will find the next preset channel, stay
there for a few seconds, and then move to
the next preset channel. To select a chan-
nel, touch “SCAN” a second time.
Page 156 of 315

AUDIO SYSTEM
159
(h) If the satellite radio tuner malfunctions
When problems occur with the XM� tuner, a message will appear on the display. Refer-
ring to the table below to identify the problem, take the suggested corr\
ective action.
ANTENNA
The XM� antenna is not connected. Check whether the
XM � antenna cable is attached securely.
A short circuit occurs in the antenna or the surrounding
antenna cable. See a Toyota certified dealer for assis-
tance.
UPDATING
You have not subscribed to the XM � Satellite Radio.
The radio is being updated with the latest encryption
code. Contact the XM� Satellite Radio for subscription
information. When a contract is canceled, you can
choose the “CH000” and all free −to− air channels.
The premium channel you selected is not authorized.
Wait for about 2 seconds until the radio returns to the
previous channel or “CH001”. If it does not change au-
tomatically, select another channel. If you want to listen
to the premium channel, contact the XM � Satellite Ra-
dio.
NO SIGNAL
The XM � signal is too weak at the current location. Wait
until your vehicle reaches a location with a stronger sig-
nal.
LOADINGThe unit is acquiring audio or program information. Wait
until the unit has received the information.
OFF AIRThe channel you selected is not broadcasting any pro-
gramming. Select another channel.
−−−−−
There is no song/program title or artist name/feature
associated with the channel at that time. No action
needed.
−−−
The channel you selected is no longer available. Wait
for about 2 seconds until the radio returns to the pre-
vious channel or “CH001”. If it does not change auto-
matically, select another channel.
Contact the XM � Listener Care Center at 1 −800−967−2346 (U.S.A.) or
1−877−438−9677 (Canada).
Page 164 of 315

AUDIO SYSTEM
167
U6022GI
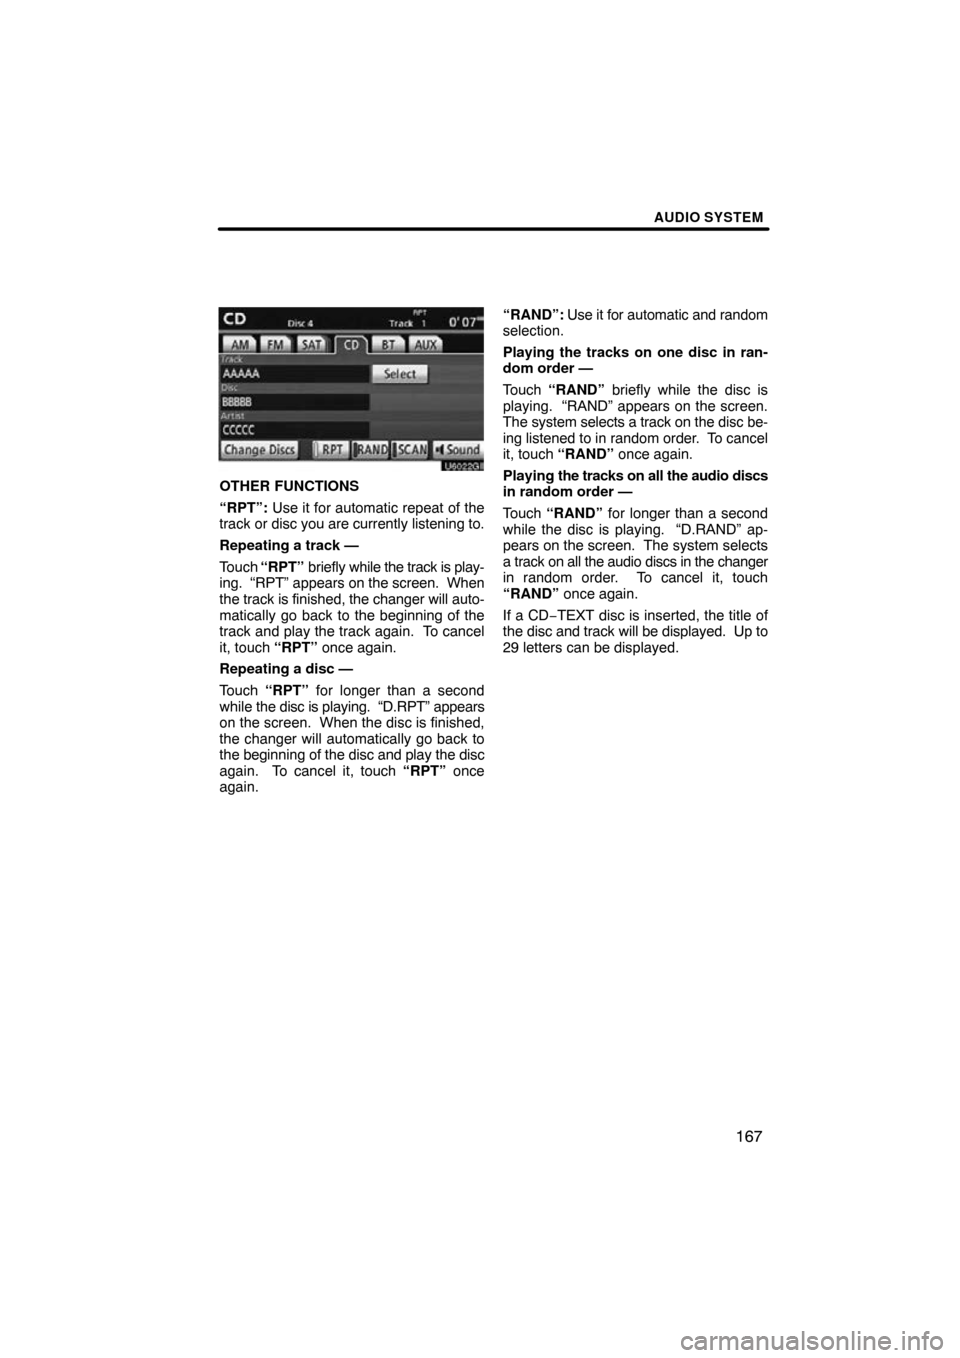
OTHER FUNCTIONS
“RPT”: Use it for automatic repeat of the
track or disc you are currently listening to.
Repeating a track —
Touch “RPT” briefly while the track is play-
ing. “RPT” appears on the screen. When
the track is finished, the changer will auto-
matically go back to the beginning of the
track and play the track again. To cancel
it, touch “RPT” once again.
Repeating a disc —
Touch “RPT” for longer than a second
while the disc is playing. “D.RPT” appears
on the screen. When the disc is finished,
the changer will automatically go back to
the beginning of the disc and play the disc
again. To cancel it, touch “RPT” once
again. “RAND”:
Use it for automatic and random
selection.
Playing the tracks on one disc in ran-
dom order —
Touch “RAND” briefly while the disc is
playing. “RAND” appears on the screen.
The system selects a track on the disc be-
ing listened to in random order. To cancel
it, touch “RAND” once again.
Playing the tracks on all the audio discs
in random order —
Touch “RAND” for longer than a second
while the disc is playing. “D.RAND” ap-
pears on the screen. The system selects
a track on all the audio discs in the changer
in random order. To cancel it, touch
“RAND” once again.
If a CD −TEXT disc is inserted, the title of
the disc and track will be displayed. Up to
29 letters can be displayed.