Page 172 of 264

OTHER FUNCTIONS
176
Speech command example: Searching
for a route to your home.
1. Push the talk switch.
2. Say “Home” .
You can also say the street name or ad-
dress.
∗ (ex. say “Woodridge Avenue” .)∗: “Hawaii” or Hawaii area is not covered by
the voice recognition.
If your home is not registered, you will hear
“Home is not registered”.
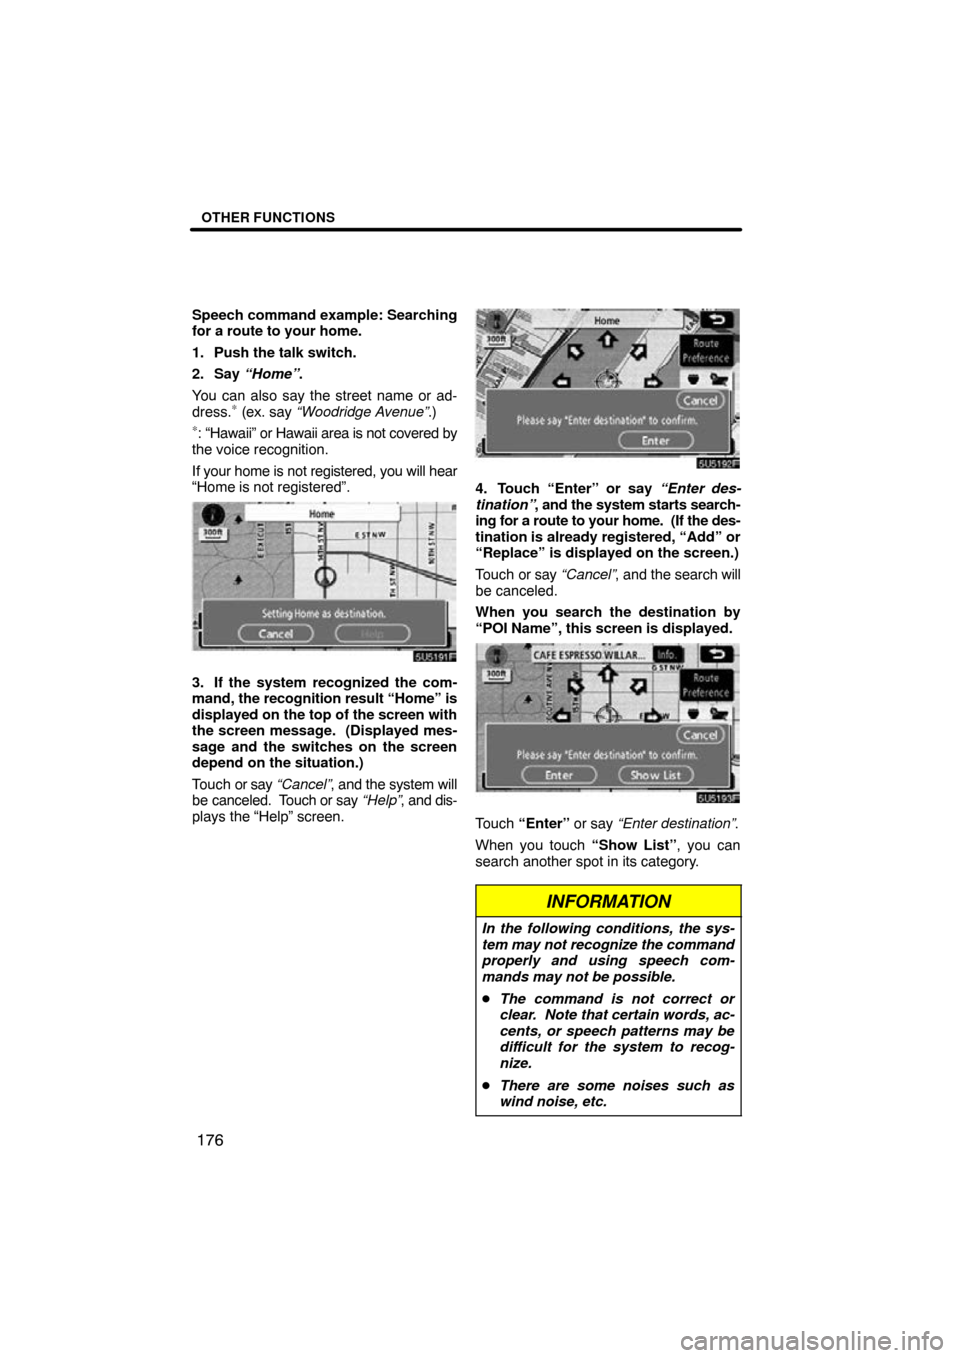
3. If the system recognized the com-
mand, the recognition result “Home” is
displayed on the top of the screen with
the screen message. (Displayed mes-
sage and the switches on the screen
depend on the situation.)
Touch or say “Cancel” , and the system will
be canceled. Touch or say “Help”, and dis-
plays the “Help” screen.
4. Touch “Enter” or say “Enter des-
tination” , and the system starts search-
ing for a route to your home. (If the des-
tination is already registered, “Add” or
“Replace” is displayed on the screen.)
Touch or say “Cancel” , and the search will
be canceled.
When you search the destination by
“POI Name”, this screen is displayed.
Touch “Enter” or say “Enter destination” .
When you touch “Show List”, you can
search another spot in its category.
INFORMATION
In the following conditions, the sys-
tem may not recognize the command
properly and using speech com-
mands may not be possible.
� The command is not correct or
clear. Note that certain words, ac-
cents, or speech patterns may be
difficult for the system to recog-
nize.
� There are some noises such as
wind noise, etc.
Page 174 of 264

OTHER FUNCTIONS
178
You can adjust the brightness, contrast,
color and tone of the screen. You can also
turn the display off, and change the screen
to either day or night mode.
�Contrast and brightness adjustment
The brightness and contrast of the screen
can be adjusted depending on the bright-
ness of your surroundings. You can also
turn the display off.
1. Push the “DISP” button.
2. Touch the desired button to adjust
contrast and brightness.
“Contrast” “+”:
Strengthens the contrast of the screen.
“Contrast” “�”:
Weakens the contrast of the screen.
“Brightness” “+”:
Brightens the screen.
“Brightness” “�”:
Darkens the screen.
3. After adjusting the screen, touch
“OK”. If your vehicle is equipped with the rear
seat entertainment system, the rear
screen turns on or off when
“Rear” is
touched.
The screen goes off when “Screen Off” is
touched. To turn the display screen back
on, push any button such as “INFO”, etc.
The selected screen appears.
INFORMATION
When you do not touch any touch�
screen button on the “Display”
screen for 20 seconds, the previous
screen will be displayed.
Screen adjustment
Page 175 of 264

OTHER FUNCTIONS
179
�
Color and tone adjustment
The color and tone of the screen can be
adjusted while a DVD video or video CD is
being played.
1. Push the “DISP” button.
2. Touch the desired button to adjust
color and tone. (with rear seat enter-
tainment system)
“Color” “R”:
Strengthens the red color of the screen.
“Color” “G”:
Strengthens the green color of the screen.
“Tone” “+”: Strengthens the tone of the
screen.
“Tone” “�”: Weakens the tone of the
screen.
3. After adjusting the screen, touch
“OK”.
The rear screen turns on or off when
“Rear” is touched.
The screen turns off when “Screen Off” is
touched. To turn the screen back on, push
any button such as “INFO” , etc. The se-
lected screen appears.
INFORMATION
When you do not touch any touch�
screen button on the “Display”
screen for 20 seconds, the previous
screen will be displayed.
�Changing between day mode and
night mode
Depending on the position of the headlight
switch, the screen changes to the day
mode or night mode.
To display the screen in the day mode
even with the headlight switch on,
touch “Day Mode” on the adjustment
screen for brightness and contrast con-
trol.
If the screen is set in the day mode with the
headlight switch turned on, this condition is
memorized in the system even with the en-
gine turned off.
Page 179 of 264
OTHER FUNCTIONS
183
You can turn the beep sound off.
1. Push the “INFO” button.
2. Touch “Beep Off”. “Beep Off” is
highlighted. To set the beep sound on,
touch “Beep Off” again. The language of the touch�screen but-
tons, pop�up messages and the voice
guidance can be changed.
1. Push the “INFO” button.
2. Touch “Language”.
3. Touch
“English”, “Français” or “Es-
pañol” to select a language.
4. Touch “OK”.
The language is changed and the screen
returns to the map display.
Beep settingSelect language
Page 182 of 264

AUDIO/VIDEO SYSTEM
186
Operations such as selecting a preset station and adjusting the sound balance are c\
ar-
ried out on the touch screen. To display the audio screen, push the “AUDIO” button.
1Function menu display screen
To control the radio, CD changer or
DVD player, touch the touch −screen
buttons. For details, see page 189.
2“AM/SAT” button
Push this button to choose an AM or
SAT station. For details, see pages
189 and 193.
3“FM 1·2” button
Push this button to choose an FM sta-
tion. For details, see pages 189 and
193.
4“DISC·AUX” button
Push this button to turn the CD
changer, DVD player and AUX on.
For details, see pages 189, 192, 206
and 218.
5“SCAN” button
Push this button to scan radio sta-
tions or scan the tracks, discs, files or
folders. For details, see pages 195,
209, 213, 220 and 223.
6“TUNE/FILE”/“AUDIO” knob
Push this knob to display the audio
control screen, and turn this knob to
move the station band and files up or
down. For details, see pages 188,
194 and 212.
7“LOAD·/CLOSE” button
Push this button to display the
“LOAD·EJECT” screen or close the
display. For details, see page 204.
Quick reference
Page 184 of 264

AUDIO/VIDEO SYSTEM
188
CAUTION
For vehicles sold in U.S.A. and
Canada:
�Part 15 of the FCC RulesFCC Warning:
Any unauthorized changes or
modifications to this equipment
will void the user’s authority to op-
erate this device.
�Laser products
�Do not take this unit apart or at-
tempt to make any changes
yourself. This is an intricate
unit that uses a laser pickup to
retrieve information from the
surface of compact discs. The
laser is carefully shielded so
that its rays remain inside the
cabinet. Therefore, never try to
disassemble the player or alter
any of its parts since you may
be exposed to laser rays and
dangerous voltages.
�This product utilizes a laser.
Use of controls or adjustments
or performance of procedures
other than those specified here-
in may result in hazardous radi-
ation exposure.
(a) Turning the system on and off
“PWR/VOL”: Push this knob to turn the
audio/video system on and off. Turn this
knob to adjust the volume. The system
turns on in the last mode used.
“TUNE/FILE”/“AUDIO”: Push this knob
to display touch− screen buttons for audio/
video system (audio control mode).
You can select the function that enables
automatic return to the previous screen
from the audio screen. See page 180 for
details.
Page 186 of 264

AUDIO/VIDEO SYSTEM
190
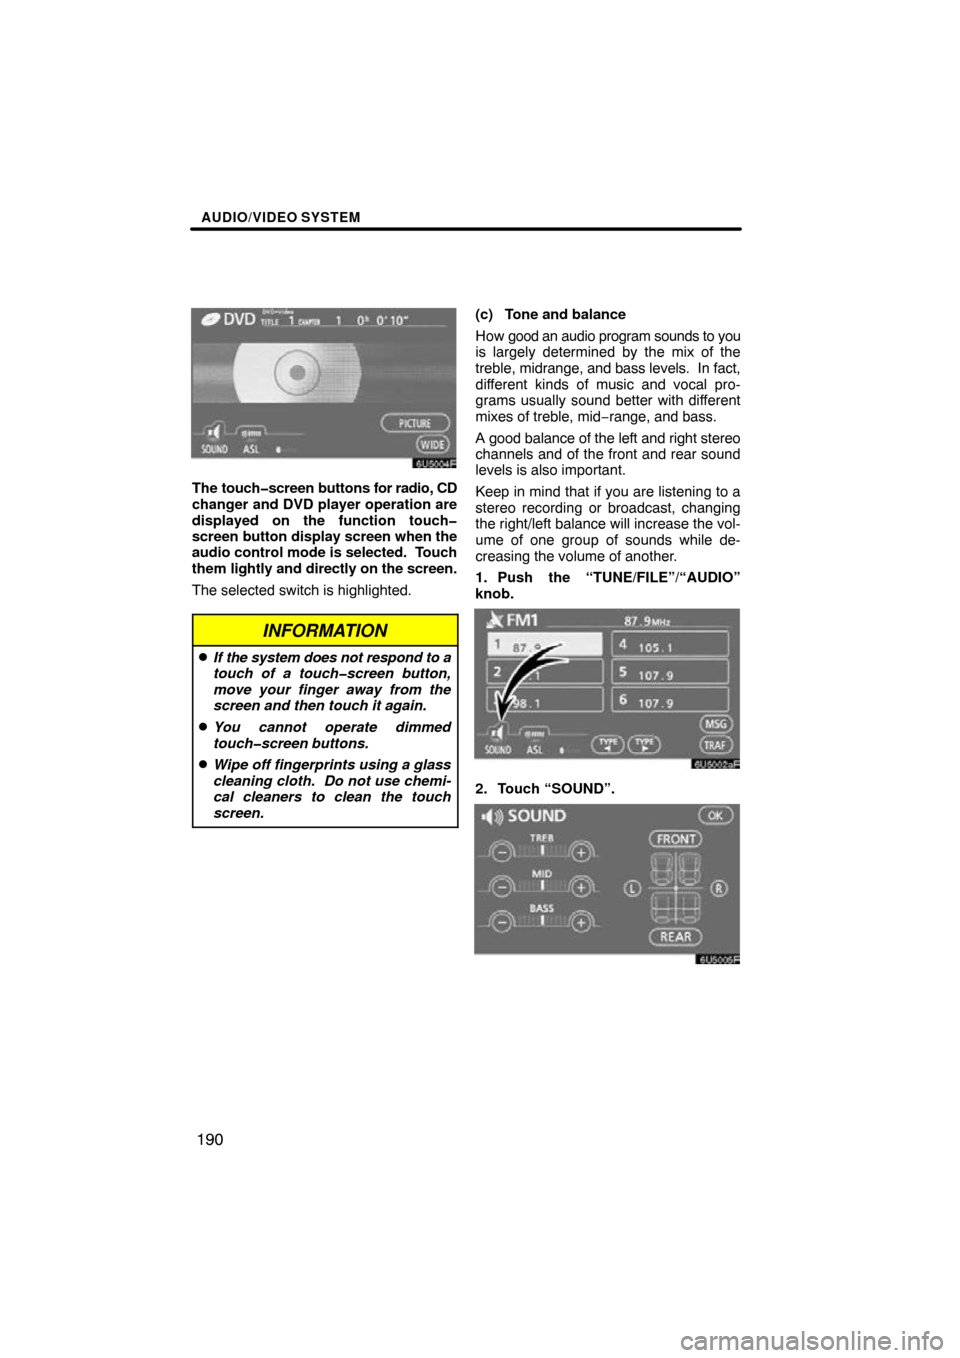
The touch�screen buttons for radio, CD
changer and DVD player operation are
displayed on the function touch�
screen button display screen when the
audio control mode is selected. Touch
them lightly and directly on the screen.
The selected switch is highlighted.
INFORMATION
�If the system does not respond to a
touch of a touch�screen button,
move your finger away from the
screen and then touch it again.
�You cannot operate dimmed
touch�screen buttons.
�Wipe off fingerprints using a glass
cleaning cloth. Do not use chemi-
cal cleaners to clean the touch
screen.
(c) Tone and balance
How good an audio program sounds to you
is largely determined by the mix of the
treble, midrange, and bass levels. In fact,
different kinds of music and vocal pro-
grams usually sound better with different
mixes of treble, mid −range, and bass.
A good balance of the left and right stereo
channels and of the front and rear sound
levels is also important.
Keep in mind that if you are listening to a
stereo recording or broadcast, changing
the right/left balance will increase the vol-
ume of one group of sounds while de-
creasing the volume of another.
1. Push the “TUNE/FILE”/“AUDIO”
knob.
2. Touch “SOUND”.
Page 187 of 264

AUDIO/VIDEO SYSTEM
191
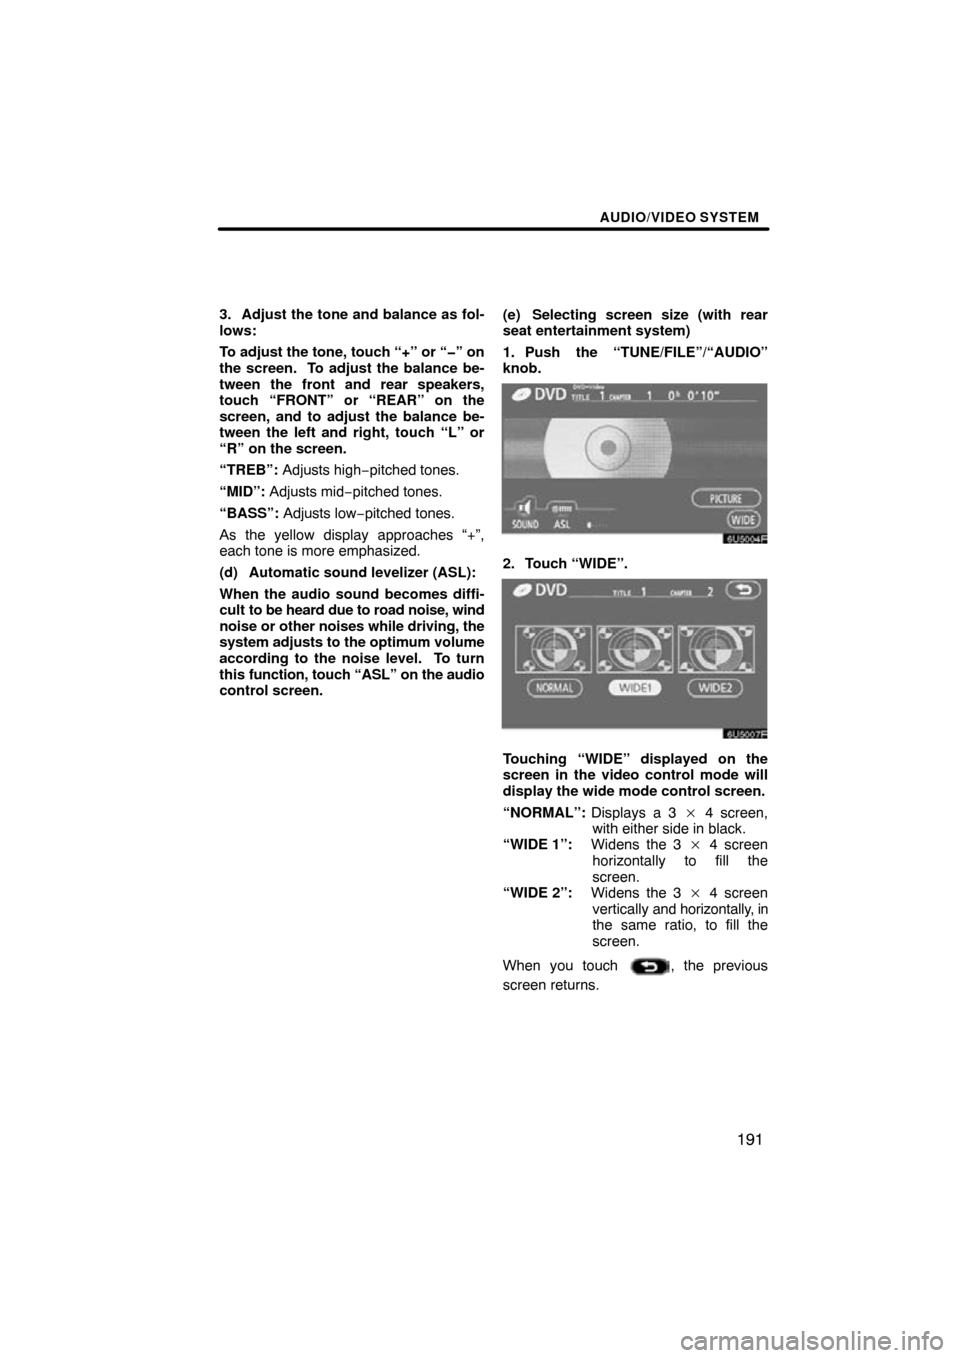
3. Adjust the tone and balance as fol-
lows:
To adjust the tone, touch “+” or “�” on
the screen. To adjust the balance be-
tween the front and rear speakers,
touch “FRONT” or “REAR” on the
screen, and to adjust the balance be-
tween the left and right, touch “L” or
“R” on the screen.
“TREB”: Adjusts high− pitched tones.
“MID”: Adjusts mid− pitched tones.
“BASS”: Adjusts low −pitched tones.
As the yellow display approaches “+”,
each tone is more emphasized.
(d) Automatic sound levelizer (ASL):
When the audio sound becomes diffi-
cult to be heard due to road noise, wind
noise or other noises while driving, the
system adjusts to the optimum volume
according to the noise level. To turn
this function, touch “ASL” on the audio
control screen. (e) Selecting screen size (with rear
seat entertainment system)
1. Push the “TUNE/FILE”/“AUDIO”
knob.
2. Touch “WIDE”.
Touching “WIDE” displayed on the
screen in the video control mode will
display the wide mode control screen.
“NORMAL”:
Displays a 3 � 4 screen,
with either side in black.
“WIDE 1”: Widens the 3 � 4 screen
horizontally to fill the
screen.
“WIDE 2”: Widens the 3 � 4 screen
vertically and horizontally, in
the same ratio, to fill the
screen.
When you touch
, the previous
screen returns.