Page 169 of 216
.XSwitch off the ignition.XOpen")
Replacing bulbs for front lamps
Before you start to replace a bulb for a
front lamp, do the following first:XTurn the exterior lamp switch to position
0027 (Y page 62).XSwitch off the ignition.XOpen the service flap ( Y page 110).
Left headlamp, (right headlamp in reverse)
0046Bulb socket for parking, and side
marker lamp0047Bulb socket for turn signal lamp008ALow‑beam headlamp cover0088High‑beam headlamp cover
Parking and side marker lamp bulb
XRemoving:
Driver’s side: Turn bulb socket 0046 toward
the outside.
Passenger side: Turn bulb socket 0046
toward the outside.XPull bulb socket 0046 out of the headlamp
housing.XPull the bulb out of bulb socket 0046.XInstalling: Insert the new bulb into bulb
socket 0046.XInsert bulb socket 0046 into the headlamp
housing.XDriver side: Turn bulb socket 0046 toward
the inside.
Passenger side: Turn bulb socket 0046
toward the inside.Low‑beam headlamp bulbXRemoving: Take off low‑beam headlamp
cover 008A.XDetach the electrical connector.XBend the retainer spring end down and
forward until it unclips. Fold the
retainer spring back.XPull the bulb out of the headlamp
housing.XInstalling: Insert the new bulb into the
headlamp housing.XFold the retainer spring forward.XBend the retainer spring end forward
then up and back to clip in.XAttach the electrical connector.XReinstall low‑beam headlamp cover 008A.
High‑beam headlamp bulb
XRemoving: Take off high‑beam headlamp
cover 0088.XDetach the electrical connector.XTilt the bulb socket down and pull it out.XPull the bulb out of the bulb socket.XInstalling: Insert the new bulb into the
bulb socket.XFit the bulb so that the retaining lug of
the base plate is pointing up.XPress the bulb into the bulb socket until
it is fully engaged.XAttach the electrical connector.XReinstall high‑beam headlamp cover 0088.
Front turn signal lamp bulb
XRemoving: Turn bulb socket 0047
counterclockwise by a quarter of turn and
pull it out of the headlamp housing.XPress gently onto the bulb and turn it
counterclockwise.XPull the bulb out of bulb socket 0047.Replacing bulbs167>> Practical hints.451_AKB; 3; 22, en-USd2ureepe,Version: 2.11.8.12009-07-27T09:36:34+02:00 - Seite 167Z
Page 170 of 216

XInstalling: Insert the new bulb into bulb
socket 0047.XPress gently onto the bulb and turn it
clockwise.XInsert bulb socket 0047 into the headlamp
housing.
The arrow on bulb socket 0047 must be in
line with the line on the headlamp
housing.XTurn bulb socket 0047 clockwise by a
quarter of turn.
Side turn signal lamp bulb
XRemoving: Open the door on the
corresponding side.XPress on retaining lug 0046 in the
direction of the arrow until the side turn
signal lamp housing disengages.XUse a suitable tool to loosen the side turn
signal lamp housing from the fender.XTurn the bulb socket counterclockwise
and pull it out of the side turn signal
lamp housing.XPull the bulb out of the bulb socket.XInstalling: Insert the new bulb into the
bulb socket.XInsert the bulb socket into the side turn
signal lamp housing and turn the bulb
socket clockwise.XFit the side turn signal lamp housing
onto the fender.XPress gently onto the side turn signal
lamp housing.
The side turn signal lamp housing must
audibly engage.
Replacing bulbs for rear lamps
Before you start to replace a bulb for a rear
lamp, do the following first:
XTurn exterior lamp switch to position
0027 (Y page 62).XSwitch off the ignition.
Tail lamp unit
XRemoving:
Coupé: Open the upper tailgate.XOpen the lower tailgate.XCabriolet: Open the rear soft top
( Y page 71).XRemove the side cover in the cargo
compartment on the corresponding side.XFold the damping material forward, if
necessary.
Left bulb carrier illustrated as example
0046Retaining tab0047Electrical connectorXPress retaining tab 0046 in the center of
the bulb carrier upwards.XPull the bulb carrier out of the tail lamp
housing.168Replacing bulbs>> Practical hints.
451_AKB; 3; 22, en-USd2ureepe,Version: 2.11.8.12009-07-27T09:36:34+02:00 - Seite 168
Page 171 of 216

0046Retaining tab008ABrake, tail, turn signal and side marker
lamp bulb0088Backup lamp bulbXDepending on which bulb needs to be
repl")
Left bulb carrier with bulb sockets (right bulb
carrier in reverse)
0046Retaining tab008ABrake, tail, turn signal and side marker
lamp bulb0088Backup lamp bulbXDepending on which bulb needs to be
replaced, press gently onto bulb 008A
or 0088 and turn it counterclockwise.XPull the bulb out of the bulb socket.XInstalling: Insert the new bulb into the
bulb socket.XPress gently onto the bulb and turn it
clockwise until it engages.XInsert the bulb carrier into the tail lamp
housing.XPress gently onto the bulb carrier.
Let retaining tab 0046 engage.XFold the damping material backward, if
necessary.XReinstall the side cover in the cargo
compartment.High-mounted brake lampXRemoving: Unscrew retaining screws 0046.XRemove high-mounted brake lamp 0047.XDetach electrical connector 0088 from bulb
socket 008A.XTurn the bulb counterclockwise and pull
it out of its socket.XInstalling: Install in the reverse order.
License plate lamps
GWarning!
High outside temperature, stop-and-go
traffic, driving on long uphill grades, or
driving at high engine speed may increase
the temperature in the engine
compartment. Therefore the area around the
air slots in the rear apron may be hot. Let
the engine cool off before touching this
area to prevent burns.
Replacing bulbs169>> Practical hints.451_AKB; 3; 22, en-USd2ureepe,Version: 2.11.8.12009-07-27T09:36:34+02:00 - Seite 169Z
Page 172 of 216

XUse a suitable tool to loosen the
corresponding license plate lamp unit at
jacking point 0046.XCarefully unclip the license plate lamp
unit.XDetach electrical connectors 0047.XRemove bulb 008A.XInsert the new bulb.XAttach electrical connectors 0047.XFit the license plate lamp unit on the
right and press gently on the left.
The license plate lamp unit must audibly
engage.
Replacing the interior lighting
You need a 12 V 10 W bulb.
XRemoving: Use a flat object to pry the
lamp lens off from the passenger side.XDetach electrical connector 0046 from the
interior lamp.XRemove bulb 0047 from its mount 008A.XInstalling: Insert the new bulb.XAttach electrical connector 0046 to the
interior lamp.XFit the lamp lens on the left in the
opening and press gently on the right.
The lamp lens must audibly engage.
Replacing wiper blades
About replacing wiper blades
GWarning!
For safety reasons, switch off the wipers
and remove the key from the starter switch
before replacing a wiper blade. The
windshield wipers could otherwise be set
in motion and cause injury.
GWarning!
Wiper blades are components that are
subject to wear and tear. Replace the wiper
blades at least twice a year, preferably in
the spring and fall. Otherwise the windows
will not be properly wiped. As a result, you
may not be able to observe surrounding
traffic conditions and could cause an
accident.
! Hold on to the wiper when folding the
wiper arm back. If released, the force of
the impact from the windshield wiper
tensioning spring could crack the
windshield.
Do not allow the wiper arms to contact the
windshield glass without a wiper blade
inserted.
We recommend that you have this work
carried out at an authorized smart
center.
170Replacing wiper blades>> Practical hints.
451_AKB; 3; 22, en-USd2ureepe,Version: 2.11.8.12009-07-27T09:36:34+02:00 - Seite 170
Page 173 of 216

To ensure proper visibility
R it is vital that you have wiper blades that
are in perfect shape
R clean the wiper blades regularly with a
cleaning agent
R remove any tough dirt stains with a
sponge or brush
Windshield wiper blades
! Do not pull on the wiper blade inserts.
They could tear.
Removing
XRemove the key from the starter switch.XFold wiper arm 0088 away from the
windshield until it snaps into place.XPress on retaining springs 0047 on both
sides of wiper blade 0046.XFold wiper blade 0046 away from wiper
arm 0088 in direction of arrow 008A.XDetach wiper blade 0046 in direction of
arrow 0086.InstallingXWith guide tab 0086 sliding into opening
0087 , attach new wiper blade 0046 onto the
wiper arm.XFold wiper blade 0046 towards the wiper
arm in direction of arrow 008A.
Retaining springs 0047 must audibly
engage in attachment 0088.XCheck whether wiper blade 0046 is securely
fastened.XFold the wiper arm backward to rest on
the windshield.
Make sure to hold on to the wiper when
folding it back.
! Make sure the wiper blades are properly
installed. Improperly installed wiper
blades may cause windshield damage.
Rear window wiper blade
Replacing wiper blades171>> Practical hints.451_AKB; 3; 22, en-USd2ureepe,Version: 2.11.8.12009-07-27T09:36:34+02:00 - Seite 171Z
Page 174 of 216

XRemoving: Fold the wiper arm away from
the rear window until you feel it engage.XFold wiper blade 0046 away from the wiper
arm in direction of arrow 0047 until it
disengages from its mounting.XDetach wiper blade 0046.XInstalling: Push the new wiper blade onto
the wiper arm until you feel it engage.XFold the wiper blade into a position
parallel to the wiper arm.XFold the wiper arm backward to rest on
the rear window.
Make sure to hold on to the wiper when
folding the wiper arm back.
! Make sure the wiper blade is properly
installed. An improperly installed
wiper blade may cause rear window
damage.
Adjusting the washer jet nozzles
0046Front washer jet nozzles0047Rear washer jet nozzlesXAdjusting: Use a needle to move washer
jet nozzles 0046 or 0047 left, right, up, or
down.
i Check the setting of the washer jet
nozzles at regular intervals. The washer
jet nozzles are correctly set when the
water jet hits the windshield or the rear
window approximately in the center.
Flat tire
Preparing the vehicle
Upon experiencing any type of problem
with the vehicle’s tires, switch on the
hazard warning flasher, carefully slow
down and exit the roadway in a cautious
manner.
XPark the vehicle at a safe distance from
moving traffic on a hard, flat surface
when possible.XMake sure the tire valve of the damaged
tire is located below the horizontal axle
of the wheel hub.XEngage the parking brake.XTurn the steering wheel so that the front
wheels are in a straight ahead position.XMove the gear selector lever to park
position P.XTurn off the engine.XRemove the key from the starter switch
and take the key with you.
i Open door only when conditions are safe
to do so.
XHave any passenger exit the vehicle at a
safe distance from the roadway.
Using the tire repair kit
! Depending on the type of damage on the
tire, the tire sealant could damage the
sensor of the Tire Pressure Monitoring
System (TPMS)*. Such damage is not
covered by the smart Limited Warranty.
When having the damaged tire replaced,
also have the TPMS sensors* checked for
proper function. When the sensor is
damaged, the TPMS* will not function
properly. The sensor must then be
replaced at an authorized smart center as
soon as possible.
172Flat tire>> Practical hints.* optional451_AKB; 3; 22, en-USd2ureepe,Version: 2.11.8.12009-07-27T09:36:34+02:00 - Seite 172
Page 175 of 216
 on the tire tread.
The tire repair kit enables you to drive on
the sealed tire to the nearest authorized
smart c")
The tire repair kit can be used to seal
punctures of up to approximately 0.16 in
(4 mm) on the tire tread.
The tire repair kit enables you to drive on
the sealed tire to the nearest authorized
smart center.XYou should have the sealed tire replaced
at an authorized smart center.GWarning!
Take care not to allow the contents of the
tire sealant to come in contact with hair,
eyes or clothing. The tire sealant is
harmful if inhaled, swallowed or absorbed
through the skin - causes skin, eye and
respiratory irritation. Wear gloves while
using this product if they are available.
Any contact with eyes or skin should be
flushed immediately with plenty of water.
If clothing comes in contact with the tire
sealant, change clothing as soon as
possible.
In case of allergic reaction or rash, consult
a physician immediately.
Notes
R Small tire punctures, particularly those
in the tread, can be sealed with the tire
sealant.
R The tire sealant can be used in ambient
temperatures from ‑4 ¦ (‑20 ¥) to
104 ¦ (+40 ¥).
R Do not remove any foreign objects such as
nails or screws that have penetrated the
tire.
R Do not use the tire sealant if the tire has
been damaged by being driven when
insufficiently inflated (e.g. bumps,
cuts, cracks etc. on the tire).
R Allow escaped tire sealant to dry, then
peel it off.
R Immediately wash all painted surfaces
that came into contact with the tire
sealant using a damp cloth.
R Avoid skin and eye contact with the tire
sealant.
R Do not swallow the tire sealant.
R Allow the tire sealant that is inside the
damaged tire to dry and dispose of
together with the tire.
R Do not use the tire sealant after the
expiration date has elapsed (see top of
container).
Instead, have it replaced at an
authorized smart center.GWarning!
The tire sealant is a limited repair device.
The tire sealant cannot be used for cuts or
punctures larger than approximately
0.16 in (4 mm) and tire damage caused by
driving with extremely low tire inflation
pressure, or on a flat tire, or a damaged
wheel.
Do not drive the vehicle under such
circumstances.
If you are unsure of the condition of the tire
or have any question whatsoever about its
suitability for driving contact the nearest
smart center for assistance or call
Roadside Assistance.
GWarning!
Please review the instructions below for
using the tire repair kit. If you are not
confident that you can competently follow
the instructions for using this kit, do not
use the kit, but instead call for Roadside
Assistance.
GWarning!
Keep the tire sealant out of reach of
children. If swallowed, rinse mouth
immediately with plenty of water and drink
plenty of water.
Do not induce vomiting!
Flat tire173>> Practical hints.451_AKB; 3; 22, en-USd2ureepe,Version: 2.11.8.12009-07-27T09:36:34+02:00 - Seite 173Z
Page 176 of 216
.XOpen the tire repai")
Consult a physician immediately.
Keep away from open flame, heat source or
sparks. Do not smoke.
Sealing a tire
XTake the tire repair kit from the
passenger footwell ( Y page 148).XOpen the tire repair kit lid.0046Flange lid0047Pressure gauge008AVent screw0088Filler hose with stopper0086Operating instructions label0087Electrical plug006EElectric air pump switch006FSticker0070Tire sealant containerXRemove sticker 006F from the tire repair
kit.XAttach sticker 006F where it will be easily
seen by the driver on the instrument
cluster.GWarning!
Follow safety instructions on the electric
air pump label.
XUnwind electrical plug 0087 and filler
hose 0088.0046Flange lidXUnscrew flange lid 0046.XUnscrew the lid of tire sealant container
0070 . Make sure not to damage the aluminum
seal.0070Tire sealant container0071FlangeXScrew tire sealant container 0070 onto
flange 0071.
Make sure the container is threaded
correctly onto the flange. This punctures
the aluminum seal of the tire sealant
container.XUnscrew the valve cap from the tire valve
of the damaged tire.XClose vent screw 008A.XPull off the stopper of filler hose 0088.174Flat tire>> Practical hints.
451_AKB; 3; 22, en-USd2ureepe,Version: 2.11.8.12009-07-27T09:36:34+02:00 - Seite 174
 1
1 2
2 3
3 4
4 5
5 6
6 7
7 8
8 9
9 10
10 11
11 12
12 13
13 14
14 15
15 16
16 17
17 18
18 19
19 20
20 21
21 22
22 23
23 24
24 25
25 26
26 27
27 28
28 29
29 30
30 31
31 32
32 33
33 34
34 35
35 36
36 37
37 38
38 39
39 40
40 41
41 42
42 43
43 44
44 45
45 46
46 47
47 48
48 49
49 50
50 51
51 52
52 53
53 54
54 55
55 56
56 57
57 58
58 59
59 60
60 61
61 62
62 63
63 64
64 65
65 66
66 67
67 68
68 69
69 70
70 71
71 72
72 73
73 74
74 75
75 76
76 77
77 78
78 79
79 80
80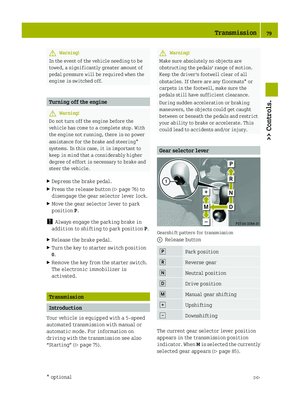 81
81 82
82 83
83 84
84 85
85 86
86 87
87 88
88 89
89 90
90 91
91 92
92 93
93 94
94 95
95 96
96 97
97 98
98 99
99 100
100 101
101 102
102 103
103 104
104 105
105 106
106 107
107 108
108 109
109 110
110 111
111 112
112 113
113 114
114 115
115 116
116 117
117 118
118 119
119 120
120 121
121 122
122 123
123 124
124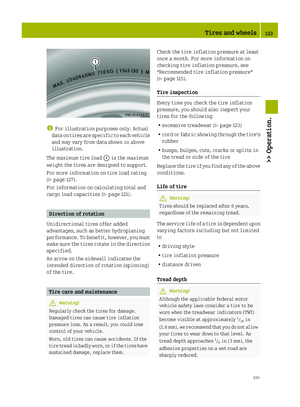 125
125 126
126 127
127 128
128 129
129 130
130 131
131 132
132 133
133 134
134 135
135 136
136 137
137 138
138 139
139 140
140 141
141 142
142 143
143 144
144 145
145 146
146 147
147 148
148 149
149 150
150 151
151 152
152 153
153 154
154 155
155 156
156 157
157 158
158 159
159 160
160 161
161 162
162 163
163 164
164 165
165 166
166 167
167 168
168 169
169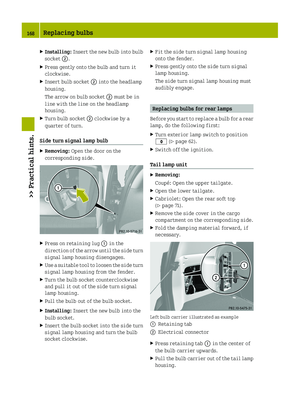 170
170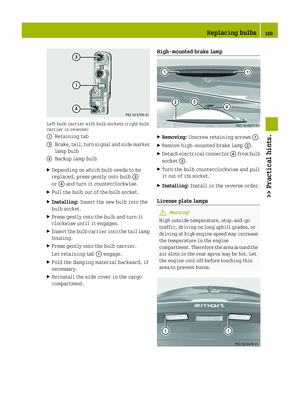 171
171 172
172 173
173 174
174 175
175 176
176 177
177 178
178 179
179 180
180 181
181 182
182 183
183 184
184 185
185 186
186 187
187 188
188 189
189 190
190 191
191 192
192 193
193 194
194 195
195 196
196 197
197 198
198 199
199 200
200 201
201 202
202 203
203 204
204 205
205 206
206 207
207 208
208 209
209 210
210 211
211 212
212 213
213 214
214 215
215