Page 113 of 216
XRemoving: Fold both levers 0046 outward in
direction of the arrows as far as they will
go.XLift the front end of service flap 0047.XRemove service flap 0047.XInserting: Insert hooks 008A on the back of
service flap 0047 completely into
openings 0088.XRemounting: Lift service flap 0047 out of
openings 0088 (Y page 111).XInsert tabs 0086 on the back of service
flap 0047 completely into openings 0087.XClosing: Push front end of service
flap 0047 down.XFold levers 0046 inward in direction of the
arrows as far as they will go.
Coolant
GWarning!
In order to avoid potentially serious burns:
R Use extreme caution when opening the
service flap if there are any signs of
steam or coolant leaking from the
Front compartment111>> Operation.451_AKB; 3; 22, en-USd2ureepe,Version: 2.11.8.12009-07-27T09:36:34+02:00 - Seite 111Z
Page 114 of 216

cooling system, or if the coolant
temperature warning lamp 00AE in the
instrument cluster indicates that the
coolant is overheated.
R Do not remove the pressure cap on coolant
reservoir if coolant temperature is
above 158 ¦ (70 ¥). Allow engine to cool
down before removing cap. The coolant
reservoir contains hot fluid and is under
pressure.
R Using a rag, slowly turn the cap
approximately 1
/ 2 turn to relieve excess
pressure. If opened immediately,
scalding hot fluid and steam will be
blown out under pressure.
The engine coolant is a mixture of water
and anticorrosion/antifreeze. To check the
coolant level the vehicle must be parked on
level ground and the engine must have
cooled down. For more information, see
“Coolants” ( Y page 209).
Checking coolant levelXRemove the service flap and insert it on
the front of the vehicle ( Y page 110).
The coolant reservoir is located in the
front compartment on the driver’s side.
XAllow the radiator to cool down for at
least 30 minutes.XUsing a rag, slowly turn pressure
cap 0046 approximately 1
/ 2 turncounterclockwise to release any excess
pressure.XContinue turning pressure cap 0046
counterclockwise and remove it.
The coolant level is correct if the level
R for cold coolant: reaches marking
bar 0047 visible through the filling
opening
R for warm coolant: is approximately
0.6 in (1.5 cm) higherXIf necessary, add coolant.
Adding coolant
XAdd coolant as required. The coolant
level may not exceed the maximum filling
level.XReplace and tighten pressure cap 0046.XRemount the service flap and close it
( Y page 110).
Windshield/rear window washer system
Both the windshield and the rear window 14
washer are supplied from the windshield
washer reservoir.
The recommended minimum filling level is
1.06 US qt (1.0 l).
XRemove the service flap and insert it on
the front of the vehicle ( Y page 110).14
Coupé only.112Front compartment>> Operation.
451_AKB; 3; 22, en-USd2ureepe,Version: 2.11.8.12009-07-27T09:36:34+02:00 - Seite 112
Page 115 of 216

The windshield washer reservoir is located
in the front compartment on the driver’s
side.GWarning!
Windshield washer concentrate is highly
flammable. Fire, naked flames and smoking
are prohibited when windshield washer
concentrate is being handled.
XUse a windshield washer concentrate
labeled for summer and water for
temperatures above freezing point.XUse a windshield washer concentrate
labeled for winter and water for
temperatures below freezing point.
! Always use a windshield washer
concentrate labeled for winter where
temperatures may fall below freezing
point. Failure to do so could result in
damage to the washer system/reservoir.
XPremix the windshield washer fluid in a
suitable container.
Observe mixing ratios depending on the
outside temperature ( Y page 208).XUse the tab to pull cap 0046 upwards.XRefill the windshield washer reservoir.XPush cap 0046 onto the windshield washer
reservoir.XRemount the service flap and close it
( Y page 110).Brake fluidGWarning!
During vehicle operation, the boiling
point of the brake fluid is continuously
reduced through the absorption of moisture
from the atmosphere. Under extremely
strenuous operating conditions, this
moisture content can lead to the formation
of bubbles in the system, thus reducing the
system’s efficiency.
Therefore, the brake fluid must be replaced
regularly. Refer to your vehicle’s
Maintenance Booklet for replacement
interval.
The brake fluid level in the brake fluid
reservoir may be too low if the brake
warning lamp in the instrument cluster
comes on ( Y page 22) although the parking
brake is released.
! If you find that the brake fluid in the
brake fluid reservoir has fallen to the
minimum mark or below, have the brake
system checked for brake pad thickness
and leaks immediately. Contact an
authorized smart center immediately. Do
not add brake fluid as this will not solve
the problem.
XRemove the service flap and insert it on
the front of the vehicle ( Y page 110).
The brake fluid reservoir is located in the
front compartment on the passenger side.
0046Brake fluid reservoirFront compartment113>> Operation.451_AKB; 3; 22, en-USd2ureepe,Version: 2.11.8.12009-07-27T09:36:34+02:00 - Seite 113Z
Page 116 of 216

Checking brake fluid levelXPerform a visual check of the brake fluid
reservoir 0046.
The brake fluid level is correct when it
is between the minimum mark and the
maximum mark.
R If the brake fluid level has fallen
slightly below the minimum mark,
drive to an authorized smart center.
R If the brake fluid level has fallen
significantly below the minimum
mark, call Roadside Assistance or an
authorized smart center.XRemount the service flap and close it
( Y page 110).
Tires and wheels
Safety notes
Contact an authorized smart center for
information on tested and recommended
rims and tires for summer and winter
operation. They can also offer advice
concerning tire service and purchase.
GWarning!
Replace rims or tires with the same
designation, manufacturer and type as
shown on the original part. For further
information contact an authorized smart
center. If incorrectly sized rims and tires
are mounted, the wheel brakes or
suspension components can be damaged.
Also, the operating clearance of the wheels
and the tires may no longer be correct.
GWarning!
Worn, old tires can cause accidents. If the
tire tread is worn to minimum tread depth,
or if the tires have sustained damage,
replace them.
When replacing rims, only use genuine
smart wheel bolts specified for the
particular rim type. Failure to do so can
result in the bolts loosening and possibly
an accident.
Retreaded tires are not tested or
recommended by smart, since previous
damage cannot always be recognized on
retreads. The operating safety of the
vehicle cannot be assured when such tires
are used.GWarning!
If you feel a sudden significant vibration
or ride disturbance, or you suspect that
possible damage to your vehicle has
occurred, you should turn on the hazard
warning flashers, carefully slow down, and
drive with caution to an area which is a safe
distance from the road.
Inspect the tires and the vehicle underbody
for possible damage. If the vehicle or tires
appear unsafe, have the vehicle towed to the
nearest authorized smart center or tire
dealer for repairs.
GWarning!
Do not drive with a flat tire. A flat tire
affects the ability to steer or brake the
vehicle. You could lose control of the
vehicle. Continued driving with a flat tire
or driving at high speed with a flat tire
will cause excessive heat build-up and
possibly a fire.
Modifications to the brake system and
wheels and the use of brake dust rings are
not permissible.
Important guidelines
R Only use sets of tires and rims of the same
type and make.
R Tires must be of the correct size for the
rim.
R Break in new tires for approximately
60 miles (100 km) at moderate speeds.
R Regularly check the tires and rims for
damage. Dented or bent rims can cause
114Tires and wheels>> Operation.
451_AKB; 3; 22, en-USd2ureepe,Version: 2.11.8.12009-07-27T09:36:34+02:00 - Seite 114
Page 117 of 216

tire pressure loss and damage to the tire
beads.
R If vehicle is heavily loaded, check tire
inflation pressure and correct as
required.
R Do not allow your tires to wear down too
far. Adhesion properties on wet roads are
sharply reduced at tread depths of less
than 1
/ 8 in (3 mm).
Recommended tire inflation pressure
GWarning!
Follow recommended tire inflation
pressures.
Do not underinflate tires. Underinflated
tires wear excessively and/or unevenly,
adversely affect handling and fuel
economy, and are more likely to fail from
being overheated.
Do not overinflate tires. Overinflated
tires can adversely affect handling and
ride comfort, wear unevenly, increase
stopping distance, and result in sudden
deflation (blowout) because they are more
likely to become punctured or damaged by
road debris, potholes etc.
Do not overload the tires by exceeding the
specified load limit as indicated on the
Tire and Loading Information placard on
the driver’s door B‑pillar. Overloading the
tires can overheat them, possibly causing
a blowout. Overloading the tires can also
result in handling or steering problems, or
brake failure.
Your vehicle is equipped with the Tire and
Loading Information placard located on
the driver’s door B‑pillar ( Y page 120).
The tire inflation pressure should be
checked regularly. Only adjust the tire
inflation pressure on cold tires. The tires
can be considered cold if the vehicle has
been parked for at least 3 hours or driven
less than 1 mile (1.6 km). Depending on the
ambient temperature, the driving speed
and the tire load, the tire temperature
changes. When the tire temperature
changes by 18 ¦ (10 ¥), the tire inflation
pressure will change by approximately
1.5 psi (0.1 bar). Keep this in mind when
checking tire inflation pressure on warm
tires and adjust the tire pressure only if
the tire inflation pressure is too low for
the current operating conditions. If you
check the tire inflation pressure when the
tires are warm, the reading will be higher
than the cold reading. This is normal. Do
not let air out to match the specified cold
tire inflation pressure. Otherwise, the
tire will be underinflated.
Follow recommended cold tire inflation
pressures listed on Tire and Loading
Information placard on the driver’s door
B‑pillar.
Keeping the tires properly inflated
provides the best handling, tread life and
riding comfort.
In addition to the Tire and Loading
Information placard on the driver’s door
B‑pillar, also consult the tire inflation
pressure label (if available) on the inside
of the filler flap for any additional
information pertaining to special driving
situations. For more information, see
“Important notes on tire inflation
pressure” ( Y page 116).
i Data shown on Tire and Loading
Information placard example are for
illustration purposes only. Tire data are
specific to each vehicle and may vary
from data shown in the following
illustration. Refer to Tire and Loading
Information placard on vehicle for
actual data specific to your vehicle.Tires and wheels115>> Operation.451_AKB; 3; 22, en-USd2ureepe,Version: 2.11.8.12009-07-27T09:36:34+02:00 - Seite 115Z
Page 118 of 216

The Tire and Loading Information placard
lists the recommended cold tire inflation
pressures 0046 for maximum loaded vehicle
weight. The tire inflation pressures listed
apply to the tires installed as original
equipment.
Important notes on tire inflation
pressure
GWarning!
If the tire inflation pressure drops
repeatedly, check the tires for punctures
from foreign objects and/or whether air is
leaking from the valves or from around the
rim.
Tire temperature and tire inflation
pressure are also increased while driving,
depending on the driving speed and the
tire load.
Potential problems associated with
underinflated and overinflated tires
Underinflated tires
GWarning!
Follow recommended tire inflation
pressures.
Do not underinflate tires. Underinflated
tires wear excessively and/or unevenly,
adversely affect handling and fuel
economy, and are more likely to fail from
being overheated.
Underinflated tires can
R cause excessive and uneven tire wear
R adversely affect fuel economy
R lead to tire failure from being
overheated
R adversely affect handling
characteristics
Overinflated tiresGWarning!
Follow recommended tire inflation
pressures.
Do not overinflate tires. Overinflated
tires can adversely affect handling and
ride comfort, wear unevenly, increase
stopping distance, and result in sudden
deflation (blowout) because they are more
likely to become punctured or damaged by
road debris, potholes etc.
Overinflated tires can
R adversely affect handling
characteristics
R cause uneven tire wear
R be more prone to damage from road
hazards
R adversely affect ride comfort
R increase stopping distance
Checking tire inflation pressure
Safety notes
GWarning!
Follow recommended tire inflation
pressures.
Do not underinflate tires. Underinflated
tires wear excessively and/or unevenly,
adversely affect handling and fuel
economy, and are more likely to fail from
being overheated.
116Tires and wheels>> Operation.
451_AKB; 3; 22, en-USd2ureepe,Version: 2.11.8.12009-07-27T09:36:34+02:00 - Seite 116
Page 119 of 216
 because they are more
l")
Do not overinflate tires. Overinflated
tires can adversely affect handling and
ride comfort, wear unevenly, increase
stopping distance, and result in sudden
deflation (blowout) because they are more
likely to become punctured or damaged by
road debris, potholes etc.
Do not overload the tires by exceeding the
specified load limit as indicated on the
Tire and Loading Information placard on
the driver’s door B‑pillar. Overloading the
tires can overheat them, possibly causing
a blowout. Overloading the tires can also
result in handling or steering problems, or
brake failure.
Check the tire inflation pressure at least
once a month.
Check and adjust the tire inflation
pressure when the tires are cold
( Y page 115).
Checking tire inflation pressure
manually
Follow the steps below to achieve correct
tire inflation pressure:
XRemove the cap from the valve on one tire.XFirmly press a tire gauge onto the valve.XRead the tire inflation pressure on tire
gauge and check against the
recommended tire inflation pressure on
the Tire and Loading Information
placard on the driver’s door B‑pillar
( Y page 120). If necessary, add air to
achieve the recommended tire inflation
pressure.XIf you have overfilled the tire, release
tire inflation pressure by pushing the
metal stem of the valve with e.g. a tip of
a pen. Then recheck the tire inflation
pressure with the tire gauge.XInstall the valve cap.XRepeat this procedure for each tire.Tire Pressure Monitoring System
(TPMS)*
Your vehicle may be equipped with a Tire
Pressure Monitoring System (TPMS).
It monitors the tire inflation pressure in
all four tires. A warning is issued to alert
you to a decrease in pressure in one or more
of the tires.
The Tire Pressure Monitoring System
(TPMS) is equipped with a combination low
tire pressure/TPMS malfunction telltale in
the instrument cluster. Depending on how
the telltale illuminates, it indicates a low
tire pressure condition or a malfunction in
the TPMS system itself:
R If the telltale illuminates continuously,
one or more of your tires is significantly
underinflated. There is no malfunction
in the TPMS.
R If the telltale flashes for 60 seconds and
then stays illuminated, the TPMS system
itself is not operating properly.
The TPMS only functions on wheels that are
equipped with the proper electronic
sensors.
GWarning!
The TPMS does not indicate a warning for
wrongly selected inflation pressures.
Always adjust tire inflation pressure
according to the Tire and Loading
Information placard on the driver’s door
B‑pillar.
The TPMS is not able to issue a warning due
to a sudden dramatic loss of pressure (e.g.
tire blowout caused by a foreign object). In
this case bring the vehicle to a halt by
carefully applying the brakes and avoiding
abrupt steering maneuvers.
GWarning!
Each tire should be checked monthly when
cold and inflated to the inflation pressure
recommended by the vehicle manufacturer
on the Tire and Loading Information
Tires and wheels117>> Operation.* optional451_AKB; 3; 22, en-USd2ureepe,Version: 2.11.8.12009-07-27T09:36:34+02:00 - Seite 117Z
Page 120 of 216

placard. If your vehicle has tires of a
different size than the size indicated on
the Tire and Loading Information placard,
you should determine the proper tire
inflation pressure for those tires.
As an added safety feature, your vehicle has
been equipped with a tire pressure
monitoring system (TPMS) that illuminates
a low tire pressure telltale when one or
more of your tires is significantly
underinflated.
Accordingly, when the low tire pressure
telltale illuminates, you should stop and
check your tires as soon as possible, and
inflate them to the proper pressure.
Driving on a significantly underinflated
tire causes the tire to overheat and can lead
to tire failure.
Underinflation also reduces fuel
efficiency and tire tread life, and may
affect the vehicle’s handling and stopping
ability. Please note that the TPMS is not a
substitute for proper tire maintenance,
and it is the driver’s responsibility to
maintain correct tire pressure, even if
underinflation has not reached the level to
trigger illumination of the TPMS low tire
pressure telltale.
Your vehicle has also been equipped with a
TPMS malfunction indicator to indicate
when the system is not operating properly.
The TPMS malfunction indicator is
combined with the low tire pressure
telltale. When the system detects a
malfunction, the telltale will flash for
approximately 1 minute and then remain
continuously illuminated.
This sequence will continue upon
subsequent vehicle start-ups as long as the
malfunction exists. When the malfunction
indicator is illuminated, the system may
not be able to detect or signal low tire
pressure as intended.
TPMS malfunctions may occur for a variety
of reasons, including the installation of
incompatible replacement or alternatetires or wheels on the vehicle that prevent
the TPMS from functioning properly. Always
check the TPMS malfunction telltale after
replacing one or more tires or wheels on
your vehicle to ensure that the replacement
or alternate tires and wheels allow the
TPMS to continue to function properly.
i If a condition causing the TPMS to
malfunction develops, it may take up to
10 minutes for the system to signal a
malfunction using the TPMS telltale
flashing and illumination sequence.
The telltale extinguishes after a few
minutes driving if the malfunction has
been corrected.
i Operating radio transmission
equipment (e.g. wireless headsets, two-
way radios) in or near the vehicle could
cause the TPMS to malfunction.
i USA only:
This device complies with Part 15 of the
FCC Rules. Operation is subject to the
following two conditions:
1. This device may not cause harmful interference, and
2. this device must accept any interference received, including
interference that may cause
undesired operation.
Any unauthorized modification to this
device could void the user’s authority to
operate the equipment.
i Canada only:
This device complies with RSS‑210 of
Industry Canada. Operation is subject to
the following two conditions:
1. This device may not cause interference, and
2. this device must accept any interference received, including118Tires and wheels>> Operation.
451_AKB; 3; 22, en-USd2ureepe,Version: 2.11.8.12009-07-27T09:36:34+02:00 - Seite 118
 1
1 2
2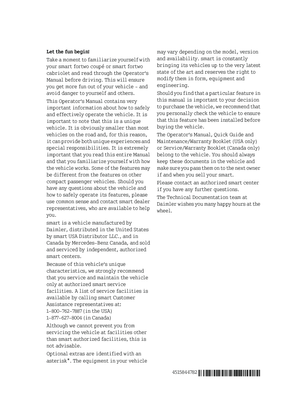 3
3 4
4 5
5 6
6 7
7 8
8 9
9 10
10 11
11 12
12 13
13 14
14 15
15 16
16 17
17 18
18 19
19 20
20 21
21 22
22 23
23 24
24 25
25 26
26 27
27 28
28 29
29 30
30 31
31 32
32 33
33 34
34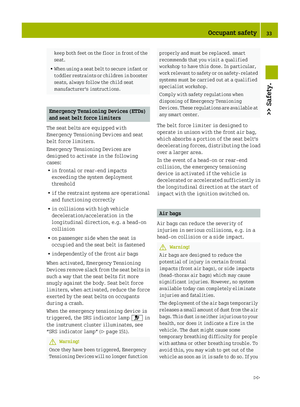 35
35 36
36 37
37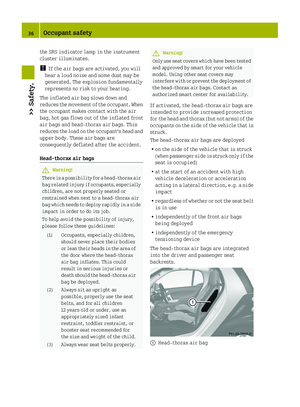 38
38 39
39 40
40 41
41 42
42 43
43 44
44 45
45 46
46 47
47 48
48 49
49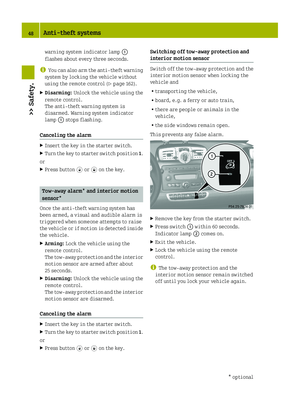 50
50 51
51 52
52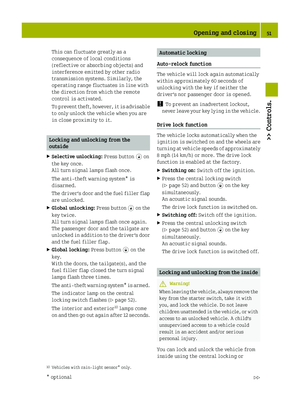 53
53 54
54 55
55 56
56 57
57 58
58 59
59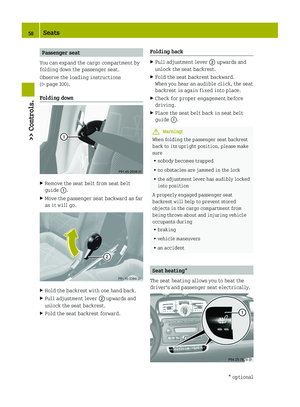 60
60 61
61 62
62 63
63 64
64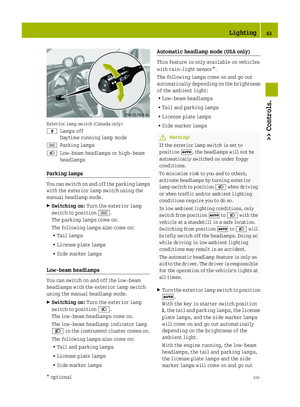 65
65 66
66 67
67 68
68 69
69 70
70 71
71 72
72 73
73 74
74 75
75 76
76 77
77 78
78 79
79 80
80 81
81 82
82 83
83 84
84 85
85 86
86 87
87 88
88 89
89 90
90 91
91 92
92 93
93 94
94 95
95 96
96 97
97 98
98 99
99 100
100 101
101 102
102 103
103 104
104 105
105 106
106 107
107 108
108 109
109 110
110 111
111 112
112 113
113 114
114 115
115 116
116 117
117 118
118 119
119 120
120 121
121 122
122 123
123 124
124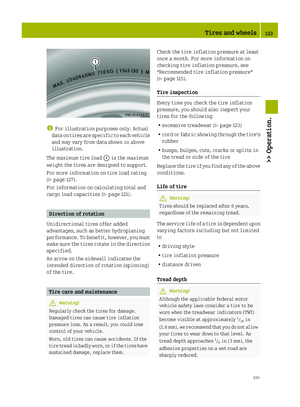 125
125 126
126 127
127 128
128 129
129 130
130 131
131 132
132 133
133 134
134 135
135 136
136 137
137 138
138 139
139 140
140 141
141 142
142 143
143 144
144 145
145 146
146 147
147 148
148 149
149 150
150 151
151 152
152 153
153 154
154 155
155 156
156 157
157 158
158 159
159 160
160 161
161 162
162 163
163 164
164 165
165 166
166 167
167 168
168 169
169 170
170 171
171 172
172 173
173 174
174 175
175 176
176 177
177 178
178 179
179 180
180 181
181 182
182 183
183 184
184 185
185 186
186 187
187 188
188 189
189 190
190 191
191 192
192 193
193 194
194 195
195 196
196 197
197 198
198 199
199 200
200 201
201 202
202 203
203 204
204 205
205 206
206 207
207 208
208 209
209 210
210 211
211 212
212 213
213 214
214 215
215