Page 9 of 43

Introduction
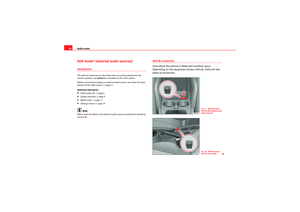
8Unit overview
Rotary/push knob
− Press to switch on or off . . . . . . . . . . . . . . . . . . . . . . . . . . . . .
− Turn to adjust the volume . . . . . . . . . . . . . . . . . . . . . . . . . . .
− Switches to Radio mode . . . . . . . . . . . . . . . . . . . . . . . . . . . .
− Changes the frequencies in Radio mode . . . . . . . . . . . . . . .
− Switches to Media mode . . . . . . . . . . . . . . . . . . . . . . . . . . . . −
Selects another media source in Media mode . . . . . . . . . . .
− Changes sound settings and volume distribution . . . . . . . .
CD slot . . . . . . . . . . . . . . . . . . . . . . . . . . . . . . . . . . . . . . . . . . . . .
Display . . . . . . . . . . . . . . . . . . . . . . . . . . . . . . . . . . . . . . . . . . . .
CD eject button . . . . . . . . . . . . . . . . . . . . . . . . . . . . . . . .
Function buttons: The current function of each button is
displayed above it on the screen . . . . . . . . . . . . . . . . . . . . . . . .
Display additional functions.
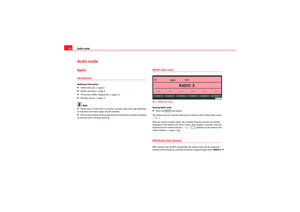
Fig. 1 Overview of the controls.
A1
10
11
A2
RADIO
12
12
A3
MEDIA
33 33
A4
SOUND
33
A5
20
A6
34
A7
EJECT
20
A8
11
A9
MENU
sound_system_2_EN Seite 8 Mittwoch, 3. März 2010 6:03 18
Page 10 of 43
 . . . . . . . . . . . . . . . . . . . . . . . . . . . . . . . . . . . . . . . . . . . .
− Display the SETUP")
Introduction9
−Display additional functions for radio mode ( SCAN, AUTOST. ,
TEXT ) . . . . . . . . . . . . . . . . . . . . . . . . . . . . . . . . . . . . . . . . . . . .
− Display the SETUP function button in any menu to open the
unit settings . . . . . . . . . . . . . . . . . . . . . . . . . . . . . . . . . . . . . .
Setting knob: The function of this knob depends on the mode
that is currently active.
− Radio mode: Press to start and stop the scan function
(SCAN) . . . . . . . . . . . . . . . . . . . . . . . . . . . . . . . . . . . . . . . . . . .
− Radio mode: Turn to tune to a station manually . . . . . . . . . .
− Media mode: Turn to change track . . . . . . . . . . . . . . . . . . . .
− Media mode: Press to start and stop the scan function
(SCAN) . . . . . . . . . . . . . . . . . . . . . . . . . . . . . . . . . . . . . . . . . . .
− SOUND menu: Turn to adjust a sound or volume setting . . .
− System settings(SETUP): Turn to adjust a setting . . . . . . . .
Rocker switch:
− In Media mode , briefly press to the right or left to change
folder or playlist . . . . . . . . . . . . . . . . . . . . . . . . . . . . . . . . . . .
Traffic Programme : Switch on and off . . . . . . . . . . . . . . . . .
Rocker switch:
− Radio mode: Press to the right or left to browse through the
available or stored stations . . . . . . . . . . . . . . . . . . . . . . . . . .
− Media mode: To change track, press briefly to the right or
left . . . . . . . . . . . . . . . . . . . . . . . . . . . . . . . . . . . . . . . . . . . . . .
− Media mode: For fast-forward or rewind press and hold to the
right or left . . . . . . . . . . . . . . . . . . . . . . . . . . . . . . . . . . . . . . . 12
34
A10
14
14
23
24
33
34
A11
FOLDER
22
A12
TP
16
A13
SEEK / TRACK
13
2323
sound_system_2_EN Seite 9 Mittwoch, 3. März 2010 6:03 18
Page 11 of 43

Introduction
10General operating informationIntroductionAdditional information:•Safety notes
⇒ page 6
•System overview ⇒page 8•Multi-function steering wheel for changing track or station ⇒Booklet
“Operating instructions”.
Additional display information
Depending on the vehicle specification, changes to air conditioning settings
or information on factory-fitted driver assistance systems may be temporarily
displayed on the screen. These displays disappear automatically when they
are no longer required.
All displays appear only after completely restarting the radio system.Caution
Only a small amount of pressure is needed to operate the unit.
Note
•Never press a button down for longer than 10 minutes. Otherwise the
system will interpret this as a malfunction ( button jammed).•Due to country-specific legislation, certain functions cannot be selected
on the screen when the vehicle is travelling above a certain speed.•Using a mobile phone in the vehicle may cause noise from the vehicle
speakers.•In some vehicles equipped with a parking distance warning system, the
volume of the current audio source is automatically lowered when reverse
gear is engaged. This volume can be changed while reverse is engaged. If the volume is not modified, when reverse is disengaged the previous volume
setting is restored. If the volume is modified, when reverse gear is disen-
gaged the audio source will stay at the set volume and, as long as the
maximum volume is not exceeded, it will be memorised for the next time
reverse gear is engaged.
Switching on and offWhen the unit is switched on the system starts up. The last audio source used
is played at the last selected volume setting, provided this does not exceed
the preselected “switch-on volume” (
ON-VOL ⇒ page 34).
Energy management
If, when the ignition is switched off and the unit switched on, the battery
voltage falls below the minimum onboard power supply voltage, a signal
sounds and LOW BATTERY appears. You should switch the radio off.
If the battery voltage level continues to fall, LOW BATTERY and RADIO OFF are
briefly shown on the display. The unit will switch off automatically.Function
Activation
Switch the unit on or off
manually.
Press the rotary/push knob
.
After the ignition key is removed the unit
switches off automatically after approx. 30
minutes (switch-off delay).
Switch on the unit auto-
matically.
Insert the vehicle key into the ignition lock.
The unit switches on automatically if it was on
when the ignition key was removed.
Switch off the unit auto-
matically.
Remove the vehicle key from the ignition lock.
sound_system_2_EN Seite 10 Mittwoch, 3. März 2010 6:03 18
Page 12 of 43
 and any media source currently being
played will be stopped.
Changes to the volume are indicated by a “bar” on")
Introduction11
Adjusting the base volumeAt “0” the unit is muted (display:
) and any media source currently being
played will be stopped.
Changes to the volume are indicated by a “bar” on the screen.
It is possible to preset certain volume settings and adjustments ⇒ page 34.
Caution
If the volume is too high or the sound is distorted, the vehicle speakers may
be damaged.
Note
If the base volume has been considerably increased on the radio system to
play a certain audio source (e.g. due to very quiet audio output from an
external audio source), lower the volume again before switching audio
source.
Names of controlsOverview•Rotary/push knobs•Labelled unit buttons (hard keys).•Function buttons (soft keys).
Rotary/push knobs
The left-hand rotary/push knob ⇒page 8, fig. 1 is referred to as the
volume control
or the on/off switch.
The right-hand rotary/push knob ⇒page 8, fig. 1 is referred to as the
setting knob.
Unit buttons and function buttons
The labelled buttons on the unit are referred to as “unit buttons” and are
pictured as a button symbol with blue content, e.g. the unit button.
There are six unlabelled unit buttons below the screen ⇒page 8, fig. 1 .
These unit buttons are referred to as “function buttons” as their functions
change depending on the current operating state.
The current function of a function button is displayed just above the button in
the bottom line of the screen (e.g. ⇒page 13, fig. 3 ).
Function
Activation
Increase the vol-
ume.
Turn the volume control
clockwise
or press the button on the multi-function steering
wheel.
Lower the volume.
Turn the volume control
anti-clockwise
or press the button on the multi-function steering
wheel.
A1A10
RADIO
A8
sound_system_2_EN Seite 11 Mittwoch, 3. März 2010 6:03 18
Page 13 of 43
 ⇒page 16•Settings menus ⇒page 33")
Audio mode
12Audio modeRadioIntroductionAdditional information:•Safety notes
⇒ page 6
•System overview ⇒page 8•TP function (Traffic Programme) ⇒page 16•Settings menus ⇒page 33Note
•Please bear in mind that in car parks, tunnels, areas with high buildings
or mountains the radio signal can be impaired.•F o i l o r m e t a l - c o a t e d s t i ck e r s a t t a ch e d t o t h e w i n d o w s m a y a f f e c t r e ce p t i o n
on vehicles with a window aerial.
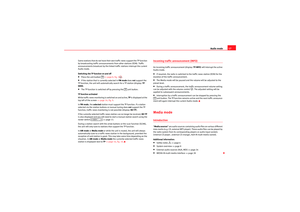
RADIO main menuFig. 2 RADIO main menu.Starting Radio mode•Press the unit button.
The station you are currently listening to is shown in the middle of the screen
⇒ fig. 2.
After you switch to Radio mode, the available frequency bands are initially
displayed in the bottom line of the screen. After roughly 5 seconds, they are
replaced by the “station buttons” ⇒fig. 2 . Stations can be stored to the
station buttons ⇒page 15.RDS (Radio Data System)With stations that are RDS-compatible, the station name will be displayed
instead of the frequency, provided reception is good enough (here: RADIO 3).
RADIO
- - -
sound_system_2_EN Seite 12 Mittwoch, 3. März 2010 6:03 18
Page 14 of 43

Audio mode13
Text information, known as radio text, can also be broadcast. It is possible to
adjust the display to show radio text ⇒page 34. Radio text will then be
shown instead of the station name. Not all stations support radio text. The
individual radio station is responsible for the texts displayed.
RDS also allows “automatic station tracking”. This means that the unit always
switches to the frequency that offers the best reception of the current radio
station as the vehicle travels from one area to the next. It is possible to
suppress automatic frequency changing ( ALTERNATIVE FREQUENCY
OFF)
⇒ page 34.
On some units it is possible to switch off the RDS function for travel in areas
where RDS is not used ⇒page 34.
Changing frequency bandFig. 3 RADIO main menu: frequency bands displayed with memory levels.The currently selected frequency band (FM or AM) is indicated above the
station display.
After you switch to Radio mode, the available frequency bands and memory
levels are displayed for roughly 5 seconds in the bottom line of the screen
⇒fig. 3 . Then they are replaced by the “station buttons” for storing stations
(for information on station buttons see page 15).
•In Radio mode, briefly press the unit button to display the function
buttons , , and ⇒fig. 3 .•Press one of the o function buttons to switch to the FM or AM
frequency band ⇒fig. 3.•Alternatively: Briefly press the unit button as often as required to
switch between the function buttons at the bottom of the screen.Changing stationsFig. 4 Changing station using the [
SEEK / ...
] rocker switch.
Fig. 5 Changing station using the [
SEEK / ...
] rocker switch with selection of stored
stations only.
RADIO
FM1
FM2
AM1
AM2
FM
AM
MEDIA
sound_system_2_EN Seite 13 Mittwoch, 3. März 2010 6:03 18
Page 15 of 43
, the
unit either switches between all available stations or stored stations only
( SETUP : see page 34).•Briefly pre")
Audio mode
14Depending on the setting selected for the search mode ( SEEK MODE), the
unit either switches between all available stations or stored stations only
( SETUP : see page 34).•Briefly press the ⇒page 8, fig. 1 rocker switch to the left or
right.
AM mode: quickly browsing the frequency band
In AM mode it is possible to skip stations.•Press and hold the rocker switch.•When you release the rocker switch, the unit tunes to the
next station it can receive.
Tuning to a station frequency manually•Select the desired frequency band ⇒page 12.•Turn the setting knob ⇒page 8, fig. 1 until the desired station
frequency (e.g. 89.9 MHz) is displayed on the screen.
Scan function (SCAN)Fig. 6 Additional radio functions and scan function (SCAN) in progress.When the scan function is running, all available stations on the current
frequency band are always played in sequence for about 5 seconds each.
If traffic news monitoring is switched on (display: TP), the scan function only
tunes to stations that support the TP function ⇒page 16.
Starting and stopping the scan function•Select the desired frequency band in Radio mode ⇒page 12.•Press the setting knob ⇒page 8, fig. 1 to start the scan function.•Alternatively: Press the unit button ⇒page 8, fig. 1 and start
the scan function with the function button.
The scan function commences with the following station. The screen displays
the additional functions for Radio mode and the button is underlined
⇒ fig. 6.•Press the setting knob or the function button to stop the scan func-
tion at the station that is currently tuned.
Special case: SEEK MODE
PRESET
Even if the setting for changing stations is the selection of stored stations
only ( SEEK MODE
PRESET
⇒ page 34), after the scan function is stopped,
System status
Result
Radio mode with
... dis-
played in the centre line of the
screen ⇒page 13, fig. 4 .
Switches to the next available station on
the current frequency band.
As you go through the stations, the adja-
cent stations are displayed ⇒ page 13,
fig. 4 .
Radio mode with
... dis-
played in the centre line of the
screen and TP indication.
Switches to the next available traffic news
station (TP function: see page 16).
Radio mode with
... dis-
played in the bottom line of the
screen ⇒page 13, fig. 5 .
Switches to the next stored station (stor-
ing stations: see page 15 onwards).
SEEK / ...
SEEK / ... SEEK / ...
A10
A10
MENU
A9
SCAN
SCAN
SCAN
sound_system_2_EN Seite 14 Mittwoch, 3. März 2010 6:03 18
Page 16 of 43

Audio mode15
using the rocker switch will scan through all available stations
⇒ page 13, fig. 4.
Only when a station is selected using a station button, does the unit revert to
the actual setting for SEEK MODE ⇒ page 13, fig. 5 .Selecting the memory levelFig. 7 Select the frequency band and memory level.Each available frequency band ( FM, AM ) has two memory levels ( FM1/FM2
and AM1 /AM2 ) with six station buttons each.
Memory levels and station buttons allow you to store stations.
Changing memory level•In Radio mode, briefly press the unit button to display the avail-
able memory levels for the frequency bands (FM, AM) ⇒fig. 7.•Briefly press one of the function buttons below the screen within 5
seconds to open the corresponding frequency band in the first or second
memory level (here: FM1).•Alternatively: Briefly press the unit button as often as required to
switch between the frequency bands and memory levels. When you have switched over, the radio stations stored in the selected
memory level are displayed in the bottom line of the screen
⇒fig. 8 . Free
station buttons are indicated by .
You can assign stations to the station buttons of a memory level either manu-
ally or automatically ⇒page 15.
Storing and selecting stationsFig. 8 Stations stored to station buttons in the FM1 memory level.When storing a station to a station button, any station already stored to the
same station button in the same memory level will be overwritten.
Assigning individual station buttons manually•Select the frequency band and memory level.•Select a station.•Press and hold the chosen station button until you hear a tone.•The selected station (in fig. 8: RADIO 3 ) will be stored to this station
button.
The station button to which the station currently playing is assigned is
displayed underlined on the screen.
SEEK / ...
RADIORADIO
---
sound_system_2_EN Seite 15 Mittwoch, 3. März 2010 6:03 18