Page 9 of 36

7
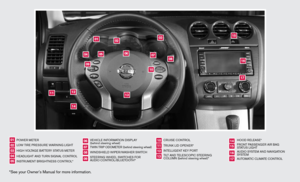
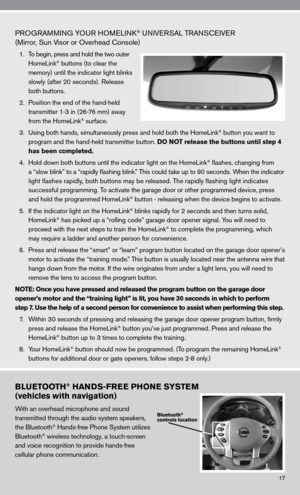
CRUISE CONTROL
To activate the cruise control, push the ON/OFF
switch. The cRui Se indicator light in the Vehicle
information display will illuminate.
To set cruising speed, accelerate the vehicle to
the desired speed, push the COAST/SET switch
and release it. The S eT indicator light in the
Vehicle information display will illuminate.
To reset at a faster cruising speed, push and hold
the ACCEL/RES switch. When the vehicle attains the desired speed, release the switch.
To reset at a slower cruising speed, push and hold the COAST/SET switch. Release the
switch when the vehicle slows to the desired speed.
To cancel cruise control, push the CANCEL switch or tap the brake pedal. The S eT indicator
light in the Vehicle information display will go out.
To resume a preset speed, push and release the ACCEL/RES switch. The vehicle returns to
the last set cruising speed when the vehicle speed is over 25 MPH (40 km/h).
To turn off cruise control, push the ON/OFF switch. Both the cRui Se indicator light and the
SeT indicator light in the Vehicle information display will go out.
AUTOMATIC CLIMATE CONTROL
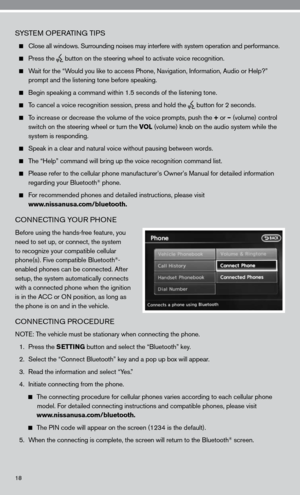
01 AUTO BUTTON
Press the AUTO button 01 . Turn the driver’s side temperature control dial 02 to the
desired temperature. This will allow the fan speed, air flow distribution and temperature to
be automatically maintained.
When AUTO is pressed, AUTO will illuminate. When DUAL 03 is pressed, DUAL will
illuminate.
To disable auto mode, press one of the air flow mode control buttons 05 , turn the fan
speed control dial 06 or press the front defroster control button 07 .
02 DRIVER’S SIDE TEMPERATURE CONTROL DIAL
Turn the driver’s side temperature control dial left for cold air or r\
ight for hot air.
01
0204
06
0910070803
05
Page 10 of 36

8
03 DUAL BUTTON
Press the DUAL button to turn the passenger’s side temperature controls on or off. T\
his
will allow the passenger’s side temperature to be adjusted independently from the driver’s
side control.
04 PASSENGER’S SIDE TEMPERATURE CONTROL DIAL
Turn the passenger’s side temperature control dial left for cold air o\
r right for hot air; doing so
will activate dual mode.
05 AIR FLOW MODE CONTROL BUTTONS
Press the buttons to select the following air flow outlets:
Air flows from the center and side vents.
Air flows from the center, side and foot vents.
Air flows mainly from the foot vents.
Air flows from the defroster and foot vents.
06 FAN SPEED CONTROL DIAL/OFF BUTTON
Turn the fan speed control dial to the left (slower) or right (faster)\
to manually control fan
speed. Press OFF to cancel fan speed operation and turn off climate control operation.
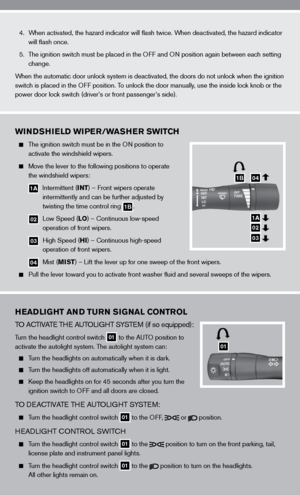
07 DEFROSTING/DEMISTING FRONT AND SIDE WINDOWS
Press the defroster control button to turn the system on. The A/ c automatically turns
on when the defroster mode is selected.
Turn the driver’s side temperature control dial left or right to set t\
he desired temperature.
To set the defroster on high, turn the fan speed control dial all the way\
to the right.
08 DEFROSTING REAR WINDOW AND OUTSIDE HEATED MIRRORS (if so equipped)
Push the rear window defroster switch
RR on. Push the switch again to manually turn the
defroster off. This function automatically turns off in approximately 15 minutes.
09 A/C ON/OFF BUTTON
Press the A/C button to manually turn the A/c on or off.
10 AIR RECIRCULATION BUTTON
Press the air recirculation button to recirculate air inside the vehicle.
Press the air recirculation button again to turn air recirculation off.
The air recirculation mode can only be selected if the air flow control\
mode is in the
following positions:
, or
.
Page 11 of 36

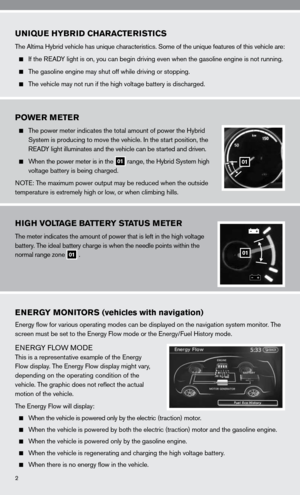
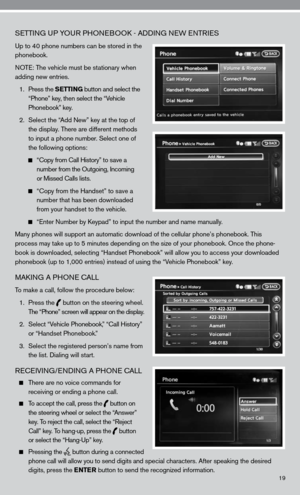
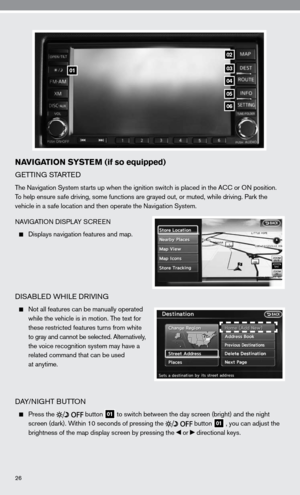
01 FM/AM BUTTON
Pressing the FM/AM button will change the band to f M1, fM2 or AM radio stations.
02 XM BUTTON*
Press the XM button to c")
9
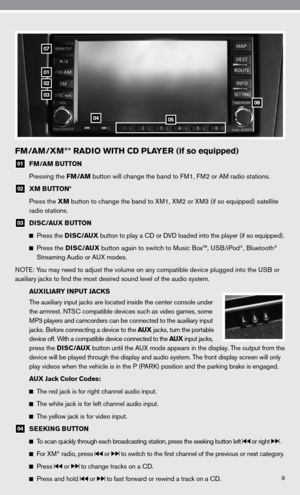
FM/AM/XM®* RADIO WITH CD PLAYER (if so equipped)
01 FM/AM BUTTON
Pressing the FM/AM button will change the band to f M1, fM2 or AM radio stations.
02 XM BUTTON*
Press the XM button to change the band to XM1, XM2 or XM3 (if so equipped) satellite
radio stations.
03 DISC/AUX BUTTON
Press the D I S C/AUX button to play a cd or d Vd loaded into the player (if so equipped).
Press the DISC/AUX button again to switch to Music Box™, u SB/iPod®, Bluetooth®
Streaming Audio or A uX modes.
n OTe: y ou may need to adjust the volume on any compatible device plugged into t\
he u SB or
auxiliary jacks to find the most desired sound level of the audio system.
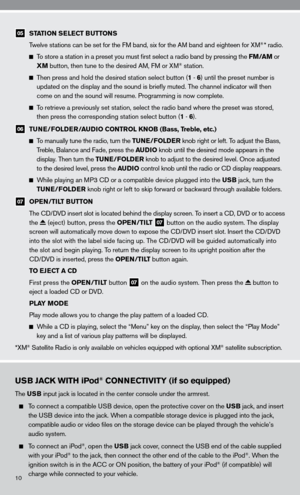
AUXILIARY INPUT JACKS
The auxiliary input jacks are located inside the center console under
the armrest. nTS c compatible devices such as video games, some
MP3 players and camcorders can be connected to the auxiliary input
jacks. Before connecting a device to the AUX jacks, turn the portable
device off. With a compatible device connected to the AUX input jacks,
press the D I S C/AUX button until the AuX mode appears in the display. The output from the
device will be played through the display and audio system. The front display screen will only
play videos when the vehicle is in the P (PAR k) position and the parking brake is engaged.
AUX Jack Color Codes:
The red jack is for right channel audio input.
The white jack is for left channel audio input.
The yellow jack is for video input.
04 SEEKING BUTTON
To scan quickly through each broadcasting station, press the seeking button left or right .
f or XM® radio, press or to switch to the first channel of the previous or next category.
Press or to change tracks on a cd.
Press and hold or to fast forward or rewind a track on a cd.
01
02
03
0405
06
07
Page 12 of 36

The USB input jack is located in the center console under the armrest.
To connect a compatible u SB device, open the protective cover on the US")
USB JACK WITH iPod® CONNECTIVITY (if so equipped)
The USB input jack is located in the center console under the armrest.
To connect a compatible u SB device, open the protective cover on the USB jack, and insert
the u SB device into the jack. When a compatible storage device is plugged into the jack,
compatible audio or video files on the storage device can be played th\
rough the vehicle’s
audio system.
To connect an iPod®, open the USB jack cover, connect the u SB end of the cable supplied
with your iPod® to the jack, then connect the other end of the cable to the iPod®. When the
ignition switch is in the A cc or On position, the battery of your iPod® (if compatible) will
charge while connected to your vehicle.
05 STATION SELECT BUTTONS
Twelve stations can be set for the f M band, six for the AM band and eighteen for XM®* radio.
To store a station in a preset you must first select a radio band by pressing the FM/AM or
XM button, then tune to the desired AM, f M or XM® station.
Then press and hold the desired station select button (1 - 6 ) until the preset number is
updated on the display and the sound is briefly muted. The channel indicator will then
come on and the sound will resume. Programming is now complete.
To retrieve a previously set station, select the radio band where the preset was stored,
then press the corresponding station select button (1 - 6 ).
06 TUNE/FOLDER/AUDIO CONTROL KNOB (Bass, Treble, etc.)
To manually tune the radio, turn the TUNE/FOLDER knob right or left. To adjust the Bass,
Treble, Balance and fade, press the AUDIO knob until the desired mode appears in the
display. Then turn the TUNE/FOLDER knob to adjust to the desired level. Once adjusted
to the desired level, press the AUDIO control knob until the radio or cd display reappears.
While playing an MP3 cd or a compatible device plugged into the USB jack, turn the
TUNE/FOLDER knob right or left to skip forward or backward through available folders.
07 OPEN/TILT BUTTON
The cd/ dVd insert slot is located behind the display screen. To insert a cd, dVd or to access
the
(eject) button, press the OPEN/TILT 07 button on the audio system. The display
screen will automatically move down to expose the cd/d Vd insert slot. insert the cd/d Vd
into the slot with the label side facing up. The cd/ dVd will be guided automatically into
the slot and begin playing. To return the display screen to its upright position after the
cd/ dVd is inserted, press the OPEN/TILT button again.
TO EJECT A CD
first press the OPEN/TILT button
07 on the audio system. Then press the button to
eject a loaded cd or d Vd.
PLAY MODE
Play mode allows you to change the play pattern of a loaded cd.
While a cd is playing, select the “Menu” key on the display, then select the “Play Mode”
key and a list of various play patterns will be displayed.
*XM
® Satellite Radio is only available on vehicles equipped with optional XM® satellite subscription.
10
Page 13 of 36

11
PLAYING AN iPod®
The interface for iPod® operation shown on the vehicle center display is similar to the iPod® interface.
Select the u SB/iPod
® mode using one of the following methods:
Push the SOURCE select switch on the steering wheel.
Press the DISC/AUX button.
FOR USB MEMORY:
After selecting the u SB/iPod® mode, select the “Play Movie contents” key or “Play Audio
contents” key to start playing audio or video files on the device.
SEEKING BUTTON
Press or for less than 1.5 seconds to skip through tracks.
Press and hold or for more than 1.5 seconds to rewind or fast forward. When the
button is released the audio will play at normal speed.
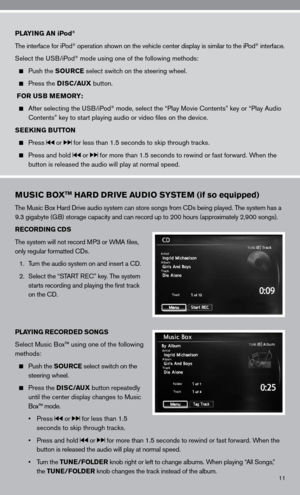
MUSIC BOXTM HARD DRIVE AUDIO SYSTEM (if so equipped)
The Music Box Hard drive audio system can store songs from cds being played. The system has a
9.3 gigabyte (GB) storage capacity and can record up to 200 hours (approximately 2,900 songs).
RECORDING CDS
The system will not record MP3 or WMA files,
only regular formatted cds.
1. Turn the audio system on and insert a cd.
2. Select the “START R ec” key. The system
starts recording and playing the first track
on the cd.
PLAYING RECORDED SONGS
Select Music Box™ using one of the following
methods:
Push the SOURCE select switch on the
steering wheel.
Press the DISC/AUX button repeatedly
until the center display changes to Music
Box™ mode.
• Press
or for less than 1.5
seconds to skip through tracks.
• Press and hold
or for more than 1.5 seconds to rewind or fast forward. When the
button is released the audio will play at normal speed.
• Turn the TUNE/FOLDER knob right or left to change albums. When playing “All Songs,”
the TUNE/FOLDER knob changes the track instead of the album.
Page 14 of 36

if you have a compatible Bluetooth® Streaming Audio device, it can be connected to the vehicle’s
audio system and played through the speakers.
cOnne")
BLUETOOTH® STREAMING AUDIO (if so equipped)
if you have a compatible Bluetooth® Streaming Audio device, it can be connected to the vehicle’s
audio system and played through the speakers.
cOnnec TinG
Press the SETTING button on the instrument panel, then select the “Bluetooth” key.
Select the “ connect Bluetooth” key and a screen will appear asking if you are connecting the
device to use with the hands-free phone system.
Select “no” when you receive the pop-up question.
enter a P in of your choice. it will be needed by your Bluetooth® audio device to complete the
connection process.
note: See the Bluetooth
® device’s Owner’s Manual for more information.
A udiO OPe RATiOn
To switch to the Bluetooth® Streaming Audio mode, press the SOURCE select switch on
the steering wheel or the DISC/AUX button repeatedly until the Bluetooth® Streaming
Audio mode is displayed on the screen.
The controls (Menu, Play and Pause) for Bluetooth® Streaming Audio are displayed on the
screen.
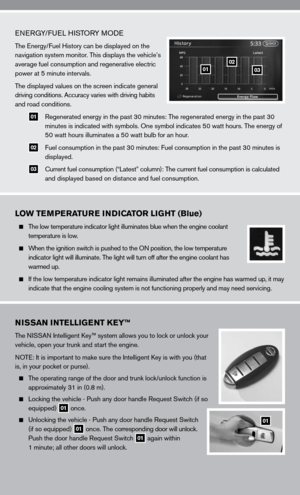
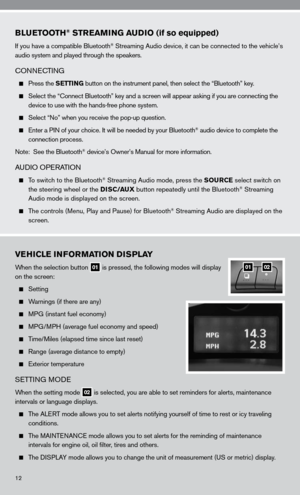
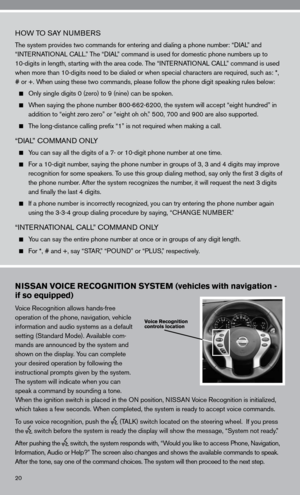
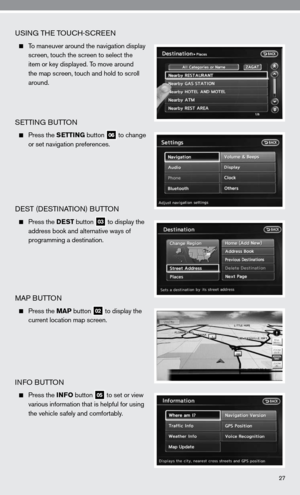
VEHICLE INFORMATION DISPLAY
When the selection button 01 is pressed, the following modes will display
on the screen:
Setting
Warnings (if there are any)
MPG (instant fuel economy)
MPG/MPH (average fuel economy and speed)
Time/Miles (elapsed time since last reset)
Range (average distance to empty)
exterior temperature
SeTTin G MO de
When the setting mode 02 is selected, you are able to set reminders for alerts, maintenance
intervals or language displays.
The ALe RT mode allows you to set alerts notifying yourself of time to rest or i\
cy traveling
conditions.
The MAinTenAnce mode allows you to set alerts for the reminding of maintenance
intervals for engine oil, oil filter, tires and others.
The di SPLAy mode allows you to change the unit of measurement (u S or metric) display.
0102
12
Page 15 of 36

Press the SETTING button, and then select the
“clock” key to access the following clock settings:
On-screen clock –")
13
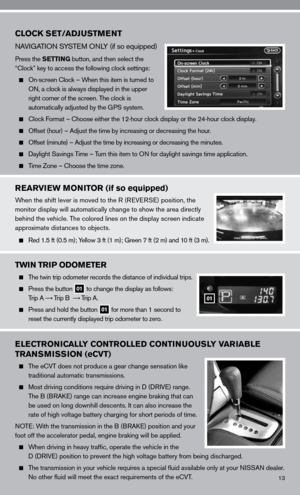
CLOCK SET/ADJUSTMENT
nAViGATi On S ySTe M O nLy (if so equipped)
Press the SETTING button, and then select the
“clock” key to access the following clock settings:
On-screen clock – When this item is turned to
On, a clock is always displayed in the upper
right corner of the screen. The clock is
automatically adjusted by the GPS system.
clock f ormat – choose either the 12-hour clock display or the 24-hour clock display.
Offset (hour) – Adjust the time by increasing or decreasing the hou\
r.
Offset (minute) – Adjust the time by increasing or decreasing the minutes.
daylight Savings Time – Turn this item to O n for daylight savings time application.
Time Zone – choose the time zone.
REARVIEW MONITOR (if so equipped)
When the shift lever is moved to the R (R eVeRSe) position, the
monitor display will automatically change to show the area directly
behind the vehicle. The colored lines on the display screen indicate
approximate distances to objects.
Red 1.5 ft (0.5 m); y ellow 3 ft (1 m); Green 7 ft (2 m) and 10 ft (3 m).
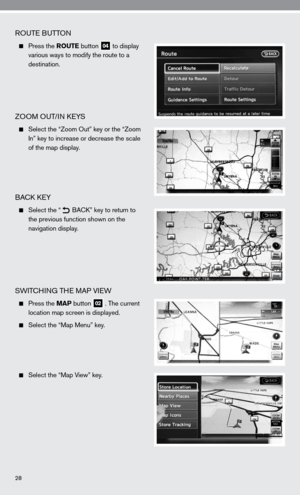
TWIN TRIP ODOMETER
The twin trip odometer records the distance of individual trips.
Press the button 01 to change the display as follows:
Trip A
Trip B
Trip A.
Press and hold the button 01 for more than 1 second to
reset the currently displayed trip odometer to zero.
ELECTRONICALLY CONTROLLED CONTINUOUSLY VARIABLE
TRANSMISSION (eCVT)
The e cVT does not produce a gear change sensation like
traditional automatic transmissions.
Most driving conditions require driving in d (d RiV e) range.
The B (BRA ke) range can increase engine braking that can
be used on long downhill descents. it can also increase the
rate of high voltage battery charging for short periods of time.
n OT e: With the transmission in the B (BRA ke) position and your
foot off the accelerator pedal, engine braking will be applied.
When driving in heavy traffic, operate the vehicle in the
d (d RiVe) position to prevent the high voltage battery from being discharged.
The transmission in your vehicle requires a special fluid available onl\
y at your ni SSAn dealer.
no other fluid will meet the exact requirements of the ecVT.
01
Page 16 of 36

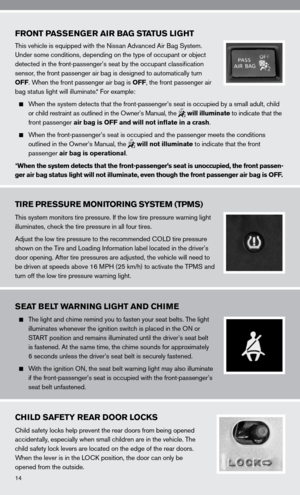
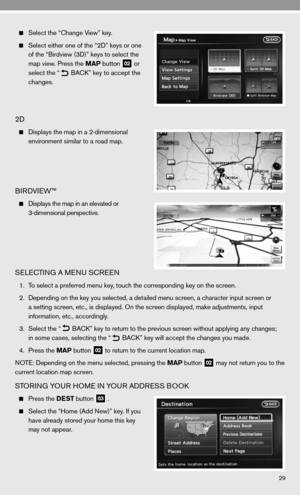
FRONT PASSENGER AIR BAG STATUS LIGHT
This vehicle is equipped with the nissan Advanced Air Bag System.
u nder some conditions, depending on the type of occupant or object
detected in the front-passenger’s seat by the occupant classification
sensor, the front passenger air bag is designed to automatically turn
OFF. When the front passenger air bag is OFF, the front passenger air
bag status light will illuminate.* f or example:
When the system detects that the front-passenger’s seat is occupied by a small adult, child
or child restraint as outlined in the Owner’s Manual, the
will illuminate to indicate that the
front passenger air bag is OFF and will not inflate in a crash.
When the front-passenger’s seat is occupied and the passenger meets the conditions
outlined in the Owner’s Manual, the
will not illuminate to indicate that the front
passenger air bag is operational.
* When the system detects that the front-passenger’s seat is unoccupied\
, the front passen-
ger air bag status light will not illuminate, even though the front pass\
enger air bag is OFF.
TIRE PRESSURE MONITORING SYSTEM (TPMS)
This system monitors tire pressure. if the low tire pressure warning light
illuminates, check the tire pressure in all four tires.
Adjust the low tire pressure to the recommended cOL d tire pressure
shown on the Tire and Loading information label located in the driver’s
door opening. After tire pressures are adjusted, the vehicle will need to
be driven at speeds above 16 MPH (25 km/h) to activate the TPMS and
turn off the low tire pressure warning light.
SEAT BELT WARNING LIGHT AND CHIME
The light and chime remind you to fasten your seat belts. The light
illuminates whenever the ignition switch is placed in the O n or
START position and remains illuminated until the driver’s seat belt
is fastened. At the same time, the chime sounds for approximately
6 seconds unless the driver’s seat belt is securely fastened.
With the ignition O n, the seat belt warning light may also illuminate
if the front-passenger’s seat is occupied with the front-passenger’s
seat belt unfastened.
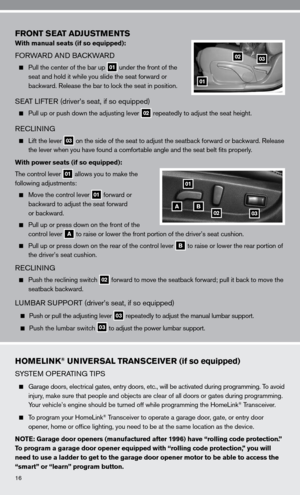
CHILD SAFETY REAR DOOR LOCKS
child safety locks help prevent the rear doors from being opened
accidentally, especially when small children are in the vehicle. The
child safety lock levers are located on the edge of the rear doors.
When the lever is in the LO ck position, the door can only be
opened from the outside.
14