2010 NISSAN ALTIMA HYBRID buttons
[x] Cancel search: buttonsPage 9 of 36

7
CRUISE CONTROL
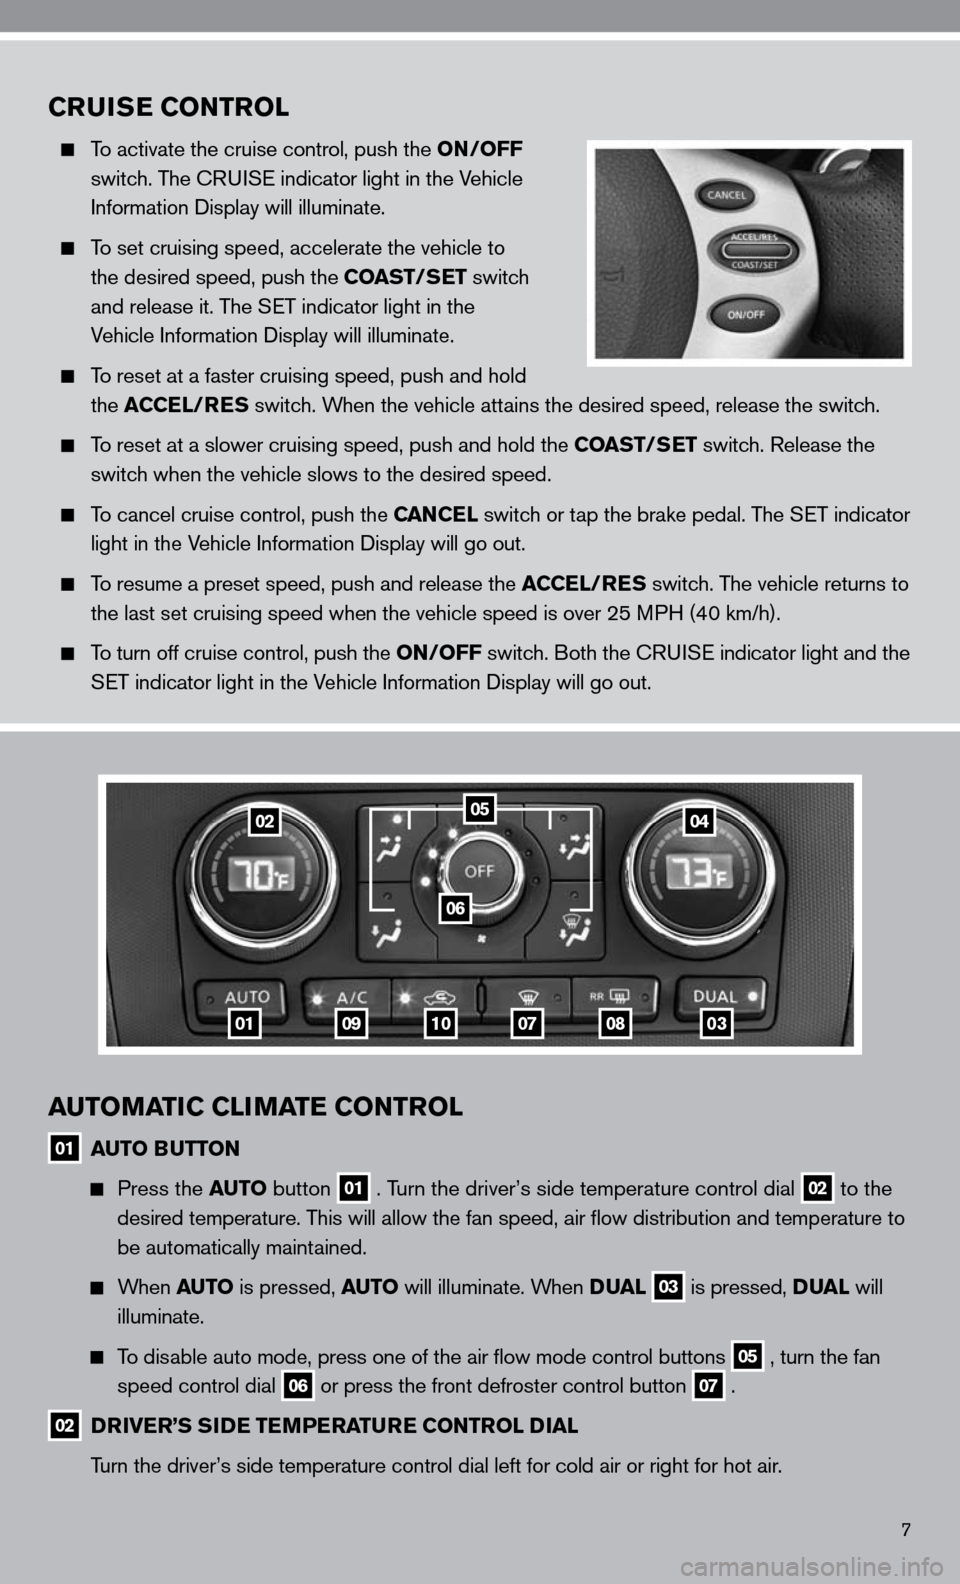
To activate the cruise control, push the ON/OFF
switch. The cRui Se indicator light in the Vehicle
information display will illuminate.
To set cruising speed, accelerate the vehicle to
the desired speed, push the COAST/SET switch
and release it. The S eT indicator light in the
Vehicle information display will illuminate.
To reset at a faster cruising speed, push and hold
the ACCEL/RES switch. When the vehicle attains the desired speed, release the switch.
To reset at a slower cruising speed, push and hold the COAST/SET switch. Release the
switch when the vehicle slows to the desired speed.
To cancel cruise control, push the CANCEL switch or tap the brake pedal. The S eT indicator
light in the Vehicle information display will go out.
To resume a preset speed, push and release the ACCEL/RES switch. The vehicle returns to
the last set cruising speed when the vehicle speed is over 25 MPH (40 km/h).
To turn off cruise control, push the ON/OFF switch. Both the cRui Se indicator light and the
SeT indicator light in the Vehicle information display will go out.
AUTOMATIC CLIMATE CONTROL
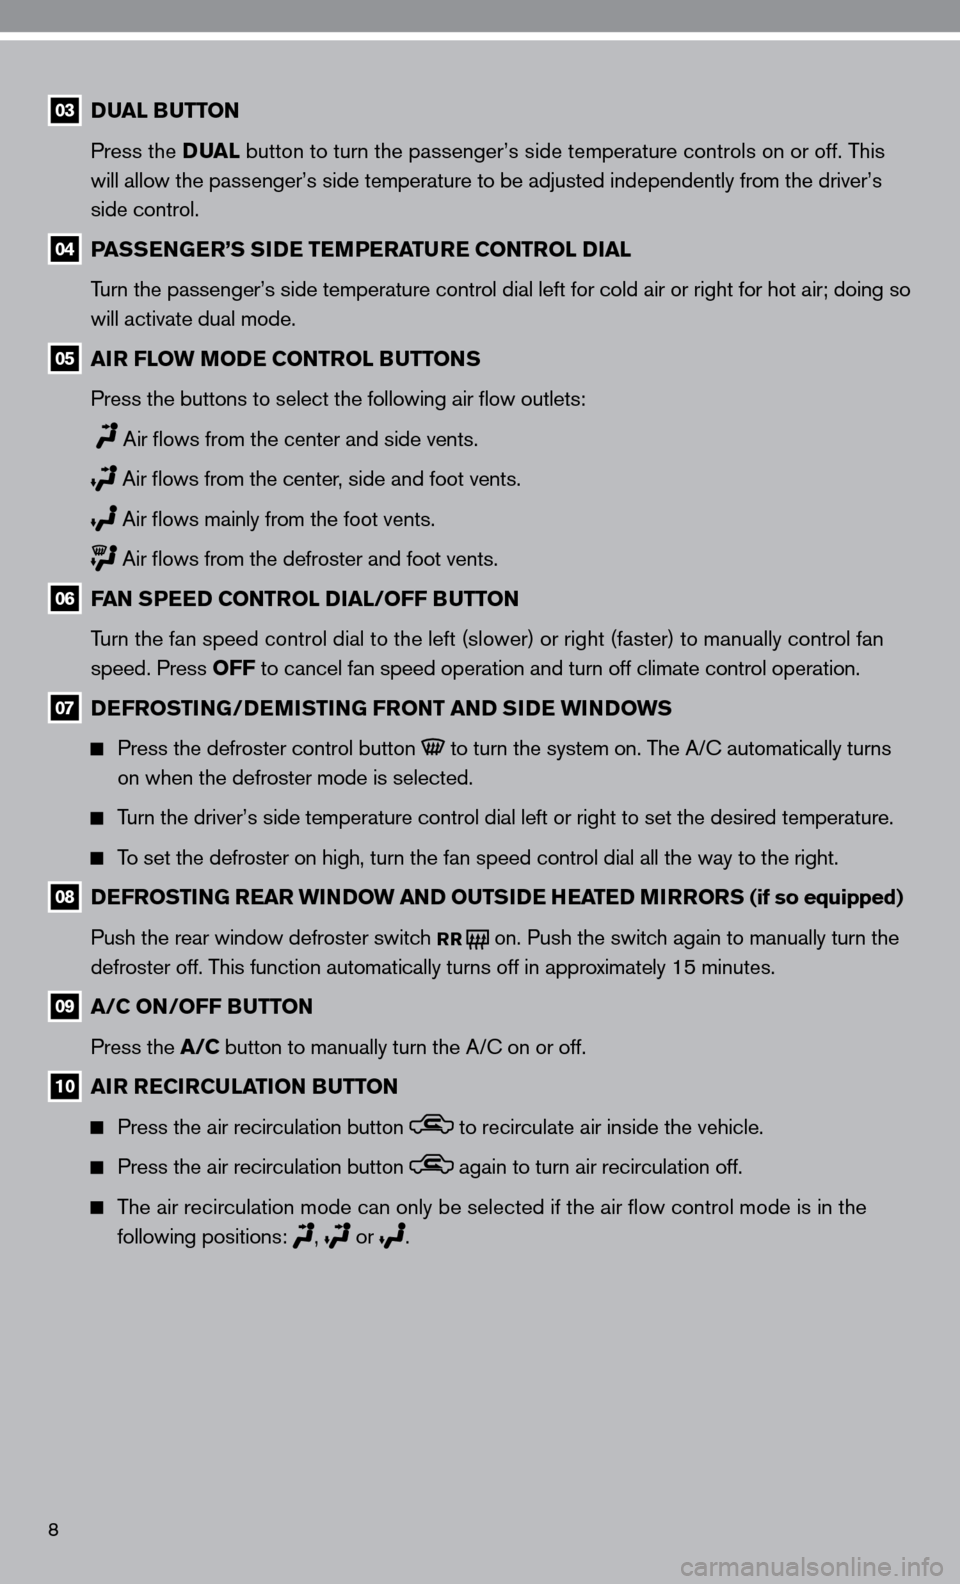
01 AUTO BUTTON
Press the AUTO button 01 . Turn the driver’s side temperature control dial 02 to the
desired temperature. This will allow the fan speed, air flow distribution and temperature to
be automatically maintained.
When AUTO is pressed, AUTO will illuminate. When DUAL 03 is pressed, DUAL will
illuminate.
To disable auto mode, press one of the air flow mode control buttons 05 , turn the fan
speed control dial 06 or press the front defroster control button 07 .
02 DRIVER’S SIDE TEMPERATURE CONTROL DIAL
Turn the driver’s side temperature control dial left for cold air or r\
ight for hot air.
01
0204
06
0910070803
05
Page 10 of 36

8
03 DUAL BUTTON
Press the DUAL button to turn the passenger’s side temperature controls on or off. T\
his
will allow the passenger’s side temperature to be adjusted independently from the driver’s
side control.
04 PASSENGER’S SIDE TEMPERATURE CONTROL DIAL
Turn the passenger’s side temperature control dial left for cold air o\
r right for hot air; doing so
will activate dual mode.
05 AIR FLOW MODE CONTROL BUTTONS
Press the buttons to select the following air flow outlets:
Air flows from the center and side vents.
Air flows from the center, side and foot vents.
Air flows mainly from the foot vents.
Air flows from the defroster and foot vents.
06 FAN SPEED CONTROL DIAL/OFF BUTTON
Turn the fan speed control dial to the left (slower) or right (faster)\
to manually control fan
speed. Press OFF to cancel fan speed operation and turn off climate control operation.
07 DEFROSTING/DEMISTING FRONT AND SIDE WINDOWS
Press the defroster control button to turn the system on. The A/ c automatically turns
on when the defroster mode is selected.
Turn the driver’s side temperature control dial left or right to set t\
he desired temperature.
To set the defroster on high, turn the fan speed control dial all the way\
to the right.
08 DEFROSTING REAR WINDOW AND OUTSIDE HEATED MIRRORS (if so equipped)
Push the rear window defroster switch
RR on. Push the switch again to manually turn the
defroster off. This function automatically turns off in approximately 15 minutes.
09 A/C ON/OFF BUTTON
Press the A/C button to manually turn the A/c on or off.
10 AIR RECIRCULATION BUTTON
Press the air recirculation button to recirculate air inside the vehicle.
Press the air recirculation button again to turn air recirculation off.
The air recirculation mode can only be selected if the air flow control\
mode is in the
following positions:
, or
.
Page 12 of 36

USB JACK WITH iPod® CONNECTIVITY (if so equipped)
The USB input jack is located in the center console under the armrest.
To connect a compatible u SB device, open the protective cover on the USB jack, and insert
the u SB device into the jack. When a compatible storage device is plugged into the jack,
compatible audio or video files on the storage device can be played th\
rough the vehicle’s
audio system.
To connect an iPod®, open the USB jack cover, connect the u SB end of the cable supplied
with your iPod® to the jack, then connect the other end of the cable to the iPod®. When the
ignition switch is in the A cc or On position, the battery of your iPod® (if compatible) will
charge while connected to your vehicle.
05 STATION SELECT BUTTONS
Twelve stations can be set for the f M band, six for the AM band and eighteen for XM®* radio.
To store a station in a preset you must first select a radio band by pressing the FM/AM or
XM button, then tune to the desired AM, f M or XM® station.
Then press and hold the desired station select button (1 - 6 ) until the preset number is
updated on the display and the sound is briefly muted. The channel indicator will then
come on and the sound will resume. Programming is now complete.
To retrieve a previously set station, select the radio band where the preset was stored,
then press the corresponding station select button (1 - 6 ).
06 TUNE/FOLDER/AUDIO CONTROL KNOB (Bass, Treble, etc.)
To manually tune the radio, turn the TUNE/FOLDER knob right or left. To adjust the Bass,
Treble, Balance and fade, press the AUDIO knob until the desired mode appears in the
display. Then turn the TUNE/FOLDER knob to adjust to the desired level. Once adjusted
to the desired level, press the AUDIO control knob until the radio or cd display reappears.
While playing an MP3 cd or a compatible device plugged into the USB jack, turn the
TUNE/FOLDER knob right or left to skip forward or backward through available folders.
07 OPEN/TILT BUTTON
The cd/ dVd insert slot is located behind the display screen. To insert a cd, dVd or to access
the
(eject) button, press the OPEN/TILT 07 button on the audio system. The display
screen will automatically move down to expose the cd/d Vd insert slot. insert the cd/d Vd
into the slot with the label side facing up. The cd/ dVd will be guided automatically into
the slot and begin playing. To return the display screen to its upright position after the
cd/ dVd is inserted, press the OPEN/TILT button again.
TO EJECT A CD
first press the OPEN/TILT button
07 on the audio system. Then press the button to
eject a loaded cd or d Vd.
PLAY MODE
Play mode allows you to change the play pattern of a loaded cd.
While a cd is playing, select the “Menu” key on the display, then select the “Play Mode”
key and a list of various play patterns will be displayed.
*XM
® Satellite Radio is only available on vehicles equipped with optional XM® satellite subscription.
10
Page 19 of 36

PROGRAMMinG yO uR HOMeL ink® uni Ve RSAL TRA nScei Ve R
(Mirror, Sun Visor or Overhead console)
1. To begin, press and hold the two outer
HomeLink® buttons (to clear the
memory) until the indicator light blinks
slowly (after 20 seconds). Release
both buttons.
2. Position the end of the hand-held
transmitter 1-3 in (26-76 mm) away
from the HomeLink
® surface.
3. using both hands, simultaneously press and hold both the HomeLink
® button you want to
program and the hand-held transmitter button. DO NOT release the buttons until step 4
has been completed.
4. Hold down both buttons until the indicator light on the HomeLink
® flashes, changing from
a “slow blink” to a “rapidly flashing blink.” This could take up to 90 seconds. When the indicator
light flashes rapidly, both buttons may be released. The rapidly flashing light indicates
successful programming. To activate the garage door or other programmed device, press
and hold the programmed HomeLink
® button - releasing when the device begins to activate.
5. if the indicator light on the HomeLink
® blinks rapidly for 2 seconds and then turns solid,
HomeLink® has picked up a “rolling code” garage door opener signal. you will need to
proceed with the next steps to train the HomeLink® to complete the programming, which
may require a ladder and another person for convenience.
6. Press and release the “smart” or “learn” program button loca\
ted on the garage door opener’s
motor to activate the “training mode.” This button is usually located near the antenna wire that
hangs down from the motor. if the wire originates from under a light lens, you will need to
remove the lens to access the program button.
NOTE: Once you have pressed and released the program button on the garage door
opener’s motor and the “training light” is lit, you have 30 seconds in which to perform
step 7. Use the help of a second person for convenience to assist when perform\
ing this step.
7. Within 30 seconds of pressing and releasing the garage door opener program butto\
n, firmly
press and release the HomeLink
® button you’ve just programmed. Press and release the
HomeLink® button up to 3 times to complete the training.
8. y our HomeLink
® button should now be programmed. (To program the remaining HomeLink®
buttons for additional door or gate openers, follow steps 2-8 only.)
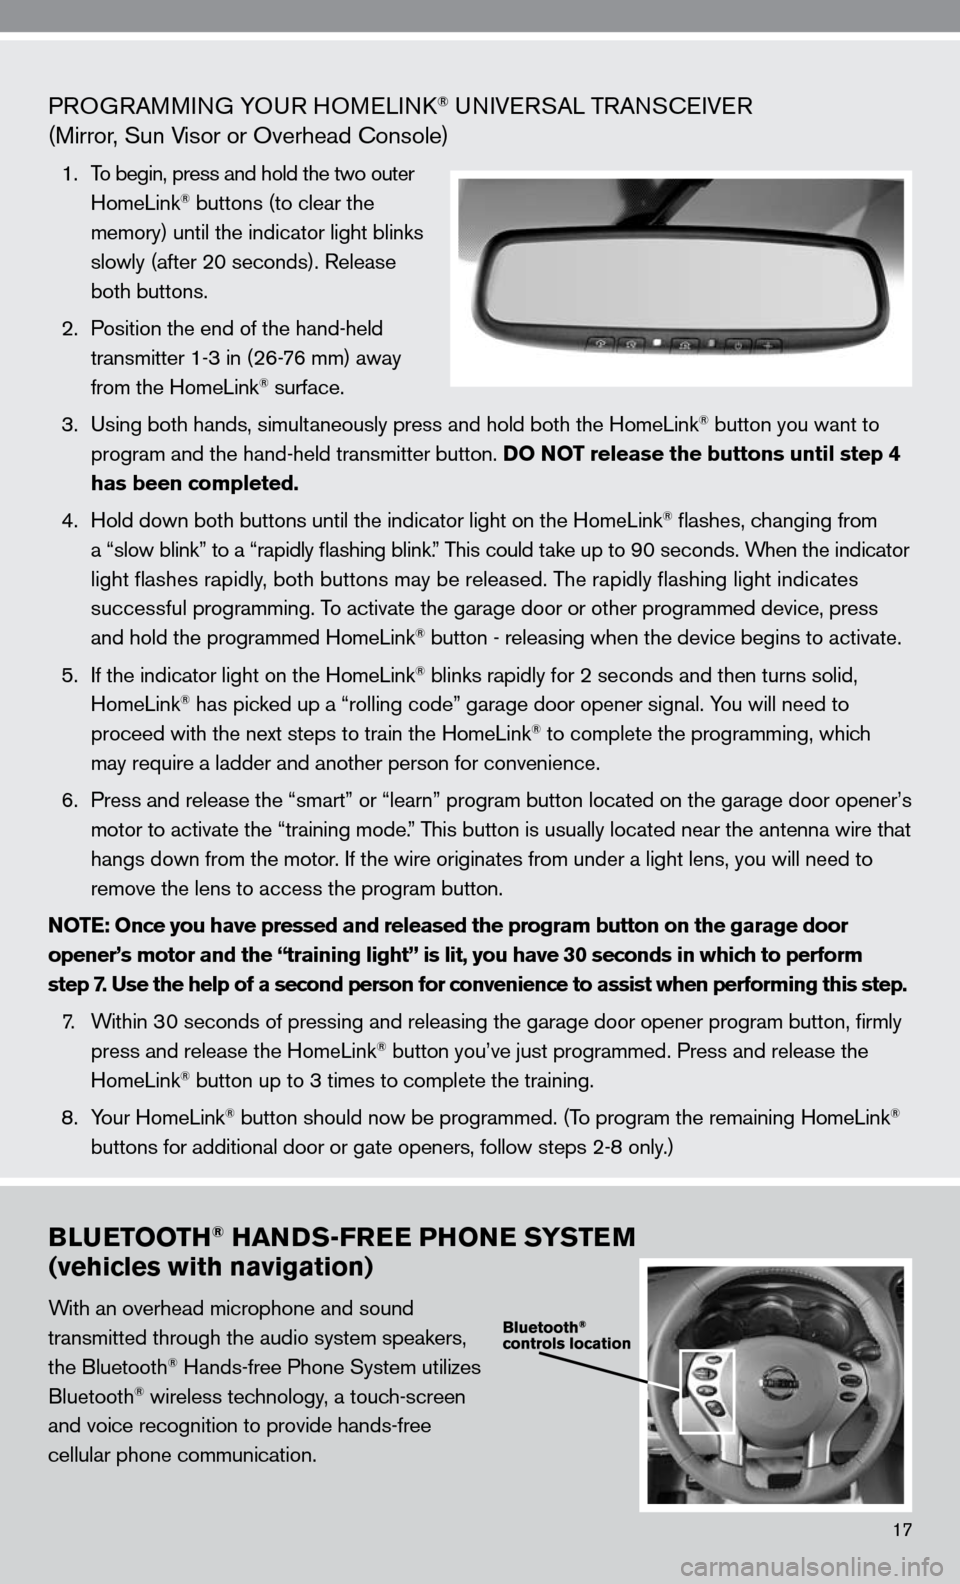
BLUETOOTH® HANDS-FREE PHONE SYSTEM
(vehicles with navigation)
With an overhead microphone and sound
transmitted through the audio system speakers,
the Bluetooth
® Hands-free Phone System utilizes
Bluetooth® wireless technology, a touch-screen
and voice recognition to provide hands-free
cellular phone communication.
17