Page 161 of 658
3-66 Features and controls
3
Testing the theft-alarm systemUse the following procedure to test the system:
1. Lower the driver’s window.
2. Arm the system as explained in “Armed stage”.
3. Make sure that the theft-alarm indicator comes on and
flashes within approximately 20 seconds.
4. Wait a few seconds and then unlock the driver’s side door
by using the inside door lock knob and opening the door.
5. Check to be sure that the horn sounds intermittently and
the headlights blink on and off when the doors or the rear
hatch is opened.
6. Disarm the system by unlocking all doors and the rear
hatch by the remote control transmitter, the F.A.S.T.-key.
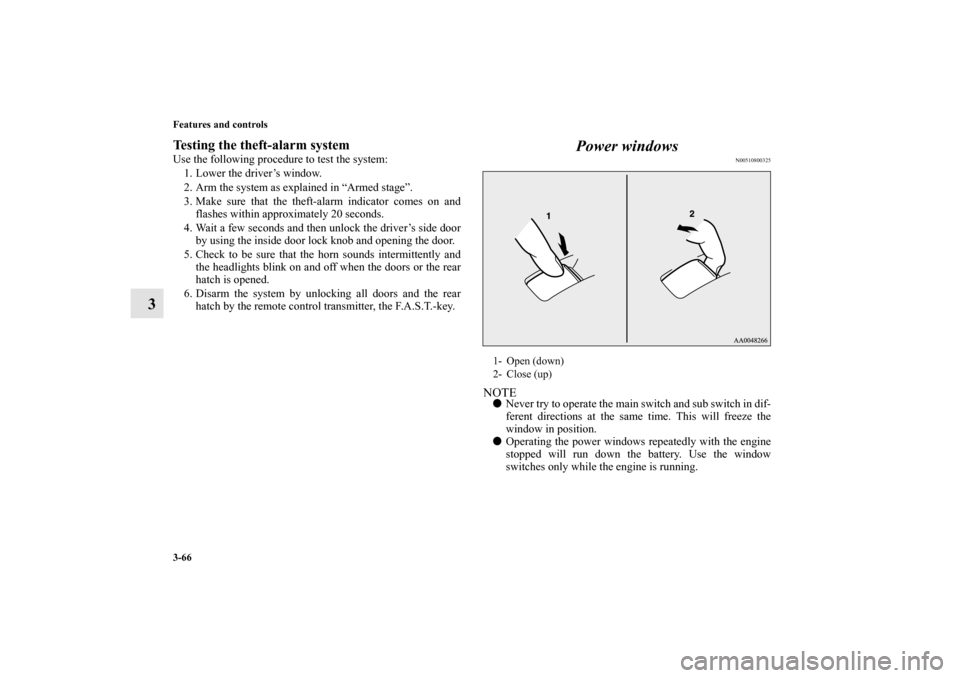
Power windows
N00510800325
NOTE�
Never try to operate the main switch and sub switch in dif-
ferent directions at the same time. This will freeze the
window in position.
�
Operating the power windows repeatedly with the engine
stopped will run down the battery. Use the window
switches only while the engine is running.
1- Open (down)
2- Close (up)
BK0103001US.book 66 ページ 2009年8月20日 木曜日 午前10時45分
Page 162 of 658
Features and controls
3-67
3
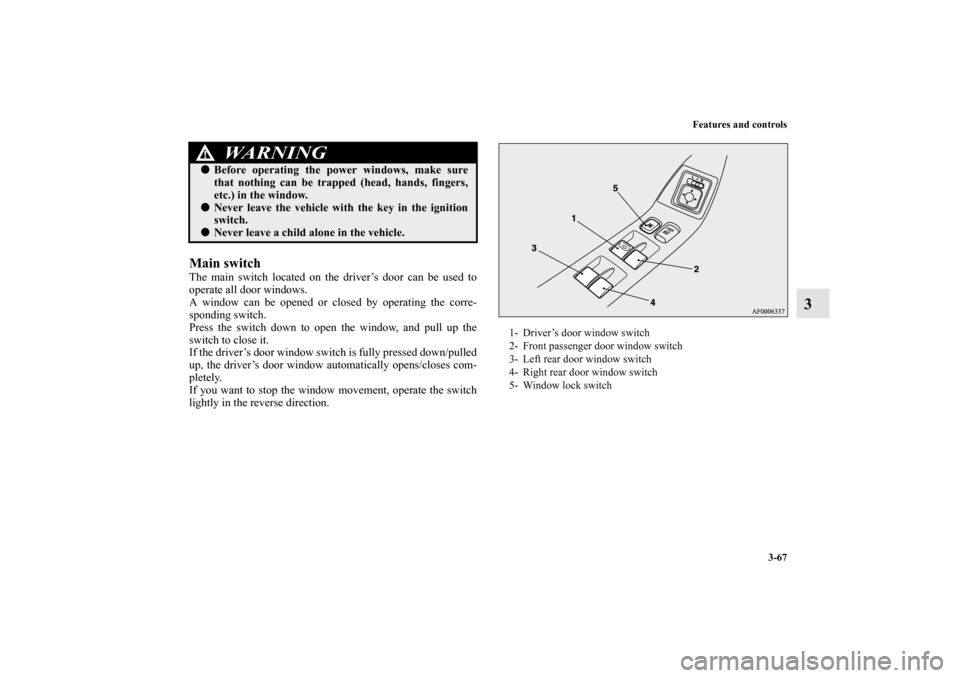
Main switchThe main switch located on the driver’s door can be used to
operate all door windows.
A window can be opened or closed by operating the corre-
sponding switch.
Press the switch down to open the window, and pull up the
switch to close it.
If the driver’s door window switch is fully pressed down/pulled
up, the driver’s door window automatically opens/closes com-
pletely.
If you want to stop the window movement, operate the switch
lightly in the reverse direction.
WA R N I N G
!�
Before operating the power windows, make sure
that nothing can be trapped (head, hands, fingers,
etc.) in the window.
�
Never leave the vehicle with the key in the ignition
switch.
�
Never leave a child alone in the vehicle.
1- Driver’s door window switch
2- Front passenger door window switch
3- Left rear door window switch
4- Right rear door window switch
5- Window lock switch
BK0103001US.book 67 ページ 2009年8月20日 木曜日 午前10時45分
Page 169 of 658
3-74 Features and controls
3Parking brake
N00511400344
To park the vehicle, first bring it to a complete stop, fully
engage the parking brake, and then move the gearshift lever to
1st (on a uphill) or “R” (Reverse) (on a downhill) position for
vehicles equipped with a manual transaxle, set the selector
lever {continuously variable transmission (CVT)} or the gear-
shift lever (Twin Clutch SST) to “P” (PARK) position for vehi-
cles equipped with CVT or Twin Clutch SST.
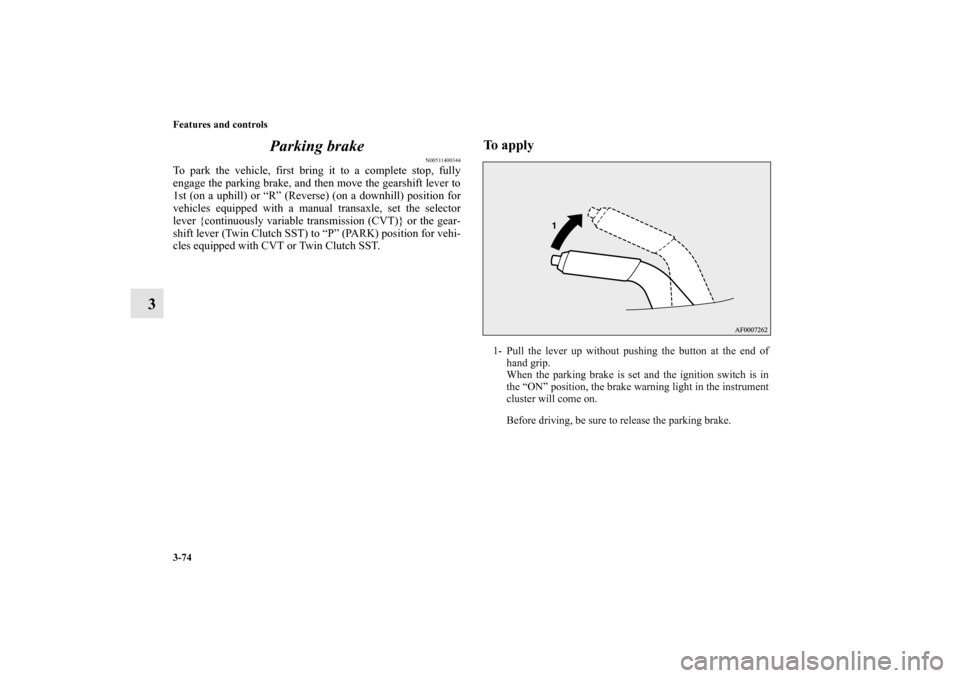
To apply 1- Pull the lever up without pushing the button at the end of
hand grip.
When the parking brake is set and the ignition switch is in
the “ON” position, the brake warning light in the instrument
cluster will come on.
Before driving, be sure to release the parking brake.
BK0103001US.book 74 ページ 2009年8月20日 木曜日 午前10時45分
Page 170 of 658
Features and controls
3-75
3
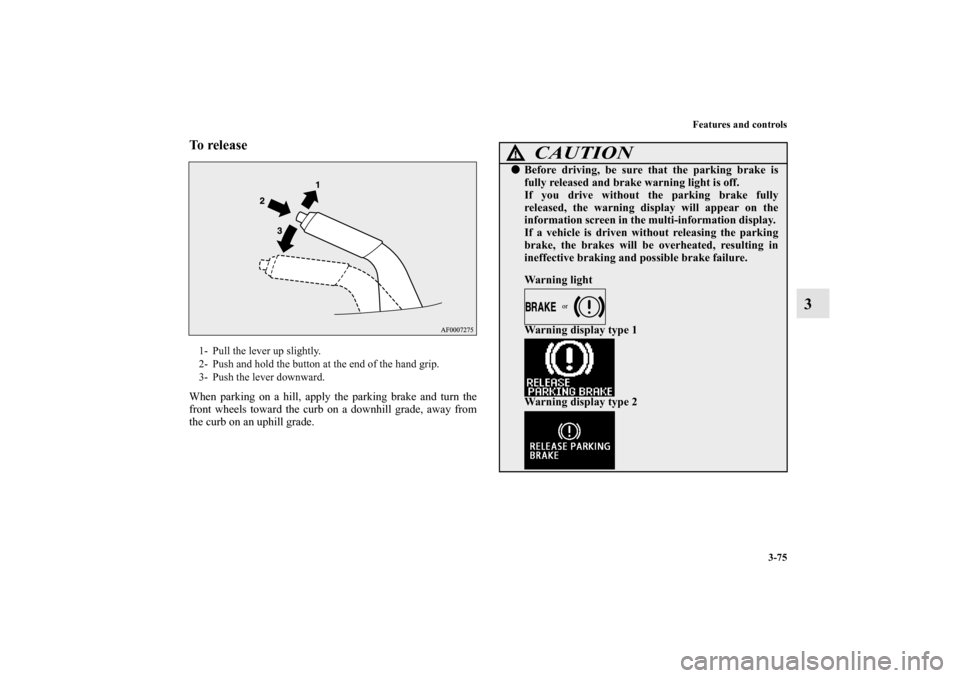
To release When parking on a hill, apply the parking brake and turn the
front wheels toward the curb on a downhill grade, away from
the curb on an uphill grade.1- Pull the lever up slightly.
2- Push and hold the button at the end of the hand grip.
3- Push the lever downward.
CAUTION
!�
Before driving, be sure that the parking brake is
fully released and brake warning light is off.
If you drive without the parking brake fully
released, the warning display will appear on the
information screen in the multi-information display.
If a vehicle is driven without releasing the parking
brake, the brakes will be overheated, resulting in
ineffective braking and possible brake failure.
Warning light
Warning display type 1
Warning display type 2
BK0103001US.book 75 ページ 2009年8月20日 木曜日 午前10時45分
Page 173 of 658
3-78 Features and controls
3
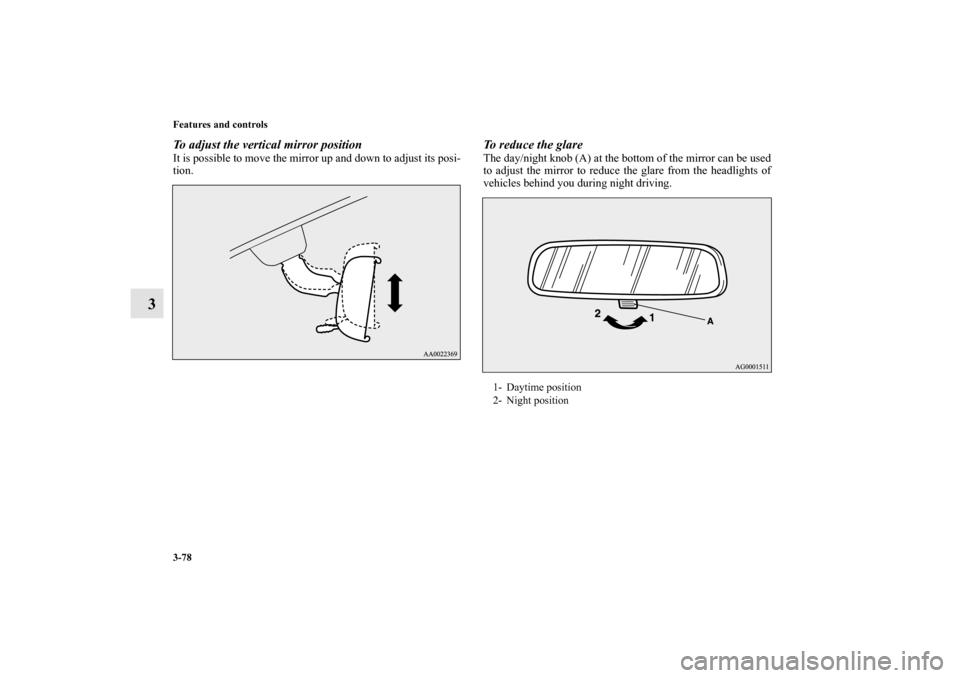
To adjust the vertical mirror positionIt is possible to move the mirror up and down to adjust its posi-
tion.
To reduce the glareThe day/night knob (A) at the bottom of the mirror can be used
to adjust the mirror to reduce the glare from the headlights of
vehicles behind you during night driving.1- Daytime position
2- Night position
BK0103001US.book 78 ページ 2009年8月20日 木曜日 午前10時45分
Page 175 of 658
3-80 Features and controls
3
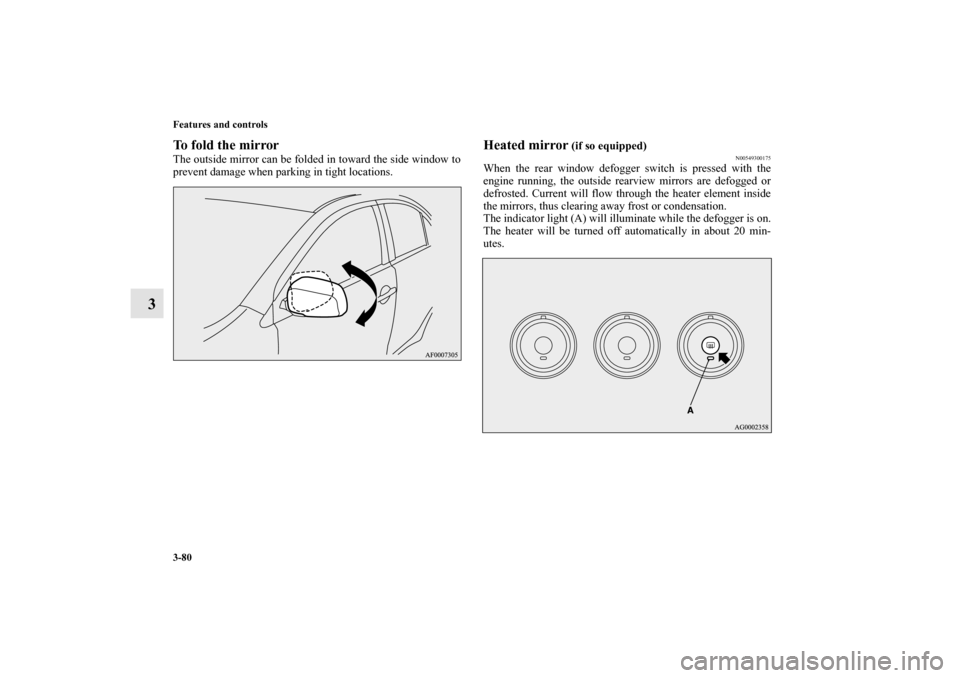
To fold the mirrorThe outside mirror can be folded in toward the side window to
prevent damage when parking in tight locations.
Heated mirror
(if so equipped)
N00549300175
When the rear window defogger switch is pressed with the
engine running, the outside rearview mirrors are defogged or
defrosted. Current will flow through the heater element inside
the mirrors, thus clearing away frost or condensation.
The indicator light (A) will illuminate while the defogger is on.
The heater will be turned off automatically in about 20 min-
utes.
BK0103001US.book 80 ページ 2009年8月20日 木曜日 午前10時45分
Page 179 of 658
3-84 Features and controls
3Steering wheel lock
N00512500179
[For vehicles equipped with the F.A.S.T.-key]
For information on operations for vehicles equipped with the
F.A.S.T.-key, refer to “F.A.S.T.-key: Steering wheel lock” on
page 3-30.
[Except for vehicles equipped with the F.A.S.T.-key]To l o c kRemove the key at the “LOCK” position.
Turn the steering wheel until it is locked.To unlockTurn the key to the “ACC” position while moving the steering
wheel slightly.
NOTE�
If the front wheels are turned, the anti-theft lock may
sometimes make it difficult to turn the key from “LOCK”
position to “ACC” position. Firmly turn the steering
wheel to the left or to the right as you turn the key.
CAUTION
!�
Remove the key when leaving the vehicle.
BK0103001US.book 84 ページ 2009年8月20日 木曜日 午前10時45分
Page 181 of 658
![MITSUBISHI LANCER SPORTBACK 2010 8.G Owners Manual 3-86 Features and controls
3
Starting the engine
N00542200045
[For vehicles equipped with the F.A.S.T.-key]
For information on operations for vehicles equipped with the
F.A.S.T.-key, refer to “F.A.S](/manual-img/19/7499/w960_7499-180.png "MITSUBISHI LANCER SPORTBACK 2010 8.G Owners Manual 3-86 Features and controls
3
Starting the engine
N00542200045
[For vehicles equipped with the F.A.S.T.-key]
For information on operations for vehicles equipped with the
F.A.S.T.-key, refer to “F.A.S")
3-86 Features and controls
3
Starting the engine
N00542200045
[For vehicles equipped with the F.A.S.T.-key]
For information on operations for vehicles equipped with the
F.A.S.T.-key, refer to “F.A.S.T.-key: Starting the engine” on
page 3-30.
[Except for vehicles equipped with the F.A.S.T.-key]
Your vehicle is equipped with an electronically controlled fuel
injection system, which automatically controls the release of
fuel. There is usually no need to depress the accelerator pedal
when starting the engine.
The starter should not be run for more than 15 seconds at a
time.
To prevent battery drain, wait a few seconds between attempts
to restart the engine. Normal conditionTo start your vehicle:
Make sure all occupants are properly seated with seat belts fas-
tened.
1. Insert the ignition key.
2. Make sure the parking brake is applied.
3. Press and hold the brake pedal down with your right foot.
4. Press and hold the clutch pedal all the way down (manual
transaxle).NOTE�
For models equipped with a manual transaxle, the starter
will not operate unless the clutch pedal is fully depressed
(Clutch interlock). This is a safety feature.5. On vehicles equipped with manual transaxle, place the
gearshift lever in the “N” (Neutral) position.
On vehicles equipped with continuously variable trans-
mission (CVT) or Twin Clutch SST, make sure the selec-
tor lever (CVT) or the gearshift lever (Twin Clutch SST)
is in the “P” (PARK) position.
NOTE�
On vehicles equipped with CVT, the starter will not oper-
ate unless the selector lever is in the “P” (PARK) or “N”
(NEUTRAL) position.
On vehicles equipped with Twin Clutch SST, the starter
will not operate unless the gearshift lever is in the “P”
(PARK) position or the gearshift lever is in the “N”
(NEUTRAL) position with the brake pedal depressed.
For safety reasons, start the engine in the “P” (PARK)
position so that the wheels are locked.
6. Turn the ignition switch to the “ON” position and make
certain that all warning lights are functioning properly
before starting the engine.
7. Turn the ignition switch to the “START” position without
pressing the accelerator pedal. Release the key when the
engine starts.
NOTE�
Minor noises may be heard on engine start-up. These will
disappear as the engine warms up.
BK0103001US.book 86 ページ 2009年8月20日 木曜日 午前10時45分
![MITSUBISHI LANCER SPORTBACK 2010 8.G Owners Manual 3-84 Features and controls
3Steering wheel lock
N00512500179
[For vehicles equipped with the F.A.S.T.-key]
For information on operations for vehicles equipped with the
F.A.S.T.-key, refer to “F.A.S.](/manual-img/19/7499/w960_7499-178.png "MITSUBISHI LANCER SPORTBACK 2010 8.G Owners Manual 3-84 Features and controls
3Steering wheel lock
N00512500179
[For vehicles equipped with the F.A.S.T.-key]
For information on operations for vehicles equipped with the
F.A.S.T.-key, refer to “F.A.S.")