2010 MINI Clubman Owner's Manual (Mini Connected)
-
 1
1 -
 2
2 -
 3
3 -
 4
4 -
 5
5 -
 6
6 -
 7
7 -
 8
8 -
 9
9 -
 10
10 -
 11
11 -
 12
12 -
 13
13 -
 14
14 -
 15
15 -
 16
16 -
 17
17 -
 18
18 -
 19
19 -
 20
20 -
 21
21 -
 22
22 -
 23
23 -
 24
24 -
 25
25 -
 26
26 -
 27
27 -
 28
28 -
 29
29 -
 30
30 -
 31
31 -
 32
32 -
 33
33 -
 34
34 -
 35
35 -
 36
36 -
 37
37 -
 38
38 -
 39
39 -
 40
40 -
 41
41 -
 42
42 -
 43
43 -
 44
44 -
 45
45 -
 46
46 -
 47
47 -
 48
48 -
 49
49 -
 50
50 -
 51
51 -
 52
52 -
 53
53 -
 54
54 -
 55
55 -
 56
56 -
 57
57 -
 58
58 -
 59
59 -
 60
60 -
 61
61 -
 62
62 -
 63
63 -
 64
64 -
 65
65 -
 66
66 -
 67
67 -
 68
68 -
 69
69 -
 70
70 -
 71
71 -
 72
72 -
 73
73 -
 74
74 -
 75
75 -
 76
76 -
 77
77 -
 78
78 -
 79
79 -
 80
80 -
 81
81 -
 82
82 -
 83
83 -
 84
84 -
 85
85 -
 86
86 -
 87
87 -
 88
88 -
 89
89 -
 90
90 -
 91
91 -
 92
92 -
 93
93 -
 94
94 -
 95
95 -
 96
96 -
 97
97 -
 98
98 -
 99
99 -
 100
100 -
 101
101 -
 102
102 -
 103
103 -
 104
104 -
 105
105 -
 106
106 -
 107
107 -
 108
108 -
 109
109 -
 110
110 -
 111
111 -
 112
112 -
 113
113 -
 114
114 -
 115
115 -
 116
116 -
 117
117 -
 118
118 -
 119
119 -
 120
120 -
 121
121 -
 122
122 -
 123
123 -
 124
124 -
 125
125 -
 126
126 -
 127
127 -
 128
128 -
 129
129 -
 130
130 -
 131
131 -
 132
132 -
 133
133 -
 134
134 -
 135
135 -
 136
136 -
 137
137 -
 138
138 -
 139
139 -
 140
140 -
 141
141 -
 142
142 -
 143
143 -
 144
144 -
 145
145 -
 146
146 -
 147
147 -
 148
148 -
 149
149 -
 150
150 -
 151
151 -
 152
152 -
 153
153 -
 154
154 -
 155
155 -
 156
156 -
 157
157 -
 158
158 -
 159
159 -
 160
160 -
 161
161 -
 162
162 -
 163
163 -
 164
164 -
 165
165 -
 166
166 -
 167
167 -
 168
168 -
 169
169 -
 170
170 -
 171
171 -
 172
172 -
 173
173 -
 174
174 -
 175
175 -
 176
176 -
 177
177 -
 178
178 -
 179
179 -
 180
180 -
 181
181 -
 182
182 -
 183
183 -
 184
184 -
 185
185 -
 186
186 -
 187
187 -
 188
188 -
 189
189 -
 190
190 -
 191
191 -
 192
192 -
 193
193 -
 194
194 -
 195
195 -
 196
196 -
 197
197 -
 198
198 -
 199
199 -
 200
200 -
 201
201 -
 202
202 -
 203
203 -
 204
204 -
 205
205 -
 206
206 -
 207
207 -
 208
208 -
 209
209 -
 210
210 -
 211
211 -
 212
212 -
 213
213 -
 214
214 -
 215
215 -
 216
216 -
 217
217
 MOBILITYAT A GLANCE CONTROLS DRIVING TIPS ENTERTAINMENT
63
NAVIGATION REFERENCE
Clock
In the tachometer
Setting the time
1.Briefly press the button in the turn indicator
lever repeatedly until \"SET/")
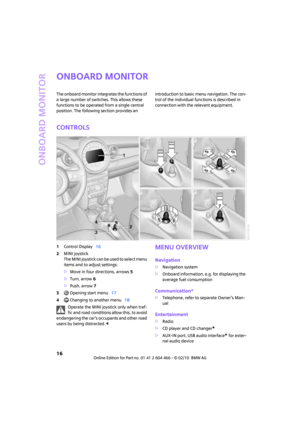
 Controls overview
64
5.Turn the MINI joystick until \"Time\" is
selected and press the MINI joystick.
6.Turn the MINI joystick until \"Set time\" is
selected and press the MINI joystick.
7.Turn the MINI")
 MOBILITYAT A GLANCE CONTROLS DRIVING TIPS ENTERTAINMENT
65
NAVIGATION REFERENCE
7.Set the month and year in the same way.
8.Wait for the display to change.
The settings are stored.
On the onboard mon")
 Controls overview
66
For most Check Control messages, you can view
more information later, e.g. regarding the cause
of a malfunction and how to respond, refer to
page67.
In urgent cases, this infor")
 MOBILITYAT A GLANCE CONTROLS DRIVING TIPS ENTERTAINMENT
67
NAVIGATION REFERENCE
3.Briefly press the button repeatedly until the
corresponding symbol and \"CHECK INFO\"
are displayed.
4.Hold the butto")
 Controls overview
68
4.Select \"Limit\".
5.Select \"Change limit:\".
6.Turn the MINI joystick to set the limit.
7.Press the MINI joystick to apply the setting.
The limit is automatically activated.
Applyi")
 MOBILITYAT A GLANCE CONTROLS DRIVING TIPS ENTERTAINMENT
69
NAVIGATION REFERENCE
5.Select \"Language\".
6.Select \"Text language\".
The language for the display texts and navi-
gation messages can be cha")
 Technology for driving comfort and safety
70
Technology for driving comfort and
safety
Park Distance Control
PDC*
The concept
PDC assists you with parking backwards. Acous-
tic signals and a visual")