Page 145 of 218

MOBILITYAT A GLANCE CONTROLS DRIVING TIPS ENTERTAINMENT
143
NAVIGATION REFERENCE
CD player and CD changer
Listening to CDs
Compressed audio files*
CDs with compressed audio files, MP3s, can be
played by the CD player and CD changer.
Starting the CD player
The upper drive is for audio CDs.
Insert the CD into the drive with the labeled side
up.
The CD is drawn in automatically. Playback starts
automatically if the sound output is on. When
playing CDs with compressed audio files, it can
take the CD player approx. 1 minute to read in
the data, depending on the directory structure.
Starting playback of an inserted CD
Onboard monitor, for operating principle refer
to page16.
1.Press the button.
This opens the start menu.
2.Move the MINI joystick to highlight "Enter-
tainment" and press the MINI joystick.
3.If necessary, move the highlight marker to
the uppermost field. Select "CD".
4.If necessary, move the highlight marker to
the second field from the top. In vehicles with a CD changer, select "CD" to start the
CD player.
Playback starts automatically if the sound out-
put is switched on.
Starting the CD changer
1.Fill the CD changer, page146.
2.Press the button.
This opens the start menu.
3.Move the MINI joystick to highlight "Enter-
tainment" and press the MINI joystick.
4.If necessary, move the highlight marker to
the uppermost field. Select "CD".
5.If necessary, move the highlight marker to
the second field from the top. Select the
desired CD.
At the end of the last track, the next CD is
selected and played.
If new CDs have been placed in the CD changer,
playback starts with the lowest CD, e.g. CD 1,
track 1.
The CD changer's load status is indicated on the
Control Display.
*
Page 146 of 218

CD player and CD changer
144
Selecting a track
Buttons on the CD player
Press the button for the desired direction
repeatedly until the desired track on the current
CD is reached.
Playback of the CD starts at the beginning of the
track. The track is displayed on the Control Dis-
play.
You can also change the track using the buttons
on the steering wheel, page11.
Using the onboard monitor
Turn the MINI joystick to select a track.
Compressed audio files*
1.Select the directory if necessary.
2.Select a track and press the MINI joystick.To change the directory:
Select a directory and press the MINI joystick.
Exit the menu:
Select the arrow.
Displaying information about the track*
With compressed audio files, any information
about the current track that has been recorded
can be displayed, e.g. the name of the artist.
1.Press the MINI joystick.
2.Select "Details".
The information is shown for the current track.
The setting is stored for the remote control cur-
rently in use, refer to Personal Profile, page26.
Sampling tracks, Scan
All tracks on the current CD are automatically
sampled once in succession.
Page 147 of 218
MOBILITYAT A GLANCE CONTROLS DRIVING TIPS ENTERTAINMENT
145
NAVIGATION REFERENCE
1.Select a track.
2.Press the MINI joystick.
Other menu items are displayed.
3.Select "Scan".
Stop sampling:
1.Press the MINI joystick.
2.Select "Scan".
Track sampling is interrupted and the selected
track is played on.
Compressed audio files*
1.Select the current track.
2.Select the desired menu item:
>To scan all tracks in the current directory:
Select "Scan directory".
>To scan all tracks on the CD: select "Scan
all".
Stop sampling
1.Press the MINI joystick.
2.Select "Scan directory" or "Scan all".
Sampling is interrupted and the selected track is
retained.
Repeating tracks
1.Select a track.
2.Press the MINI joystick.
Other menu items are displayed.
3.Select "Repeat".
The current track on the CD is repeated.
Stop repeating
1.Press the MINI joystick again.
2.Select "Repeat".
Page 148 of 218

CD player and CD changer
146
Compressed audio files*
1.Select the current track.
2.Select the desired menu item:
>To repeat the selected track: select
"Repeat track".
>To repeat all tracks in the current direc-
tory: select "Repeat directory".
Stop repeating
1.Press the MINI joystick.
2.Select "Repeat track" or "Repeat directory".
Random play sequence
The tracks on the current CD are played once
each in random order.
1.Select a track.
2.Press the MINI joystick.
Other menu items are displayed.
3.Select "Random".
Stop random function
1.Press the MINI joystick.
2.Select "Random".
Compressed audio files*
1.Select the current track.
2.Select the desired menu item:
>To play back the tracks in the current
directory in random order: select "Ran-
dom directory".
>To play back all tracks on the CD in ran-
dom order: select "Random all".
Stop random function
1.Press the MINI joystick.
2.Select "Random directory" or "Random all".
Fast forward/reverse
Buttons on the CD player:
Press and hold the button for the corre-
sponding direction.
The tracks can be heard, but reproduction is dis-
torted.
CD changer
The MINI CD changer for 6 CDs is installed in the
dashboard.
When loading CDs into or removing them
from the CD changer, hold them at their
edges and do not touch the reflective signal-
sensing area.<
Opening
Briefly press the bottom edge of the cover.
Closing
Push the cover back into its original position.
To prevent injury in the event of an acci-
dent, close the cover after use while the
vehicle is being driven.<
Page 149 of 218

MOBILITYAT A GLANCE CONTROLS DRIVING TIPS ENTERTAINMENT
147
NAVIGATION REFERENCE
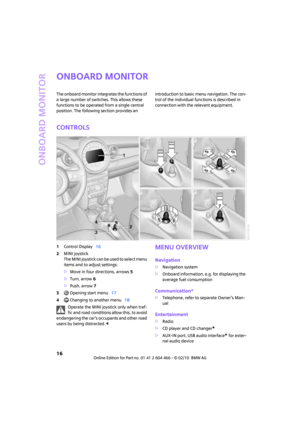
Controls and displays
1LEDs at the CD slot
LEDs flash when a CD can be inserted.
2Buttons for CD compartments
LED is lit when a CD is in the compartment.
Filling the CD changer
1.Press the button.
The LED on the first empty compartment
flashes.
2.To select another compartment if necessary:
Press the ... button.
3.When the LEDs 1 next to the CD slot flash,
insert a single CD.
The CD is drawn in automatically and is
placed in the selected CD compartment.
Only insert the CD when the LEDs1
next to the CD slot are flashing; other-
wise, the CD or CD changer may be dam-
aged.
Do not push the CD while it is being drawn in
as this may cause it to jam and become
impossible to eject.<
4.To fill additional CD compartments:
Repeat steps 1-3.
5.Close the cover after the CDs have been fully
drawn in.
Filling empty CD compartments
1.Press the button for a longer period.
The LEDs on the empty CD compartments
flash.
2.When the LEDs 1 next to the CD slot flash,
insert a single CD.
The CD is drawn in automatically and is
placed in the first vacant CD compartment.Only insert the CD when the LEDs1
next to the CD slot are flashing; other-
wise, the CD or CD changer may be dam-
aged.
Do not push the CD while it is being drawn in
as this may cause it to jam and become
impossible to eject.<
3.Wait for the CD to be drawn in.
4.To fill additional CD compartments:
Repeat steps 2 and 3.
5.Close the cover after the CDs have been fully
drawn in.
Removing CDs from the CD changer
1.Press the button.
2.Press the ... button to select the
CD compartment.
The CD is partially ejected from the CD
changer.
3.Remove the CD.
4.Close the cover after the CDs have been
removed.
Removing all CDs from the CD changer
1.Press the button for a longer period.
The CDs are partially ejected from the CD
changer one after the other.
2.Remove the CDs.
3.Close the cover after the CDs have been
removed.
Malfunction
If all LEDs on the CD changer are flashing rapidly,
there is a malfunction.
To solve the problem:
1.Press button or .
The CD inserted last is ejected.
2.Remove the CD.
If the LEDs stop flashing rapidly, the CD changer
is operational again.
Page 150 of 218

CD player and CD changer
148
Notes
MINI CD/DVD players and changers are
officially designated Class 1 laser products.
Do not operate if the cover is damaged; other-
wise, severe eye damage can result.
Do not use self-recorded CDs/DVDs with labels
applied as these can become detached during
playback due to heat build-up and can cause
irreparable damage to the device.
Only use round CDs/DVDs with a standard diam-
eter of 4.7 in/12 cm and do not play CDs/DVDs
with an adapter, e.g. Single-CDs; otherwise, the
CDs or the adapter can jam and will no longer
eject.
Do not use a combined CD/DVD, e.g. DVD
Plus;
otherwise, the CD/DVD can jam and will no
longer eject.<
General malfunctions
MINI CD/DVD changers and players have been
optimized for performance in vehicles. In some
instances they may be more sensitive to faulty
CDs/DVDs than stationary devices would be.
If a CD/DVD cannot be played, first check if it has
been inserted correctly.
Humidity
High levels of humidity can lead to condensation
on the CD/DVD or the laser's scan lens and tem-
porarily prevent playback.
Malfunctions with individual CDs/DVDs
If malfunctions only occur with individual CDs/
DVDs, one of the following factors may be the
cause.
Self-recorded CDs/DVDs
Possible reasons for malfunctions with self-
recorded CDs/DVDs are inconsistent data-cre-
ation or recording processes, or poor quality or
old age of the CD/DVD blank.
Only label CDs/DVDs on the top, with a pen
designed for this purpose.
Dirty or damaged CDs/DVDs
Avoid leaving fingerprints, as well as dust,
scratches or moisture on the CDs/DVDs.
Keep CDs/DVDs in protective sleeves or cases.
Do not expose CDs/DVDs to temperatures above
1227/506, high humidity, or direct sunlight.
CDs/DVDs with copy protection
CDs/DVDs are often copy-protected by the man-
ufacturer. This can mean that some CDs/DVDs
cannot be played or can only be played to a lim-
ited extent.
Page 151 of 218
MOBILITYAT A GLANCE CONTROLS DRIVING TIPS ENTERTAINMENT
149
NAVIGATION REFERENCE
AUX-IN port
You can connect an external audio device, for
instance an MP3 player, and play audio tracks
over the car's speaker system. You can adjust
the tone on the onboard monitor.
Connecting
Connection for audio playback:
TRS connector 1/8"/3.5 mm.
To play audio tracks over the car's speaker sys-
tem, connect the headset or line-out port of the
external device to the AUX-IN port.
Starting audio playback
The audio device must be switched on.
Onboard monitor, for operating principle refer
to page16.
1.Press the button.
This opens the start menu.
2.Move the MINI joystick to highlight "Enter-
tainment" and press the MINI joystick.3.Select "AUX".
4.Select "AUX IN".
5.Adjust volume and tone, if necessary.
Page 152 of 218

USB audio interface
150
USB audio interface
Connections for external
devices
An external audio device or USB device can be
connected to the USB audio interface, for exam-
ple:
>MP3 player
>USB memory stick
>iPod/iPhone
>Suitable mobile phone
If they are supported by the USB audio interface,
these devices can be controlled using the
onboard monitor.
If the mobile phone has a music player connec-
tion, connect the mobile phone using the snap-
in adapter, refer to the separate Owner's Man-
ual. Audio playback is only possible if there is no
device connected to the USB audio interface.
The standard audio formats, e.g. MP3, WMA,
WAV (PCM) and AAC, and playlists in the M3U
format can be played.
Due the variety of audio devices and iPods on
the market, it cannot be guaranteed that every
device will be operable on the vehicle.
Ask your MINI Service which audio devices,
mobile phones or USB devices are suitable.
Connecting via the USB audio interface
1Connection for audio playback:
TRS connector 1/8"/3.5 mm
2USB interface
Apple iPod/iPhone
To connect the device, use the special cable
adapter for the Apple iPod/iPhone, available
from your dealer. The cable adapter is required
for a flawless connection.
For additional information, contact your MINI
dealer or visit the Internet at www.MINI.com/
usb
To play audio tracks over the car's speaker sys-
tem, connect the iPod/ /iPhone to ports 1 and 2.
The iPod/iPhone's menu structure is supported
by the USB audio interface.
USB device
To play audio tracks over the car's speaker sys-
tem, connect the USB device to port2.
After the device is connected for the first time,
the track information (e. g. artist, type of music)
and the playlists are transferred from the USB
device to the vehicle. This procedure may take
some time. The duration depends on the USB
device and the number of tracks.
During transfer, you can call up the tracks using
the directories and file names.
After transfer, you can also call up the tracks
using the information and playlists.
Track information from up to four USB devices or
for approx. 16,000 tracks can be stored on the
vehicle.
If a fifth USB device is connected or if more than
16,000 tracks are to be stored, the information
on existing tracks is deleted.
Music tracks with integrated Digital Rights
Management (DRM) cannot be played.<
Starting audio playback
1.Press the button.
This opens the start menu.
2.Move the MINI joystick to highlight "Enter-
tainment" and press the MINI joystick.
*