2010 MERCEDES-BENZ SLS COUPE cooling
[x] Cancel search: coolingPage 7 of 361
A
ABS (Anti-lock Braking System) .........46
Warning lamp ................................. 308
Accident
Notes ............................................. 313
Acoustic warning signal
see Warning tone
Active partition (US Bdevices only)
Selecting ........................................ 189
Active Service System PLUS
see ASSYS TPLUS service interval
display ........................................... 279
ADAPTIVE BRAKE ................................. 49
Adaptive brake lamps .........................46
Address book Calling up ....................................... 149
Changing an entry .......................... 154
Connecting acall........................... 154
Creating an entry ........................... 151
Deleting an entry ........................... 153
Detail sabout an entry ................... 153
Importing data ............................... 155
Menu overview .............................. 151
Searching for an entry ...................152
Selecting an entry ..........................151
Starting route guidance .................155
Voice entry .................................... 155
Address input menu
Calling up ........................................ .93
Airbag
Fron tpassenger kneebag ................39
Headbag .......................................... 40
Airbags
Activation ......................................... 35
Control unit ...................................... 35
Driver's ............................................ 38
Driver's knee airba g......................... 39
Front ................................................ 38
Front passenger ............................... 38
PASSENGER AIRBAG OFF warning
lamp .............................................. 307
Sidebag ............................................ 39
System ............................................. 37
Airc onditioning
Activating/deactivating .................253
Activating/deactivating air-recir-
culation mode ................................ 256Controlling automatically
...............253
Convenience opening/closing
(air-recirculatio nmode) ................. 256
Cooling with aird ehumidification..253
Demisting the windscreen .............255
Malfunction indicator lamp ............307
Misted-up windows ........................255
Rea rwindow heatin g..................... 256
Setting the aird istribution.............254
Setting the airflow .........................255
Setting the airv ents...................... 254
Setting the temperature ................254
THERMOTRONIC 2-zone auto-
matic climate control .....................252
Air-conditioning system
see Air conditioning
Air pressure
see Tyre pressure
Alphabetical track selection ............188
Alternative route ............................... 117
AMG Button ............................................ 225
Menu (on-board computer) ............241
RACETIMER (on-board computer) ..241
SETUP ............................................ 241
Anti-loc kBraking System
se eA BS ........................................... 46
Anti-theft alarm system
see ATA ............................................ 49
Anti-theft systems ............................... 49
Area Avoiding ........................................... 86
Ashtray ............................................... 259
ASSYST PLUS see ASSYST PLUS service interval
displa y........................................... 279
ASSYST PLUS service interval dis-
play ..................................................... 279
Calling up the date (on-board
computer) ...................................... 280
Display message ............................ 279
ATA (anti-theft alarm system) ............49
Switching off the alarm ....................49
Audio
On-board computer .......................235
Audio AUX mode ............................... 1894
Index BA 197 ECE RE 2010/6a; 1; 2, en-GB
sabbae uV ersion: 3.0.3.6
2010-05-07T14:19:43+02:00 - Seite 4
Page 254 of 361
You can also switch off the display of the area
behind the vehicle in the COMAND display.
Climate control
General notes
THERMOTRONIC 2-zone automatic climate
control controls the temperature and the
humidity of the vehicle interior and filters out
undesirable substances fro mthe air.
THERMOTRONIC 2-zone automatic climate
control is only operational when the engine is
running. Optimum operation is achieved only
when you drive with the side windows closed.
i When the weather is warm, ventilate the
vehicle for a brief period. This will speed up
the cooling process and the desired vehicle
interior temperature will be reached more
quickly.
i The integrated filter can filter out most
particles of dust and completely filters out
pollen. Aclogged filter reduces the amount
of air supplied to the vehicle interior .For
this reason, you should always observe the
interval for replacing the filter, which is
specified in the Service Booklet .As it
depends on environmental conditions, e.g.
heavy air pollution, the interval may be
shorter than stated in the Service Booklet. G
Risk of accident
Observe the settings recommended on the
following pages. Otherwise, the windows
could mist up. This may obstruct your view of
the traffic situation and, as a result, you may
cause an accident. Climate control
251Controls
BA 197 ECE RE 2010/6a; 1; 2, en-GB
sabbaeu Version: 3.0.3.6 2010-05-07T14:19:43+02:00 - Seite 251 Z
Page 255 of 361
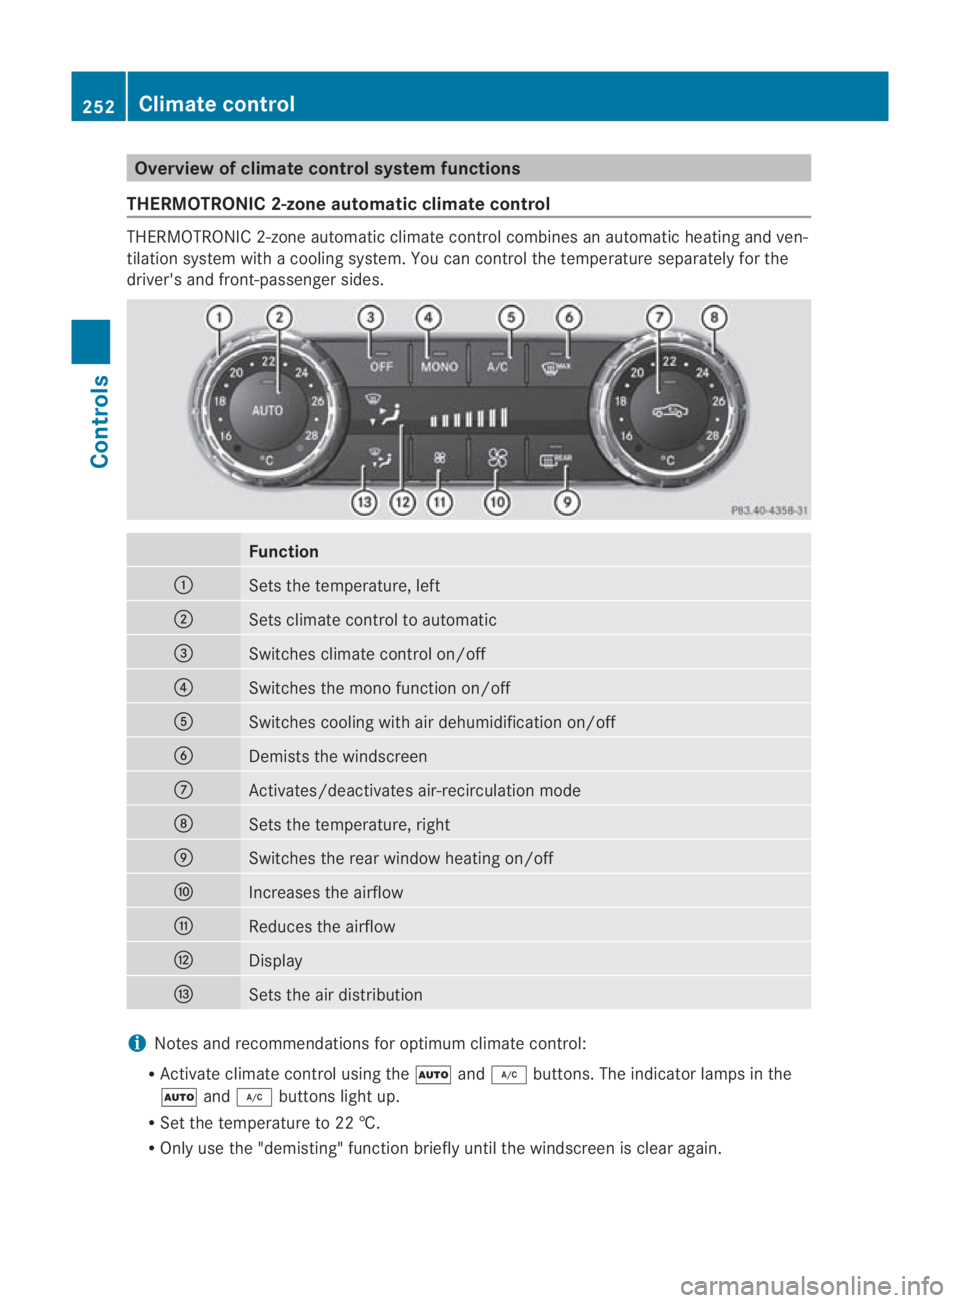
Overview of climate control system functions
THERMOTRONIC 2-zone automatic climate control THERMOTRONIC 2-zone automatic climate control combines an automatic heating and ven-
tilation system with a cooling system. You can control the temperature separately for the
driver's and front-passenger sides. Function
0001
Sets the temperature, left
0002
Sets climate control to automatic
0015
Switches climate control on/off
0014
Switches the mono function on/off
0012
Switches cooling with air dehumidification on/off
0013
Demists the windscreen
000A
Activates/deactivates air-recirculation mode
000B
Sets the temperature, right
000C
Switches the rear window heating on/off
000D
Increases the airflow
000E
Reduces the airflow
000F
Display
0010
Sets the air distribution
i
Notes and recommendations for optimum climate control:
R Activate climate control using the 0001and0004 buttons. The indicator lamps in the
0001 and0004 buttons light up.
R Set the temperature to 22 †.
R Only use the "demisting" function briefly until the windscreen is clear again. 252
Climate controlControls
BA 197 ECE RE 2010/6a; 1; 2, en-GB
sabbaeu
Version: 3.0.3.6 2010-05-07T14:19:43+02:00 - Seite 252
Page 256 of 361
R
Only use air-recirculation mode briefly, e.g. if there are unpleasant outside odours or when
in a tunnel. The windows could otherwise mist up as in air-recirculation mode no fresh air
is drawn into the vehicle.
R Use the "MONO" function if you want to adopt the temperature and air distribution set-
tings from the driver's side for all air-conditioning zones. The indicator lamp in the
0005 button lights up. Switching climate control on/off
i When climate control is switched off, the
air supply and air circulation are also
switched off. Only select this setting briefly;
otherwise, the windows may mist up.
i Activate climate control primarily using
the 0001 button (Y page 252).
X Select key position 2with the Start/Stop
button.
X To activate: press the0001button.
The indicator lamp in the 0001button lights
up. Airflow and air distribution are set to
automatic mode.
or
X Press the 0006button.
The indicator lamp in the 0006button goes
out. The previously selected settings come
into effect again.
X To deactivate: press the0006button.
The indicator lamp in the 0006button lights
up. Switching cooling with air dehumidi-
fication on/off
The cooling with air dehumidification function
is only available when the engine is running.
The air inside the vehicle is cooled and dehu-
midified according to the temperature selec-
ted. G
Risk of accident
If the "cooling with air dehumidification" func-
tion is deactivated, the air inside the vehicle
will not be cooled (during warm weather) or
dehumidified. The windows could mist up more quickly. This may prevent you from
observing the traffic conditions, thereby caus-
ing an accident.
Condensation may drip from the underside of
the vehicle when THERMOTRONIC is in cool-
ing mode.
X To activate: press the0004button.
The indicator lamp in the 0004button lights
up.
X To deactivate: press the0004button.
The indicator lamp in the 0004button goes
out. The cooling with air dehumidification
function has a delayed switch-off feature. Setting climate control to automatic
In automatic mode, the set temperature is
controlled automatically. The system auto-
matically regulates the temperature of the
dispensed air, the airflow and the air distri-
bution.
Automatic mode will achieve optimal opera-
tion if cooling with air dehumidification is also
activated. If desired, cooling with air dehu-
midification can be deactivated.
X Select key position 2with the Start/Stop
button.
X Set the desired temperature.
X To activate: press the0001button.
The indicator lamp in the 0001button lights
up. Automatic air distribution and airflow
are activated.
X To deactivate: press the0001button.
The indicator lamp in the 0001button goes
out. Automatic air distribution and airflow
are deactivated. Climate control
253Controls
BA 197 ECE RE 2010/6a; 1; 2, en-GB
sabbaeu Version: 3.0.3.6 2010-05-07T14:19:43+02:00 - Seite 253 Z
Page 258 of 361
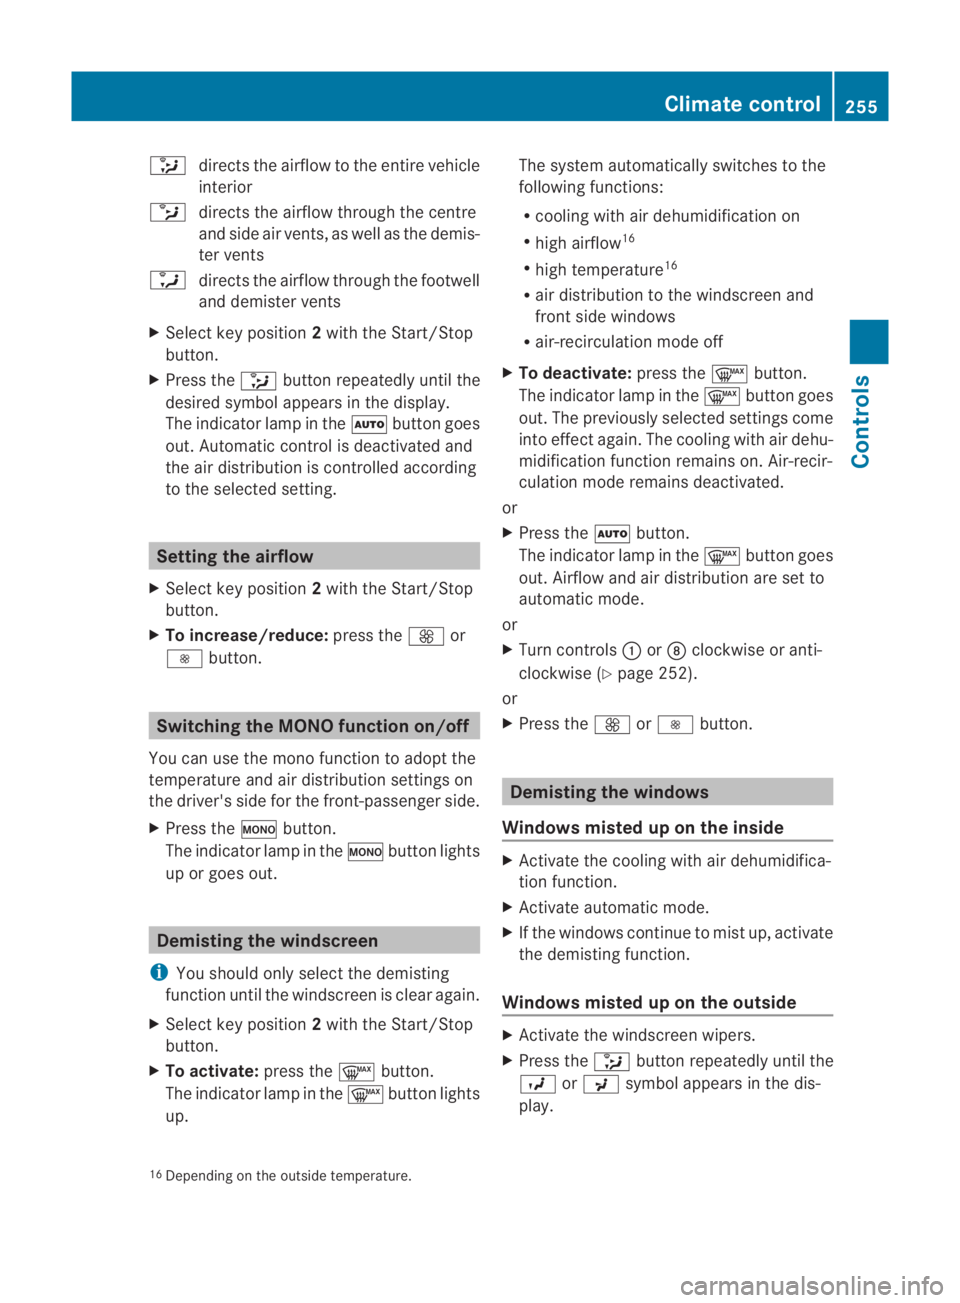
0013
directs the airflow to the entire vehicle
interior
0012 directs the airflow through the centre
and side air vents, as well as the demis-
ter vents
0011 directs the airflow through the footwell
and demister vents
X Select key position 2with the Start/Stop
button.
X Press the 0013button repeatedly until the
desired symbol appears in the display.
The indicator lamp in the 0001button goes
out. Automatic control is deactivated and
the air distribution is controlled according
to the selected setting. Setting the airflow
X Select key position 2with the Start/Stop
button.
X To increase/reduce: press the0015or
0014 button. Switching the MONO function on/off
You can use the mono function to adopt the
temperature and air distribution settings on
the driver's side for the front-passenger side.
X Press the 0005button.
The indicator lamp in the 0005button lights
up or goes out. Demisting the windscreen
i You should only select the demisting
function until the windscreen is clear again.
X Select key position 2with the Start/Stop
button.
X To activate: press the0009button.
The indicator lamp in the 0009button lights
up. The system automatically switches to the
following functions:
R cooling with air dehumidification on
R high airflow 16
R high temperature 16
R air distribution to the windscreen and
fron tside windows
R air-recirculation mode off
X To deactivate: press the0009button.
The indicator lamp in the 0009button goes
out. The previously selected settings come
into effect again. The cooling with air dehu-
midification function remains on. Air-recir-
culation mode remains deactivated.
or
X Press the 0001button.
The indicator lamp in the 0009button goes
out. Airflow and air distribution are set to
automatic mode.
or
X Turn controls 0001or000B clockwise or anti-
clockwise (Y page 252).
or
X Press the 0015or0014 button. Demisting the windows
Windows misted up on th einside X
Activate the cooling with air dehumidifica-
tion function.
X Activate automatic mode.
X If the windows continue to mist up, activate
the demisting function.
Windows misted up on the outside X
Activate the windscreen wipers.
X Press the 0013button repeatedly until the
0016 or0017 symbol appears in the dis-
play.
16 Depending on the outside temperature. Climate control
255Controls
BA 197 ECE RE 2010/6a; 1; 2, en-GB
sabbaeu Version: 3.0.3.6 2010-05-07T14:19:43+02:00 - Seite 255 Z
Page 272 of 361
i
If the bonnet can be raised slightly, it is
not properly engaged. Open it again and
close it with a little more force. Engine oil
Depending on driving style, the vehicle con-
sumes a maximum of 0.8 l oil per 1000 km.
The oil consumption may be highert han this
when the vehicle is new or if you frequently
drive at high engine speeds.
Checking the engine oil level X
To check the engine oil, move the vehicle
to level ground. Switch off the engine at
normal operating temperature after run-
ning it in neutral for 30 seconds. X
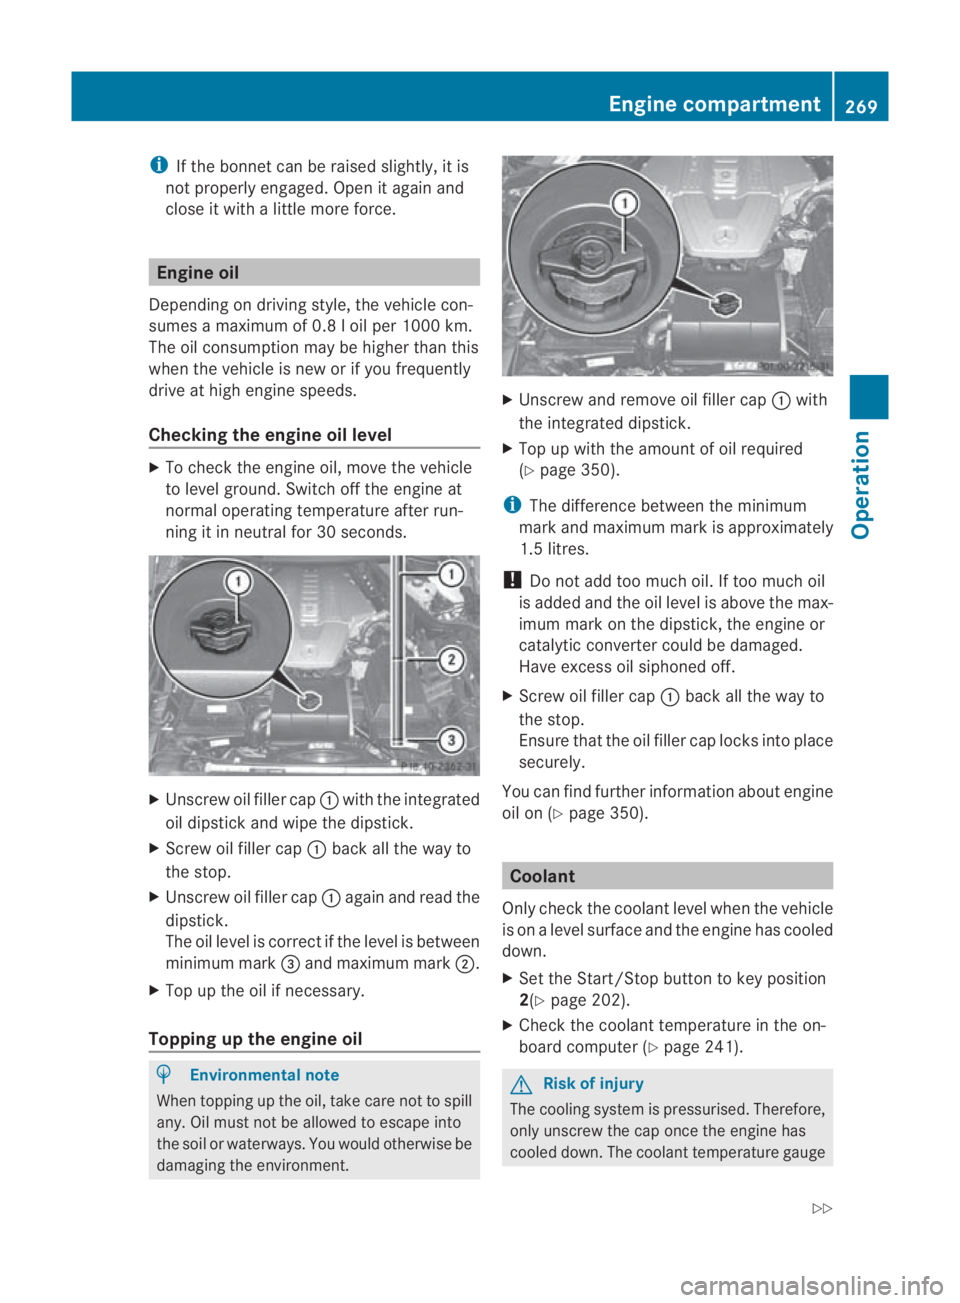
Unscrew oil filler cap 0001with the integrated
oil dipstick and wipe the dipstick.
X Screw oil filler cap 0001back all the way to
the stop.
X Unscrew oil filler cap 0001again and read the
dipstick.
The oil level is correct if the level is between
minimum mark 0015and maximum mark 0002.
X Top up the oil if necessary.
Topping up the engine oil H
Environmental note
When topping up the oil, take care not to spill
any. Oil must not be allowed to escape into
the soil or waterways. You would otherwise be
damaging the environment. X
Unscrew and remove oil filler cap 0001with
the integrated dipstick.
X Top up with the amount of oil required
(Y page 350).
i The difference between the minimum
mark and maximum mark is approximately
1.5 litres.
! Do not add too much oil. If too much oil
is added and the oil level is above the max-
imum mark on the dipstick, the engine or
catalytic converter could be damaged.
Have excess oil siphoned off.
X Screw oil filler cap 0001back all the way to
the stop.
Ensure that the oil filler cap locks into place
securely.
You can find further information about engine
oil on (Y page 350). Coolant
Only check the coolant level when the vehicle
is on a level surface and the engine has cooled
down.
X Set the Start/Stop button to key position
2(Y page 202).
X Check the coolant temperature in the on-
board computer (Y page 241). G
Risk of injury
The cooling system is pressurised. Therefore,
only unscrew the cap once the engine has
cooled down. The coolant temperature gauge Engine compartment
269Operation
BA 197 ECE RE 2010/6a; 1; 2, en-GB
sabbaeu Version: 3.0.3.6 2010-05-07T14:19:43+02:00 - Seite 269 Z
Page 308 of 361
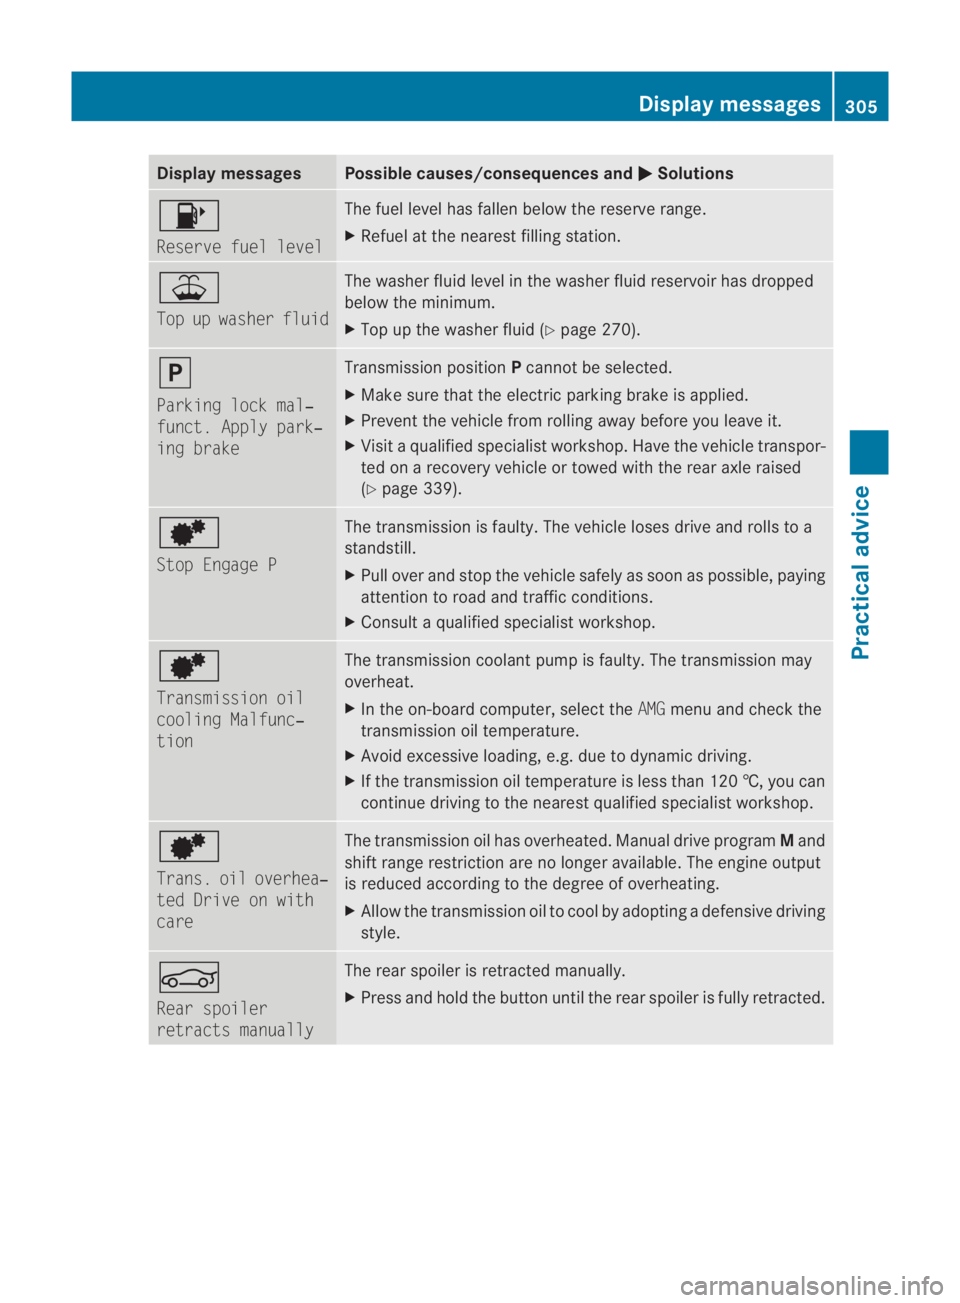
Display messages Possible causes/consequences and
0003 Solutions
0007
Reserve fuel level The fuel level has fallen belo
wthe reserve range.
X Refuel at the nearest filling station. 0016
Top up washer fluid The washer fluid level in the washer fluid reservoir has dropped
below the minimum.
X
Top up the washer fluid (Y page 270).0009
Parking lock mal‐
funct. Apply park‐
ing brake Transmission position
Pcannot be selected.
X Make sure that the electric parking brake is applied.
X Prevent the vehicle from rolling away before you leave it.
X Visit a qualified specialist workshop. Have the vehicle transpor-
ted on a recovery vehicle or towed with the rear axle raised
(Y page 339). 0001
Stop Engage P The transmission is faulty. The vehicle loses drive and rolls to a
standstill.
X
Pull over and stop the vehicle safely as soon as possible, paying
attention to road and traffic conditions.
X Consult a qualified specialist workshop. 0001
Transmission oil
cooling Malfunc‐
tion The transmission coolant pump is faulty. The transmission may
overheat.
X In the on-board computer, select the AMGmenu and check the
transmission oil temperature.
X Avoid excessive loading, e.g. due to dynamic driving.
X If the transmission oil temperature is less than 120 †, you can
continue driving to the nearest qualified specialist workshop. 0001
Trans. oil overhea‐
ted Drive on with
care The transmission oil has overheated. Manual drive program
Mand
shift range restriction are no longer available. The engine output
is reduced according to the degree of overheating.
X Allow the transmission oil to cool by adopting a defensive driving
style. 0005
Rear spoiler
retracts manually The rear spoiler is retracted manually.
X
Press and hold the button until the rear spoiler is fully retracted. Display messages
305Practical advice
BA 197 ECE RE 2010/6a; 1; 2, en-GB
sabbaeu Version: 3.0.3.6 2010-05-07T14:19:43+02:00 - Seite 305 Z
Page 310 of 361
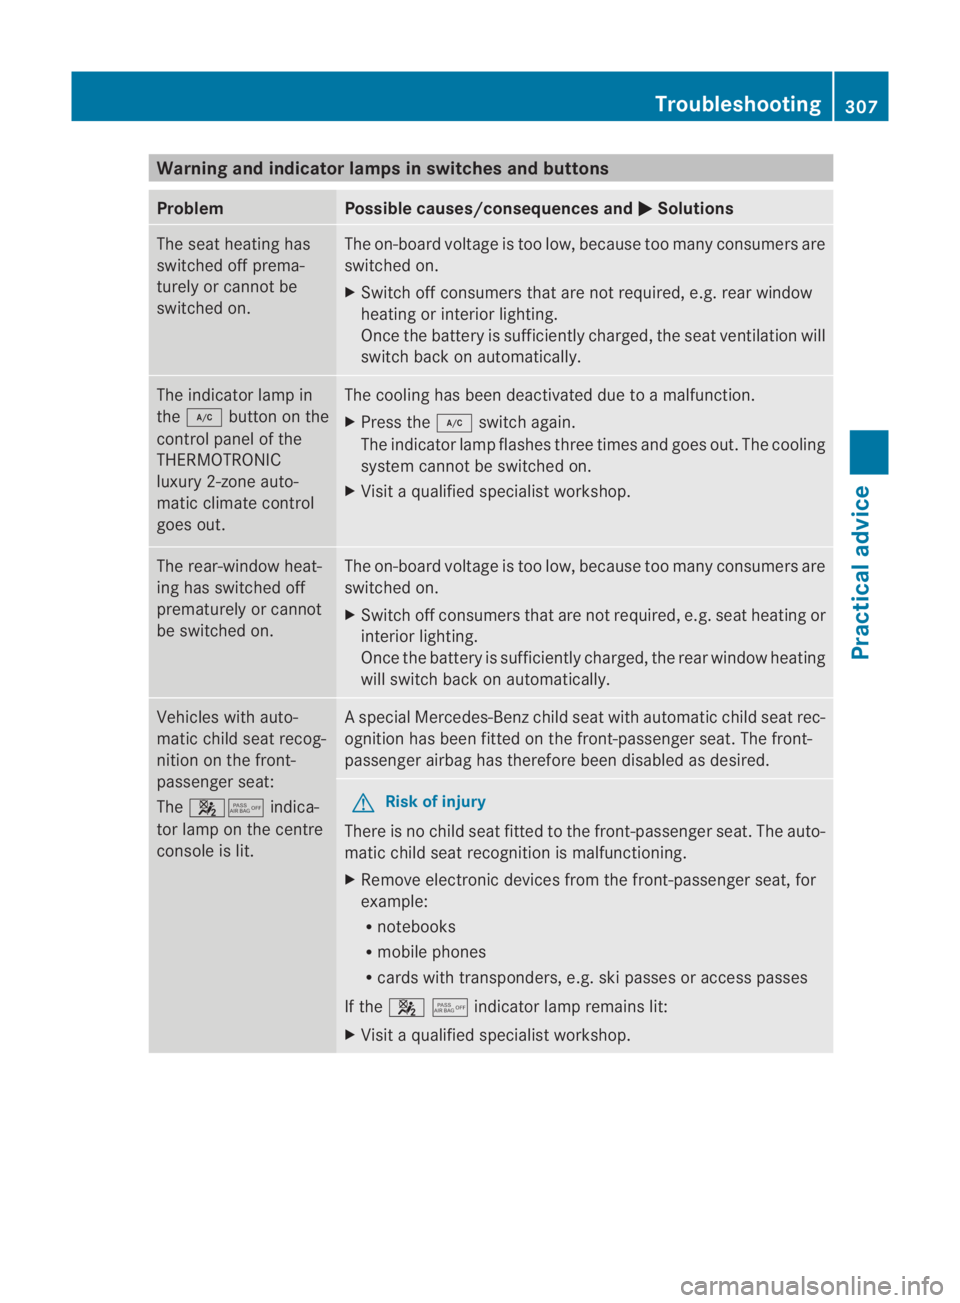
Warning and indicator lamps in switches and buttons
Problem Possible causes/consequences and
0003 Solutions
The sea
theating has
switched off prema-
turely or cannot be
switched on. The on-board voltage is too low, because too many consumers are
switched on.
X Switch off consumers that are not required, e.g. rear window
heating or interior lighting.
Once the battery is sufficiently charged, the seat ventilation will
switch back on automatically. The indicator lamp in
the
0004 button on the
control panel of the
THERMOTRONIC
luxury 2-zone auto-
matic climate control
goes out. The cooling has been deactivated due to a malfunction.
X
Press the 0004switch again.
The indicator lamp flashes three times and goes out. The cooling
system cannot be switched on.
X Visit a qualified specialist workshop. The rear-window heat-
ing has switched off
prematurely or cannot
be switched on. The on-board voltage is too low, because too many consumers are
switched on.
X Switch off consumers that are not required, e.g. seat heating or
interior lighting.
Once the battery is sufficiently charged, the rear window heating
will switch back on automatically. Vehicles with auto-
matic child seat recog-
nition on the front-
passenger seat:
The
000A0017 indica-
tor lamp on the centre
console is lit. As
pecial Mercedes-Benz child seat with automatic child seat rec-
ognition has been fitted on the front-passenger seat. The front-
passenger airbag has therefore been disabled as desired. G
Risk of injury
There is no child seat fitted to the front-passenger seat. The auto-
matic child seat recognition is malfunctioning.
X Remove electronic devices from the front-passenger seat, for
example:
R
notebooks
R mobile phones
R cards with transponders, e.g. ski passes or access passes
If the 000A0017indicator lamp remains lit:
X Visit a qualified specialist workshop. Troubleshooting
307Practical advice
BA 197 ECE RE 2010/6a; 1; 2, en-GB
sabbaeu Version: 3.0.3.6 2010-05-07T14:19:43+02:00 - Seite307 Z