2010 MERCEDES-BENZ SLS COUPE reset
[x] Cancel search: resetPage 152 of 361
X
Select a telephone category, e.g. Mobile.
X Select Save.
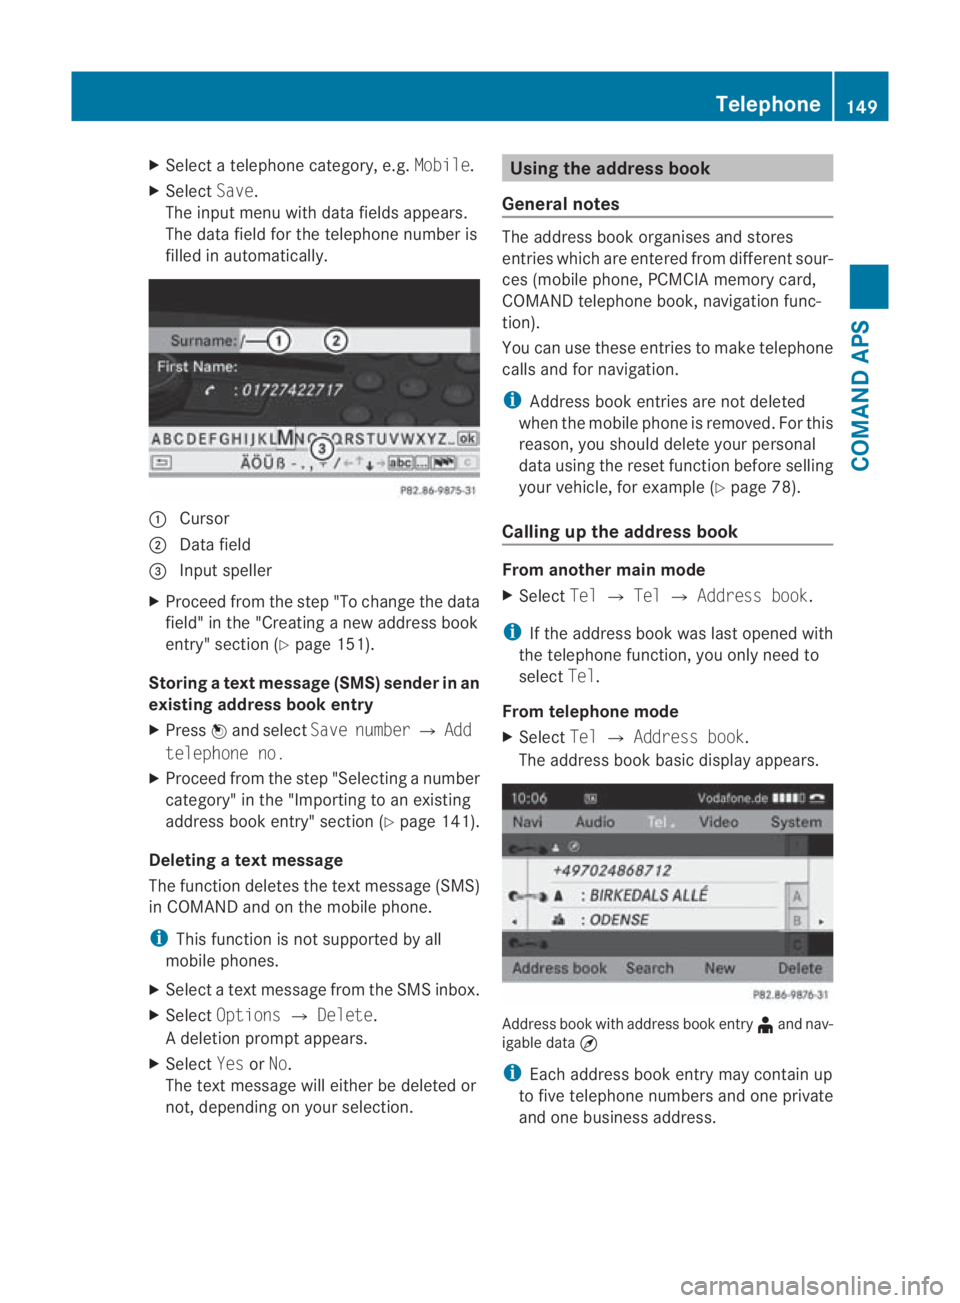
The input menu with data fields appears.
The data field for the telephone number is
filled in automatically. 0001
Cursor
0002 Data field
0015 Inpu tspeller
X Proceed from the step "To change the data
field" in the "Creating anew address book
entry" section (Y page 151).
Storing atext message (SMS) sender in an
existing address book entry
X Press 0017and select Save number 0004Add
telephone no.
X Proceed fro mthe step "Selecting a number
category" in the "Importing to an existing
address book entry" section (Y page 141).
Deleting atext message
The function deletes the tex tmessage (SMS)
in COMAND and on the mobile phone.
i This function is not supported by all
mobile phones.
X Select a textm essage from the SMS inbox.
X Select Options 0004Delete.
Ad eletion prompt appears.
X Select YesorNo.
The textm essage will either be deleted or
not, depending on your selection. Using the address book
General notes The address book organises and stores
entries which are entered from differen
tsour-
ces (mobile phone, PCMCIA memory card,
COMAND telephone book, navigation func-
tion).
You can use these entries to make telephone
calls and for navigation.
i Address book entries are not deleted
when the mobile phone is removed. For this
reason, you should delete your personal
data using the reset function before selling
your vehicle, for example (Y page 78).
Calling up the address book From another main mode
X
Select Tel0004Tel 0004Address book.
i If the address book was last opened with
the telephone function, you only need to
select Tel.
From telephone mode
X Select Tel0004Address book.
The address book basic display appears. Address book with address book entry
¥and nav-
igable data ¤
i Each address book entry may contain up
to five telephone numbers and one private
and one business address. Telephone
149COMAND APS
BA 197 ECE RE 2010/6a; 1; 2, en-GB
sabbaeu Version: 3.0.3.6 2010-05-07T14:19:43+02:00 - Seite 149 Z
Page 161 of 361
Some stations only transmit programmes at
certain times. If yo uhave selected a station
that is subsequently removed from the
ensemble, it will no longer be received. You
will continue to receive the other pro-
grammes in the ensemble. Select either a dif-
ferent programme or a different ensemble.
i DAB cannot be received everywhere in
Europe.
Bit rate and MP2 format
R bit rate between 32 and 256 kbit/s
R MP2 coded audio stream (MPEG1 audio
layer 2)
Switching to radio mode or DAB radio
mode* Option 1
X
Press the 0006function button.
The radio or DA Bradio display appears.
Radio mode: you will hear the last station
played on the last waveband.
DAB radio mode: you will hear the last sta-
tio np layed fro mthe last ensemble selec-
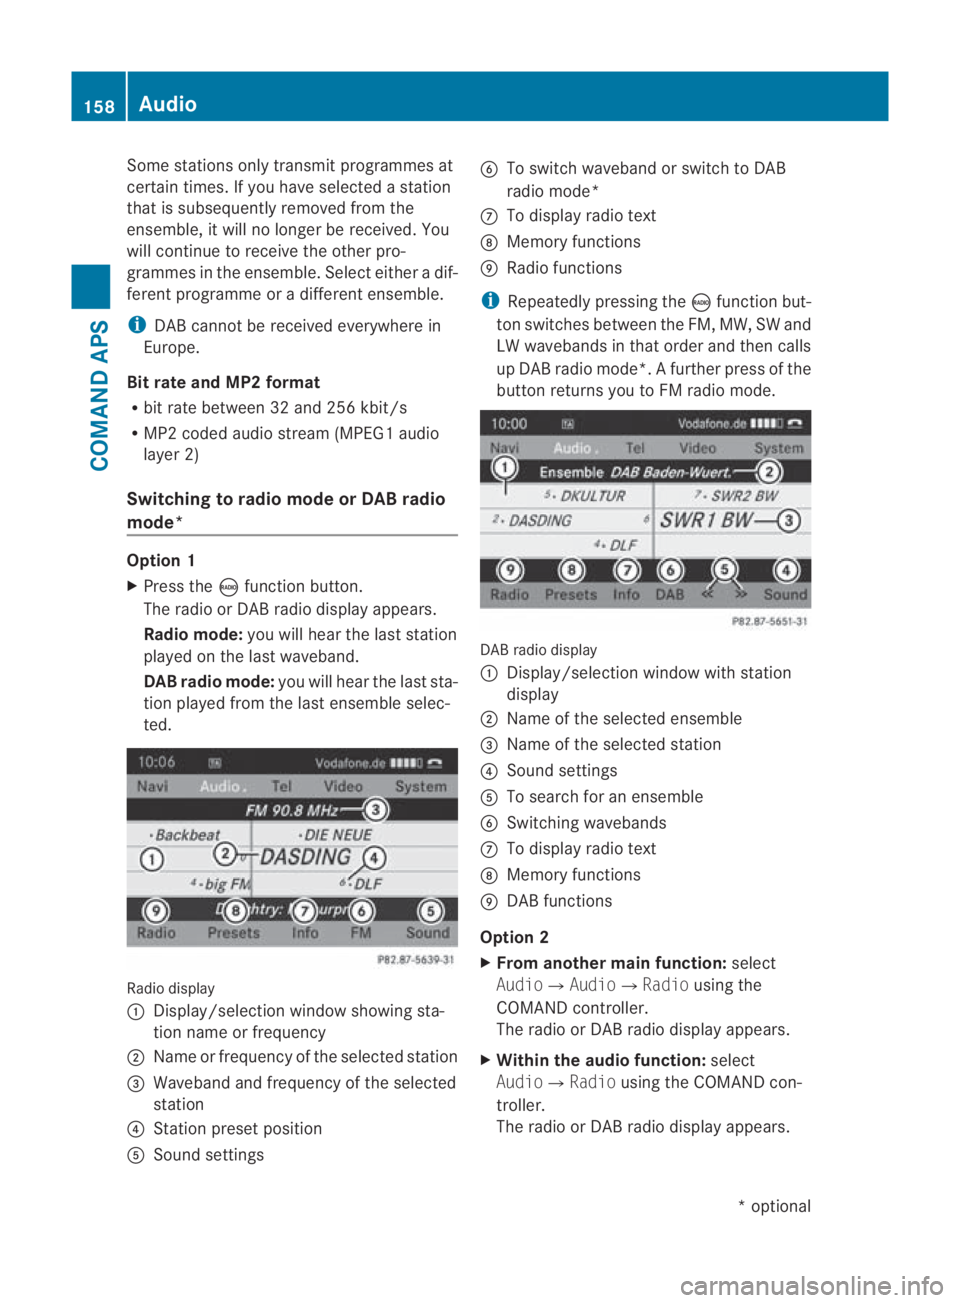
ted. Radio display
0001
Display/selection window showing sta-
tion name or frequency
0002 Name or frequency of the selected station
0015 Waveband and frequency of the selected
station
0014 Station preset position
0012 Sound settings 0013
To switch waveband or switch to DAB
radio mode*
000A To display radio text
000B Memory functions
000C Radio functions
i Repeatedly pressing the 0006function but-
ton switches between the FM, MW, SW and
LW wavebands in that order and then calls
up DAB radio mode*. Afurther press of the
butto nreturns you to FM radio mode. DABr
adio display
0001 Display/selectio nwindow with station
display
0002 Name of the selected ensemble
0015 Name of the selected station
0014 Sound settings
0012 To search for an ensemble
0013 Switching wavebands
000A To display radio text
000B Memory functions
000C DAB functions
Option 2
X From another main function: select
Audio0004Audio0004 Radiousing the
COMAND controller.
The radio or DA Bradio display appears.
X Within the audio function: select
Audio0004 Radiousing the COMAND con-
troller.
The radio or DA Bradio display appears. 158
AudioCOMAND APS
*o
ptional
BA 197 ECE RE 2010/6a; 1; 2, en-GB
sabbaeu
Version: 3.0.3.6 2010-05-07T14:19:43+02:00 - Seite 158
Page 163 of 361
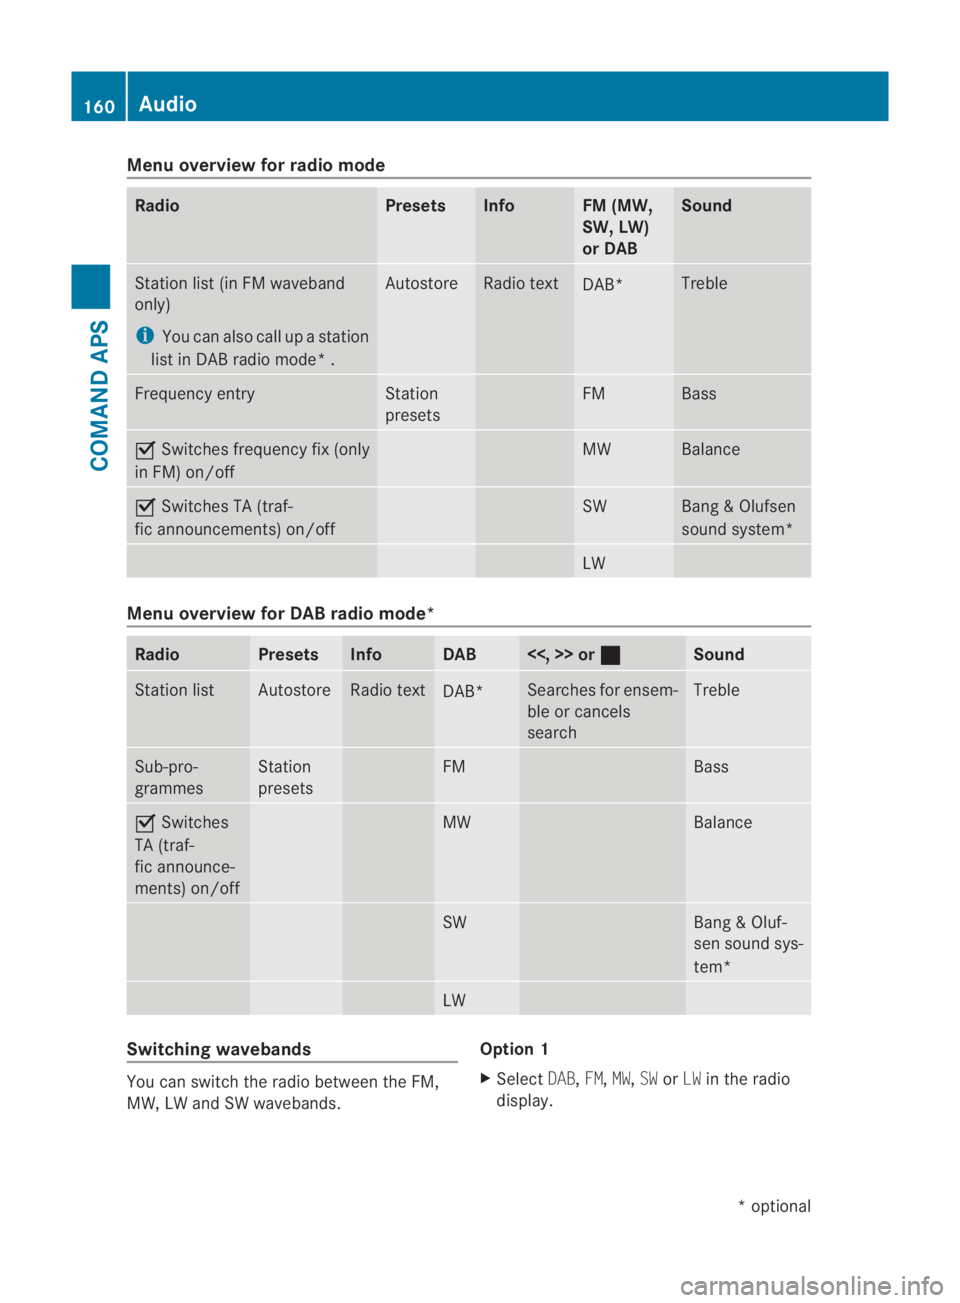
Menu overview for radio mode
Radio Presets Info FM (MW,
SW, LW)
or DAB Sound
Station list(
in FM waveband
only)
i You can also call up a station
list in DAB radio mode* . Autostore Radio text
DAB* Treble
Frequency entry Station
presets FM Bass
0019
Switches frequency fix (only
in FM) on/off MW Balance
0019
Switches TA (traf-
fic announcements) on/off SW Bang
&Olufsen
sound system* LW
Menu overview for DAB radio mode*
Radio Presets Info DAB <<, >> or
0020 Sound
Station list Autostore Radio text
DAB* Searches for ensem-
ble or cancels
search Treble
Sub-pro-
grammes Station
presets FM Bass
0019
Switches
TA (traf-
fic announce-
ments) on/off MW Balance
SW Bang & Oluf-
sen sound sys-
tem*
LW
Switching wavebands
You can switch the radio between the FM,
MW, LW and SW wavebands. Option 1
X
Select DAB,FM,MW,SWorLW in the radio
display. 160
AudioCOMAND APS
*o
ptional
BA 197 ECE RE 2010/6a; 1; 2, en-GB
sabbaeu
Version: 3.0.3.6 2010-05-07T14:19:43+02:00 - Seite 160
Page 165 of 361
Example display
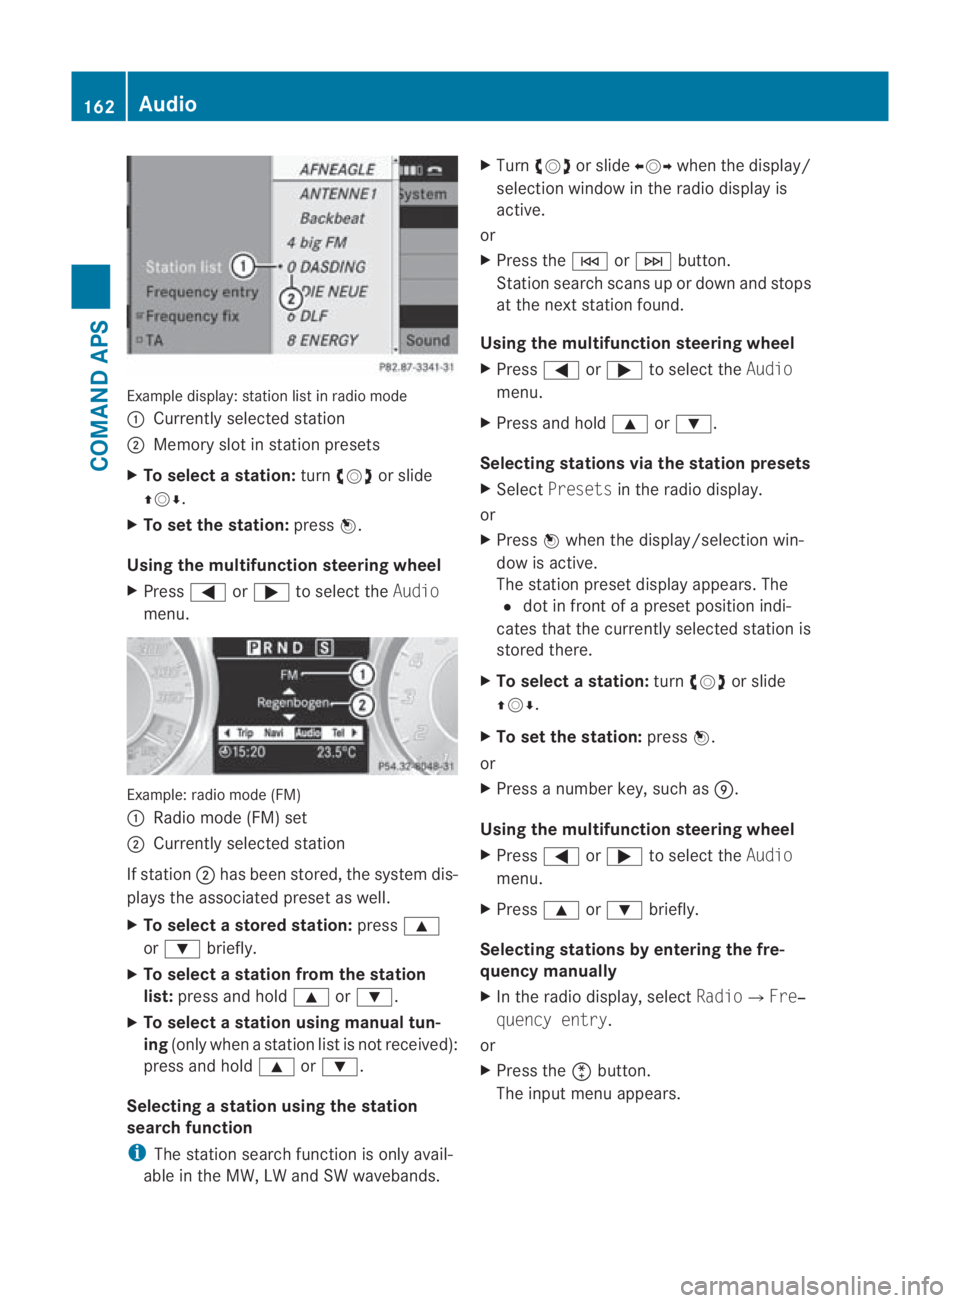
:station list in radio mode
0001 Currently selected station
0002 Memory slot in statio npresets
X To selectas tation:turn002800130029 or slide
001F0013000D .
X To set the station: press0017.
Using the multifunction steering wheel
X Press 0008or000E to select the Audio
menu. Example: radio mode (FM)
0001
Radio mode (FM) set
0002 Currently selected station
If station 0002has been stored, the system dis-
plays the associated preset as well.
X To select astore dstation: press000F
or 000C briefly.
X To select a station from the station
list: press and hold 000For000C.
X To select a station using manual tun-
ing (only when a statio nlist is not received):
press and hold 000For000C.
Selecting astation using the station
search function
i The statio nsearch function is only avail-
able in the MW, LW and SW wavebands. X
Turn 002800130029 or slide 002B0013002Cwhen the display/
selection window in the radio display is
active.
or
X Press the 0001or0002 button.
Station search scans up or down and stops
at the next station found.
Using the multifunction steering wheel
X Press 0008or000E to select the Audio
menu.
X Press and hold 000For000C.
Selecting stations via the station presets
X Select Presets in the radio display.
or
X Press 0017when the display/selection win-
dow is active.
The station preset display appears. The
0023 dot in front of a preset position indi-
cates that the currently selected station is
stored there.
X To select astation: turn002800130029 or slide
001F0013000D .
X To set the station: press0017.
or
X Press a numbe rkey, such as 000C.
Using the multifunction steering wheel
X Press 0008or000E to select the Audio
menu.
X Press 000For000C briefly.
Selecting stations by entering the fre-
quency manually
X In the radio display, select Radio0004Fre‐
quency entry.
or
X Press the 0007button.
The input menu appears. 162
AudioCOMAND APS
BA 197 ECE RE 2010/6a; 1; 2, en-GB
sabbaeu
Version: 3.0.3.6 2010-05-07T14:19:43+02:00 - Seite 162
Page 166 of 361
X
To enter a frequency: press the number
keys.
COMAND tunes in to the frequency
entered.
i You can only enter currently permitted
numbers. Waveband Frequency
FM (VHF) 87.5 – 108.0 Mhz
MW (medium wave) 531 – 1620 kHz
SW (shor
twave) 5800 – 6250 kHz
LW (long wave) 153 – 282 kHz
Storing stations
Ten stations can be store
dfor each wave-
band.
Storing stations manually
X Press and hold a number key, e.g. 000C, until
you hear a tone.
The station is stored.
or
X To call up station presets: press0017when
the display/selection window is active.
or
X Select Presets in the radio display.
In both cases, the station presets appear.
The 0023dot in front of a preset position
indicates that the currently selected sta-
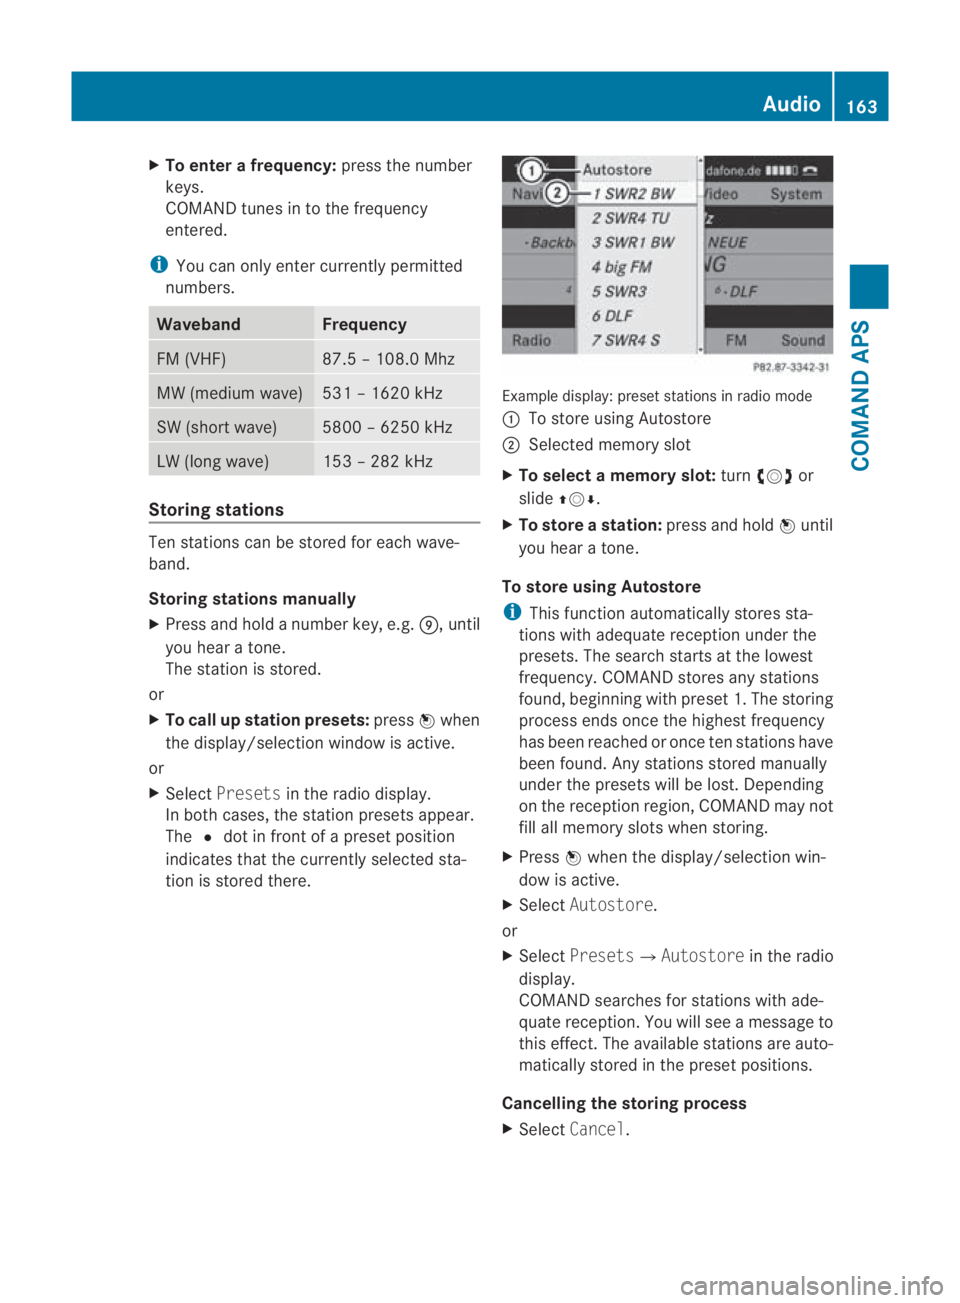
tion is stored there. Example display: preset stations in radio mode
0001
To store using Autostore
0002 Selected memory slot
X To select a memory slot: turn002800130029 or
slide 001F0013000D.
X To store astation: press and hold 0017until
you hear a tone.
To store using Autostore
i This functio nautomatically stores sta-
tions with adequate reception under the
presets. The search starts at the lowest
frequency. COMAND store sany stations
found, beginning with preset 1. The storing
process ends once the highest frequency
has been reached or once ten stations have
been found. Any stations stored manually
under the presets will be lost. Depending
on the reception region, COMAND may not
fill all memory slots when storing.
X Press 0017when the display/selectio nwin-
dow is active.
X Select Autostore.
or
X Select Presets0004 Autostorein the radio
display.
COMAND searches for stations with ade-
quate reception. You will see a message to
this effect .The available stations are auto-
matically stored in the preset positions.
Cancelling the storing process
X Select Cancel. Audio
163COMAND APS
BA 197 ECE RE 2010/6a; 1; 2, en-GB
sabbaeu Version: 3.0.3.6 2010-05-07T14:19:43+02:00 - Seite 163 Z
Page 212 of 361
i
If you are driving faster than 47 km/h, you
can no longer fold in the exterior mirrors.
Make sure that the exterior mirrors are
always folded out fully while the vehicle is
in motion, as they may otherwise vibrate.
Resetting the exterio rmirrors If the battery has been disconnected or com-
pletely discharged, the exterior mirrors must
be reset .The exterior mirrors will otherwise
not fold in when you select the "Fold in mir-
rors when locking" function in the on-board
computer (Y page 240).
X Select key position 1with the Start/Stop
button.
X Briefly press button 0014.
Folding the exterior mirrors in/out
automatically* If the "Fold in mirrors when locking" function
is activated in the on-board computer
(Y
page 240):
R the exterior mirrors fold in automatically as
soon as you lock the vehicle from the out-
side.
R the exterior mirrors fold out again automat-
ically as soon as you unlock the vehicle and
then open the driver's or front-passenger
door.
i If you have activated this function and fold
in the exterior mirrors using button 0014, they
will not be folded out automatically .You
can then only fold out the exterior mirrors
using button 0014. Automatic anti-dazzle mirrors*
The rear-view mirror and the exterior mirror
on the driver's side automatically go into anti-
dazzle mode if the ignition is switched on and
incident light from headlamps strikes the sen-
sor in the rear-view mirror.
The mirrors do not go into anti-dazzle mode if
reverse gear is engaged. G
Risk of accident
If incident light from headlamps is prevented
from striking the sensor in the rear-view mir-
ror, for instance, by luggage piled too high in
the vehicle, the mirror's automatic anti-dazzle
function will not operate.
Incident light could then dazzle you. This may
distract you from the traffic conditions, and
as a result, you may cause an accident .Inthis
case, adjust the rear-view mirror manually. Parking position for the exterior mir-
ror on the front-passenger side
To make it easier to park, you can set and
store the front-passenger side exterior mirror
position in such a way that you can see the
rear wheel on that side as soon as you engage
reverse gear.
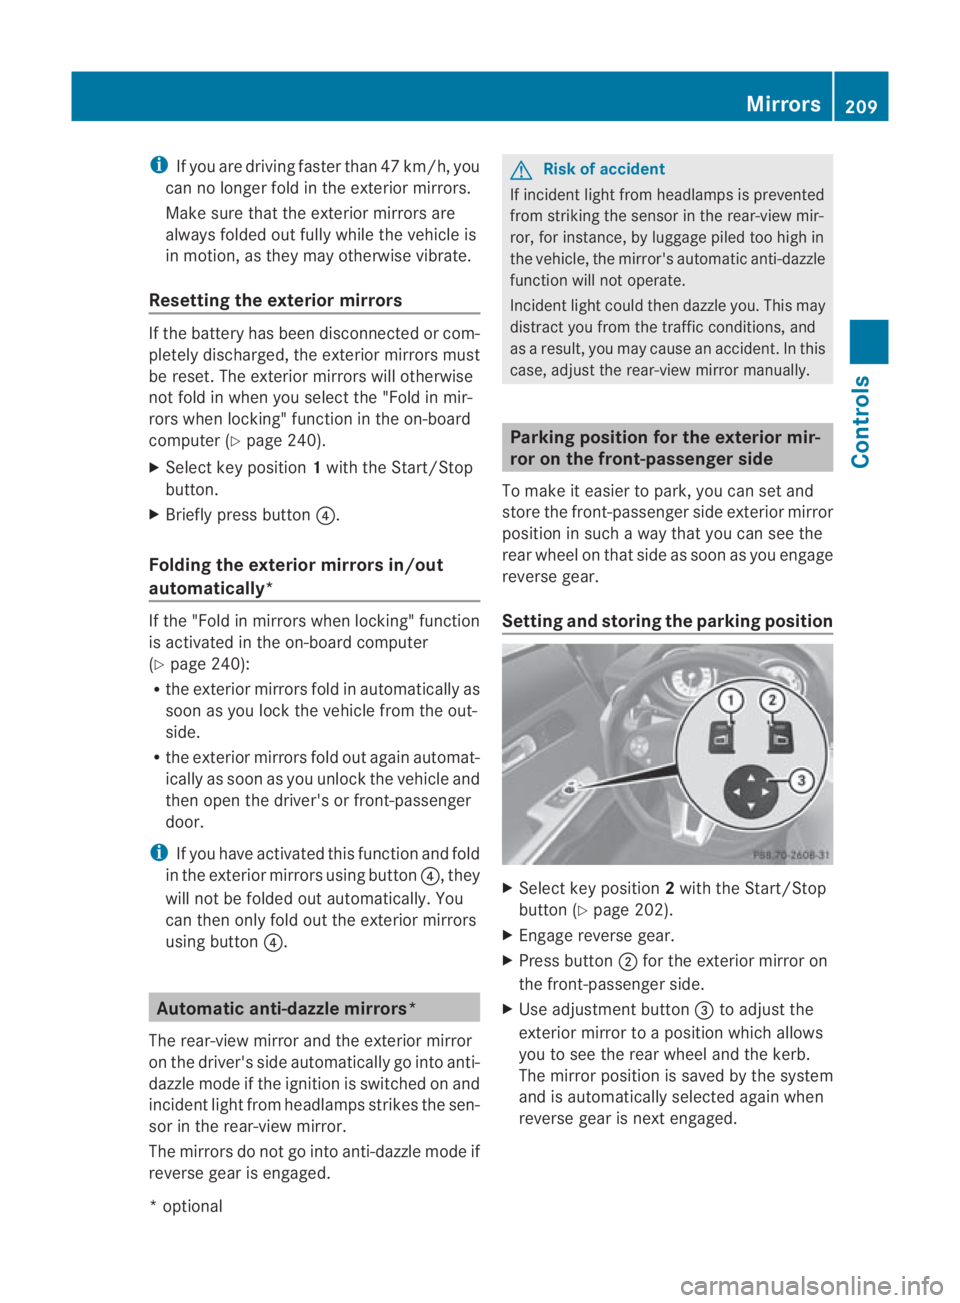
Setting and storing the parking position X
Select key position 2with the Start/Stop
button (Y page 202).
X Engage reverse gear.
X Press button 0002for the exterior mirror on
the front-passenger side.
X Use adjustment button 0015to adjust the
exterior mirror to a position which allows
you to see the rear wheel and the kerb.
The mirror position is saved by the system
and is automatically selected again when
reverse gear is next engaged. Mirrors
209Controls
*optional
BA 197 ECE RE 2010/6a; 1; 2, en-GB
sabbaeu
Version: 3.0.3.6 2010-05-07T14:19:43+02:00 - Seite 209 Z
Page 213 of 361
Calling up
astore dparking position set-
ting X
Select key position 2with the Start/Stop
button (Y page 202).
X Engage reverse gear.
The exterior mirror on the front-passenger
side moves to the stored parking position.
The exterior mirror on the front-passenger
side moves back to its original position:
R as soon as you exceed a speed of
10 km/h
R about ten seconds after you have disen-
gaged reverse gear
R if you press button 0001for the exterior mir-
ror on the driver's side Memory functions*
Storing settings
Using the memory function, you can store up
to three different settings, e.g. for three dif-
ferent people.
You can save the following settings as a single
memory preset:
R sea tand backres tposition
R driver's side: steering wheel position
R driver's side: position of the exterior mir-
rors on the driver's and front-passenger
sides G
Risk of injury
The memory function can still be used when
the key has been removed. For this reason,
children should never be left unsupervised in
the vehicle. They could otherwise become
trapped when adjusting the seat or the steer-
ing wheel. G
Risk of accident
Only use the memory function on the driver's
side when the vehicle is stationary. Other-
wise, you could be distracted from the traffic
conditions by the steering wheel and seat moving of their own accord, and as a result
cause an accident.
X
Select key position 2with the Start/Stop
button.
X Adjust the seat (Y page 204).
X On the driver's side, adjust the steering
wheel (Y page 206) and the mirrors
(Y page 208).
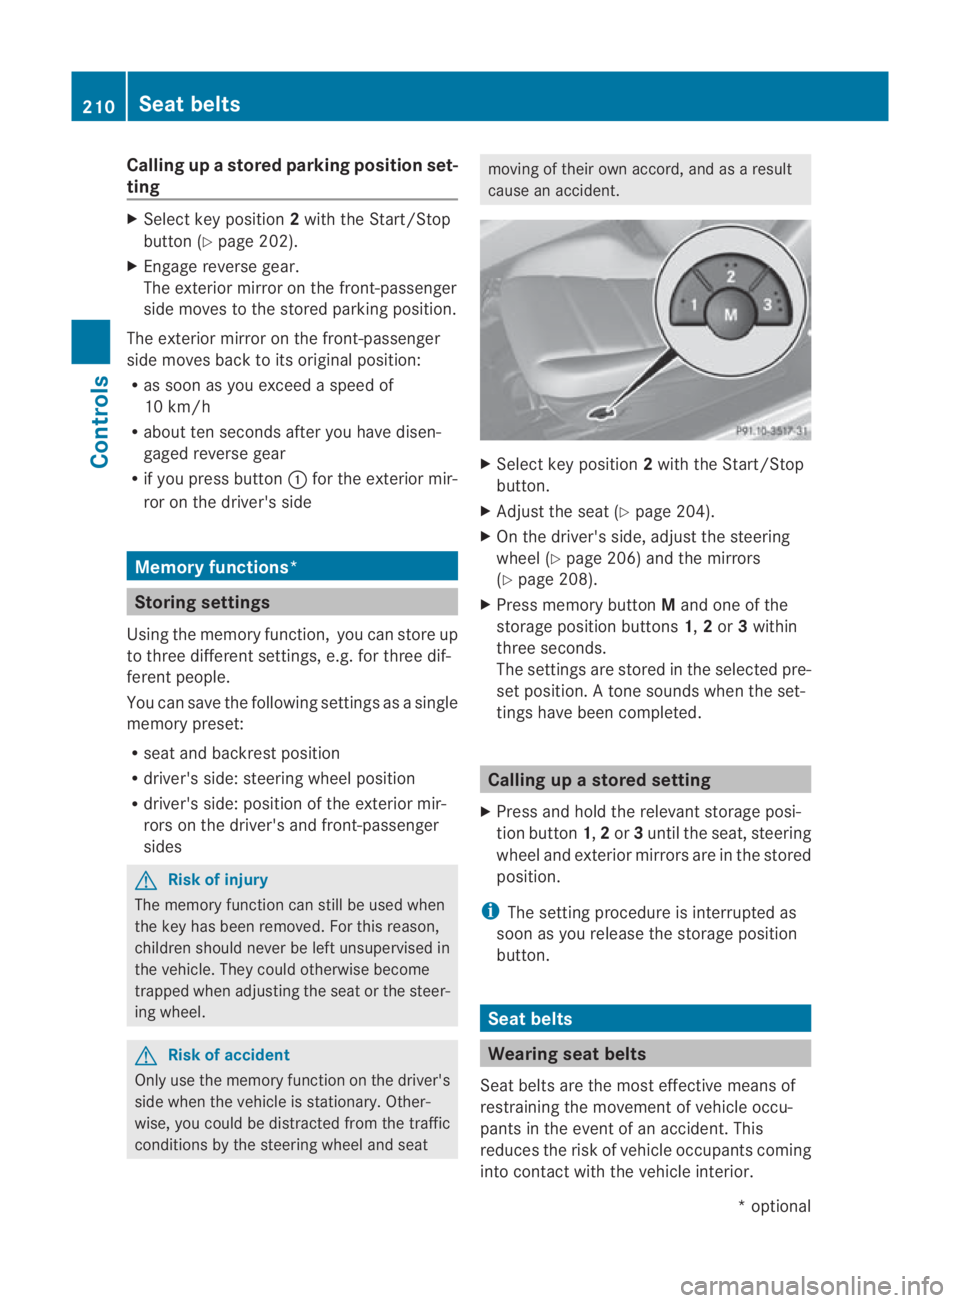
X Press memory button Mand one of the
storage position buttons 1,2or 3within
three seconds.
The settings are stored in the selected pre-
set position. Atone sounds when the set-
tings have been completed. Calling up
astore dsetting
X Press and hold the relevant storage posi-
tio nb utton 1,2or 3until the seat, steering
wheel and exterio rmirrors are in the stored
position.
i The setting procedure is interrupted as
soon as you release the storage position
button. Seat belts
Wearing seat belts
Seat belts are the most effective means of
restraining the movement of vehicle occu-
pants in the event of an accident. This
reduces the risk of vehicle occupants coming
into contact with the vehicle interior. 210
Seat beltsControls
*o
ptional
BA 197 ECE RE 2010/6a; 1; 2, en-GB
sabbaeu
Version: 3.0.3.6 2010-05-07T14:19:43+02:00 - Seite 210
Page 220 of 361
combination switch beyond the pressure
point in the direction of arrow 000Bor
000D(Y page 215).
The indicator lamp on the corresponding
side of the vehicle flashes.
The hazard warning lamps switch off auto-
matically afte rfull brak eapplication if the
vehicle reaches a speed of over 10 km/h
again. Headlamp cleaning system
The headlamps are cleaned automatically if
the "Wipe with washer fluid" function is oper-
ated 10 times while the lights are on and the
engine is running. The headlamps are cleaned
again every tenth time the windscreen is
wiped with washer fluid. When you switch off
the ignition, the automatic headlamp cleaning
system is reset and counting is resumed from
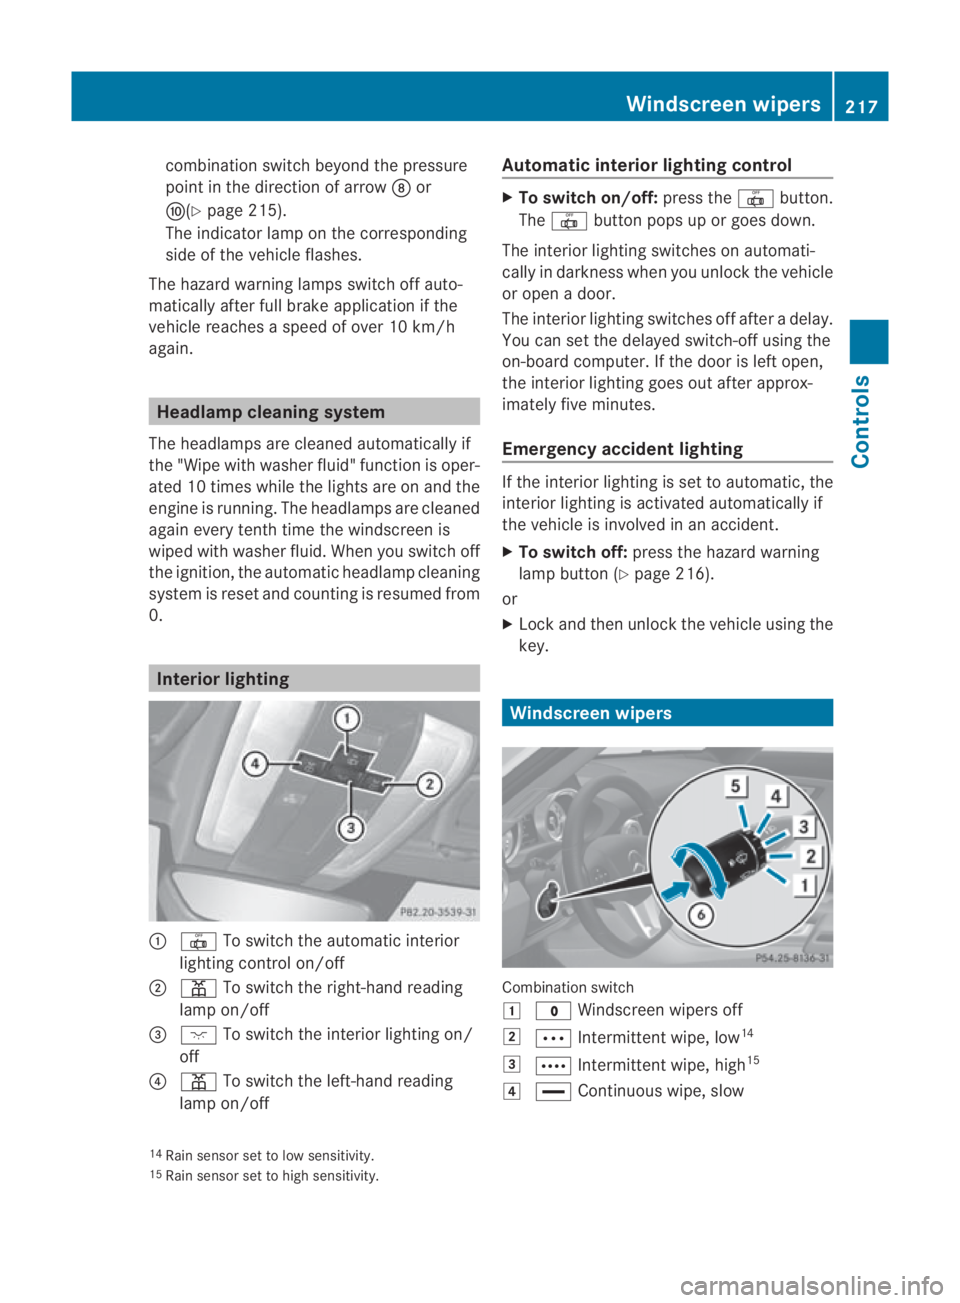
0. Interior lighting
0001
0015 To switch the automatic interior
lighting control on/off
0002 0002 To switch the right-han dreading
lamp on/off
0015 0007 To switch the interior lighting on/
off
0014 0002 To switch the left-hand reading
lamp on/off Automatic interior lighting control X
To switch on/off: press the0015button.
The 0015 button pops up or goes down.
The interior lighting switches on automati-
cally in darkness when you unlock the vehicle
or open a door.
The interior lighting switches off after a delay.
You can set the delayed switch-off using the
on-board computer. If the door is left open,
the interior lighting goes out after approx-
imately five minutes.
Emergency accident lighting If the interior lighting is set to automatic, the
interior lighting is activated automatically if
the vehicle is involved in an accident.
X
To switch off: press the hazard warning
lamp button (Y page 216).
or
X Lock and then unlock the vehicle using the
key. Windscreen wipers
Combination switch
0003
0010 Windscreen wipers off
0004 000A Intermittent wipe, low 14
0005 000C Intermittent wipe, high 15
0006 0014 Continuous wipe, slow
14 Rain sensor set to low sensitivity.
15 Rain sensor set to high sensitivity. Windscreen wipers
217Controls
BA 197 ECE RE 2010/6a; 1; 2, en-GB
sabbaeu Version: 3.0.3.6 2010-05-07T14:19:43+02:00 - Seite 217 Z