2010 MERCEDES-BENZ SLS COUPE buttons
[x] Cancel search: buttonsPage 244 of 361
X
Press the 0008or000E button on the steer-
ing wheel to select the Settingsmenu.
X Press the 000Cor000F button to select the
Factory setting submenu.
X Press the 000Abutton to confirm.
The Reset all message appears.
X Press the 000Cor000F button to select
Yes orNo.
X Press the 000Abutton to confirm the selec-
tion.
If you have selected Yes, the multifunction
display shows a confirmation message. AMG menu
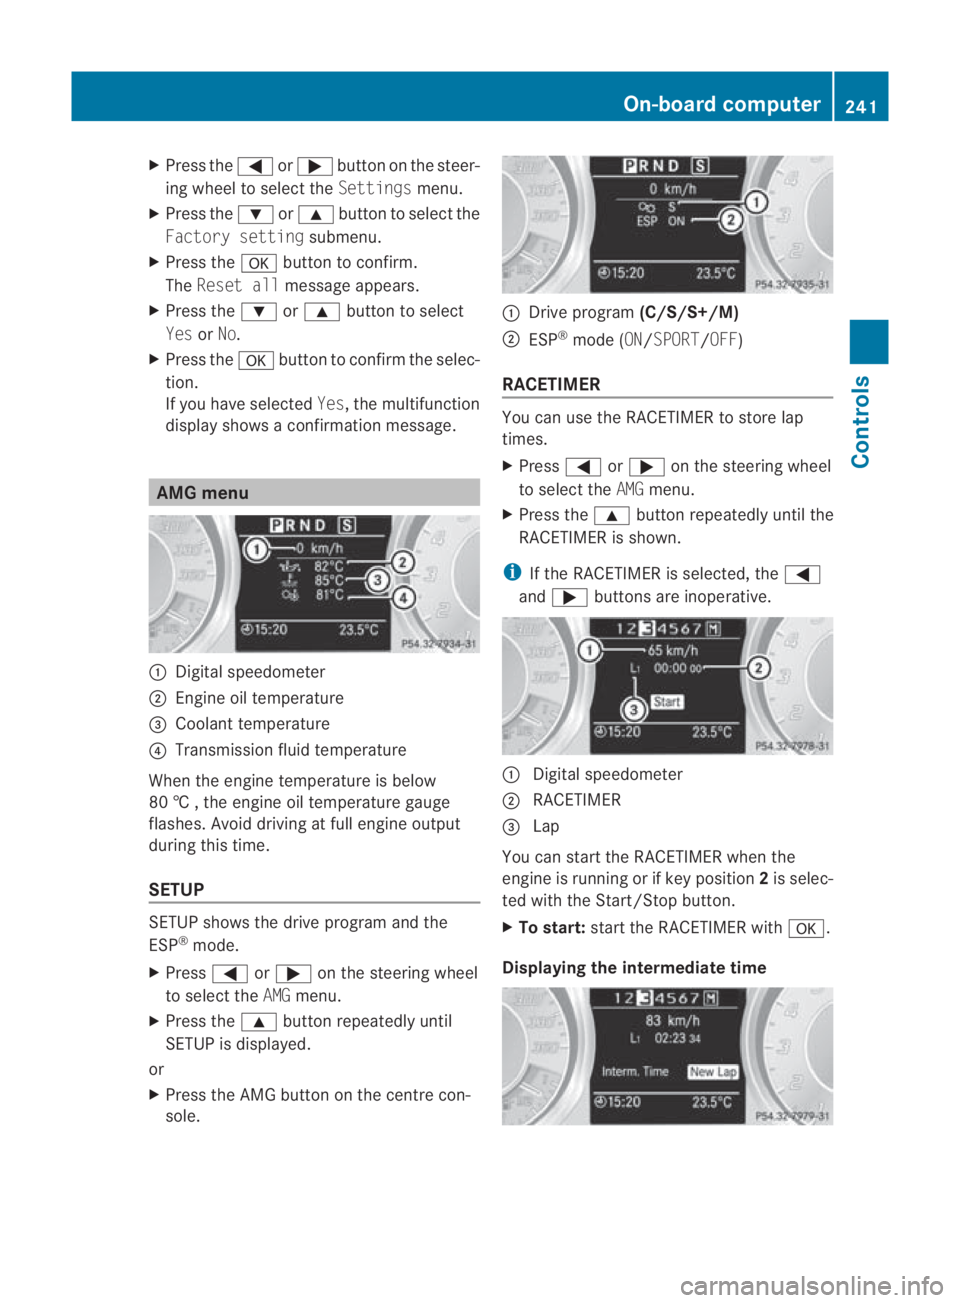
0001
Digital speedometer
0002 Engine oil temperature
0015 Coolant temperature
0014 Transmission fluid temperature
When the engine temperature is below
80 †,the engine oil temperature gauge
flashes. Avoid driving at full engine output
during this time.
SETUP SETUP shows the drive progra
mand the
ESP ®
mode.
X Press 0008or000E on the steering wheel
to select the AMGmenu.
X Press the 000Fbutton repeatedly until
SETUP is displayed.
or
X Press the AMG button on the centre con-
sole. 0001
Drive program (C/S/S+/M)
0002 ESP ®
mode (ON/ SPORT/OFF)
RACETIMER You can use the RACETIMER to store lap
times.
X
Press 0008or000E on the steering wheel
to select the AMGmenu.
X Press the 000Fbutton repeatedly until the
RACETIMER is shown.
i If the RACETIMER is selected, the 0008
and 000E buttons are inoperative. 0001
Digital speedometer
0002 RACETIMER
0015 Lap
You can start the RACETIMER when the
engine is running or if key position 2is selec-
ted with the Start/Stop button.
X To start: start the RACETIMER with 000A.
Displaying the intermediate time On-board computer
241Controls
BA 197 ECE RE 2010/6a; 1; 2, en-GB
sabbaeuV ersion: 3.0.3.6
2010-05-07T14:19:43+02:00 - Seite 241 Z
Page 255 of 361
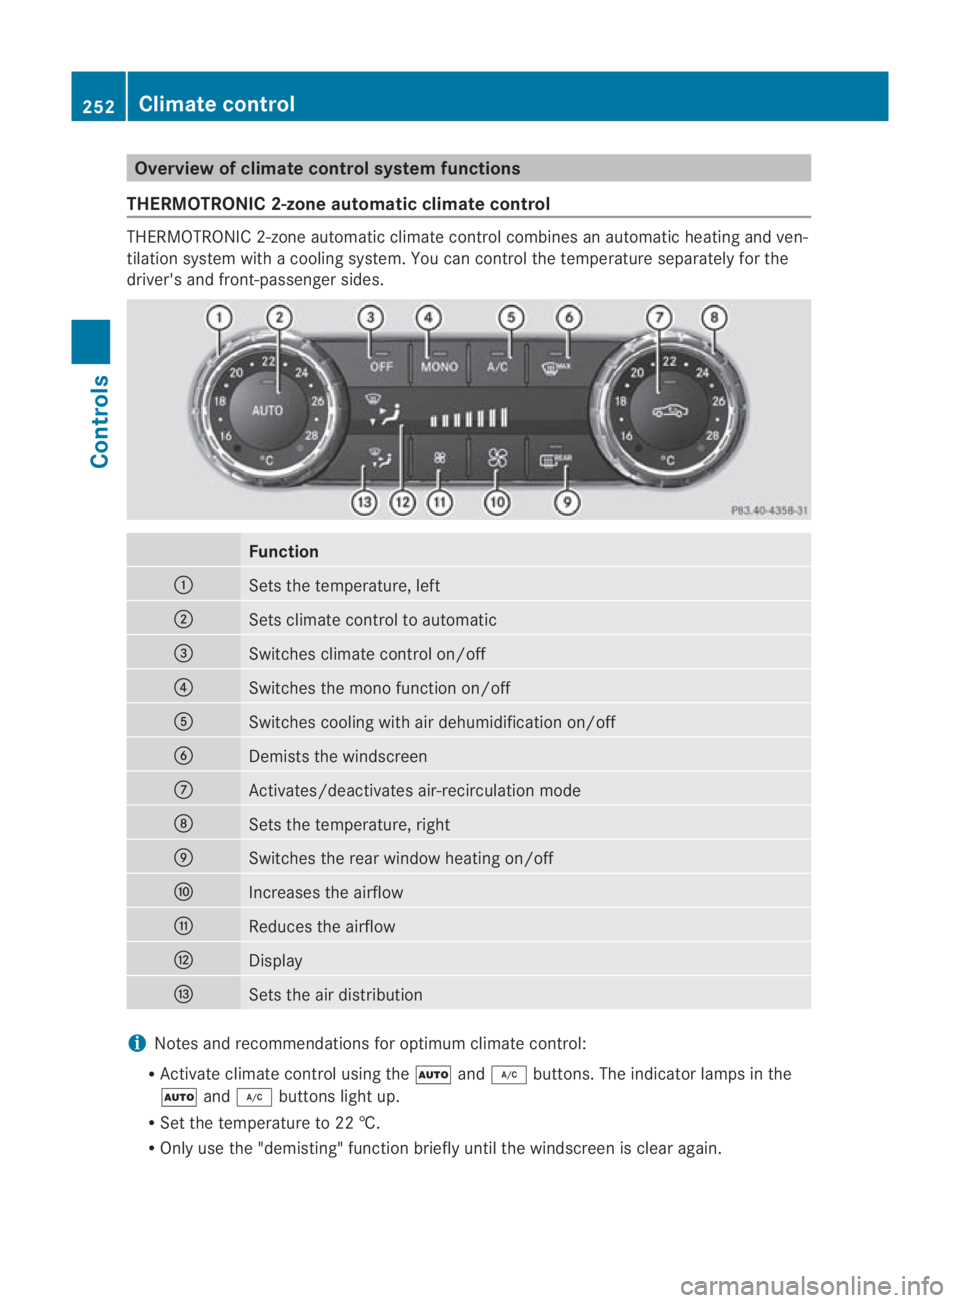
Overview of climate control system functions
THERMOTRONIC 2-zone automatic climate control THERMOTRONIC 2-zone automatic climate control combines an automatic heating and ven-
tilation system with a cooling system. You can control the temperature separately for the
driver's and front-passenger sides. Function
0001
Sets the temperature, left
0002
Sets climate control to automatic
0015
Switches climate control on/off
0014
Switches the mono function on/off
0012
Switches cooling with air dehumidification on/off
0013
Demists the windscreen
000A
Activates/deactivates air-recirculation mode
000B
Sets the temperature, right
000C
Switches the rear window heating on/off
000D
Increases the airflow
000E
Reduces the airflow
000F
Display
0010
Sets the air distribution
i
Notes and recommendations for optimum climate control:
R Activate climate control using the 0001and0004 buttons. The indicator lamps in the
0001 and0004 buttons light up.
R Set the temperature to 22 †.
R Only use the "demisting" function briefly until the windscreen is clear again. 252
Climate controlControls
BA 197 ECE RE 2010/6a; 1; 2, en-GB
sabbaeu
Version: 3.0.3.6 2010-05-07T14:19:43+02:00 - Seite 252
Page 264 of 361
fere with the vehicle's electronics and thereby
jeopardise the operating safety of the vehicle
and you rsafety. Therefore, you must only use
this equipment if it is correctly connected to
a separate reflection-free exterio raerial. G
Risk of injury
Excessive levels of electromagnetic radiation
may cause damage to your health and the
health of others. Using an exterior aerial takes
into account current scientific discussions
relating to the possible health risk posed by
electromagnetic fields.
To ensure optimum reception quality for
mobile phones in the vehicle, and to minimise
mutual influences between the vehicle elec-
tronics and mobile phones, Mercedes–Benz
recommends the use of an approved exterior
aerial. An exterior aerial conducts the elec-
tromagnetic fields generated by a wireless
device to the exterior of the vehicle; the field
strength within the vehicle interior is lower
than in a vehicle that does not have an exte-
rior aerial.
i There are various mobile phone brackets
that may be fitted to your vehicle; in some
cases, these are country-specific. You can
obtain these mobile phone brackets from a
qualified specialist workshop, e.g. a
Mercedes-Benz Service Centre.
The functions and services available when
you use the phone depend on your mobile
phone model and service provider.
X To insert amobile phone: open the tele-
phone compartment (Y page 258).
X Place the mobile phone bracket into the
pre-installed bracket; see the separate
mobile phone bracket installation instruc-
tions.
X Insert the mobile phone into the mobile
phone bracket; see the separate mobile
phone bracket installation instructions.
If the mobile phone is inserted in the mobile
phone bracket, you can speak to the person
you are calling using the hands-free system. You can operate the telephon
eusing the
001C and0015 buttons on the multifunction
steering wheel. You can operate other mobile
phone functions via the on-board computer
(Y page 236).
When you select key position 0with the
Start/Stop button, the mobile phone stays on
but you can no longer use the hands-free sys-
tem.
If you are making a call and you would like to
take the key out of the ignition lock, first
remove the mobile phone from the bracket.
Otherwise, the call will be ended. Rear spoiler
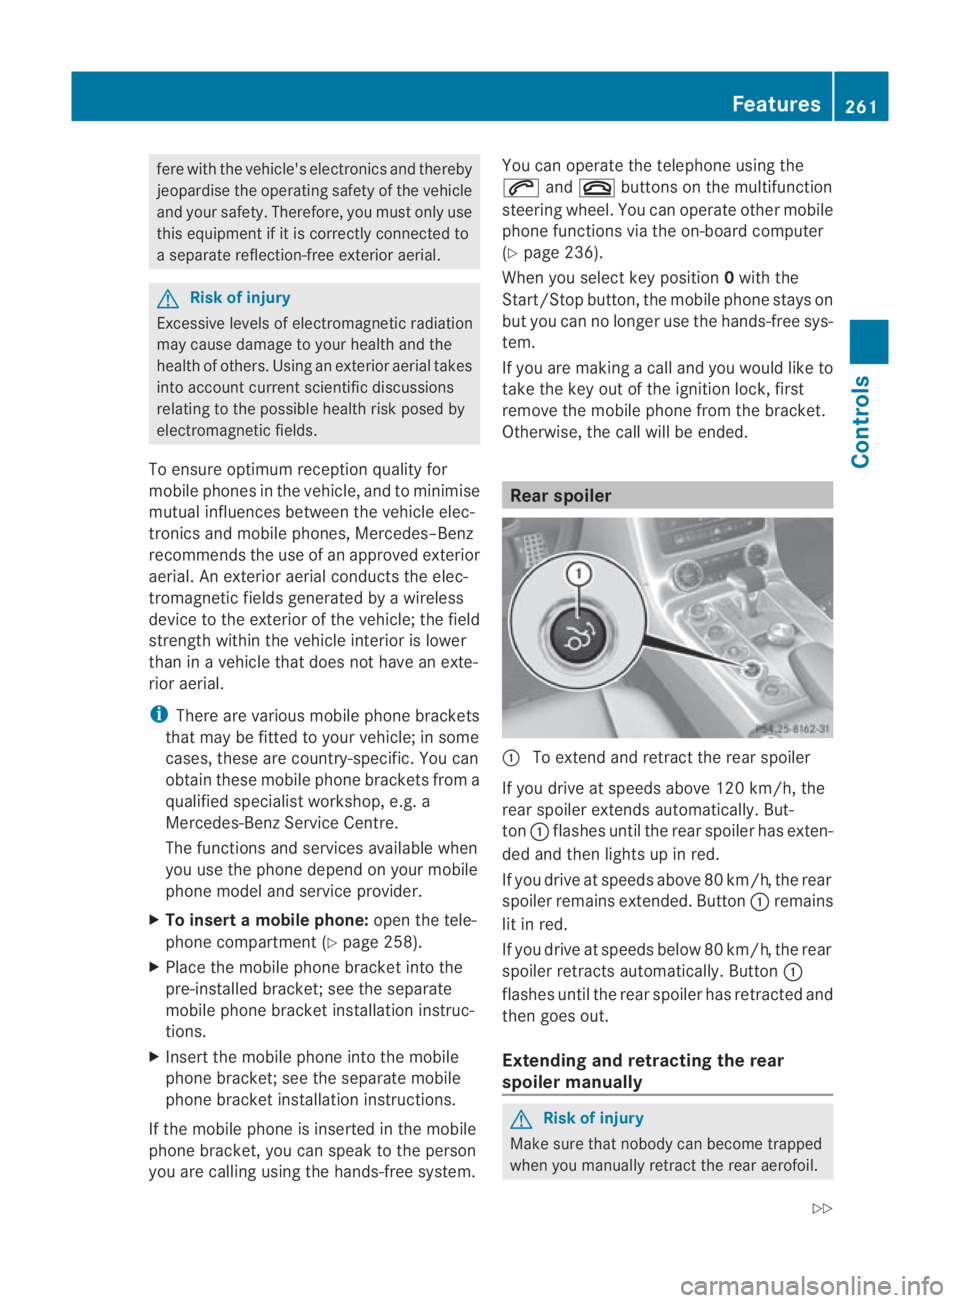
0001
To extend and retract the rear spoiler
If you drive at speeds above 120 km/h, the
rear spoiler extends automatically. But-
ton 0001flashes until the rear spoiler has exten-
ded and then lights up in red.
If you drive at speeds above 80 km/h, the rear
spoiler remains extended. Button 0001remains
lit in red.
If you drive at speeds below 80 km/h, the rear
spoiler retracts automatically. Button 0001
flashes until the rear spoiler has retracted and
then goes out.
Extending and retracting the rear
spoiler manually G
Risk of injury
Make sure that nobody can become trapped
when you manually retract the rear aerofoil. Features
261Controls
BA 197 ECE RE 2010/6a; 1; 2, en-GB
sabbaeu Version: 3.0.3.6 2010-05-07T14:19:43+02:00 - Seite 261 Z
Page 266 of 361
X
Erase the memory of the integrated remote
control ( Ypage 264) before programming
it for the first time.
X Select key position 2with the Start/Stop
button ( Ypage 202).
X Press and hold one of transmitter but-
tons 0002to0014 on the integrated remote
control.
Indicator lamp 0001starts to flash after a
short while. It flashes abou tonce a second.
i Indicato rlamp 0001flashes immediately
the first time the transmitte rbutton is pro-
grammed. If this transmitter button has
already been programmed, indicator
lamp 0001will only start flashing at a rate of
once a second after 20 seconds have
elapsed.
X Keep the transmitte rbuttons depressed.
X Point the transmitter of the garage door's
remote control towards th eleft-hand side
of the rear-view mirror from a distance of 5
to 20 cm.
i The distance between the garage door's
remote control and the integrated garage
door opener depends on the system of the
garage door drive. You might require sev-
eral attempts. You should test every posi-
tion for at least 20 seconds before trying
another position.
X Keep the transmitter button on the garage
door's remote control depressed until indi-
cator lamp 0001starts to flash rapidly.
The programming was successful if indica-
tor lamp 0001flashes rapidly.
X Release the transmitter buttons on the
garage door's remote control and the inte-
grated remote control.
If indicator lamp 0001goes out after approx-
imately 20 seconds and did not flash rapidly
before this:
X Release the transmitter buttons on the
integrated and portable remote controls.
X Repeat the programming procedure. When
doing so, change the distance between the garage door's remote control and the trans-
mitter buttons in the rear-view mirror.
i If the garage door system works with a
rolling code, after programming, you must
synchronise the remote control integrated
in the rear-view mirror with the garage door
system receiver.
You will find further information in the
garage door opening system' soperating
instructions, e.g. the sections on "Synchro-
nising the transmitter" or "Registering a
new transmitter". You can also call the hot-
line mentioned above.
Opening or closing the garage door Once programmed, the integrated remote
control will assume the function of the garage
door system's remote control. Please read
the operating instructions for the garage door
system.
X
Select key position 2with the Start/Stop
button (Y page 202).
X Press the transmitter button on the rear-
view mirror that you have programmed to
operate the garage door.
Garage door system with fixed code: indi-
cator lamp 0001lights up continuously.
Garage door system with rolling code: indi-
cator lamp 0001flashes briefly and then lights
up for approximately two seconds. This is
repeated for up to 20 seconds.
i The transmitter will transmit a signal for
as long as the transmitter button is being
pressed. The transmission will be halted
after a maximum of 20 seconds and indi-
cator lamp 0001will flash. Press the trans-
mitter button again, if necessary. Features
263Controls
BA 197 ECE RE 2010/6a; 1; 2, en-GB
sabbaeu Version: 3.0.3.6 2010-05-07T14:19:43+02:00 - Seite 263 Z
Page 267 of 361
Deleting the remote control memory
X
Selec tkey position 2with the Start/Stop
button (Y page 202).
X Press and hold transmitter buttons 0002
and 0014for approximately 20 seconds until
indicator lamp 0001flashes rapidly.
The memory is cleared.
i You should clear the remot econtrol mem-
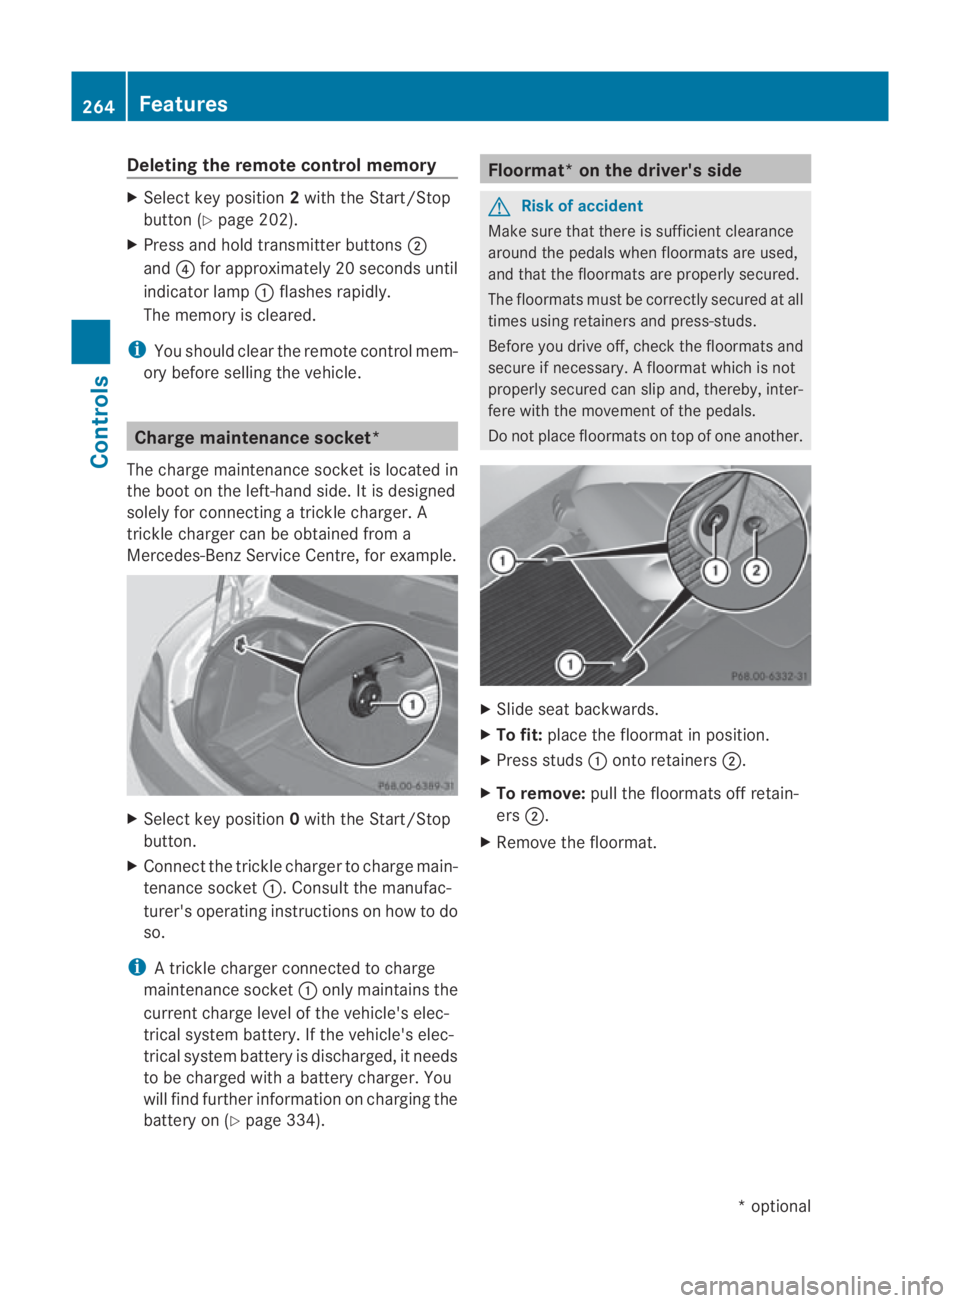
ory before selling the vehicle. Charge maintenance socket*
The charge maintenance socket is located in
the boot on the left-hand side. It is designed
solely for connecting a trickle charger. A
trickle charger can be obtained from a
Mercedes-Benz Service Centre, for example. X
Select key position 0with the Start/Stop
button.
X Connect the trickle charger to charge main-
tenance socket 0001. Consult the manufac-
turer's operating instructions on how to do
so.
i A trickle charger connected to charge
maintenance socket 0001only maintains the
current charge level of the vehicle's elec-
trical system battery. If the vehicle's elec-
trical system battery is discharged, it needs
to be charged with a battery charger. You
will find further information on charging the
battery on (Y page 334). Floormat* on the driver's side
G
Risk of accident
Make sure that there is sufficient clearance
around the pedals when floormats are used,
and that the floormats are properly secured.
The floormats must be correctly secured at all
times using retainers and press-studs.
Before you drive off, check the floormats and
secure if necessary. Afloormat which is not
properly secured can slip and, thereby, inter-
fere with the movemen tofthe pedals.
Do not place floormats on top of one another. X
Slide seat backwards.
X To fit: place the floormat in position.
X Press studs 0001onto retainers 0002.
X To remove: pull the floormats off retain-
ers 0002.
X Remove the floormat. 264
FeaturesControls
*o
ptional
BA 197 ECE RE 2010/6a; 1; 2, en-GB
sabbaeu
Version: 3.0.3.6 2010-05-07T14:19:43+02:00 - Seite 264
Page 293 of 361
Please respond in accordance with the dis-
play messages and follow the additional
notes in this Owner's Manual. G
Risk of accident
No further messages can be displayed if the
instrument cluster or the multifunction dis-
play fails.
This means that you will not see information
about the driving situation, such as the speed,
outside temperature, warning/indicator
lamps, display messages or system failures.
The vehicle's handling characteristics may be
affected. Adapt your driving style and speed
accordingly.
Immediately consult a qualified specialist
workshop which has the necessary specialist
knowledge and tools to carry out the work
required. Mercedes-Benz recommends that
you use a Mercedes-Benz Service Centre for
this purpose. In particular, work relevant to
safety or on safety-related systems must be
carried out at a qualified specialist workshop.
Calling up display messages Use the buttons on the multifunction steering
wheel.
X Using 0008or000E select the Service
menu.
If there are display messages, the multi-
function display shows 2 messages, for
example.
X Press the 000For000C button to select the
entry, e.g. 2 messages.
X Confirm with 000A.
X Using 000Cor000F scroll through the dis-
play messages.
Hiding display messages You cannot hide display messages of the
highest priority. The multifunction display
shows these messages continuously until the
causes for the messages have been rem-
edied. The on-board computer saves certain
display messages. Use the buttons on the multifunction steering
wheel.
X
Press 000Aor0001 to hide the display
message.
The following tables contain all the display
messages. 290
Display messagesPractical advice
BA 197 ECE RE 2010/6a; 1; 2, en-GB
sabbaeu
Version: 3.0.3.6 2010-05-07T14:19:43+02:00 - Seite 290
Page 310 of 361
Warning and indicator lamps in switches and buttons
Problem Possible causes/consequences and
0003 Solutions
The sea
theating has
switched off prema-
turely or cannot be
switched on. The on-board voltage is too low, because too many consumers are
switched on.
X Switch off consumers that are not required, e.g. rear window
heating or interior lighting.
Once the battery is sufficiently charged, the seat ventilation will
switch back on automatically. The indicator lamp in
the
0004 button on the
control panel of the
THERMOTRONIC
luxury 2-zone auto-
matic climate control
goes out. The cooling has been deactivated due to a malfunction.
X
Press the 0004switch again.
The indicator lamp flashes three times and goes out. The cooling
system cannot be switched on.
X Visit a qualified specialist workshop. The rear-window heat-
ing has switched off
prematurely or cannot
be switched on. The on-board voltage is too low, because too many consumers are
switched on.
X Switch off consumers that are not required, e.g. seat heating or
interior lighting.
Once the battery is sufficiently charged, the rear window heating
will switch back on automatically. Vehicles with auto-
matic child seat recog-
nition on the front-
passenger seat:
The
000A0017 indica-
tor lamp on the centre
console is lit. As
pecial Mercedes-Benz child seat with automatic child seat rec-
ognition has been fitted on the front-passenger seat. The front-
passenger airbag has therefore been disabled as desired. G
Risk of injury
There is no child seat fitted to the front-passenger seat. The auto-
matic child seat recognition is malfunctioning.
X Remove electronic devices from the front-passenger seat, for
example:
R
notebooks
R mobile phones
R cards with transponders, e.g. ski passes or access passes
If the 000A0017indicator lamp remains lit:
X Visit a qualified specialist workshop. Troubleshooting
307Practical advice
BA 197 ECE RE 2010/6a; 1; 2, en-GB
sabbaeu Version: 3.0.3.6 2010-05-07T14:19:43+02:00 - Seite307 Z
Page 326 of 361
Changing batteries (key)
Notes
It is advisable to have th ebatteries replaced
at a qualified specialist workshop, e.g .ata
Mercedes-Benz Service Centre. G
Risk of poisoning
Batteries contain toxic and caustic substan-
ces. For this reason, keep batteries away from
children.
If a battery is swallowed, consult a doctor
immediately. H
Environmental note
Do not dispose of batteries with the house-
hold rubbish. They contain highly toxic sub-
stances.
Take discharged batteries to aqualified spe-
cialist workshop, e.g .aMercedes-Benz
Service Centre, or to a special collection point
for old batteries. Key
Checking the batteries X
Press the 0009or000B button.
The battery is working properly, if the bat-
tery charge indicator lamp lights up briefly.
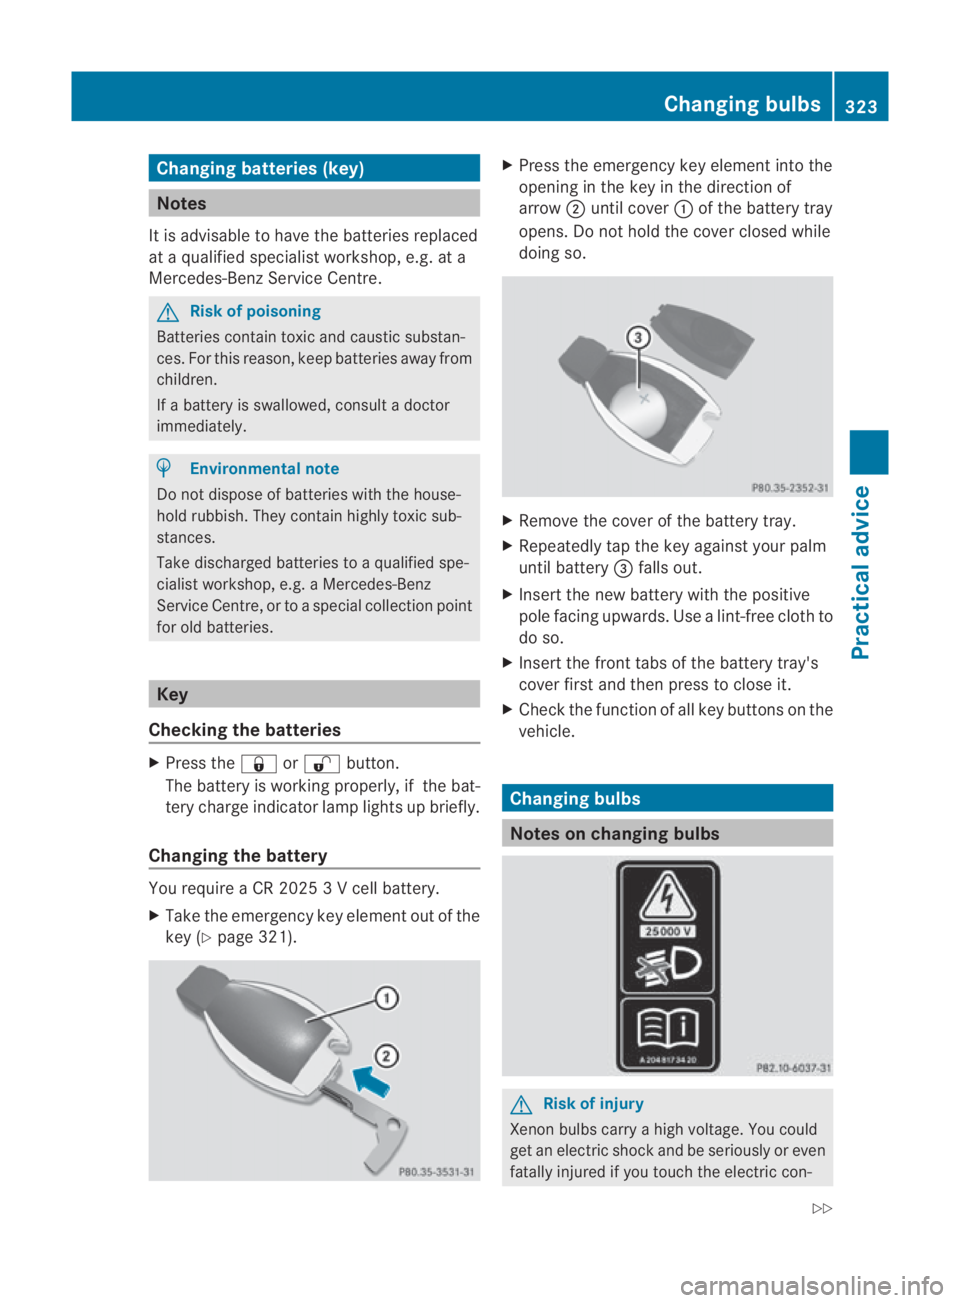
Changing the battery You require a CR 2025 3 V cell battery.
X
Take the emergency key element out of the
key (Y page 321). X
Press the emergency key element into the
opening in the key in the direction of
arrow 0002until cover 0001of the battery tray
opens. Do not hold the cover closed while
doing so. X
Remove the cover of the battery tray.
X Repeatedly tap the key against your palm
until battery 0015falls out.
X Insert the new battery with the positive
pole facing upwards. Use alint-free cloth to
do so.
X Insert the front tabs of the battery tray's
cover first and then press to close it.
X Check the function of all key buttons on the
vehicle. Changing bulbs
Notes on changing bulbs
G
Risk of injury
Xenon bulbs carry a high voltage. You could
get an electric shoc kand be seriously or even
fatally injured if you touch the electri ccon- Changing bulbs
323Practical advice
BA 197 ECE RE 2010/6a; 1; 2, en-GB
sabbaeu Version: 3.0.3.6 2010-05-07T14:19:43+02:00 - Seite 323 Z